

I will be doing a build log on this kit as a means to flesh out the review I have done: You can find it HERE (2-26-10 not linked yet).
My main reference, as noted in my review, is "T-34: Mythical Weapon" by Robert Michulec and Miroslaw Zientarzewski. I agree with Cookie Sewell that while the book is a fabulous source of detail drawings and technical photos, the historical recount is biased. I am also using Concord's 7011 Soviet Tanks in Combat 1941-45 (T-28, T-34, T-34/85, and T-44 medium tanks) by Steve Zaloga and Ian Allen's Russian Armor: T-34 Medium Tank 1939-43 by Mikhail Baryatinskiy.
More to follow.
Hosted by Jacques Duquette
DML #6564 T-34/76 m43 with Commanders Coupola

Jacques

Joined: March 04, 2003
KitMaker: 4,630 posts
Armorama: 4,498 posts

Posted: Friday, February 26, 2010 - 01:47 PM UTC


VonArnim
Joined: April 10, 2004
KitMaker: 48 posts
Armorama: 35 posts
Posted: Friday, February 26, 2010 - 07:44 PM UTC
Hi Jacques ,
Looking forward to the blog & review .
regards
JOEY
Looking forward to the blog & review .
regards
JOEY

MCR
Joined: July 15, 2004
KitMaker: 464 posts
Armorama: 407 posts
Posted: Saturday, February 27, 2010 - 04:27 AM UTC
A word on Mythical Weapon - Though the book may be "biased" in the sense that part of its original intent was to take the reputation of the tank down from its extraordinarily high pedestal in Eastern Europe, much of what it writes about the problems the T-34 had is difficult to argue with.
The biggest issue I find with the text is what amounts to poor translation which at times leaves you with mistaken impressions or bad information.
For instance, the book refers to HEAT rounds for the F-34 gun when from the context it's obvious its referring to APCR (the UBR-354P "Arrowhead") rounds. As far as I've ever found no HEAT round was ever developed for this 76mm gun during the war.
Another problem is the drawings; all are flawed to one extent or another and this is especially so for those of post Model '41 tanks. To depend on them without having a better understanding of the T-34 will lead you to make any number of detail mistakes on a kit.
With that said the photos alone are worth the price of the book, especially the detail images in the back, though even there it pays to do you due diligence and research your specific variant.
Looking forward to your review!
Mark

Kiyatkin
Joined: September 15, 2005
KitMaker: 291 posts
Armorama: 284 posts

Posted: Sunday, February 28, 2010 - 05:58 AM UTC
following with interest

Jacques
Joined: March 04, 2003
KitMaker: 4,630 posts
Armorama: 4,498 posts
Posted: Sunday, February 28, 2010 - 04:44 PM UTC
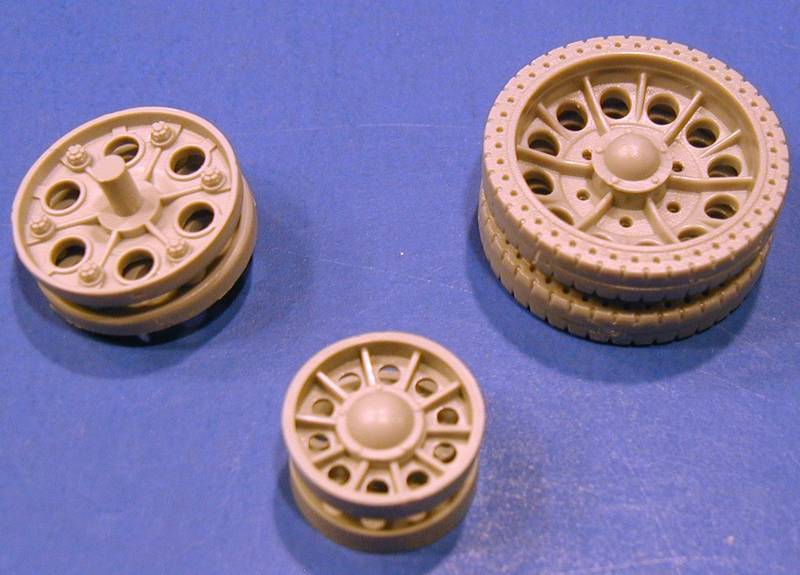
Step one - The wheels.
Here is what 1 wheel, 1 sprocket, and 1 idler look like.
More to follow.
Here is what 1 wheel, 1 sprocket, and 1 idler look like.
More to follow.
Kiyatkin
Joined: September 15, 2005
KitMaker: 291 posts
Armorama: 284 posts
Posted: Monday, March 01, 2010 - 02:28 AM UTC
that is a start
bill_c
Joined: January 09, 2008
KitMaker: 10,553 posts
Armorama: 8,109 posts
Posted: Tuesday, March 02, 2010 - 06:31 AM UTC
Looking forward to seeing this one built. Jacques, can you suggest "fixes" to the problems, including PE sets that would have the correct grill and barrels to fix the styrene version in the kit?
Jacques
Joined: March 04, 2003
KitMaker: 4,630 posts
Armorama: 4,498 posts
Posted: Tuesday, March 02, 2010 - 12:48 PM UTC
Wow, I never expected the response I am getting in thread and by e-mail. Cool. In answer to the question of details, I plan to address them the same way I did the SU-100 build. Except I plan to finish this up in a orderly fashion. 
More updates as I get time...
More updates as I get time...

Steve_W

Joined: January 19, 2010
KitMaker: 44 posts
Armorama: 7 posts

Posted: Thursday, March 04, 2010 - 11:30 AM UTC
Jacques
Joined: March 04, 2003
KitMaker: 4,630 posts
Armorama: 4,498 posts
Posted: Friday, March 05, 2010 - 05:04 PM UTC
Steps 2 and 3 in progress...
The front roadwheel arm on the Right (gunners) side of the kit should be part A4, not A1 as listed on the directions.
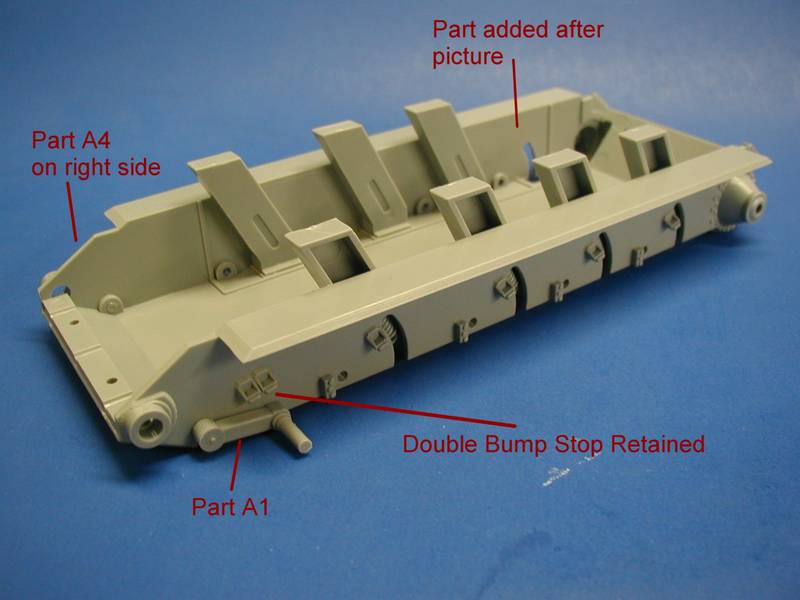
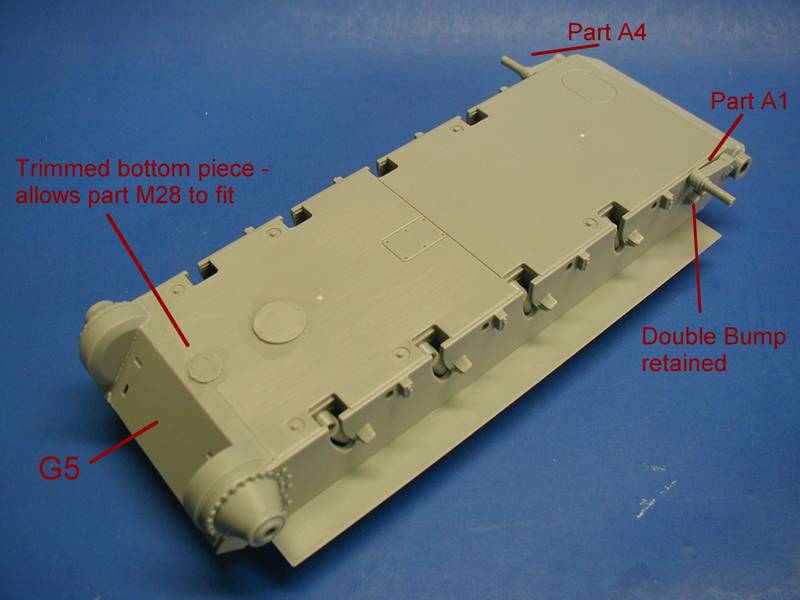
As per my conversation with Mark Rethoret on the review thread, I retained the double bump stops on the front. I also had to trim down the raised partial round piece on Part G5 (lower hull back plate) so I could add Part M4.
And the red line for Part M28 should point the the LARGE round cover, not Part M4 (small round hatch on the bottom of the hull).
The front roadwheel arm on the Right (gunners) side of the kit should be part A4, not A1 as listed on the directions.
As per my conversation with Mark Rethoret on the review thread, I retained the double bump stops on the front. I also had to trim down the raised partial round piece on Part G5 (lower hull back plate) so I could add Part M4.
And the red line for Part M28 should point the the LARGE round cover, not Part M4 (small round hatch on the bottom of the hull).
Jacques
Joined: March 04, 2003
KitMaker: 4,630 posts
Armorama: 4,498 posts
Posted: Monday, March 08, 2010 - 10:55 AM UTC
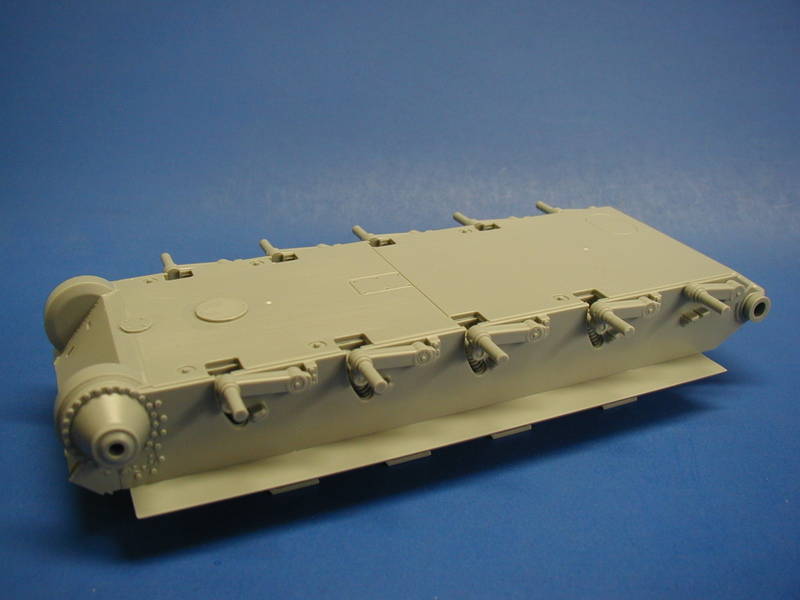
Build step 2 is done except for part A6 (the idler swing-arm) so that track can be properly fit later.
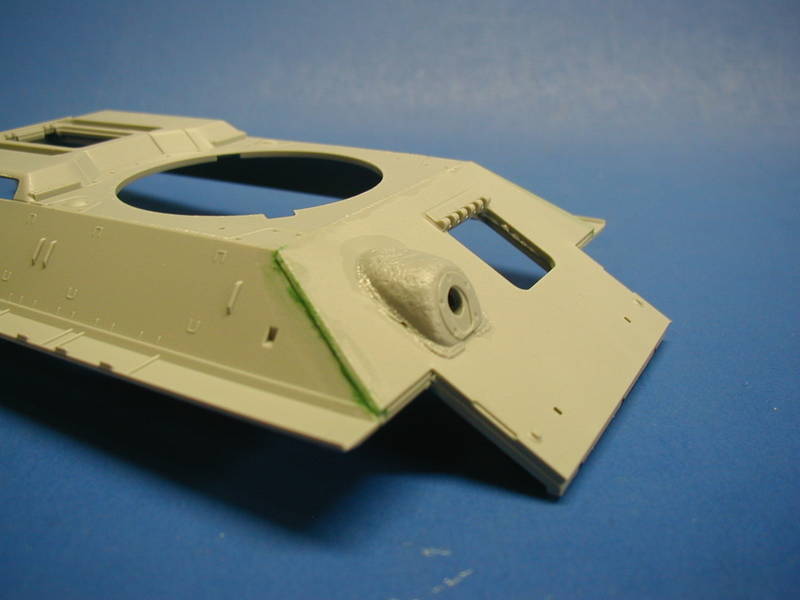
The front glacis is started. I had to putty the edges of part L8 (front glacis) to get everything to line up nicely. I did not really want to clamp the pieces together, and this worked well. I also added the Hull MG casting...it is very rough, but adds a nice contrast to the rolled steel of the glacis. I will need to put a touch of putty where the attachment point was on the MG mount, a small detail but needed.
Next, that engine blower deck screen. As you can see, and compared to the PE offering in DML's kit #6359 SU-100 Premium kit, the offered screen in the kit is not usable. Yes, the PE was glued properly to the top left corner of the opening.
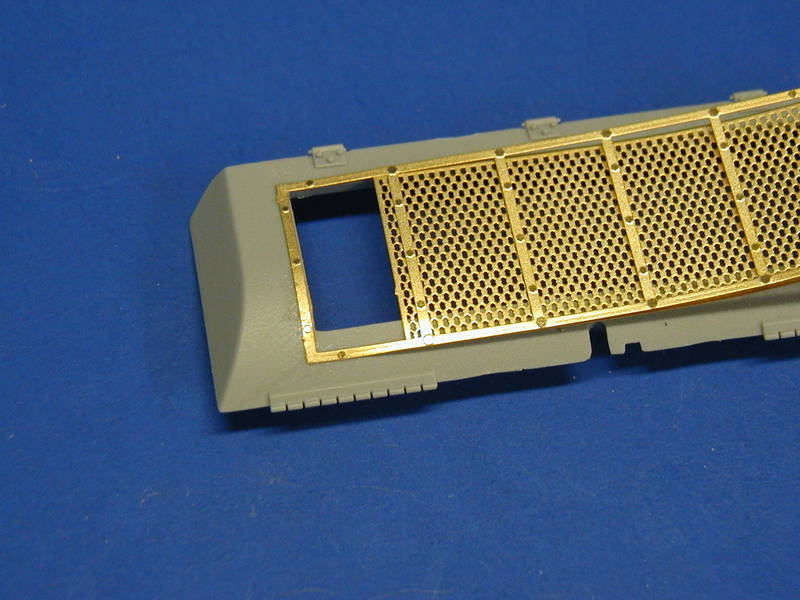
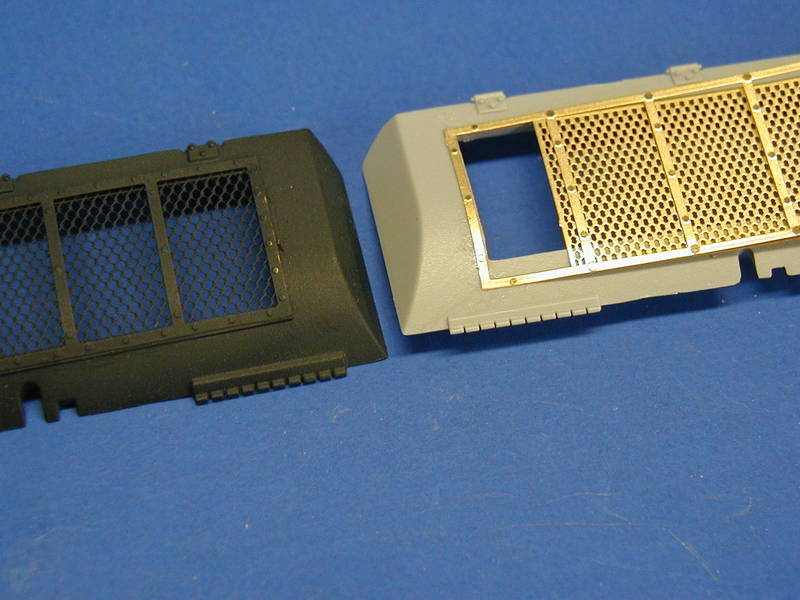
The photo above is a bit deceptive as the SU-100 hatch sits level and the T-34 hatch does not...I have measured and the openings in both kit hatches are the same...DML screwed up the PE.
I am looking for a suitable replacement screen. You can use part P19, with the molded in screen, if you prefer. I would rather have the screen done correctly.
The front glacis is started. I had to putty the edges of part L8 (front glacis) to get everything to line up nicely. I did not really want to clamp the pieces together, and this worked well. I also added the Hull MG casting...it is very rough, but adds a nice contrast to the rolled steel of the glacis. I will need to put a touch of putty where the attachment point was on the MG mount, a small detail but needed.
Next, that engine blower deck screen. As you can see, and compared to the PE offering in DML's kit #6359 SU-100 Premium kit, the offered screen in the kit is not usable. Yes, the PE was glued properly to the top left corner of the opening.
The photo above is a bit deceptive as the SU-100 hatch sits level and the T-34 hatch does not...I have measured and the openings in both kit hatches are the same...DML screwed up the PE.
I am looking for a suitable replacement screen. You can use part P19, with the molded in screen, if you prefer. I would rather have the screen done correctly.
VonArnim
Joined: April 10, 2004
KitMaker: 48 posts
Armorama: 35 posts
Posted: Monday, March 08, 2010 - 02:49 PM UTC
Hi Jacques ,
Aber makes a nice engine grill set for the T-34 # G07 . It is available from R&J Enterprises for around $9-$11 . Here is a link to R&J's website
http://www.rjproducts.com/
Go to products,aber it is set # ABG07 T-34 Grills
regards
JOEY
Aber makes a nice engine grill set for the T-34 # G07 . It is available from R&J Enterprises for around $9-$11 . Here is a link to R&J's website
http://www.rjproducts.com/
Go to products,aber it is set # ABG07 T-34 Grills
regards
JOEY
Jacques
Joined: March 04, 2003
KitMaker: 4,630 posts
Armorama: 4,498 posts
Posted: Thursday, March 18, 2010 - 02:38 PM UTC
I promise more updates this weekend. Lots of building and notes, not much time for pictures. 
Progress does continue.
Progress does continue.
Jacques
Joined: March 04, 2003
KitMaker: 4,630 posts
Armorama: 4,498 posts
Posted: Thursday, March 25, 2010 - 03:17 PM UTC
No, I did not forget. I just ran into a few MORE snags with this kit, and ran out of time to take pics and post on here. Working on a problem with the pistol ports on the turret, and the fitting of the mantlet to the turret. I will try to get to it this weekend, it is a bit of a write up though...
bill_c
Joined: January 09, 2008
KitMaker: 10,553 posts
Armorama: 8,109 posts
Posted: Friday, March 26, 2010 - 03:52 AM UTC
Wow, with all the T-34s on the market, this one is slipping rapidly to the bottom of the pile.... 

Life is too short to struggle with defective fit.
Life is too short to struggle with defective fit.
Jacques
Joined: March 04, 2003
KitMaker: 4,630 posts
Armorama: 4,498 posts
Posted: Friday, April 02, 2010 - 07:39 PM UTC
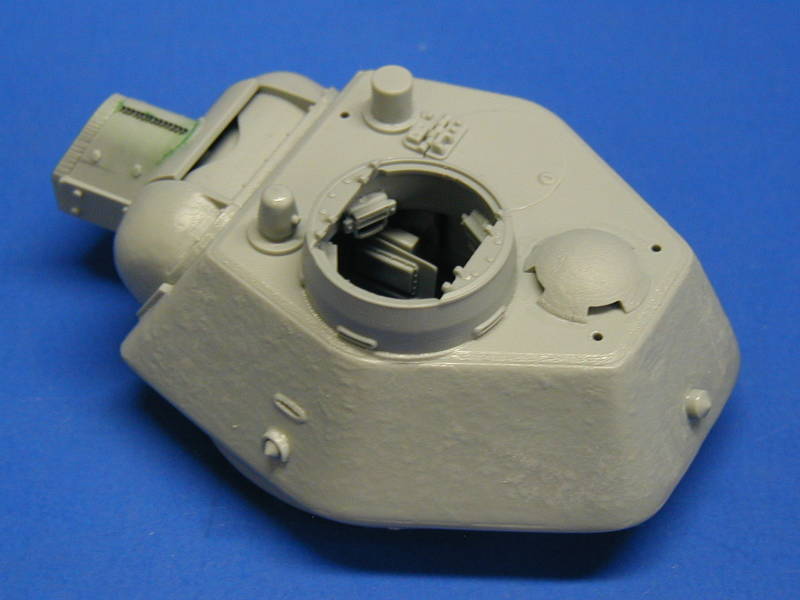
First off...the turret. It is nicely done, but the fit of the top and bottom turret halves was not the best. In the end, it sanded down nice enough.
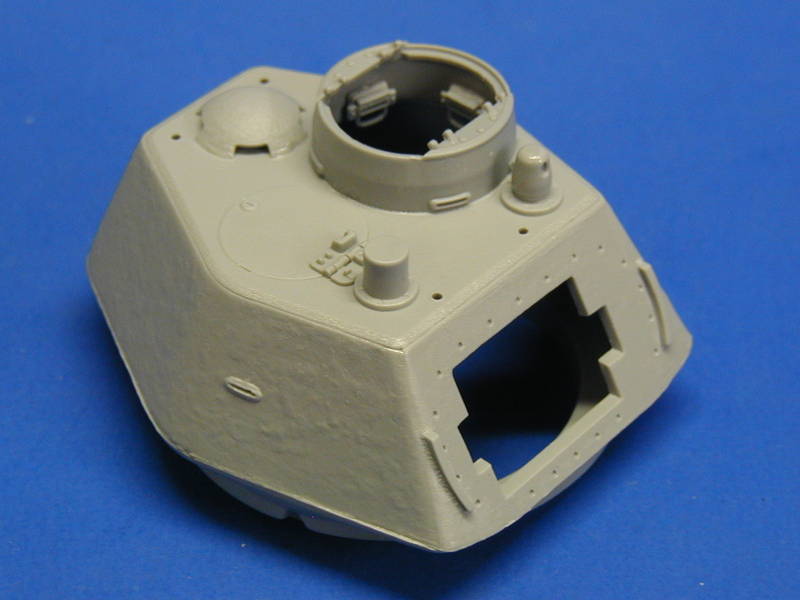
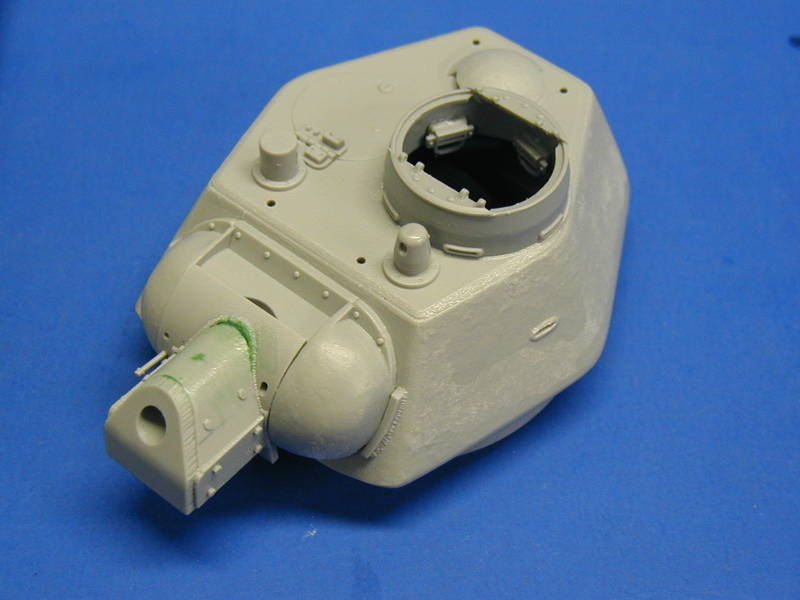
BUT...what to do about the pistol ports? Labeled on the side of the box is "newly tooled pistol ports" but there is no mention of the pistol ports to add to the turret in the instructions. They do exist on the parts tree as L16, 29, and 30. But, another miss on Dragon's part. Sigh.
The pieces of the main gun, breech, and mantlet look nice, but the fit of the mantlet to the gun shield is very poor.
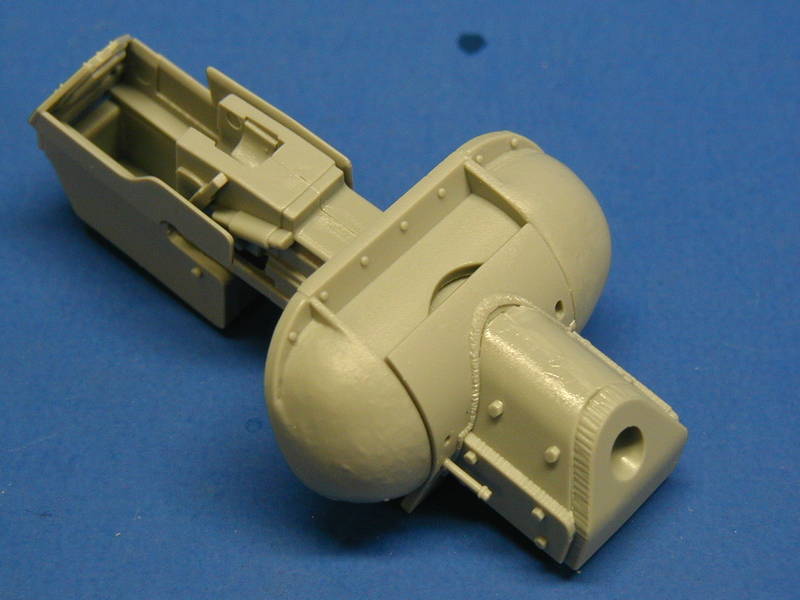

Putty does fix the problem, but ...ugh.
The small "filets" on either side of the mantlet, on the front face of the turret, need to be sanded and trimmed a bit to allow for a good fit when the gun/mantlet assembly is attached, or else it will not sit fluch as it is too tight a fit.
BUT...what to do about the pistol ports? Labeled on the side of the box is "newly tooled pistol ports" but there is no mention of the pistol ports to add to the turret in the instructions. They do exist on the parts tree as L16, 29, and 30. But, another miss on Dragon's part. Sigh.
The pieces of the main gun, breech, and mantlet look nice, but the fit of the mantlet to the gun shield is very poor.
Putty does fix the problem, but ...ugh.
The small "filets" on either side of the mantlet, on the front face of the turret, need to be sanded and trimmed a bit to allow for a good fit when the gun/mantlet assembly is attached, or else it will not sit fluch as it is too tight a fit.
MCR
Joined: July 15, 2004
KitMaker: 464 posts
Armorama: 407 posts
Posted: Saturday, April 03, 2010 - 07:14 AM UTC
No worries about having to add putty to the weld bead along the top of the recouperator housing, on the real ones the seam is quite large and pretty ugly.
Also, there should be a weld bead running along the top centerline of that housing if you want to add it.
Mark
Also, there should be a weld bead running along the top centerline of that housing if you want to add it.
Mark
MCR
Joined: July 15, 2004
KitMaker: 464 posts
Armorama: 407 posts
Posted: Saturday, April 03, 2010 - 07:30 AM UTC
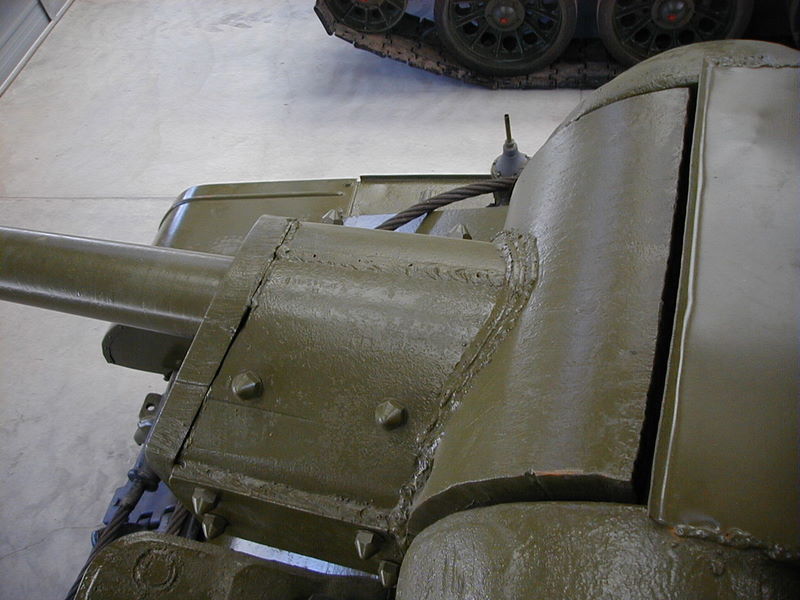
Meant to attach this one!
Mark
Jacques
Joined: March 04, 2003
KitMaker: 4,630 posts
Armorama: 4,498 posts
Posted: Wednesday, April 07, 2010 - 03:54 PM UTC
I have updates, but I am waiting for the gallery to be fixed.
Mark, I am just annoyed that these "New" parts have worse fit than the base kit. I would be happier if they were all about the same "speed". It just shows sloppiness on DML's part, and I know they are better than this.
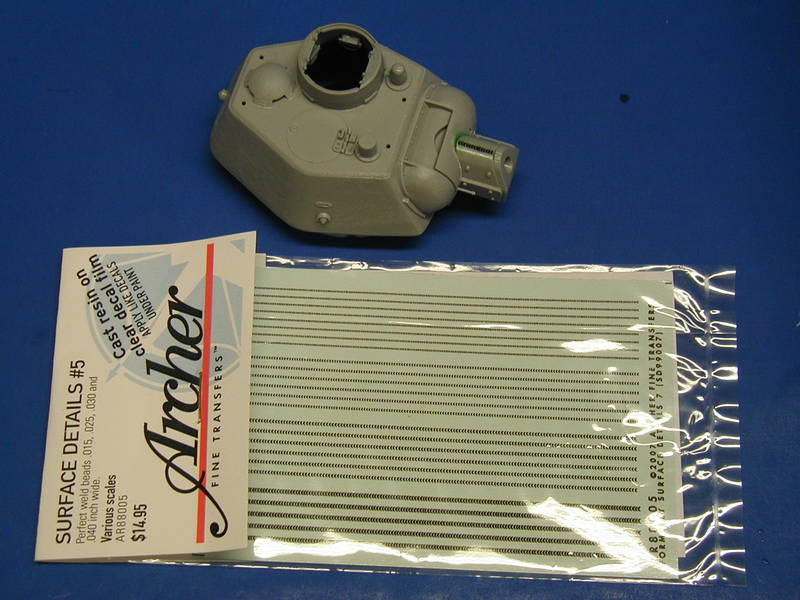
I put a weld bead on top of the recouperator housing using archer resin decals. More when I can put a pic up.
Mark, I am just annoyed that these "New" parts have worse fit than the base kit. I would be happier if they were all about the same "speed". It just shows sloppiness on DML's part, and I know they are better than this.
I put a weld bead on top of the recouperator housing using archer resin decals. More when I can put a pic up.
MCR
Joined: July 15, 2004
KitMaker: 464 posts
Armorama: 407 posts
Posted: Saturday, April 10, 2010 - 02:24 PM UTC
Oh, no argument here. DML just hasn't given these kits the serious consideration they deserve and it shows up in all sorts of ways from useless PE, to iffy fit, to just plain wrong details.
Still haven't gotten that call from Tamiya asking for my help though so I guess we're stuck with it.
Mark
Still haven't gotten that call from Tamiya asking for my help though so I guess we're stuck with it.
Mark
Jacques
Joined: March 04, 2003
KitMaker: 4,630 posts
Armorama: 4,498 posts
Posted: Tuesday, April 13, 2010 - 04:12 PM UTC
Pictures!
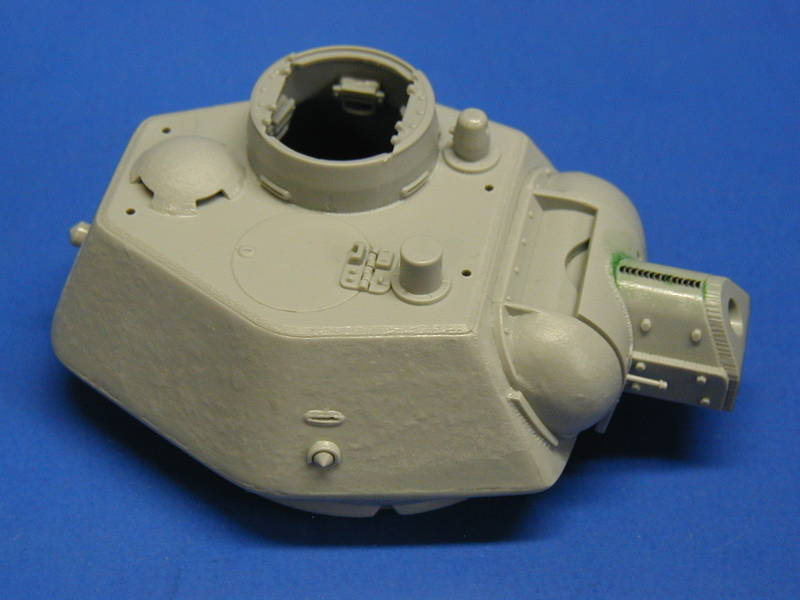
This was done to show the weld beads and to show the location for the pistol ports DML does NOT tell you about.
This was done to show the weld beads and to show the location for the pistol ports DML does NOT tell you about.

Kocic

Joined: November 10, 2005
KitMaker: 17 posts
Armorama: 16 posts

Posted: Wednesday, April 14, 2010 - 08:27 AM UTC
Jacques, i intently follow your building process.
I have also this kit and befor i start to build it i would like
find some solutions for some "faults" and learn from other people expirience.
From my point of view the pistol ports on the turret are not correct.
I think they should be molded on the turret (like on the MIniarm turrets) because on the original they where casted on the turret itself. The parts from the kit looks for me more like pistol ports for "upgrading" an old turret.
I saw today first time the Archer resin welding seams.
How are they? How would they look on a plane surface?
I have always problems to make some good looking welding seams on my kits so i am always happy to see new solutions for my problem.
BTW: Great job!
Igor
Removed by original poster on 04/15/10 - 03:22:20 (GMT).
Jacques
Joined: March 04, 2003
KitMaker: 4,630 posts
Armorama: 4,498 posts
Posted: Wednesday, April 14, 2010 - 04:26 PM UTC
The two side pistol ports look pretty good once glued on...I cannot speak to them being 100% correct for a Factory 183 m43 turret though. The rear pistol port plug looks goofy and out of place. I am not sure what to do about that just yet. Enough beating this dead horse of a DML mistake.
The Archer weld beads are very nice to work with, but they do not go around edges well (like 90 degree bends) or in a curved motion, although they do have some flexability. I am also not sure how well they look as applied...I may add some diluted putty over them to give them a more conjoined look with the mantlet.
The Archer weld beads are very nice to work with, but they do not go around edges well (like 90 degree bends) or in a curved motion, although they do have some flexability. I am also not sure how well they look as applied...I may add some diluted putty over them to give them a more conjoined look with the mantlet.
MCR
Joined: July 15, 2004
KitMaker: 464 posts
Armorama: 407 posts
Posted: Wednesday, April 14, 2010 - 04:27 PM UTC
Igor is absolutely right about the pistol port bulges.
The sort that the kit includes are more like those on the forged turret whereas with cast turrets they were either incorporated into the form or were done without (just the hole and plug with no bulge).
The pattern/profile varies a bit between turrets it seems and this may be factory/timeframe related.
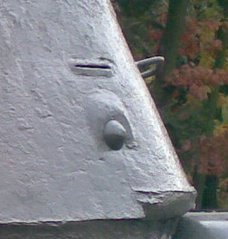
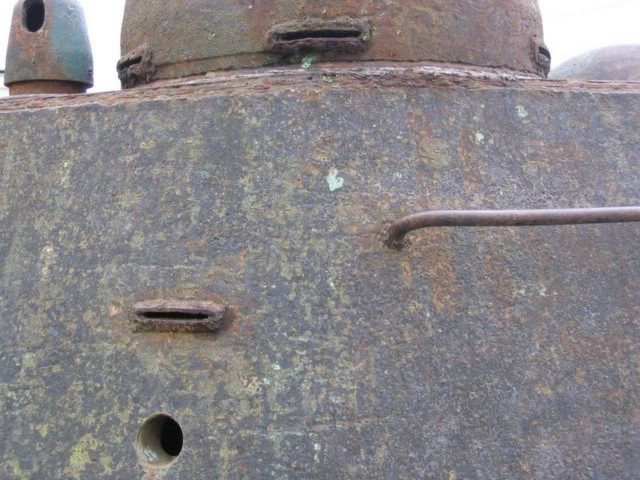
 |

WEB HOSTING BY


Copyright ©2021 Armorama and Kitmaker Network, a subsidiary of Silver Star Enterprises
All Rights Reserved. Please read our Conditions of Use and Privacy Policy.
All Rights Reserved. Please read our Conditions of Use and Privacy Policy.