Minnesota, United States
Joined: October 01, 2008
KitMaker: 597 posts
Armorama: 439 posts
Posted: Thursday, May 26, 2011 - 04:28 AM UTC
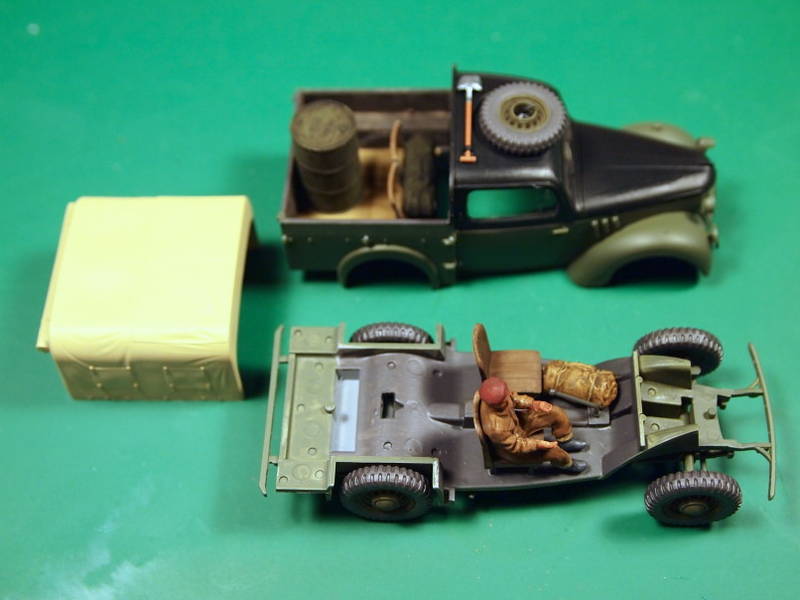
Hello all. I had to take a bit of a break to move over the past couple of months, then I inadvertently donated my campaign kit (British Rover 7 Ambulance) to my club for our show raffle last week. Of course, I won a few items, including my entry for this campaign:
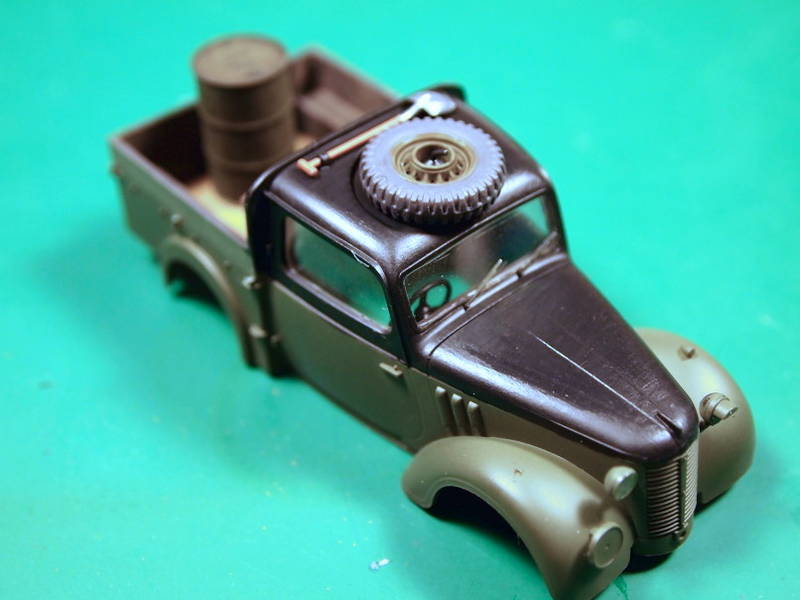
Tamiya's 1/48 British Light Utility Car 10HP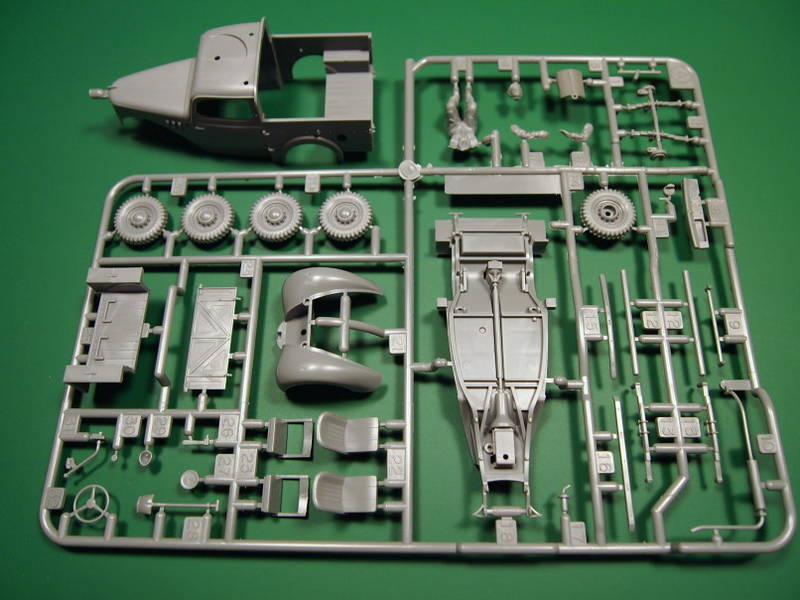
After about three hours last night, here is where the "Tilly" sits:
With only one sprue, it's not a difficult kit, and something I didn't think I'd really enjoy. But it is a fun kit to build; the two piece clear tarp covering the bed is a real headscratcher. Also, the rolled up tarp over the rear of the bed doesn't have any folds on the end, just flat ended. Weird, but it's pretty small and easy to overlook I guess.
EWC(SW/AW) USN 1990-2005
IPMS #46275
Minnesota, United States
Joined: October 01, 2008
KitMaker: 597 posts
Armorama: 439 posts
Posted: Friday, June 10, 2011 - 10:49 AM UTC
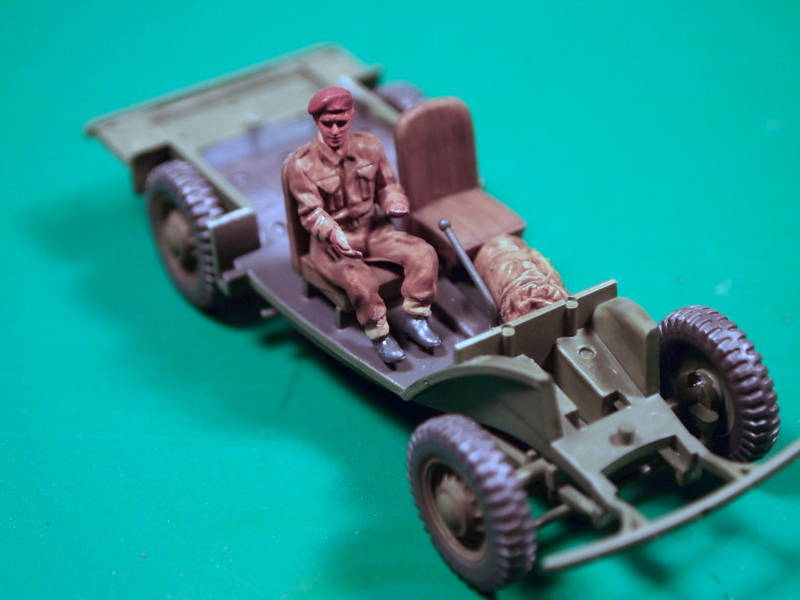
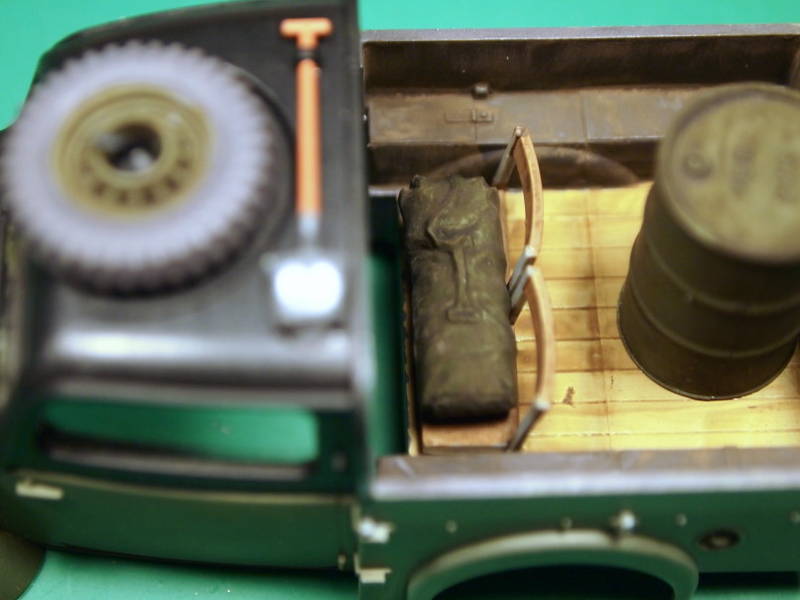
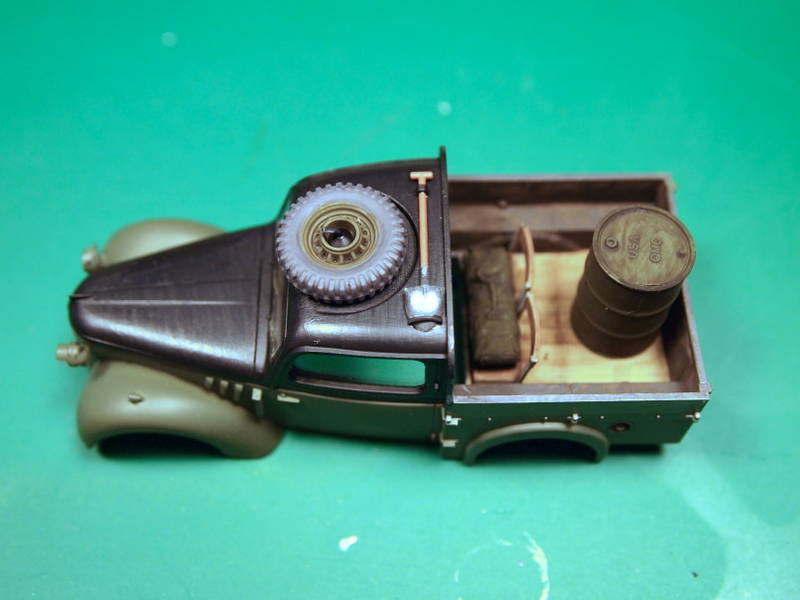
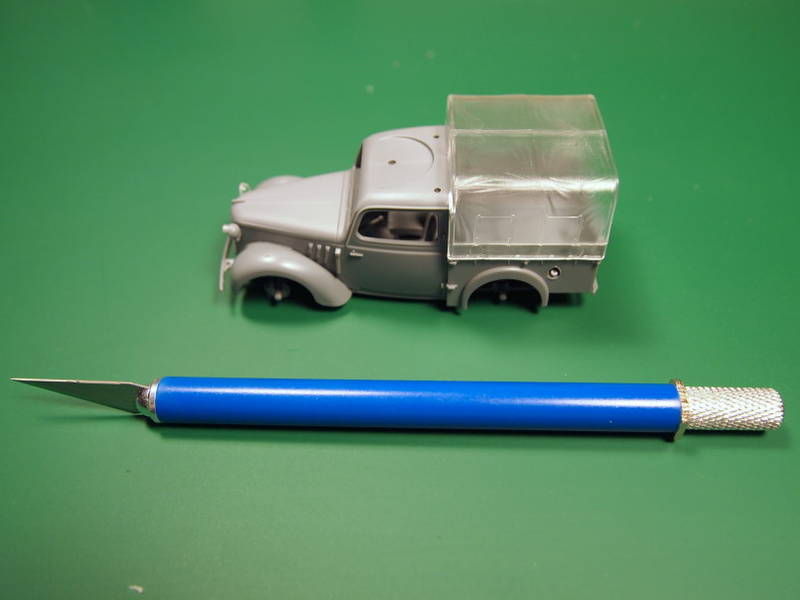
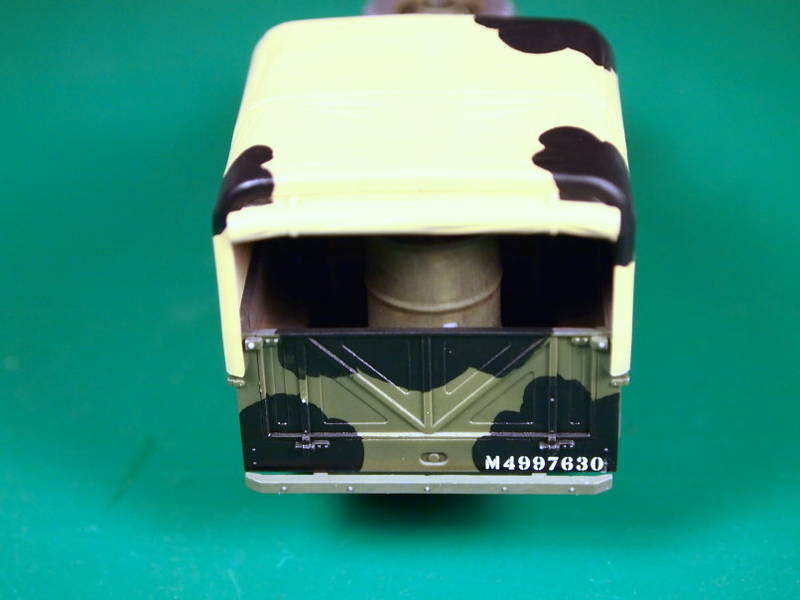
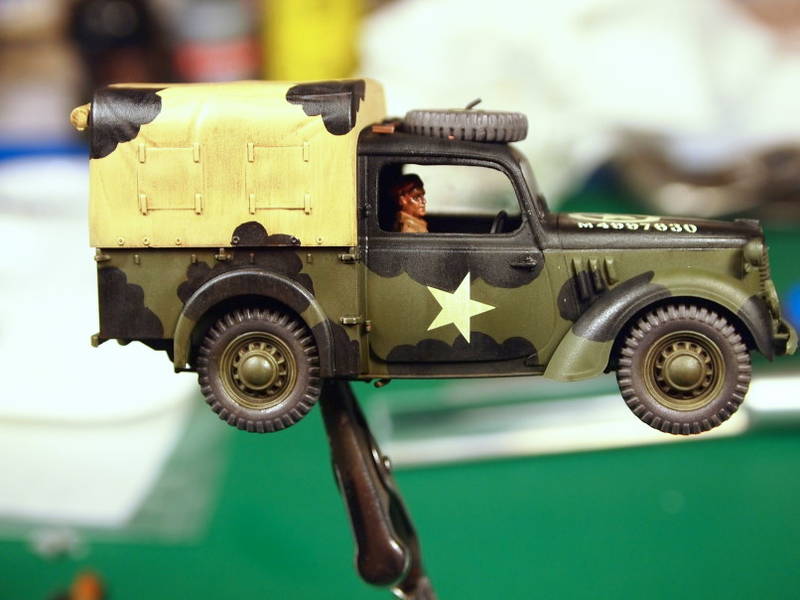
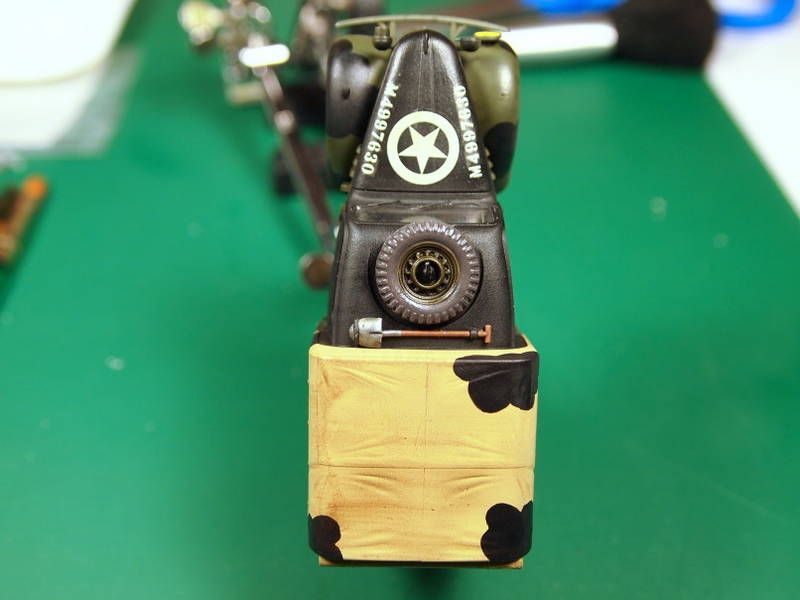
Tilly Update 6/10/11:
She's getting there. The rear tarp had a nasty seam. Again, why they decided to make this out of clear plastic is beyond me. Got the basecoats on her, and the interior painted. I have some fuel drums and tarps I will be putting in the back later on.

Decided to put the driver with this truck, as it's eventually going to end up in a small diorama with a US Jeep and the Tamiya Universal Carrier, both in 1/48 scale, along with some Allied soldiers in a more relaxed atmosphere.
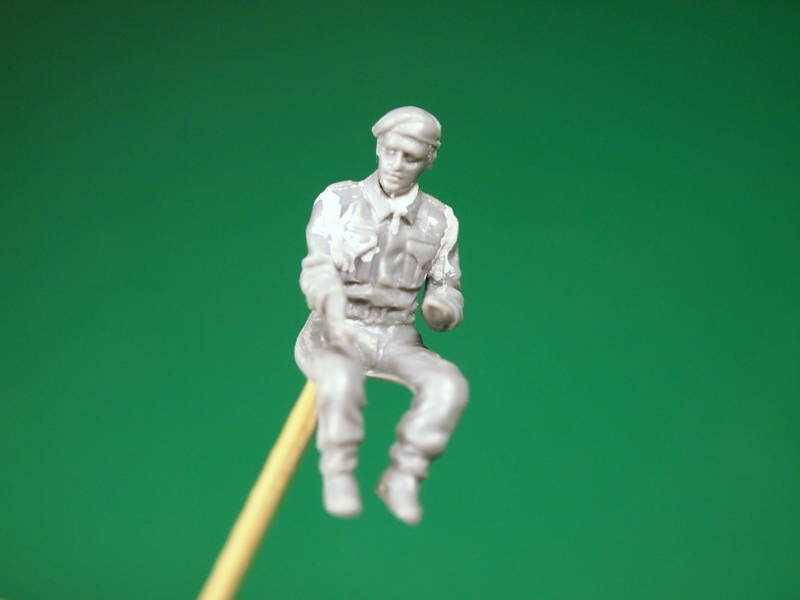

Will probably have to cut down the drivers side window, or remove it completely to tie everything together down the road.
EWC(SW/AW) USN 1990-2005
IPMS #46275
Minnesota, United States
Joined: October 01, 2008
KitMaker: 597 posts
Armorama: 439 posts
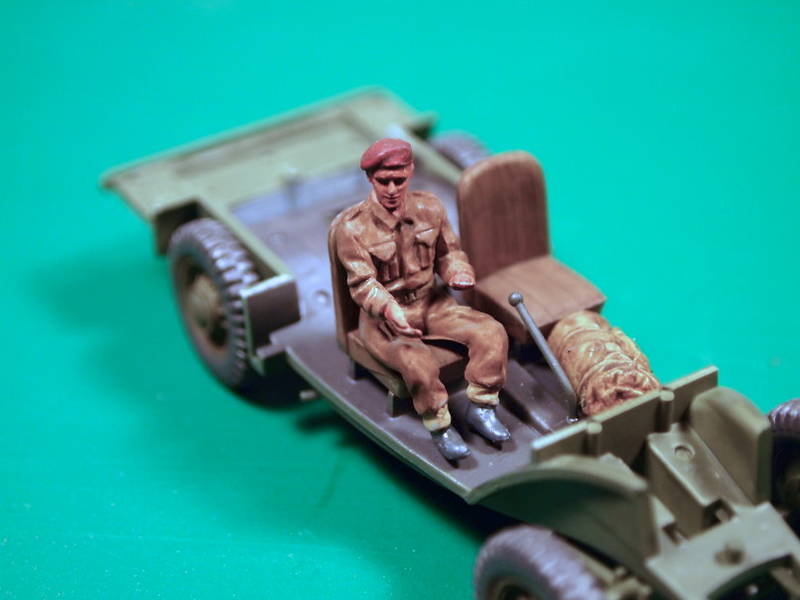
Posted: Saturday, June 11, 2011 - 07:21 PM UTC
EWC(SW/AW) USN 1990-2005
IPMS #46275
California, United States
Joined: December 06, 2004
KitMaker: 3,694 posts
Armorama: 2,693 posts
Posted: Saturday, June 11, 2011 - 08:00 PM UTC
Your driver looks pretty good. My figures always looked like very surprised cadavers.
Minnesota, United States
Joined: October 01, 2008
KitMaker: 597 posts
Armorama: 439 posts
Posted: Saturday, June 11, 2011 - 08:25 PM UTC
Gary:
The greatest thing about 1/48 scale figures I've found is that a good wash will settle into the eye recesses, which means no saucer eyeballs for me. Wish I could say the same about my 1/35 scale figures...
EWC(SW/AW) USN 1990-2005
IPMS #46275
Minnesota, United States
Joined: October 01, 2008
KitMaker: 597 posts
Armorama: 439 posts
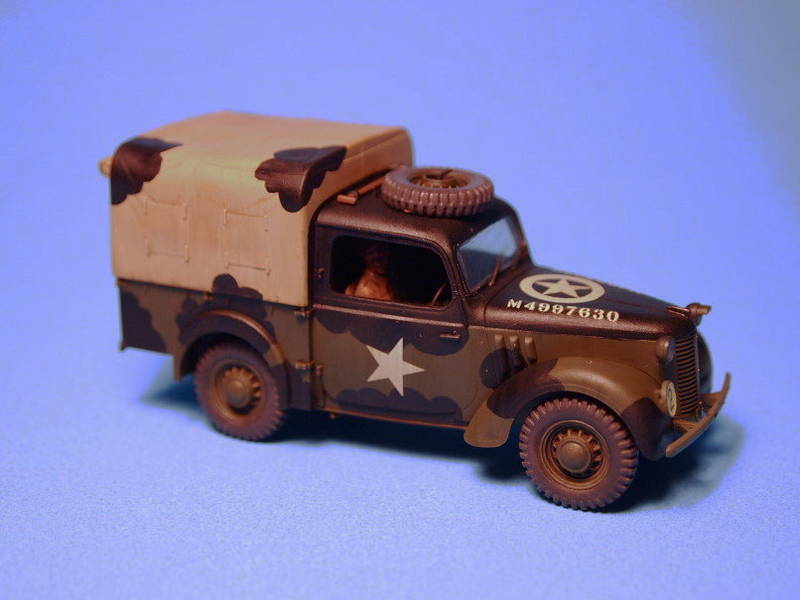
Posted: Thursday, June 16, 2011 - 02:58 PM UTC
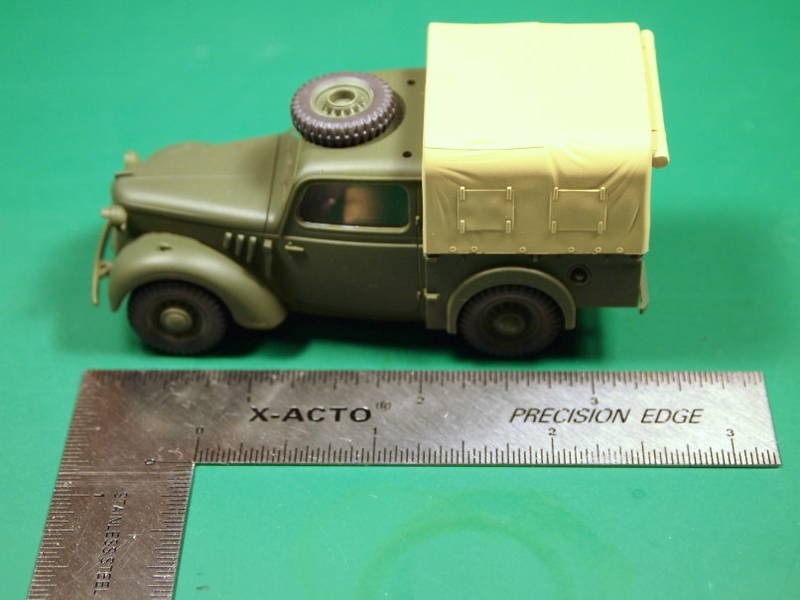
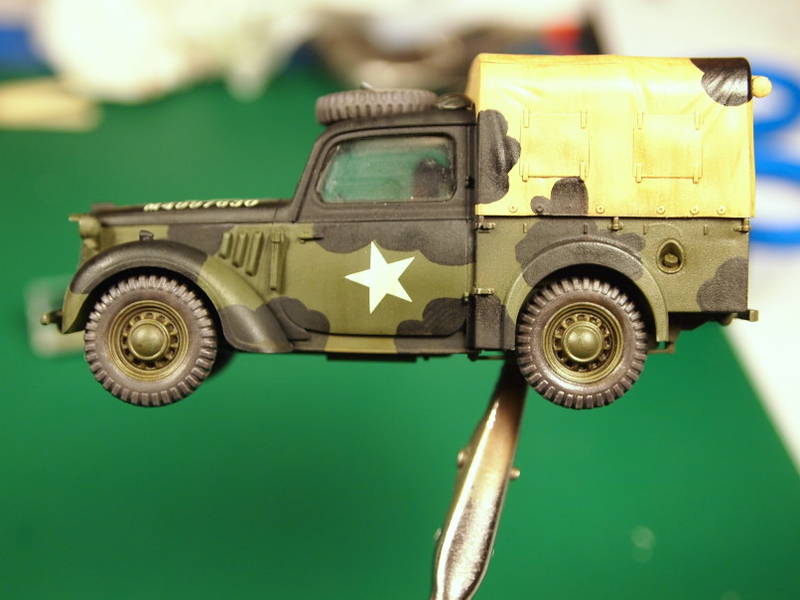
Update for 6/16/11:
Almost to the finish line...really. Decals are on and a Vallejo Gloss Varnish overcoat has been sprayed. Will let the gloss fully cure and hit it with some of the AK Interactive enamel sets I picked up, as I'm really wanting to get a feel for them. I haven't painted with enamels since I was in high school in the late 80s. Should be fun. Here are some photos:
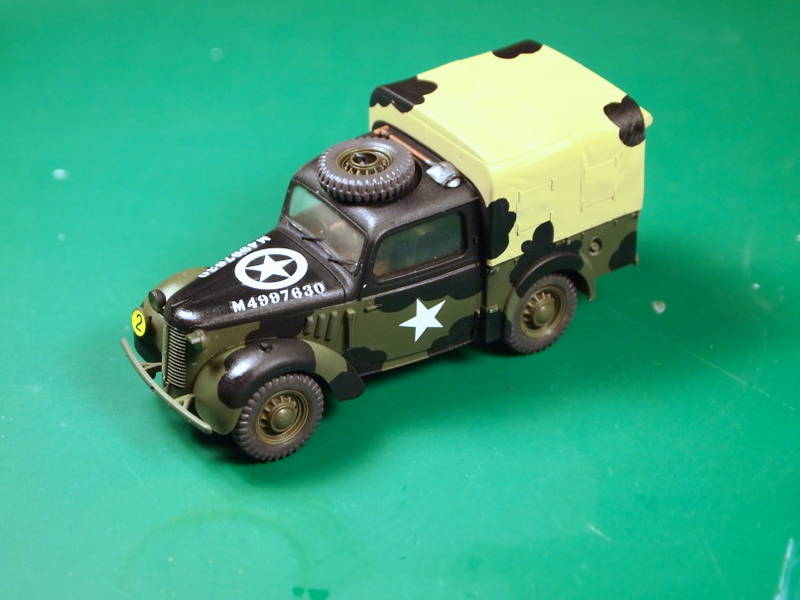
I really like the yellow "2" ID plate as it gives some color to the little truck.
Oh and for those unaware, Vallejo Gloss Varnish and Future are NOT the same when sprayed. I had to scrub the windows with a Tamiya extra small swab dampened with Windex to scrub the stuff off the window, and will have to go over it again when it gets a bit drier, as it started to gum up and make quite a mess. Lesson learned, I suppose.
Cheers!
EWC(SW/AW) USN 1990-2005
IPMS #46275
Wisconsin, United States
Joined: September 11, 2009
KitMaker: 1,917 posts
Armorama: 735 posts
Posted: Friday, June 17, 2011 - 01:32 AM UTC
Quoted Text
Your driver looks pretty good. My figures always looked like very surprised cadavers.
Gary! You're not painting the whites of the eyes, are you? I read that it's better not to paint white at all, if you can't keep it to just a tiny hint.
I'm only speaking from what I've read. The only figs I've painted in the past 10 years are the 3 MP's with sunglasses from my armored M151 last year.
Matt- that is some awesome work in a tiny scale. Very well done, sir!
-Sean.


That's hilarious though. Minutes later, I'm still laughing quietly to myself in my cubicle at work. I've made way too many of those surprised cadavers!
Current: model railroad layout
Stalled a while ago:
. 1950's Chrome, WW II Twins
Last completed: Police Car
Minnesota, United States
Joined: October 01, 2008
KitMaker: 597 posts
Armorama: 439 posts
Posted: Friday, June 17, 2011 - 03:09 AM UTC
Sean - Thanks for the kind words. I'm starting to really like this 1/48 armor thing. Enough detail but still small enough to display enough of them in my cabinet. Much like my switch from 1/48 aircraft to 1/72 aircraft back when I was in high school in the late 80s.
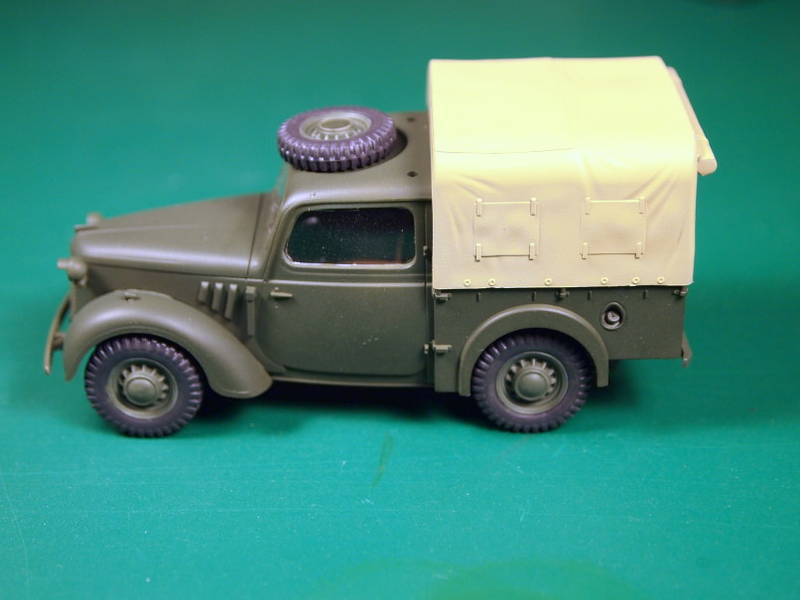
Spent some time last night experimenting with some of the products from AK Interactive USA, namely their enamel washes and streaking products. I also learned that all gloss varnishes are not equal, as I didn't mask the clear cab windows before laying down a coat of Vallejo Gloss Varnish (instead of my normal Future gloss coat). Lesson learned. Here's the Tilly as she sits now (compared to the shots in my last post just after decaling):
This weekend I'm going to experiment (yet again) with making a small base. I have the 1/48 Tamiya road sign set and there is a couple with some NW Europe (France specifically) signs that would really set this off, I think.
Cheers!
EWC(SW/AW) USN 1990-2005
IPMS #46275
Myanmar
Joined: March 05, 2004
KitMaker: 4,011 posts
Armorama: 1,498 posts
Posted: Friday, June 17, 2011 - 12:52 PM UTC
That's a neat little model you built up. Yeah, I've never tried the Vallejo Gloss, but only used the Future

i watched a scale plastic figure crawl along the edge . . . of an exacto blade . . . that's my dream , it's my nightmare . . . . . . . crawling , slithering . . . . . along the edge . . . . . . of an exacto . . . . . blade . . . . and surviving
Auckland, New Zealand
Joined: June 01, 2011
KitMaker: 1,716 posts
Armorama: 1,638 posts
Posted: Saturday, June 18, 2011 - 01:52 AM UTC
I know the voices ain't real but they do come up with some great ideas
Never trust a man who left alone with a tea cozy and doesn't try it on ( Billy Connolly )
Overkill is often very understated
spongya
 Associate Editor
Budapest, Hungary
Joined: February 01, 2005
KitMaker: 2,365 posts
Armorama: 1,709 posts
Posted: Saturday, June 18, 2011 - 09:54 AM UTC
Please visit me at my blog: https://butterfingeredmodelbuilder.wordpress.com/
Minnesota, United States
Joined: October 01, 2008
KitMaker: 597 posts
Armorama: 439 posts
Posted: Wednesday, June 22, 2011 - 03:47 AM UTC
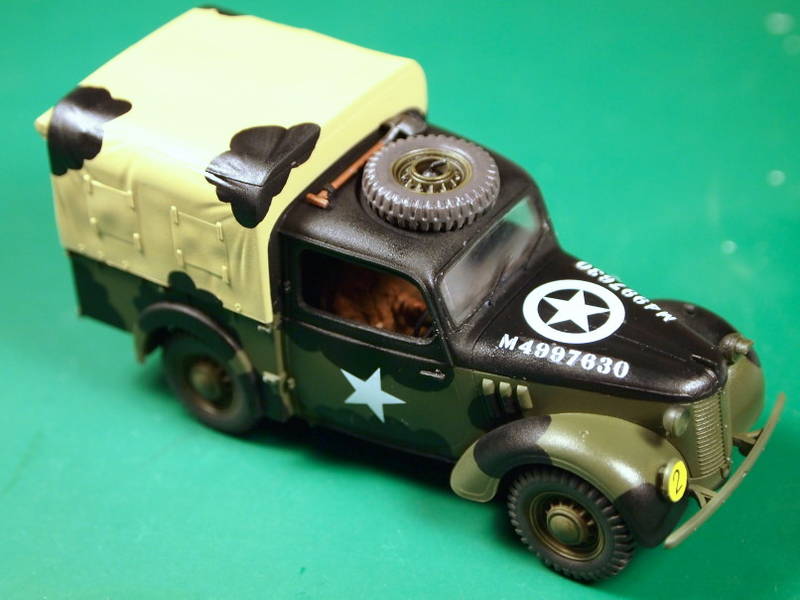
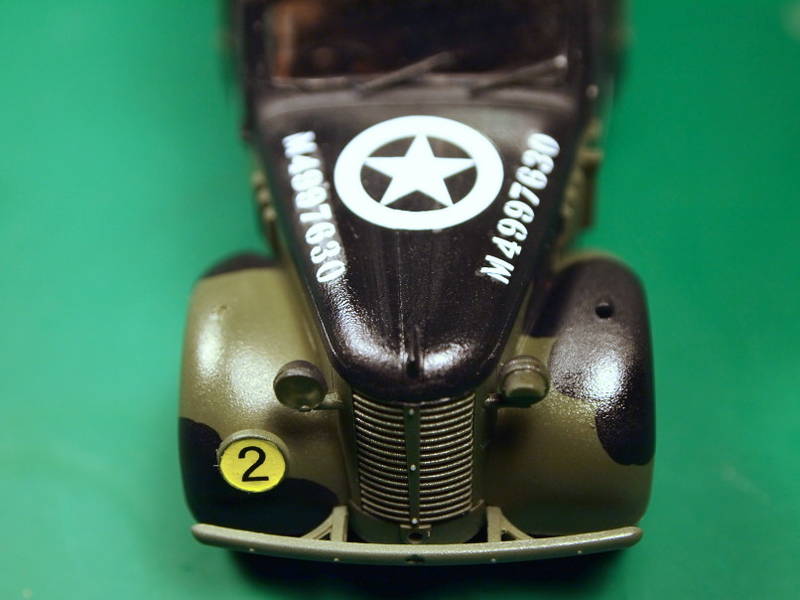
The build for the vehicle is done, so I'm calling this one finished for the campaign.
Final photos posted to the campaign gallery:

I left the dust and mud off as I have yet to figure out how I'm going to display this little guy (just over 3 1/2" bumper to bumper). I have a couple more 1/48 kits (Universal Carrier and the Jeep that comes with the Tamiya US Infantry at Rest figure set), so I might see if I can squeeze one more of those two out and make a little display with them.
EWC(SW/AW) USN 1990-2005
IPMS #46275
United Kingdom
Joined: August 17, 2002
KitMaker: 443 posts
Armorama: 357 posts
Posted: Sunday, June 26, 2011 - 08:13 AM UTC
Progress is slow, This is how far i have got.

Cheers
Robbo
WARLORD
Associate Editor Warszawa, Poland
Joined: April 23, 2003
KitMaker: 1,923 posts
Armorama: 868 posts
Posted: Monday, June 27, 2011 - 11:18 PM UTC
Istanbul, Turkey / Türkçe
Joined: December 05, 2007
KitMaker: 953 posts
Armorama: 705 posts
Posted: Tuesday, June 28, 2011 - 12:46 PM UTC
Fine work Marcin....


#041
Kobenhavn, Denmark
Joined: July 20, 2006
KitMaker: 10,069 posts
Armorama: 4,677 posts
Posted: Wednesday, June 29, 2011 - 08:28 AM UTC
Nice build, Matt. The Mickey Mouse camouflage came out very well.
Marcin, really nice job on the GMC. I like the wooden seat changed and left unpainted. Nice touch.
Campaign'oholic - 252+ campaigns completed
Limburg, Netherlands
Joined: November 18, 2003
KitMaker: 894 posts
Armorama: 643 posts
Posted: Wednesday, July 06, 2011 - 08:58 AM UTC
Hi guys,
it's been a while since I enlisted to this campaign but I had to clean my desk of other unfinished models first
I got the bottom part done. The roadwheels were bad so a lot of putty was needed to fill the casting marks. Thanks to tips I got on this site I found out a long time ago that Panzershop put the wrong kind of track with the kit, it should not be the T-72, but the T-55 type which had to be modified a bit (cutting of the side and every 6th guide horn) The drive sprocket has 14 teeth which is wrong but I kept it like that, I took a leftover T-72 set which I narrowed a bit to fit the tracks. The "box" did not fit on the bottom plate, so I had to widen it a bit.


I already started a bit on the bonnet and cab and it will be a nightmare to make them fit, luckily this is the last Panzershop kit in my stash and I will not buy a new one ever

Matthijs
"We don't know anything about their race, history, or culture, but one thing's for sure. They stand for everything we stand against."
Zapp Brannigan from the cartoon series "Futurama"
Limburg, Netherlands
Joined: November 18, 2003
KitMaker: 894 posts
Armorama: 643 posts
Posted: Thursday, July 14, 2011 - 07:40 AM UTC
here's the cab and bonnet, it took me 2 nights to figure out where to put all the parts since there is no clear indication where to glue what like with plastic kits


"We don't know anything about their race, history, or culture, but one thing's for sure. They stand for everything we stand against."
Zapp Brannigan from the cartoon series "Futurama"
Limburg, Netherlands
Joined: November 18, 2003
KitMaker: 894 posts
Armorama: 643 posts
Posted: Sunday, July 17, 2011 - 02:33 AM UTC
thanks to bad weather my project is making a lot of progress
some tiny bits and pieces, various dashboard parts and window frames masked with micromask which gives them the blue colour

The front, now with some more parts and PE. I replaced some PE parts by Evergreen because they just would not fit or in case of the fire extinguisher brackets where the parts were not seen on pictures of the real vehicle

is it a jet plane?

compared to other Panzershop kits I built this one is actually quite easy to build (little sanding or filling). Accuracy still stays a problem...
cheers,
Matthijs
"We don't know anything about their race, history, or culture, but one thing's for sure. They stand for everything we stand against."
Zapp Brannigan from the cartoon series "Futurama"
Limburg, Netherlands
Joined: November 18, 2003
KitMaker: 894 posts
Armorama: 643 posts
Posted: Wednesday, July 20, 2011 - 07:15 AM UTC
more and more parts are being added


first beginning of the radar, very fiddly job

"We don't know anything about their race, history, or culture, but one thing's for sure. They stand for everything we stand against."
Zapp Brannigan from the cartoon series "Futurama"
Limburg, Netherlands
Joined: November 18, 2003
KitMaker: 894 posts
Armorama: 643 posts
Posted: Saturday, July 23, 2011 - 07:49 AM UTC
"We don't know anything about their race, history, or culture, but one thing's for sure. They stand for everything we stand against."
Zapp Brannigan from the cartoon series "Futurama"
Wojewodztwo Podkarpackie, Poland
Joined: December 05, 2007
KitMaker: 2,435 posts
Armorama: 1,256 posts
Posted: Saturday, July 23, 2011 - 11:53 PM UTC
Hi guys,
I see that I've missed a lot of great builds here... Sorry for lack of active participation but I had a lot of work recently which did not exaclty helped my health... so, I'm slowly recovering now and I hope I will be able to be more supportive here...
I have to prepare some pictures to post here - I did not stopped building, I just couldn't find enough time/strength to post them here.
Anyway: superb builds once again!
Andrzej

United Kingdom
Joined: August 17, 2002
KitMaker: 443 posts
Armorama: 357 posts
Posted: Sunday, July 24, 2011 - 09:58 AM UTC
Hi all,
Had a bit of time to spend on the Famo, most of the build is finished now and on with the paint.

More pics tomorrow
Cheers
Robbo
United Kingdom
Joined: August 17, 2002
KitMaker: 443 posts
Armorama: 357 posts
Posted: Monday, July 25, 2011 - 07:53 AM UTC
Second coat of paint added showing a well worn vehicle. Now to add some gear and the last few bits to build.

Cheers
Robbo
Guatemala
Joined: April 12, 2005
KitMaker: 343 posts
Armorama: 223 posts
Posted: Monday, July 25, 2011 - 08:06 AM UTC
Nice work on that canvas Sean, looking good!!
Happy Modeling
Byron
If you are not part of the solution, Don't be a part of the problem.