

Campaigns
Where Armorama group builds can be discussed, organized, and updates posted.
Where Armorama group builds can be discussed, organized, and updates posted.
Hosted by Darren Baker, Richard S.
Braille Battlefield
Removed by original poster on 11/07/10 - 12:11:25 (GMT).

Algernon

Joined: December 27, 2008
KitMaker: 17 posts
Armorama: 13 posts

Posted: Sunday, November 07, 2010 - 12:12 AM UTC
Here's my submission for the campaign:
Revell famo with a CMK conversion to make it the artillery version, towing the morsar 18, I have some cmk figures arriving to go with this.
Won't be starting this until after the IPMS show at Telford next week.

OK, if someone could help please, i've tried to upload the photo using the BB code help info, it's hosted on the kitmaker gallery but regardless of how many variations I try, no success!
Revell famo with a CMK conversion to make it the artillery version, towing the morsar 18, I have some cmk figures arriving to go with this.
Won't be starting this until after the IPMS show at Telford next week.
OK, if someone could help please, i've tried to upload the photo using the BB code help info, it's hosted on the kitmaker gallery but regardless of how many variations I try, no success!

Maurice

Joined: September 11, 2006
KitMaker: 254 posts
Armorama: 75 posts
Posted: Sunday, November 07, 2010 - 12:34 AM UTC
Quoted Text
OK, if someone could help please, i've tried to upload the photo using the BB code help info, it's hosted on the kitmaker gallery but regardless of how many variations I try, no success!

Here you go. Good choice, looking forward to seeing it finished.
Algernon
Joined: December 27, 2008
KitMaker: 17 posts
Armorama: 13 posts
Posted: Sunday, November 07, 2010 - 01:37 AM UTC
Thanks a lot for that, now i've got to learn how to upload the pictures properly myself 
tread_geek

Joined: March 23, 2008
KitMaker: 2,847 posts
Armorama: 2,667 posts
Posted: Sunday, November 07, 2010 - 02:19 AM UTC
Quoted Text
Jan, your the one with a full plate! You have got your work cut out for you. I can't wait to tackle that SG-122A as I will be kit bashing chassis components and upper hull pieces to try an achieve as accurate a model as I can and I'm sure I will encounter some similar issues along the way. That periscope ring on your Stug looks better now!
Thanks for the comments, Eddy. The StuG wasn't supposed to be a return to the T-80 or anything similar. It WAS supposed to be a quick completion of an incomplete and forlorn build. If I knew what I was getting myself into I might have thought differently. As I see it at the moment I have two options. Modify the new lower hull or use the old one and change the drive sprocket to the newer one. Actually, after looking at the model for so long I must say that it's pretty detailed for its age. The thing even has weld beads were plates meet. It's quite surprising about the turret ring though. The .030" plastic was as thick as the hatch before I sanded it down. I wonder what the real kit part was like.
Quoted Text
Thanks a lot for that, now i've got to learn how to upload the pictures properly myself
Welcome to the campaign, Leighton. You sure have picked a subject that could be quite a massive undertaking. I have the howitzer in my stash so I am well aware of its intricacy. Next to something like the 60 cm Karl it's one of the finest 1/72 artillery pieces that I have had the pleasure to examine.

As for your picture issues. The Campaigns Administrator has put up a thread with information for those new to campaigns. You can find it HERE. IT should give you a good overview of how things work.
For the "quick and dirty solution":

If you have any further questions, please feel free to ask. Either myself or someone else in this thread will be glad to assist.
Cheers,
Jan


firstcircle


Joined: November 19, 2008
KitMaker: 2,249 posts
Armorama: 2,007 posts
Posted: Sunday, November 07, 2010 - 12:08 PM UTC
Yes, an interesting collection of builds, and I almost feel guilty being just in the finishing off stage of some very simple kit while others are embarking on what look like veritable braille epics. Maurice, the Achilles looks great, I've never seen a model of one of these before, wonder if there's any chance of the Egyptian colours...? Leighton, you also look like you could be a while with those two; I assume that is both elements of the campaign in one go.
AJB, can you be tempted to get the drill going again for the smoke dischargers? And Jan . . .
Progress on the Isuzu... headlamps are on, a bit of filler around the wheel arches, radiator cap, tried to add a bit of texture for the canvas sides using acrylic paste, and made some chassis mounts for the bumper (the kit of course has the fender attached to the radiator grill, not much use in a prang.)

Slight experiment with the primer: white on the top surfaces of the body, and grey on the chassis and lower sides of body. I'll see if I can make use of this when adding the body colour. Haven't really decided what colour that will be yet. Any ideas?


AJB, can you be tempted to get the drill going again for the smoke dischargers? And Jan . . .
Quoted Text
A bit hard to tell from the photo, but actually the idler looks a bit low to me. Also the return rollers look a little on the large side; in fact on my screen they measure exactly the same as the rollers on the back of "Sturmgeshutz III in action", i.e. 10mm, yet the road wheel in the book measures 16.5mm, while your road wheels appear at 15mm. Not very scientific I know, but they do look a bit big. rear has the idlers so high there is not enough room for the tracks
Progress on the Isuzu... headlamps are on, a bit of filler around the wheel arches, radiator cap, tried to add a bit of texture for the canvas sides using acrylic paste, and made some chassis mounts for the bumper (the kit of course has the fender attached to the radiator grill, not much use in a prang.)
Slight experiment with the primer: white on the top surfaces of the body, and grey on the chassis and lower sides of body. I'll see if I can make use of this when adding the body colour. Haven't really decided what colour that will be yet.
Any ideas? 
woltersk

Joined: May 27, 2003
KitMaker: 1,026 posts
Armorama: 654 posts
Posted: Monday, November 08, 2010 - 02:41 AM UTC
Oh what have I gotten myself into? So far all Ive done is open the Nashorn box, opened the bag, looked at all the itty-bitty road wheels, checked out all the itty-bitty individual track links, onced over the tome that is the instruction book which covers all those miniscule pieces which make up the interior and the complex gun mechanism.
What was I thinking when choosing an open-air vehicle in 1/72 scale
What was I thinking when choosing an open-air vehicle in 1/72 scale

tread_geek
Joined: March 23, 2008
KitMaker: 2,847 posts
Armorama: 2,667 posts
Posted: Monday, November 08, 2010 - 05:27 AM UTC
@firstcircle
I'll take a stab at helping with the camo colour. A Katsushi Owaki posted (in early 2000) on www.j-aircraft.com/faq/airfield_vehicles.htm the Japanese color standards. He stated that late war Oscars were painted in a green (similar to U.S. Olive Drab), and that this color was also used on other Army equipment such as helmets, field artillery, tanks, etc. This color is close to FS 34088.
Model Art #329 on IJA Fighters has a color drawing section showing both field equipment such as trucks as well as uniforms for pilots and ground crew.
The trucks are shown with this "olive drab" shade all over except canvas roofs, which are a lighter green or somewhat "khaki" color. Excuse the term khaki as it means many things to many people! Navy vehicles were generally painted what they call Cowling Blue which appears to be quite a dark blue colour.
On On The Way, a fellow used Tamiya colours to paint a different Japanese truck and you can find his commentary of the build HERE.
Matthew, the pictures I post are meant to be for reference purposes, hence the lack of anything to suggest scale. The problem with trying to use any two pictures to scale things is that they are not taken with identical camera settings and distance from the subject. The only standard is that I am using a 35-250 mm zoom lens with a 4X macro filter attached. I will try to get some more specific dimensions and post them later.
@woltersk Welcome to the "madness," Keith. I DID warn you about that kit. It should result in quite an impressive build, should you decide to continue with it as your submission.
-----------------------------------------------------------------------
Due to frustration and the need to think things through I had momentarily set the StuG aside. I spent some time looking at and researching about the SU-76i and the qualities and attributes of resin castings. My findings from observation of the running gear was that not only the one side was severely warped but the opposite side was also less extensively distorted.
From my reading and after consulting with a fellow IPMS club member who casts in resin, I put the knowledge to the test. It appears that many resins exhibit the property of retaining a memory of their shape that resulted from the casting process.
First is a close up of the distorted sections. The lower is obviously the worst case.

Next up was to put the memory theory into practice. I liberated a small tuna can from the trash, cleaned it then after boiling some tap water poured it into the can. After the bubbles from the boiling subsided I placed the most distorted chassis piece into the water. According to instructions I let it sit for all of five minutes. Using tweezers I gently tried to position the distorted areas to a more proper form. Much to my happy surprise, it appeared to be working.

After the prescribed time period I removed the section and immersed it in ice-water. And the result on some paper towelling.

I repeated the process with the other section but left it in the hot water for ten minutes. Without any help it returned to a proper form (memory?). Just these parts and a couple of others to go and it should be ready for painting.
The predominance of pictures of this vehicle show them in typical Russian green. One very unique picture has the title "The joke of the life. Captured by Russian Pz.III was rebuild to SPG SU-76i (СУ-76И), captured back by German, and again captured by Russian!!! " The picture speaks for itself (for discussion purposes only).

Cheers,
Jan

Quoted Text
Haven't really decided what colour that will be yet. Any ideas?
I'll take a stab at helping with the camo colour. A Katsushi Owaki posted (in early 2000) on www.j-aircraft.com/faq/airfield_vehicles.htm the Japanese color standards. He stated that late war Oscars were painted in a green (similar to U.S. Olive Drab), and that this color was also used on other Army equipment such as helmets, field artillery, tanks, etc. This color is close to FS 34088.
Model Art #329 on IJA Fighters has a color drawing section showing both field equipment such as trucks as well as uniforms for pilots and ground crew.
The trucks are shown with this "olive drab" shade all over except canvas roofs, which are a lighter green or somewhat "khaki" color. Excuse the term khaki as it means many things to many people! Navy vehicles were generally painted what they call Cowling Blue which appears to be quite a dark blue colour.
On On The Way, a fellow used Tamiya colours to paint a different Japanese truck and you can find his commentary of the build HERE.
Matthew, the pictures I post are meant to be for reference purposes, hence the lack of anything to suggest scale. The problem with trying to use any two pictures to scale things is that they are not taken with identical camera settings and distance from the subject. The only standard is that I am using a 35-250 mm zoom lens with a 4X macro filter attached. I will try to get some more specific dimensions and post them later.
@woltersk Welcome to the "madness," Keith.
I DID warn you about that kit. It should result in quite an impressive build, should you decide to continue with it as your submission. -----------------------------------------------------------------------
Due to frustration and the need to think things through I had momentarily set the StuG aside. I spent some time looking at and researching about the SU-76i and the qualities and attributes of resin castings. My findings from observation of the running gear was that not only the one side was severely warped but the opposite side was also less extensively distorted.
From my reading and after consulting with a fellow IPMS club member who casts in resin, I put the knowledge to the test. It appears that many resins exhibit the property of retaining a memory of their shape that resulted from the casting process.
First is a close up of the distorted sections. The lower is obviously the worst case.
Next up was to put the memory theory into practice. I liberated a small tuna can from the trash, cleaned it then after boiling some tap water poured it into the can. After the bubbles from the boiling subsided I placed the most distorted chassis piece into the water. According to instructions I let it sit for all of five minutes. Using tweezers I gently tried to position the distorted areas to a more proper form. Much to my happy surprise, it appeared to be working.
After the prescribed time period I removed the section and immersed it in ice-water. And the result on some paper towelling.
I repeated the process with the other section but left it in the hot water for ten minutes. Without any help it returned to a proper form (memory?). Just these parts and a couple of others to go and it should be ready for painting.
The predominance of pictures of this vehicle show them in typical Russian green. One very unique picture has the title "The joke of the life. Captured by Russian Pz.III was rebuild to SPG SU-76i (СУ-76И), captured back by German, and again captured by Russian!!! " The picture speaks for itself (for discussion purposes only).
Cheers,
Jan
woltersk
Joined: May 27, 2003
KitMaker: 1,026 posts
Armorama: 654 posts
Posted: Monday, November 08, 2010 - 09:24 AM UTC
JanI should learn to heed warnings in lieu of just running roughshod into projects.
Leightonmy hat is off to you and what appears to be two major projects undertook to be formed into one. That is an interesting looking item in the bubblepack. A whole chassis for the conversion and not separate pieces? Hmmm
Everyone elseAfter decades of building HO scale ROCO fare with single piece running gear and tracks and such; and after tackling many a 1/72 aircraft I thought small scale armor would be a breeze. Boy was I wrong! So any tips and tricks gleaned by the masses would be greatly appreciated.
Good luck to all.
Keith
woltersk
Joined: May 27, 2003
KitMaker: 1,026 posts
Armorama: 654 posts
Posted: Monday, November 08, 2010 - 02:40 PM UTC
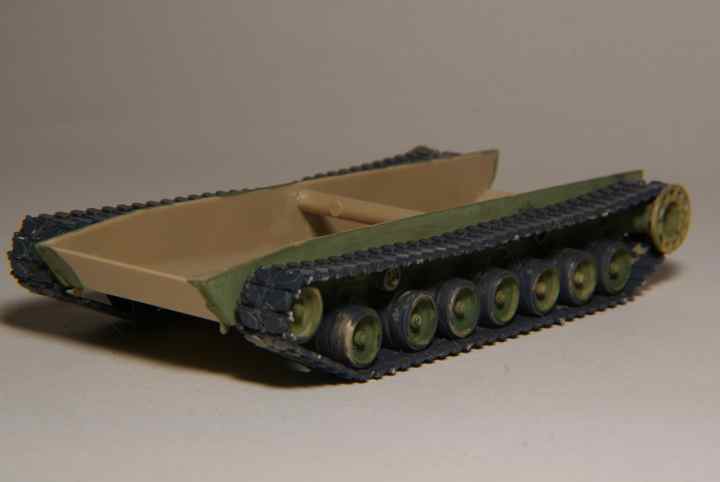
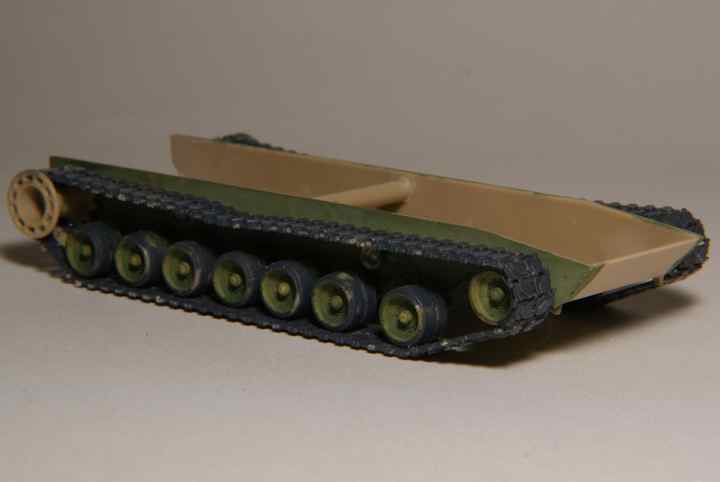
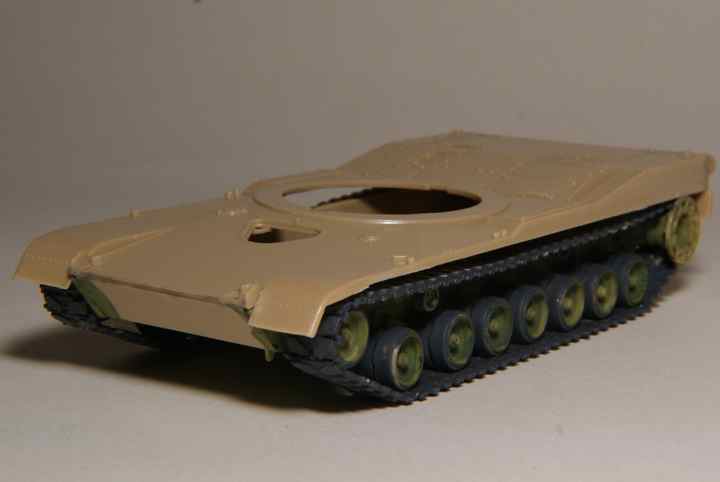
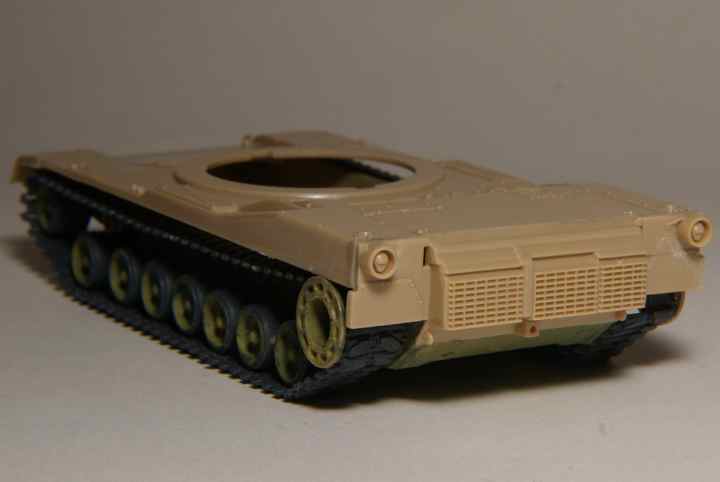
Here is the start of my entry, the 1/72 Nashorn from Revell

tread_geek
Joined: March 23, 2008
KitMaker: 2,847 posts
Armorama: 2,667 posts
Posted: Monday, November 08, 2010 - 03:53 PM UTC
Wow, Keith, that looks pretty much as intence as the Dragon offering. I checked out the instructions on Henk's site and that supports my impession. Whatever questions you have with the build, I am sure someone here can help. The hard part will at first be the suspension and the link and length tracks. You have to get the bogies just right or it might throw off the tracks. It may not be what you want, but check the instructions well before glue meets plastic. I've done a couple of Revell kits lately and they may not show you the best approach to construction. Best is to take your time and remember that 1/72 is still larger and easier than 1/87 or heaven forbid 1/144.
Cheers,
Jan
Cheers,
Jan
Maurice
Joined: September 11, 2006
KitMaker: 254 posts
Armorama: 75 posts
Posted: Monday, November 08, 2010 - 10:59 PM UTC
That Nashorn looks like a complicated build indeed, especially with all those separate track links, but at least there is no photo etched stuff
@Jan, nice work getting that track straight again, almost seems like a magic trick.
@Jan, nice work getting that track straight again, almost seems like a magic trick.

spacewolfdad
Joined: May 23, 2010
KitMaker: 642 posts
Armorama: 593 posts

Posted: Tuesday, November 09, 2010 - 02:15 AM UTC
Hi Keith,
It looks to me that the gun shield for the Nashorn has broken in two. If you want an intact one I can send you one as I have spares. Let me know if that would help.
All the best,
Paul
It looks to me that the gun shield for the Nashorn has broken in two. If you want an intact one I can send you one as I have spares. Let me know if that would help.
All the best,
Paul
woltersk
Joined: May 27, 2003
KitMaker: 1,026 posts
Armorama: 654 posts
Posted: Tuesday, November 09, 2010 - 04:59 AM UTC
Quoted Text
Hi Keith,
It looks to me that the gun shield for the Nashorn has broken in two. If you want an intact one I can send you one as I have spares. Let me know if that would help.
All the best,
Paul
Hey Paul,
I must say, that is a sharp eye you have to notice one broken piece amongst all that plastic!
Thanks for your kind offer and I will keep it in mind, but Im gonna try to repair it myself. It might be good practice for the rest of those miniscule parts. And odds are, knowing how the USPS is, yours may not survive the transit anyway! (No offense to any postal workers out there.)
Well see how things go. I may be in touch with you yet!
Keith
woltersk
Joined: May 27, 2003
KitMaker: 1,026 posts
Armorama: 654 posts
Posted: Tuesday, November 09, 2010 - 05:36 AM UTC
Jan,
Much like with marriage, now that the initial shock is over Im warming up to the idea of building this kit. Heck Im actually getting excited, forming a game plan and everythingviewing it as mini-kit subassemblies of gun and chassis, thinking about the running gear, and considering paint scheme options. I just hope I can get most of it done before the 7 year itch sets in and my eyes wander to another kit.
Maurice,
Thanks for the encouragement. I had not thought about PE and your post put a shudder down my spine. Your Achilles is looking good. PE and an interior?! Ill stop whining about my kit now.
AJ,
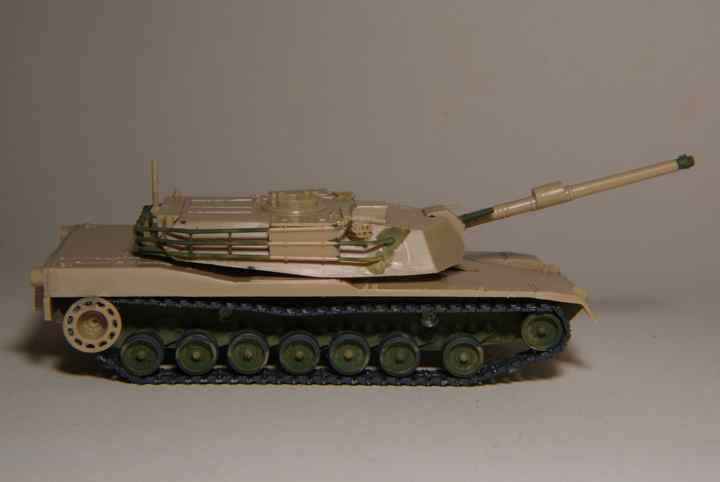
Hey there! Good to see you here. Its been a while. Nice M1. Another build which could be mistaken for 1/35th scale.
--Keith
Much like with marriage, now that the initial shock is over Im warming up to the idea of building this kit. Heck Im actually getting excited, forming a game plan and everythingviewing it as mini-kit subassemblies of gun and chassis, thinking about the running gear, and considering paint scheme options. I just hope I can get most of it done before the 7 year itch sets in and my eyes wander to another kit.
Maurice,
Thanks for the encouragement. I had not thought about PE and your post put a shudder down my spine. Your Achilles is looking good. PE and an interior?! Ill stop whining about my kit now.
AJ,
Hey there! Good to see you here. Its been a while. Nice M1. Another build which could be mistaken for 1/35th scale.
--Keith

weathering_one
Joined: April 04, 2009
KitMaker: 458 posts
Armorama: 456 posts
Posted: Tuesday, November 09, 2010 - 09:12 AM UTC
Quoted Text
AJB, can you be tempted to get the drill going again for the smoke dischargers?
Matthew, if you had looked closer at one of my pictures, the smoke things already come partially bored out.
I'll leave them that way as they will look like they are loaded.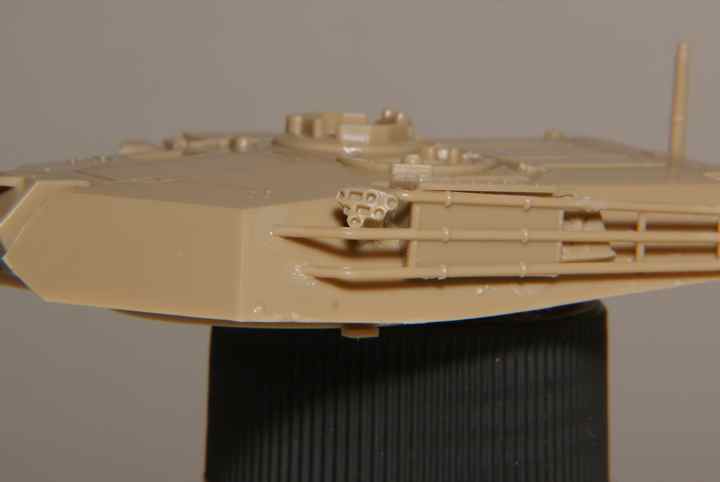
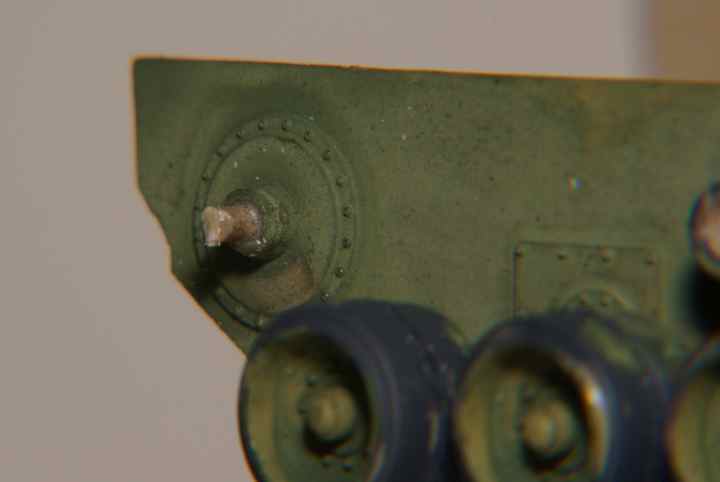
Progress has been steady but I goofed. Only one person noticed that my rear most wheel isn't supposed to be there. It is meant to be in front and the sprocket is at the rear. I used one of Jan's methods to break off the wheel, drill holes and put a new axle in.
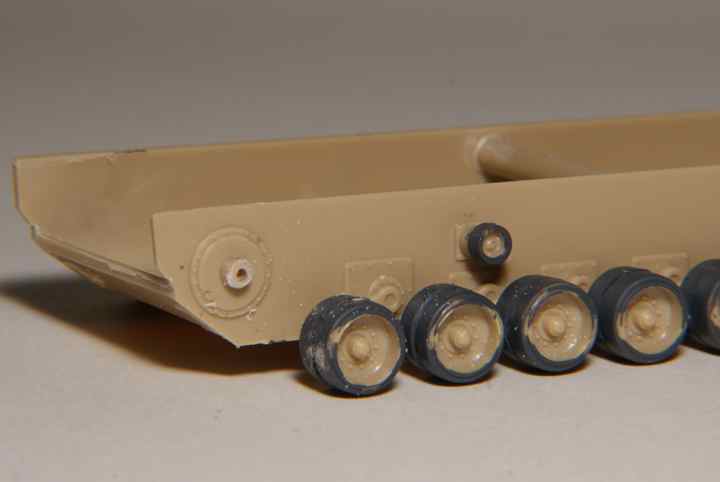
Did some pre-painting on the sides and the wheels and started on the tracks. Must say that they were a pain.
Now I know what those L & L tracks are like.
 They look good but are really fiddly.
 @Keith and for others - Don't trust the instructions as far as the track section placement goes. It also takes forever to dry fit them to see what combination and where they should fit best.
Regards,
AJ
eremzet

Joined: September 10, 2010
KitMaker: 89 posts
Armorama: 87 posts

Posted: Wednesday, November 10, 2010 - 12:13 AM UTC
Hi everyone!
This is my Valentine which I've finished BEFORE the Nov. 1st so it is not under this campaign label but I've shown it here few weeks before so I think I should share the photos of finished project.
The vehicle represents tank from 2nd Polish Corps in Palestine 1943 during driving lessons.


Hope You enjoy it.
Within this project I have this ugly frog:


The wheels are "glued" with blue-tac just for photos. The figure is Milicast Italian para-POW converted to PAI soldier with motorcyclist helmet.
Next updates soon
This is my Valentine which I've finished BEFORE the Nov. 1st so it is not under this campaign label but I've shown it here few weeks before so I think I should share the photos of finished project.
The vehicle represents tank from 2nd Polish Corps in Palestine 1943 during driving lessons.
Hope You enjoy it.
Within this project I have this ugly frog:
The wheels are "glued" with blue-tac just for photos. The figure is Milicast Italian para-POW converted to PAI soldier with motorcyclist helmet.
Next updates soon
Maurice
Joined: September 11, 2006
KitMaker: 254 posts
Armorama: 75 posts
Posted: Wednesday, November 10, 2010 - 01:15 AM UTC
Valentine looks nice. Which one is it, the Italeri/Esci one or the Fujimi one? I got the Fujimi one lying here waiting to be build.
Milicast is 20mm or 1:76 right? How does that compare to the 1:72 Italeri kit?
Milicast is 20mm or 1:76 right? How does that compare to the 1:72 Italeri kit?
eremzet
Joined: September 10, 2010
KitMaker: 89 posts
Armorama: 87 posts
Posted: Wednesday, November 10, 2010 - 06:27 AM UTC
Quoted Text
Valentine looks nice. Which one is it, the Italeri/Esci one or the Fujimi one? I got the Fujimi one lying here waiting to be build.
Milicast is 20mm or 1:76 right? How does that compare to the 1:72 Italeri kit?
Model is from Italeri. It is quite nice considering it's age. I don't know Fujimi model and I don't want to - I hate 1:76 models.
Figures are from Milicast (both Polish and Italian soldier) and thats all I know - it was a gift from my frind from Polish modelling forum.
tread_geek
Joined: March 23, 2008
KitMaker: 2,847 posts
Armorama: 2,667 posts
Posted: Wednesday, November 10, 2010 - 06:50 AM UTC
Greetings all.  There has been enough activity to warrant updating the Campaign Chart.
AJB Nice progress on the M1. Sorry to hear about the problems but you seemed to overcome them well. I must agree with myself and you that the link and length tracks and the instructions for them seem to be a problem over several manufacturers.
Radek The Valentine and the diorama look excellent. I am sure that most would not be able to tell what scale it is. The Sahara looks to be coming along very well. In its own right it is somewhat ugly. I've seen them at the LHS but always shied away from them. Your build may get me to rethink that opinion.
Cheers,
Jan
There has been enough activity to warrant updating the Campaign Chart.AJB Nice progress on the M1. Sorry to hear about the problems but you seemed to overcome them well. I must agree with myself and you that the link and length tracks and the instructions for them seem to be a problem over several manufacturers.
Radek The Valentine and the diorama look excellent. I am sure that most would not be able to tell what scale it is.
The Sahara looks to be coming along very well. In its own right it is somewhat ugly. I've seen them at the LHS but always shied away from them. Your build may get me to rethink that opinion.Cheers,
Jan
weathering_one
Joined: April 04, 2009
KitMaker: 458 posts
Armorama: 456 posts
Posted: Wednesday, November 10, 2010 - 08:36 AM UTC
That's a really nice tank you got there Radek. The setting and the figures looked wonderful. That Italian vehicle looks like it's coming along well, and I also vote that it's an ugly beast.
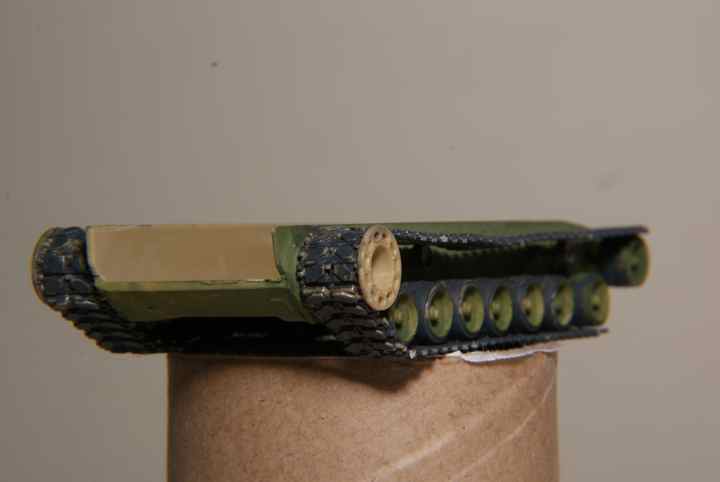
With the horrible tracks out of the way I got to start on the more fun stuff. The upper body went on but the locating tabs are pretty tiny but I think that I got it OK.
The periscope/sight thing on the turret was hollow so I glued in some clear plastic for effect. Now to figure out how to mask it.
Finally, a picture with the turret on. It's now starting to look like a complete tank.
Regards,
AJ
The setting and the figures looked wonderful. That Italian vehicle looks like it's coming along well, and I also vote that it's an ugly beast. With the horrible tracks out of the way I got to start on the more fun stuff. The upper body went on but the locating tabs are pretty tiny but I think that I got it OK.
The periscope/sight thing on the turret was hollow so I glued in some clear plastic for effect. Now to figure out how to mask it.
Finally, a picture with the turret on. It's now starting to look like a complete tank.
Regards,
AJ
firstcircle
Joined: November 19, 2008
KitMaker: 2,249 posts
Armorama: 2,007 posts
Posted: Wednesday, November 10, 2010 - 11:33 AM UTC
Radek, the Valentine is great; and a very nicely presented diorama. I'm curious about the sand - is it all stuck on? If so, how do you have such a granular lumpy effect? That Sahariana looks almost indistinguishable from my Italeri 1/35 version; I've always thought it ugly but in a good way, it's just like something out of Mad Max 2. Looking forward to seeing this done, and no doubt on another neat base.
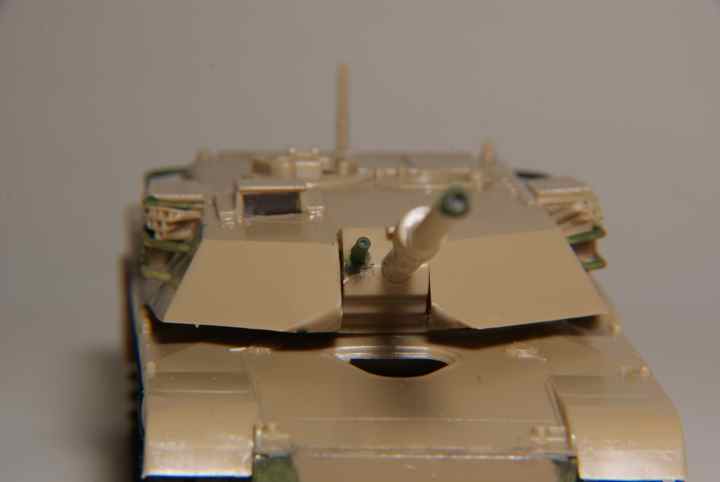
AJ, on the smoke discharger things, if you say so . . . Here is a nice big photo for you . . . M1
I did some painting on the Isuzu; I've always regretted that many models I do end up being too dark by the time they've been weathered, so although I went with Jan's suggested olive drab / khaki type colour, I lightened it up to a very extreme level (yes, I am ruthlessly using this kit to experiment upon) and added more drops of white into the airbrush bowl as I moved upwards. Inevitably hard to see in the photo:

And inevitably, I've gone for the toothpaste again to see if I can do some kind of distressed finish. I think I was thinking about how rusty those Datsuns used to get in the 1970s. . . so here is some of the primer re-exposed:

Really I know but . . .
washing the toohpaste off was all I managed tonight as I had promised to bake for a cake sale at daughter's school. There are lots of Army families' children at the school, so they're having a fund raising week to support the local regiments: the Irish Guards and the Household Cavalry. Of course it is also Remembrance Day tomorrow, 11th November. Anyway, camouflage cakes:

AJ, on the smoke discharger things, if you say so . . .
Here is a nice big photo for you . . . M1 I did some painting on the Isuzu; I've always regretted that many models I do end up being too dark by the time they've been weathered, so although I went with Jan's suggested olive drab / khaki type colour, I lightened it up to a very extreme level (yes, I am ruthlessly using this kit to experiment upon
) and added more drops of white into the airbrush bowl as I moved upwards. Inevitably hard to see in the photo: And inevitably, I've gone for the toothpaste again to see if I can do some kind of distressed finish. I think I was thinking about how rusty those Datsuns used to get in the 1970s. . . so here is some of the primer re-exposed:
Really
I know but . . .washing the toohpaste off was all I managed tonight as I had promised to bake for a cake sale at daughter's school. There are lots of Army families' children at the school, so they're having a fund raising week to support the local regiments: the Irish Guards and the Household Cavalry. Of course it is also Remembrance Day tomorrow, 11th November. Anyway, camouflage cakes:
Removed by original poster on 11/11/10 - 15:30:42 (GMT).

Sudzonic

Joined: December 07, 2007
KitMaker: 2,096 posts
Armorama: 1,983 posts

Posted: Thursday, November 11, 2010 - 03:37 AM UTC
My life just got made a lot easier
http://tracks-n-troops.eu/shop/index.php?main_page=product_info&cPath=14_10&products_id=5139
I found this when i was looking for something else but what a find! it will save a lot of scratch building and bad language..
http://tracks-n-troops.eu/shop/index.php?main_page=product_info&cPath=14_10&products_id=5139
I found this when i was looking for something else but what a find! it will save a lot of scratch building and bad language..
eremzet
Joined: September 10, 2010
KitMaker: 89 posts
Armorama: 87 posts
Posted: Thursday, November 11, 2010 - 04:03 AM UTC
Matthew, Jan, AJB - thanks a lot for comments on my Valentine. Really glad that you like it. In fact this is second model base in my life and it is far far away from beeing good even.
The sand - I've made it with sand for chinchillas (in Polish it is called "szynszyla" so it is very international animal I think : ) ), plaster and pigments. It is mixex all together and put leyer after leyer with wood glue and Mig's pigment fixer. The plaster I've used both kind - powder and big piceces crushed in fingers.
Matthew could you say something more regarding "toothpaste" method? It looks really good and seems to be perfect for my next project - DAK Opel Blitz.
 |

WEB HOSTING BY


Copyright ©2021 Armorama and Kitmaker Network, a subsidiary of Silver Star Enterprises
All Rights Reserved. Please read our Conditions of Use and Privacy Policy.
All Rights Reserved. Please read our Conditions of Use and Privacy Policy.