Armor/AFV: Axis - WWII
Armor and ground forces of the Axis forces during World War II.
Hosted by Darren Baker
Panzer 1 Ausf A Build Log
SDavies
Visit this Community
England - South East, United Kingdom
Joined: January 09, 2010
KitMaker: 979 posts
Armorama: 959 posts
Posted: Sunday, December 05, 2010 - 12:47 AM UTC
Hi All,

Lots of progress since last post. The biggest step forward was the mounting of the transmission. This was not easy. The transmission is connected to the foot pedals and the steering arms as welll as another mount to the right of the transmission. Making sure it all fitted well and gluing it into the tank was tricky and frustrating. Now that it's in, I glued on the brake fume extractor fan and have begun the process of lightly weathering the model.

For illustrative purposes, I have attached the floor access panels but have not glued them on.


The driver's compartment is nearly complete, however, there are a few key stages left. The main one being the construction and installation of the driver's seat.

I also have to add the signal flares to the hull and complete the weathering. The next major build wil be the installation of the engine. To be honest, since I have heavily modified this vehicle it's anyone's guess how easy the installation will be. After that it's all downhill really, only the installaton of the suspension, the building and soldering of the upper hull and the turret.

I was expecting to complete this build by Christmas, I now realise that was hoplessly optimistic.

Many thanks,

Steven
BBD468
Visit this Community
Texas, United States
Joined: March 08, 2010
KitMaker: 2,465 posts
Armorama: 2,383 posts
Posted: Sunday, December 05, 2010 - 04:06 AM UTC
Hi Steven,

the interior looks awsome! i have to ask if that is a dog hair in the second pic?
im just wondering because i have a rottweiler and a cat and i am constantly picking hair off my models and my paint jobs. looking forward to some more pz goodies from ya! nice job Steven.

Gary
SDavies
Visit this Community
England - South East, United Kingdom
Joined: January 09, 2010
KitMaker: 979 posts
Armorama: 959 posts
Posted: Sunday, December 05, 2010 - 04:49 AM UTC
Hi Gary,

Thanks for the comments. Its a cat hair, did not see it

S
jaberwaki
Visit this Community
Georgia, United States
Joined: September 29, 2010
KitMaker: 109 posts
Armorama: 97 posts
Posted: Sunday, December 05, 2010 - 05:13 AM UTC
looks great i cant wait to see more.
Nito74
Visit this Community
Lisboa, Portugal
Joined: March 04, 2008
KitMaker: 5,386 posts
Armorama: 4,727 posts
Posted: Monday, December 06, 2010 - 03:04 AM UTC
I've been following this one carefully.
i admire your patience .. with all those small details, a small panzer I from Dragon is already a headache , adding the Aber madness, I can only imagine ..

what color or wash did you use for the transmission ?

great work so far !!
SDavies
Visit this Community
England - South East, United Kingdom
Joined: January 09, 2010
KitMaker: 979 posts
Armorama: 959 posts
Posted: Monday, December 06, 2010 - 07:21 AM UTC
Hi All,

Thanks for the comments guys,

Nito74, I primed the transmission with Tamyia Surface Primer and then sprayed it X-1 Black. Then I began to add some MIG Enamel Brown wash in various degrees of concentration and finally a little Abt100 Faded Gray.

There are various interpretations of how the transmission is supposed to be coloured I assumed that it would be black, but you can see it painted in Dark yellow too.

Thanks

Ps currently building the drivers chair, its very hard.

Steven
SDavies
Visit this Community
England - South East, United Kingdom
Joined: January 09, 2010
KitMaker: 979 posts
Armorama: 959 posts
Posted: Tuesday, December 07, 2010 - 08:36 AM UTC
Hi All,

Quick post tonight to celebrate the completion of the Drivers Chair and here it is:


Aber provide resin parts for the chair but I decided to recreate them in brass, well by now what would you expect well it was challenging, trying to solder numerous small pieces together is hard enough but doing it while trying not to unsolder what you have just soldered is a recipie for frustration.

Well it looks good even if I say so myself.

Just one last thing a test fit................


It does not fit

Ahhhhhhhhhhhhhhhhhhhhhhhhh

This will require serious thought (Alcohol)

Nito74
Visit this Community
Lisboa, Portugal
Joined: March 04, 2008
KitMaker: 5,386 posts
Armorama: 4,727 posts
Posted: Tuesday, December 07, 2010 - 01:03 PM UTC
3 lemon-vodka coming up, sir !
BBD468
Visit this Community
Texas, United States
Joined: March 08, 2010
KitMaker: 2,465 posts
Armorama: 2,383 posts
Posted: Tuesday, December 07, 2010 - 03:39 PM UTC
Make it a double!

The seat looks incredible Steven! that sucks about the fit problem. what do you think your gonna do? good luck!

Gary
panzerdoc
Visit this Community
Alaska, United States
Joined: August 22, 2010
KitMaker: 147 posts
Armorama: 81 posts
Posted: Tuesday, December 07, 2010 - 05:07 PM UTC
Steven, this really looks great and the brass work is very impressive. What exactly is the fit problem? Sorry, I am not that familiar with this subject. Height of the chair or width?
SDavies
Visit this Community
England - South East, United Kingdom
Joined: January 09, 2010
KitMaker: 979 posts
Armorama: 959 posts
Posted: Tuesday, December 07, 2010 - 08:18 PM UTC

Quoted Text

Steven, this really looks great and the brass work is very impressive. What exactly is the fit problem? Sorry, I am not that familiar with this subject. Height of the chair or width?


Thanks for the comments. The problem is the width.

The base of the chair fits well inside the hull, the problem arose when I added the arms, its about 1mm too big.

I will have another look tonight, maybe if I get it at just the right angle it will fit otherwise I will have to think about another solution. Maybe if I remove the bolt detail?


guygantic
Visit this Community
Antwerpen, Belgium
Joined: August 19, 2006
KitMaker: 7,084 posts
Armorama: 970 posts
Posted: Wednesday, December 08, 2010 - 01:21 AM UTC
This is just crazy, but I like crazy !
Plasticbattle
#003
Visit this Community
Donegal, Ireland
Joined: May 14, 2002
KitMaker: 9,763 posts
Armorama: 7,444 posts
Posted: Wednesday, December 08, 2010 - 03:01 AM UTC
Hi Steven. Amazing work so far. Love what you did with the transmission. Looking forward to more!
panzerdoc
Visit this Community
Alaska, United States
Joined: August 22, 2010
KitMaker: 147 posts
Armorama: 81 posts
Posted: Wednesday, December 08, 2010 - 03:43 PM UTC
Steven,
I am looking through my references to see what this should look like so I can be more help. With the size of the resin seat cushions with respect to the frame, it doesn't seem like you have much room to rescale your frame and bolt work without remaking them. I realize that in a perfect world all of the model companies and aftermarket guys would make their kits EXACTLY to scale or at least make the AM stuff fit but for whatever reason they can't pull this off so I guess on occasion, we either have to cheat or start over. Your seat it gorgeous so if it were me, I would find a way to cheat!
SDavies
Visit this Community
England - South East, United Kingdom
Joined: January 09, 2010
KitMaker: 979 posts
Armorama: 959 posts
Posted: Wednesday, December 08, 2010 - 08:54 PM UTC
Hi Everybody,

Thanks for all the comments, Last night I can report that I successfully managed to install the drivers seat into position. I was considering the problem all yesterday evening and decided to try to install the seat at a different angle, after about 5 minutes it slid into place.

So I primed and painted the seat and re-installed it inplace. By the time I did all this it was 11.30pm so too late to photograph and update.

The problem stems from the Dragon conversion, the hull sides are slightly thicker than the Tristar kit, not much. If I was doing this project again I would sand back the hull sides by about 0.5mm.

I was considering that for my next Panzer 1 project I would actually build my own hull out of brass sheet and leave the model unpainted. I am getting to know the little tank rather well.

S
SDavies
Visit this Community
England - South East, United Kingdom
Joined: January 09, 2010
KitMaker: 979 posts
Armorama: 959 posts
Posted: Thursday, December 09, 2010 - 09:14 AM UTC
Hi All,

Not really any significant progress since last post, but I thought it worth while to show two pictures of the painted driver's chair in place in the model.

When installing the chair, I chipped paint off the brass of the transmission but I have repaired these chips and hopefully you won't be able to tell!

In the real Panzer 1, the Germans stowed a tool box (Werkzeugkasten1) under the driver's seat. It was always my intention to add this as well but since getting the seat in place was already complicated enough, I decided to leave it out. Not that you would be able to see it anyway.


I debated what colour to paint the chair and consulted all my reference books. In all the period pictures, the chair was made of black leather supported by a steel frame painted black, so I decided I had no choice but to follow this rather simplistic colour scheme. I guess I'm getting tired of painting everything either grey green, white and black and was looking for some variation. I guess interior design was not a high priority of German AFV designers.


Interestingly, I have discovered a rather large mistake with the Aber kit parts which I will fully explore in the next post. Hope I'm not being too cryptic!!

Thanks for looking,

Steven
panzerdoc
Visit this Community
Alaska, United States
Joined: August 22, 2010
KitMaker: 147 posts
Armorama: 81 posts
Posted: Thursday, December 09, 2010 - 12:31 PM UTC
Looks like a perfect fit to me. Nice work.
BBD468
Visit this Community
Texas, United States
Joined: March 08, 2010
KitMaker: 2,465 posts
Armorama: 2,383 posts
Posted: Thursday, December 09, 2010 - 04:09 PM UTC
Hey Steven,

looks spot on to me. great job! i admire your determination.

Gary
guygantic
Visit this Community
Antwerpen, Belgium
Joined: August 19, 2006
KitMaker: 7,084 posts
Armorama: 970 posts
Posted: Saturday, December 11, 2010 - 12:27 PM UTC

Quoted Text

Hey Steven,

looks spot on to me. great job! i admire your determination.

Gary


The same here ! Fabulous interior !
SDavies
Visit this Community
England - South East, United Kingdom
Joined: January 09, 2010
KitMaker: 979 posts
Armorama: 959 posts
Posted: Monday, December 13, 2010 - 08:29 AM UTC
Hi Everyone,

Thanks for the comments guys,

Quite a lot of progress since the last post.

I have almost completed the front portion of the hull, I have added the recognition flags and the spare MG barrel holder along with the step over the the drive shaft.

The Aber Kit parts depicting the signal flags are actually quite crude, I thought they were signal rockets at first. Its quite unusual seeing a German Panzer with signal flags, I guess that the concept of communication with radios was a new one and still not fully trusted so the flags were kept as a backup. I believe that they were deleted on the Panzer 1b.


So I decided to make my own flags and flag holders. The holders were quite easy to make, just brass tubing heated at one side and then worked while still red hot to get them into the right shape. The flags themselves are constructed from lead sheet glued to a brass wire and then wrapped around. actually it was quite easy to achieve. Painting ws straight forward, I have to admit that I am not sure that the colours are right so you may have to forgive me if they are not entirely historically accurate.


I stated in the last post that ABER had made a mistake with the floor of the Panzer 1a. I attach a reference picture from Panzertracts 1 to illustrate my point:


As you can see there are two further access hatches in the floor of the fighting compartment for access to a motor generator to recharge the radio batteries and a tool bag for the radio. These are missing from the ABER kit. Since the floor of the tank is complex enough they may have decided to leave these hatches out, this seems the most logical explanation since the tank is so accurately depicted in most other respects.

You can see from the first picture that I have begun work on the engine bay. The ABER kits do not provide any details for this section of the tank so I am scratchbuilding as I go. I have dry installed the fuel cells from the tristar kit and scratched the H frame that supports them in place.

The Engine is complex, even more so than the Transmission, but I am aiming to have as accurate depiction as possible, there will be of course more to follow.

Thanks for looking

Steven
BBD468
Visit this Community
Texas, United States
Joined: March 08, 2010
KitMaker: 2,465 posts
Armorama: 2,383 posts
Posted: Monday, December 13, 2010 - 09:18 AM UTC
Hi Steven,

the signal flags look sweet man! nice addition to the interior.

Gary
panzerdoc
Visit this Community
Alaska, United States
Joined: August 22, 2010
KitMaker: 147 posts
Armorama: 81 posts
Posted: Monday, December 13, 2010 - 11:39 AM UTC
This is great stuff and I really like the reference pics!
jaberwaki
Visit this Community
Georgia, United States
Joined: September 29, 2010
KitMaker: 109 posts
Armorama: 97 posts
Posted: Monday, December 13, 2010 - 04:21 PM UTC
it is turning into a masterpiece.
SDavies
Visit this Community
England - South East, United Kingdom
Joined: January 09, 2010
KitMaker: 979 posts
Armorama: 959 posts
Posted: Saturday, December 18, 2010 - 03:29 AM UTC
Hi All,

Thank you once again for your kind comments; they only encourage me further to redouble my efforts into this challenging project.

In my last post I made reference to the engine bay and it is there that we shall now turn.

I have added some bolt detail as well as the engine mount in the rear of the tank. The mount was made from brass sheet cut and folded into shape, I then used a hand drill to make the correct incisions.


I then turned to the fuel tanks, and the twin oil filters. Tristar do a fine job with the tanks however they need a little sanding down in order to eliminate the marks made from the injection moulding process. The oil filters are excellent and match well to reference pictures.

However there are several omissions and problems with the Tristar kit. First the oil filter mounts are simplistic and perhaps more seriously tristar ommit the filter lines completely. In addition I have found lots of other minor problems which I will address in future posts. This is not to say that I am unhappy with the Tristar Engine so far I would give it a solid 8/10.


(Please note in the last pic the Fuel tanks are not quite in place. The brass wire creates a certain amount of tension within the hull when connected together which will be cured when the fuel tanks are glued into the hull)

I began the build by constructing the H frame which sits between the fuel tanks and which will act as a frame for the radiator. I achieved this through cutting brass sheet into strips and folding them into the correct shape and soldering them together.

I then began to think about the oil filters. The Germans used two of them in the Panzer 1a and they were connected by pipes. I considered how best to recreate them and settled on using Brass wire and tubing. I started by drilling a hole in the filters and ran brass wire through them. I then created a 2x 3 way joints to connect the wires out of brass tubing soldered together. This took me three evenings to get right.

Once they were in place I created the fuel tank mounts out of spare brass and glued them in place on the tanks and attached the brass wiring to replicate the filter lines.


In the next two pictures I have photographed the fuel tanks out of the tank in order to illustrate the details a little better. I have also added some folded brass to the tanks to recreate the mounts to the hull on the real tank.

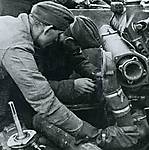
To illustrate the task that I have set myself I have reproduced below( with the kind permission of Mr Chris "toadman" Hughes) a picture of the Panzer 1a engine from Toadman's Tank Picture website. As you can see there is lots left to do !!!!


Thanks for looking

Steven
BBD468
Visit this Community
Texas, United States
Joined: March 08, 2010
KitMaker: 2,465 posts
Armorama: 2,383 posts
Posted: Saturday, December 18, 2010 - 04:33 AM UTC
Hi Steven,

every time i see one of your updates i smile and say wow this guy is good. thanks so much for sharing your hard work man.

Gary