

Very nice work on the PBV should look fantastic when its finished.
Great work on the figures Simon well done.
Campaigns
Where Armorama group builds can be discussed, organized, and updates posted.
Where Armorama group builds can be discussed, organized, and updates posted.
Hosted by Darren Baker, Richard S.
Winter Warriors campaign

Sudzonic

Joined: December 07, 2007
KitMaker: 2,096 posts
Armorama: 1,983 posts

Posted: Wednesday, January 19, 2011 - 03:42 AM UTC

mecanix

Joined: March 03, 2003
KitMaker: 201 posts
Armorama: 189 posts
Posted: Sunday, January 23, 2011 - 02:06 AM UTC
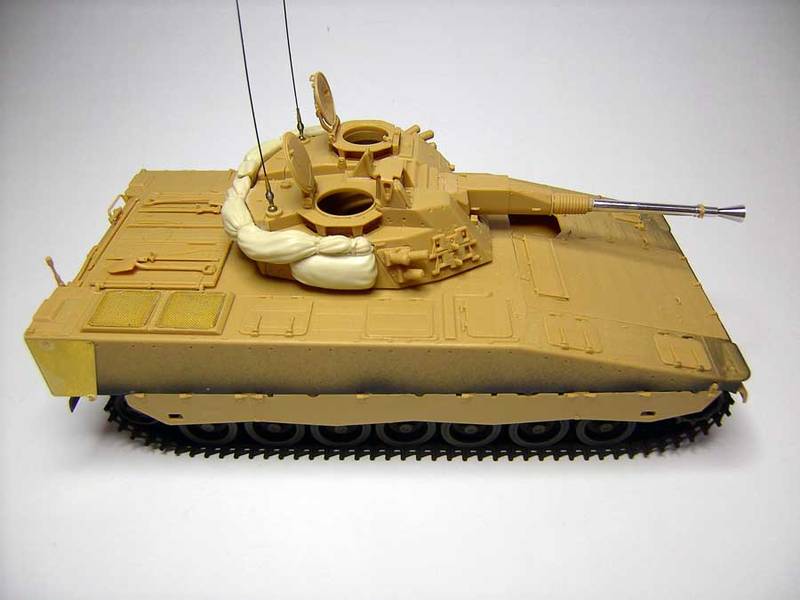
Still working to produce a complete body-shell, I had left the tricky curved side panels till last.So using a pair of small sissors,a post-it note and lots of Cellotape I filled and trimmed a sheet to fill the gap and fit between the existing panels and create a template..

Using the template I cut a couple of sheets to match and with the aid of a brush handle and some CA glue, both panels were rolled and shaped before being slotted into place.


The wheels and their (incorrect ) disk covers were only fitted to check the correct distance between the body and the running gear.They will need a fair bit of work later.


The hull is now roughly in shape and need a bit of sanding,gap filling and shaping before the next stage, adding the hull fittings hooks,handles and hatches.
Gary,Jeremy and Scott thank you for your kind words.
Paul I know what you mean but I found a couple of M730's hiding at the back so my single M548 was spared the ultimate sacrifice !!
I dont know if anybody has noticed but HobbyFan are now offering a rather good looking PbV 302 for about $140.
regards
Paddy
Using the template I cut a couple of sheets to match and with the aid of a brush handle and some CA glue, both panels were rolled and shaped before being slotted into place.
The wheels and their (incorrect ) disk covers were only fitted to check the correct distance between the body and the running gear.They will need a fair bit of work later.
The hull is now roughly in shape and need a bit of sanding,gap filling and shaping before the next stage, adding the hull fittings hooks,handles and hatches.
Gary,Jeremy and Scott thank you for your kind words.
Paul I know what you mean but I found a couple of M730's hiding at the back so my single M548 was spared the ultimate sacrifice !!
I dont know if anybody has noticed but HobbyFan are now offering a rather good looking PbV 302 for about $140.
regards
Paddy
Sudzonic
Joined: December 07, 2007
KitMaker: 2,096 posts
Armorama: 1,983 posts
Posted: Tuesday, January 25, 2011 - 12:36 AM UTC
More greatings from PE hell.

That pbv is looking fantastic well done.
That pbv is looking fantastic well done.
Sudzonic
Joined: December 07, 2007
KitMaker: 2,096 posts
Armorama: 1,983 posts
Posted: Tuesday, January 25, 2011 - 02:23 AM UTC
One more update for today guys.


meaty_hellhound

Joined: July 23, 2010
KitMaker: 786 posts
Armorama: 753 posts

Posted: Tuesday, January 25, 2011 - 04:19 AM UTC
nice paintwork on those winter figures Simon and killer scratchbuilding on the Pebba, that's going to be a one of a kind model once finished. i gave a huge chuckle at the "PE Hell" update... we've all had a vacation at that resort. kudos to all the hard work guys, bd.


vonHengest

Joined: June 29, 2010
KitMaker: 5,854 posts
Armorama: 4,817 posts

Posted: Tuesday, January 25, 2011 - 03:35 PM UTC
Yeah, I'm not sure I want to go back... 
I can't wait to see that PE armor in place on your Leopard 2 Scott
Simon: Those figures are really coming along!
Paddy: That's a bit expensive for me, I think I'll sit back and enjoy watching your scratchbuild come along
I can't wait to see that PE armor in place on your Leopard 2 Scott
Simon: Those figures are really coming along!
Paddy: That's a bit expensive for me, I think I'll sit back and enjoy watching your scratchbuild come along

BRAVO3

Joined: February 18, 2009
KitMaker: 148 posts
Armorama: 144 posts
Posted: Saturday, January 29, 2011 - 05:11 AM UTC
Time for an update...
The model is completed, painting can be started...
The model is completed, painting can be started...

ltb073
Joined: March 08, 2010
KitMaker: 3,662 posts
Armorama: 3,078 posts
Posted: Sunday, January 30, 2011 - 05:00 PM UTC
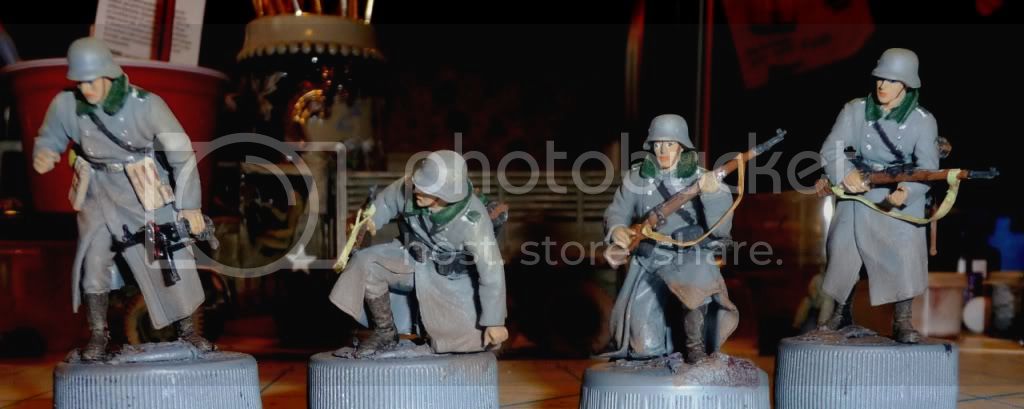
Steady but slow progress weapons were drying and these guy need some wash but thats about it

and there backs


and there backs


brynje

Joined: June 28, 2010
KitMaker: 176 posts
Armorama: 175 posts

Posted: Sunday, January 30, 2011 - 11:03 PM UTC
SAL
Your figs turned out good.. the washes will be the finishing touch ^^ Are you planning on a dio/vignette?
Your figs turned out good.. the washes will be the finishing touch ^^ Are you planning on a dio/vignette?

brynje
Joined: June 28, 2010
KitMaker: 176 posts
Armorama: 175 posts
Posted: Monday, January 31, 2011 - 11:28 AM UTC
Ok this is where im at. It looks like a MESS right now. But I guess that's how a "construction site" looks like 
I've build the groundwork in oasis, and I've started some of the trench. I thought about it and I came to the conclusion that it would be easiest to build the trench sides(the wooden parts) and then add the actual ground/mud afterwards, since it's easy to "sculp" in the oasis and make the walls.
There will be a guy sleeping in that little niche in the round trench and the path left of it will end up looking like the entrance to some kind of underground dugout.
I guess its hard for you guys to imagine how this will end up looking good haha. But I hope it will look good finished
The figure is just a random one I use for make stuff in the right scale. He will not be in the dio too cold for him^^


I've build the groundwork in oasis, and I've started some of the trench. I thought about it and I came to the conclusion that it would be easiest to build the trench sides(the wooden parts) and then add the actual ground/mud afterwards, since it's easy to "sculp" in the oasis and make the walls.
There will be a guy sleeping in that little niche in the round trench and the path left of it will end up looking like the entrance to some kind of underground dugout.
I guess its hard for you guys to imagine how this will end up looking good haha. But I hope it will look good finished
The figure is just a random one I use for make stuff in the right scale. He will not be in the dio
too cold for him^^meaty_hellhound
Joined: July 23, 2010
KitMaker: 786 posts
Armorama: 753 posts
Posted: Monday, January 31, 2011 - 12:50 PM UTC
that's a splendid base there Simon, i can already see how good it will turn out once everything is done. are you planning on adding homemade mud for the groundwork?
Sal, your figures are always improving... really nice to see them coming along. this is a super idea for a campaign, so many great projects to check out. cheers, bd.
Sal, your figures are always improving... really nice to see them coming along. this is a super idea for a campaign, so many great projects to check out. cheers, bd.
brynje
Joined: June 28, 2010
KitMaker: 176 posts
Armorama: 175 posts
Posted: Monday, January 31, 2011 - 05:22 PM UTC
Quoted Text
are you planning on adding homemade mud for the groundwork?
Yes . Polyfilla mixed with paint, small stones, grass, small roots. That's it I guess
and then add snow ofc.. I guess im using baking powder : )vonHengest
Joined: June 29, 2010
KitMaker: 5,854 posts
Armorama: 4,817 posts
Posted: Monday, January 31, 2011 - 05:34 PM UTC
I think everything of Sal's is improving, it's awesome to watch skills develop like that 
Simon: That actually looks way cool already (no pun intended). I can already see it coming together
Simon: That actually looks way cool already (no pun intended). I can already see it coming together
brynje
Joined: June 28, 2010
KitMaker: 176 posts
Armorama: 175 posts
Posted: Tuesday, February 01, 2011 - 12:19 AM UTC
Quoted Text
: That actually looks way cool already (no pun intended). I can already see it coming together
I hope that wasn't a reverse pun


ltb073
Joined: March 08, 2010
KitMaker: 3,662 posts
Armorama: 3,078 posts
Posted: Tuesday, February 01, 2011 - 01:41 AM UTC
Hi Guys thanks for the positive comments.
@ Simon your dio is as Jeremy said looking COOL I plan to use my guys in a dio as well they will be hiding out in a Mini Art Garage in the Urban Warfare Campaign, from a KV-1 that will be rumbling down the street
@ Simon your dio is as Jeremy said looking COOL
I plan to use my guys in a dio as well they will be hiding out in a Mini Art Garage in the Urban Warfare Campaign, from a KV-1 that will be rumbling down the street ltb073
Joined: March 08, 2010
KitMaker: 3,662 posts
Armorama: 3,078 posts
Posted: Wednesday, February 02, 2011 - 06:08 AM UTC
Ok Guys, I think they are finished. Here is what they are looking like
and their backs

Here they are posed inside of an unfinished Mini-Art church

Like I said before they will be hiding out inside of a Mini-Art ruined Garage in the Urban Warfare Campaign so I will wait to post in the gallery until then. Comments are always welcome as they help me improve
Thanks guys


and their backs

Here they are posed inside of an unfinished Mini-Art church

Like I said before they will be hiding out inside of a Mini-Art ruined Garage in the Urban Warfare Campaign so I will wait to post in the gallery until then. Comments are always welcome as they help me improve
Thanks guys
Sudzonic
Joined: December 07, 2007
KitMaker: 2,096 posts
Armorama: 1,983 posts
Posted: Wednesday, February 02, 2011 - 06:21 AM UTC
Nice work Sal and Simon. That dio is going to look very good.

GaryKato
Joined: December 06, 2004
KitMaker: 3,694 posts
Armorama: 2,693 posts

Posted: Saturday, February 12, 2011 - 06:22 AM UTC
Here is my idea for a ribbon.


VLADPANZER

Joined: December 20, 2010
KitMaker: 568 posts
Armorama: 549 posts
Posted: Saturday, February 12, 2011 - 07:08 AM UTC
Hi Scott,
I was just wondering if i can join this campaign, here is my project:
http://armorama.com/forums/168881&page=1
Thanks,
I was just wondering if i can join this campaign, here is my project:
http://armorama.com/forums/168881&page=1
Thanks,
brynje
Joined: June 28, 2010
KitMaker: 176 posts
Armorama: 175 posts
Posted: Saturday, February 12, 2011 - 12:11 PM UTC
Gary
that looks good maybe just another color for the border? It's a little techno.. maybe it's just me
that looks good
maybe just another color for the border? It's a little techno.. maybe it's just me meaty_hellhound
Joined: July 23, 2010
KitMaker: 786 posts
Armorama: 753 posts
Posted: Saturday, February 12, 2011 - 01:13 PM UTC
Gary, that's a cool ribbon. i can't help but ask if the barrel could be a carrot on a tank-shaped snowman? haha. bd.
GaryKato
Joined: December 06, 2004
KitMaker: 3,694 posts
Armorama: 2,693 posts
Posted: Saturday, February 12, 2011 - 03:05 PM UTC
Quoted Text
Gary
that looks good
I thought of light blue to keep with the cold theme. What color would you suggest? I'm not very good with color.
vonHengest
Joined: June 29, 2010
KitMaker: 5,854 posts
Armorama: 4,817 posts
Posted: Saturday, February 12, 2011 - 04:15 PM UTC
A light ice blue will work well Gary. Looking at the ribbon, I think it would look cool to turn the tank into a snowman tank and give it an orange gun in place of a carrot nose. It would fit in well with your skiing plane in the winter wonderland campaign
GaryKato
Joined: December 06, 2004
KitMaker: 3,694 posts
Armorama: 2,693 posts
Posted: Saturday, February 12, 2011 - 06:50 PM UTC


vonHengest
Joined: June 29, 2010
KitMaker: 5,854 posts
Armorama: 4,817 posts
Posted: Saturday, February 12, 2011 - 07:33 PM UTC
lol, I didn't even realize that Bruce had the same thoughts Guess there's more on my mind than I realized.. Anyways I like how the ribbons turned out Gary, I favor the contrast of the second one, but like the colors in the first better
Guess there's more on my mind than I realized.. Anyways I like how the ribbons turned out Gary, I favor the contrast of the second one, but like the colors in the first better |

WEB HOSTING BY


Copyright ©2021 Armorama and Kitmaker Network, a subsidiary of Silver Star Enterprises
All Rights Reserved. Please read our Conditions of Use and Privacy Policy.
All Rights Reserved. Please read our Conditions of Use and Privacy Policy.