New York, United States
Joined: March 08, 2010
KitMaker: 3,662 posts
Armorama: 3,078 posts
Posted: Tuesday, February 15, 2011 - 07:14 AM UTC
Active Campaigns on the bench:
Operation Fall Gelb - Pz.Kpfw. IV Ausf. C
Engineering the Future - M-26 Recovery Vehicle
115 Campaigns completed
Texas, United States
Joined: February 22, 2008
KitMaker: 5,026 posts
Armorama: 1,604 posts
Posted: Tuesday, February 15, 2011 - 07:26 AM UTC
Sal, thanks for the photos they have helped me with the suspension and bogies. Well the two troubles with pain meds are 1. modling on another level (sometimes not what you are looking for) 2. CONSTIPATION "Owwww!
Bob
If it aint broke dont fix it.
Texas, United States
Joined: June 29, 2010
KitMaker: 5,854 posts
Armorama: 4,817 posts
Posted: Tuesday, February 15, 2011 - 08:28 AM UTC
G &
Bob: Awesome Guys! I haven't seen much of the way in Dragon's Imperial kits, so I'm curious to see how the Pz III build progresses. No doubt you guys will both be finished in a month's time or so
 Sal
Sal: Wow, patience indeed! Let's keep our fingers crossed that things turn out alright.
Nevada, United States
Joined: December 21, 2008
KitMaker: 1,109 posts
Armorama: 1,095 posts
Posted: Tuesday, February 15, 2011 - 09:14 AM UTC
This isn't a bad kit, just old. You really see how Dragon came from this one to where they are now.
Sal we had more rain that month than we normally receive in a year. This area averages 4.5 inches a year, and in 48 hours we had a good 5 inches of rainfall.
I live way south in Henderson and about 900 feet above the valley floor. It's always 5 degrees cooler, and we get the rain first. Wouldn't trade it for anything

G
Lasci la pistola. Porti le cannoli.
Texas, United States
Joined: February 22, 2008
KitMaker: 5,026 posts
Armorama: 1,604 posts
Posted: Tuesday, February 15, 2011 - 12:51 PM UTC
I had to fill the gaps on both sides with some sheet card.


Bob
If it aint broke dont fix it.
North Carolina, United States
Joined: June 06, 2006
KitMaker: 4,691 posts
Armorama: 3,509 posts
Posted: Tuesday, February 15, 2011 - 02:00 PM UTC
Nice kit "G" looking forward to see your build.You know Bill Plunk did a nice blog for that kit on his website, very good you should check it out
Nevada, United States
Joined: December 21, 2008
KitMaker: 1,109 posts
Armorama: 1,095 posts
Posted: Wednesday, February 16, 2011 - 10:24 AM UTC
Anthony,
Thank You for the heads up ! I totally forgot about Wild Bill's build up and went there late last night. Thank goodness I did, 'cause I screwed some things up following the directions.
See what I get for reading the instructions?
G
Lasci la pistola. Porti le cannoli.
Minnesota, United States
Joined: October 01, 2008
KitMaker: 597 posts
Armorama: 439 posts
Posted: Wednesday, February 16, 2011 - 11:07 AM UTC
Instructions...Dragon should just call them "suggestions". Wait, I do that already with furniture. May explain why my coffee table is supported by the Yellow Pages...
I kid of course, but yeah, those Dragon instructions can be a bit... dodgy to say the least.
EWC(SW/AW) USN 1990-2005
IPMS #46275
Nevada, United States
Joined: December 21, 2008
KitMaker: 1,109 posts
Armorama: 1,095 posts
Posted: Wednesday, February 16, 2011 - 02:07 PM UTC
Quoted Text
Instructions...Dragon should just call them "suggestions". Wait, I do that already with furniture. May explain why my coffee table is supported by the Yellow Pages...
I kid of course, but yeah, those Dragon instructions can be a bit... dodgy to say the least.
Sir you are much more polite (PC) than I!

I used a few choice phrases from my past that even my wife hasn't heard.......
G
Lasci la pistola. Porti le cannoli.
Removed by original poster on 02/17/11 - 03:28:45 (GMT).
Illinois, United States
Joined: February 25, 2007
KitMaker: 55 posts
Armorama: 52 posts
Posted: Wednesday, February 16, 2011 - 03:34 PM UTC
OK, I have a college degree. I better be able upload a gosh-darn photo:

BINGO! Finally, I can get on to something easy... like building the darn thing.
Chicks dig guys who work in 1:35.
Texas, United States
Joined: June 29, 2010
KitMaker: 5,854 posts
Armorama: 4,817 posts
Posted: Wednesday, February 16, 2011 - 05:09 PM UTC
Steve: Awesome! At ease and enjoy a few good hours of modeling time

This is a great start everyone, I can feel the momentum

New York, United States
Joined: March 08, 2010
KitMaker: 3,662 posts
Armorama: 3,078 posts
Posted: Thursday, February 17, 2011 - 03:19 AM UTC
Active Campaigns on the bench:
Operation Fall Gelb - Pz.Kpfw. IV Ausf. C
Engineering the Future - M-26 Recovery Vehicle
115 Campaigns completed
Texas, United States
Joined: June 29, 2010
KitMaker: 5,854 posts
Armorama: 4,817 posts
Posted: Thursday, February 17, 2011 - 03:26 AM UTC
Enjoy some well earned rest Sal, and we'll be looking forward to your start on this project. Glad it finally arrived

Hawaii, United States
Joined: August 27, 2006
KitMaker: 1,646 posts
Armorama: 1,557 posts
Posted: Thursday, February 17, 2011 - 06:36 AM UTC
Aloha All,
Here is my start photo for this campaign.
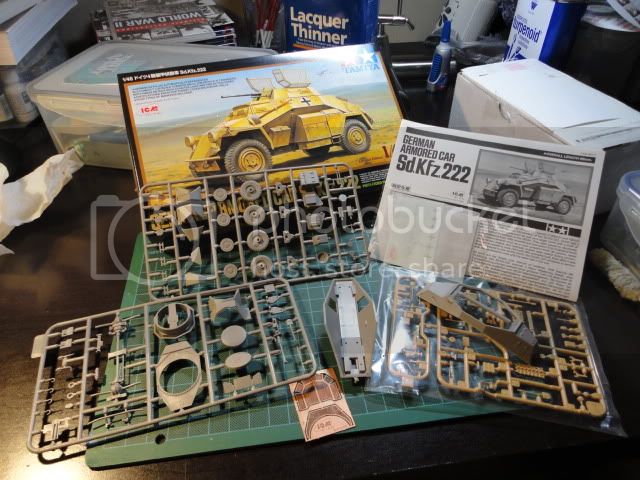
It's an ICM kit in a Tamiya Box. So far, lots of flash and other small kind clean up.
Happy Modelling, -zon

"Certainty of death.
Small chance of sucess.
What are we waiting for?"
-Gimli, Return of the King.
Texas, United States
Joined: February 22, 2008
KitMaker: 5,026 posts
Armorama: 1,604 posts
Posted: Thursday, February 17, 2011 - 06:55 AM UTC
Wow! lots of photos of some nice kits. Maybe the tank fairy

will visit me and leave some ot the ones that I have seen under my pillow tonight
.
Bob
If it aint broke dont fix it.
Nevada, United States
Joined: December 21, 2008
KitMaker: 1,109 posts
Armorama: 1,095 posts
Posted: Thursday, February 17, 2011 - 12:13 PM UTC
I want a DAK TigerI want a DAK TigerI want a DAK TigerI want a DAK Tiger
Sorry, dreaming.....................
Sal, only 17 hours? Ya wuss
Slowly making progress, more pics to come.
G
Lasci la pistola. Porti le cannoli.
California, United States
Joined: May 11, 2009
KitMaker: 128 posts
Armorama: 127 posts
Posted: Thursday, February 17, 2011 - 03:25 PM UTC
"In the absence of orders, go find something and kill it"
"I would rather he had given me one more division" in response to being promoted to Field Marshall.
Erwin Rommel
Texas, United States
Joined: June 29, 2010
KitMaker: 5,854 posts
Armorama: 4,817 posts
Posted: Thursday, February 17, 2011 - 04:01 PM UTC
Zon: That will be interesting, I've heard about those reboxed kits being sold under Tamiya but I've never seen one.
Ralph: Great to see some pics, I love both of those kits!
Nevada, United States
Joined: December 21, 2008
KitMaker: 1,109 posts
Armorama: 1,095 posts
Posted: Friday, February 18, 2011 - 02:11 PM UTC
Ralph I've built that Dragon PzIV already. I really enjoyed the kit and it went like a dream once I deciphered the instructions.
Keep us informed about the Opel, I'm eyeing that one too.
G
Lasci la pistola. Porti le cannoli.
California, United States
Joined: May 11, 2009
KitMaker: 128 posts
Armorama: 127 posts
Posted: Friday, February 18, 2011 - 04:04 PM UTC
Wayne;
I will have an update on the Blitz tomorrow, I made some progress the past couple of evenings. I'm completing in sections and painting as I go along. I will probaly weather the frame before I get to far with the body. Building the cab up now.
The only problem I have had so far is that the drive shaft seemed to be short, I used a piece of copper wire to extend it so it connected wuth the rear axel. I don't know if I some how switched the rear springs or something. But the center of the springs apear to be as such, no offset to front or rear.
Ralph
"In the absence of orders, go find something and kill it"
"I would rather he had given me one more division" in response to being promoted to Field Marshall.
Erwin Rommel
Illinois, United States
Joined: February 25, 2007
KitMaker: 55 posts
Armorama: 52 posts
Posted: Saturday, February 19, 2011 - 05:30 PM UTC
Nice start, everybody. I've got photos to upload of my Saturday night progress, and I will as soon as I find the %#^! USB cord to connect the camera to the computer. It's so nice of all of these electronics companies to make cords that are unique to their product. I found 17 cords and chargers, but not the one I needed.
It'll turn up.
The M13/40 is going together well. Tamiya doesn't fool around when it comes to a good fit. I'll be entering wheel-painting purgatory tomorrow. Of course, the guys doing Panzer IVs are scoffing at my task, I'm sure.
Good luck.
Chicks dig guys who work in 1:35.
Texas, United States
Joined: June 29, 2010
KitMaker: 5,854 posts
Armorama: 4,817 posts
Posted: Saturday, February 19, 2011 - 06:01 PM UTC
Ralph: Could you post a picture or two of the bottom of your Opel so we can see what's going on?
Steve: It's pretty bad, and I'm pretty sure they do it on purpose. The only difference between any of them is the shape of the connections where they plug into the devices. Looking forward to seeing some more pictures of your progress, and good luck on the wheels
California, United States
Joined: May 11, 2009
KitMaker: 128 posts
Armorama: 127 posts
Posted: Sunday, February 20, 2011 - 01:50 PM UTC
I discovered my problem with the short drive shaft, I had one of the rear springs backwards, the taller bracket goes toward the rear. I was able to make the correction without messing up things to bad. The directions were not exacytly clear.
Another thing, I was unable to use the gas tank due to not being able to fit the cab over it. I tried every way possible, the tank is too wide or the cab to narrow. You don't notice it as yoy can only tell if the truck is upside down. If you look at the frame under the seat, the opening is not wide enough for the wifith of the tank, You can't have the cab frame sit on the tank.
I am making progress despit the two problems.


"In the absence of orders, go find something and kill it"
"I would rather he had given me one more division" in response to being promoted to Field Marshall.
Erwin Rommel
Illinois, United States
Joined: February 25, 2007
KitMaker: 55 posts
Armorama: 52 posts
Posted: Sunday, February 20, 2011 - 02:01 PM UTC
OK, here we go:

Here are the beginnings of the wheels and the turret. My main concern here was not getting any glue on my fingers and messing up the surface of the tank.

Here's my first ever attempt at photo-etch. I had to superglue the crosshairs to the rest of the machine gun. Not too much trouble. This kit has a small sprue of PE, with no bending necessary, so my new Hold & Fold stayed in the box. I was strictly on glue duty, so the more intricate stuff will go for the next kit. At least I'm not afraid of the stuff anymore.

Just checking the hatch to make sure it will match up with the tanker's arm.

This is where I left off, with much of the body built except for the wheels and a few accessories. I'll prime it next using the Tamiya RLM Grey, as that's close to the gray-green that Italian tanks were painted coming off the assembly line, then apply the desert basecoat over that.

I have to highly recommend those Xuron PE snips (I think I read a review of them here) and I thought I'd include my Saturday night video inspiration, too.
Chicks dig guys who work in 1:35.


 @ Wayne last time I was I Vegas (Jan.2010) it rained for days on end


