AFV Club Churchill Mk IV with ITA Interior
England - East Anglia, United Kingdom
Joined: August 12, 2005
KitMaker: 14,499 posts
Armorama: 11,675 posts
Posted: Wednesday, October 26, 2011 - 03:01 AM UTC
Hi folks,
Well the final kit for the build arrived a few days ago:

Hopefully I can finish a few ongoing projects this week and get back to the build at the weekend. If this is an option for you then adding a filler for the whole length of the sponson as I did at the beginning is the way to go, as no additional plate comes with the set.


Al
'Action this Day'
Winston Spencer Churchill
England - East Anglia, United Kingdom
Joined: August 12, 2005
KitMaker: 14,499 posts
Armorama: 11,675 posts
Posted: Wednesday, November 02, 2011 - 11:27 PM UTC
Hi folks,
Eye of the experts please. Have I got these positioned correctly? I could only find two pics of this item, on one they look to be fixed with the bolt head facing forwards as I have done here and on the other it appears to be facing back

. Unfortunately the angle of the pictuers doesn't allow me to make more than a best guess.

Thanks
Al
'Action this Day'
Winston Spencer Churchill
England - East Anglia, United Kingdom
Joined: August 12, 2005
KitMaker: 14,499 posts
Armorama: 11,675 posts
Posted: Wednesday, November 23, 2011 - 11:24 AM UTC
Hi folks,
Well after a somewhat longer pause than I intended I got production underway this evening by making the replacement empty bin for the front LHS of the sponson. The kit provides both the original resin parts for some of the bins and the new PE options. This means that if I do a little scratch building as I go along I might well end up with the best part of a 2nd interiors!
PE is not a medium I am great at working with but the new replacement PE bins should fit the part nicely as I've settled on doing the kit as a production line vehicle which should allow much of the interior work to be dispalyed. Any parts not used can be incorporated into the next Churchill as I have many more of these planned for the future.
Some updates tomorrow - light permitting.
Cheers and apologies for the delay in getting on with this one.
Al

'Action this Day'
Winston Spencer Churchill
England - East Anglia, United Kingdom
Joined: August 12, 2005
KitMaker: 14,499 posts
Armorama: 11,675 posts
Posted: Wednesday, November 23, 2011 - 10:50 PM UTC
Hi folks,
A little work done. The PE Besa bin on the LHS is nicely done with shelves that slide in. There is a front cover with the Besa tin details scribed onto it and the tin handles were attached to various sides of the structure in order to bend over I assume. As I needed the empty shelving this was a reasonably easy piece to construct. If you solder then you'll get a terrific finish, a little mroe tricky with the silly glue.
I've made an empty stowage bin for the front of the LHS from .5mm plastic card leavng me a spare full bin for anothr project. The ammo rack on the RHS is again very nicely done, no groves to slide the insert shelves in thought so I used cocktail sticks to align these. You could happily load this bin up with a few rounds which would be pretty cool.
I found that the fit was a bit tight so shaved off some pastic from the inside top of the pannier to allow the bins to slide in more easilly. You'd be best to paint the inside of the bins before fitting, so it will be test fit, paint and fit.
The PE is good to work with, easy to remove and strong enough to stay in shape as you bend the sections.


Al
'Action this Day'
Winston Spencer Churchill
England - East Anglia, United Kingdom
Joined: August 12, 2005
KitMaker: 14,499 posts
Armorama: 11,675 posts
Posted: Wednesday, November 23, 2011 - 10:58 PM UTC
Other elements for the sides in this build include the fuel tanks. I did a review of the engine/transmission and tanks here:
Engine and Transmission 
Al
'Action this Day'
Winston Spencer Churchill
England - South West, United Kingdom
Joined: January 01, 2010
KitMaker: 717 posts
Armorama: 697 posts
Posted: Thursday, November 24, 2011 - 02:14 AM UTC
Very nice work indeed Al

With the fuel tanks, if you want to be super accurate, leave the seam from the cast block on the fuel tanks. The real tanks have a fine seam were the thin sheet metal their outer casing is made from is folded over and welded
Chris
England - East Anglia, United Kingdom
Joined: August 12, 2005
KitMaker: 14,499 posts
Armorama: 11,675 posts
Posted: Thursday, November 24, 2011 - 03:20 AM UTC
Hi Chris,
Thanks, too late
, they got a light file a while ago. I'm going to see if I can construct them with some piping!!. The upper one looks like it was supported by some kind of spring. from underneath and from the side tank.
The PE blanking plates ar excellent . I had to file the top a little to get a snug fit but a big improvement. Nice PE too.
Back to work.
Cheers
Al
'Action this Day'
Winston Spencer Churchill
England - East Anglia, United Kingdom
Joined: August 12, 2005
KitMaker: 14,499 posts
Armorama: 11,675 posts
Posted: Thursday, November 24, 2011 - 09:17 PM UTC
Hi folks,
I've added the small fitigns by thehatch entrance. These need bend into shape and a row of four small bolts added at the botton. I've alos test fitted the blanking plateswhich sit snug into the side of the pannier and added the outline shelving for the LHS storage area and the RHS battery box.


Just contemplating the best approach to fit the fuel storage tanks and what piping I might add in.
Al
'Action this Day'
Winston Spencer Churchill
England - South West, United Kingdom
Joined: January 01, 2010
KitMaker: 717 posts
Armorama: 697 posts
Posted: Friday, November 25, 2011 - 12:11 AM UTC
Nice work Al
The batteries should be black by the way. I always use a dark gray though so I can add shadow and 'pop' the detail later with a black wash
By the way, you are doing this as a MkIV yes? (rather than the MkIII option in the box)
If so the interior should be white
Chris
England - East Anglia, United Kingdom
Joined: August 12, 2005
KitMaker: 14,499 posts
Armorama: 11,675 posts
Posted: Friday, November 25, 2011 - 01:34 AM UTC
Hi Chris,
As a mk IV. BTW do you kow the distance of the breaks in the track runners? You mentioned production pictures which would be handy for reference?
Painting wise I was thinking part bare metal and part painted. I'm not sure at which point in production the vehciels would have been painted.
Hope to get a little more done this afternoon.
Cheers
Al
'Action this Day'
Winston Spencer Churchill
England - South West, United Kingdom
Joined: January 01, 2010
KitMaker: 717 posts
Armorama: 697 posts
Posted: Friday, November 25, 2011 - 02:47 AM UTC
Hi Al,
I've not been able to get to the scanner since that message, its not linked to this computer you see. I'll be able to do it tonight though
Its just occured to me though; I don't actually know what colour these things were primed!
As for the track runners, ones I've looked at on some at one place have sizeable breaks between them, 4 or 5 inches. However the MkVII at the IWM London has virtually no gaps, maybe a few mm
The sizeable gaps were on MkII and early MkIII Chassis. I would speculate that on the first ones they tried it out, but possibly found they caught debris etc in the gaps (I would think they would) and made them smaller. If I was you I'd go with just a slit cut into them with a razor saw.
If you want to go super detail, each section of track runner has three small welds on the inner side and two longer welds on the outer side holding it on
The sections of track runner appear to be in equal lengths, with five on each side of the run (so ten per sponson)
Chris
England - East Anglia, United Kingdom
Joined: August 12, 2005
KitMaker: 14,499 posts
Armorama: 11,675 posts
Posted: Friday, November 25, 2011 - 03:23 AM UTC
Thanks Chris,
I'll work out the gaps and adding the welds at this point would be good as this area will be exposed.
Cheers
Al
'Action this Day'
Winston Spencer Churchill
England - East Anglia, United Kingdom
Joined: August 12, 2005
KitMaker: 14,499 posts
Armorama: 11,675 posts
Posted: Wednesday, November 30, 2011 - 03:40 AM UTC
Hi folks,
Some work form last week on the fuel tanks and the RHS front stowage bin.

Al
'Action this Day'
Winston Spencer Churchill
British Columbia, Canada
Joined: June 06, 2008
KitMaker: 402 posts
Armorama: 393 posts
Posted: Friday, December 02, 2011 - 03:56 AM UTC
HI Alan, This is going to be lovely. Can I ask you where you purchased the interior and engine sets for the Churchill?
Thanks for sharing
Brad
England - East Anglia, United Kingdom
Joined: August 12, 2005
KitMaker: 14,499 posts
Armorama: 11,675 posts
Posted: Friday, December 02, 2011 - 04:08 AM UTC
Hi Bard,
Thanks, Chris from inside the Armour is the man to talk to regarding the conversion sets.
Here's a link to his site.
http://www.insidethearmour.com/ Cheers
Al
'Action this Day'
Winston Spencer Churchill
British Columbia, Canada
Joined: June 06, 2008
KitMaker: 402 posts
Armorama: 393 posts
Posted: Friday, December 02, 2011 - 12:15 PM UTC
Many thanks Al
Brad
England - South West, United Kingdom
Joined: January 01, 2010
KitMaker: 717 posts
Armorama: 697 posts
Posted: Friday, December 02, 2011 - 12:29 PM UTC
Al, I've just had a moment of cold sweaty fear !
There's something missing in the instructions: 6pdr stowage in the left pannier
The parts are on the fret with the stowage for the other side. I'll send you a new page for the instuctions
IF ANYONE WHO HAS THE KIT IS READING THIS PLEASE EMAIL ME ASAP FOR NEW INSTRUCTIONS
England - East Anglia, United Kingdom
Joined: August 12, 2005
KitMaker: 14,499 posts
Armorama: 11,675 posts
Posted: Sunday, December 04, 2011 - 10:57 PM UTC
Hi Chris,
No worries, thanks.
Al
'Action this Day'
Winston Spencer Churchill
England - East Anglia, United Kingdom
Joined: August 12, 2005
KitMaker: 14,499 posts
Armorama: 11,675 posts
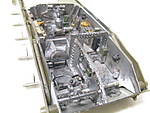
Posted: Friday, June 15, 2012 - 11:35 PM UTC
Hi folks,
The trouble with setting something aside whilst waiting on parts is that it's hard to pick up on it again. I finally cleared a bit of space to get back to work on this one.
LHS pannier should now be fully stocked with just the plate to secure once painted and the RHS isn't far behind either.


Cheers
Al
and a question. Would the radiators sit slightly proud of the panniers or within them?

Thanks
A
'Action this Day'
Winston Spencer Churchill
England - East Anglia, United Kingdom
Joined: August 12, 2005
KitMaker: 14,499 posts
Armorama: 11,675 posts
Posted: Saturday, June 16, 2012 - 04:21 AM UTC
Hi folks,
with the small handles for thye fuel lines attached.
Al

'Action this Day'
Winston Spencer Churchill
England - South West, United Kingdom
Joined: January 01, 2010
KitMaker: 717 posts
Armorama: 697 posts
Posted: Saturday, June 16, 2012 - 05:27 AM UTC
Quoted Text
and a question. Would the radiators sit slightly proud of the panniers or within them?
Thanks
A
Hi Al, nice progress! They should sit just within them. Careful though the radiator is upside down in your picture
Chris
CMOT
 Editor-in-Chief
England - South West, United Kingdom
Joined: May 14, 2006
KitMaker: 10,954 posts
Armorama: 8,571 posts
Posted: Saturday, June 16, 2012 - 06:32 AM UTC
Alan I am looking at this a bit late but I have a question ref the springs; I have seen a few complaints about installing them as they try to force the pieces apart, did you suffer this problem?
England - East Anglia, United Kingdom
Joined: August 12, 2005
KitMaker: 14,499 posts
Armorama: 11,675 posts
Posted: Saturday, June 16, 2012 - 06:34 AM UTC
Hi Chris,
Thanks, that helps.
Cheers
Al
'Action this Day'
Winston Spencer Churchill
England - East Anglia, United Kingdom
Joined: August 12, 2005
KitMaker: 14,499 posts
Armorama: 11,675 posts
Posted: Saturday, June 16, 2012 - 06:42 AM UTC
Hi Darren,
You do need to bind the sides together with elastic bands to make sure you get a good fit of the parts, until the glue dries. I think that is common given the make up of the bits.
I'm just test fitting the trasnmission. I had already fitted the exterior rings but found I needed to file off the internal detail to get a decent fit. If I were doing a transmission again I'd file or cut about 1mm off each of the outer rings which should solve the problem.
Cheers
Al
'Action this Day'
Winston Spencer Churchill
England - East Anglia, United Kingdom
Joined: August 12, 2005
KitMaker: 14,499 posts
Armorama: 11,675 posts
Posted: Saturday, June 16, 2012 - 07:10 AM UTC
Hi folks,
The transmission is very nicely done. My recommendation here would be as above, I had to file off some of the internal detail to get it to fit and the result of that is I've lost most of the spacing between the outer and inner rings. In the end it shouldn't be a problem as those will only be slightly seen.
I added to rounds so that I will have some play in the final setting when it comes to linking this up to the engine.


Al
'Action this Day'
Winston Spencer Churchill