AFV Club Churchill Mk IV with ITA Interior
England - East Anglia, United Kingdom
Joined: August 12, 2005
KitMaker: 14,499 posts
Armorama: 11,675 posts
Posted: Friday, July 08, 2011 - 05:39 AM UTC
Ah, I can see you are inspired and impressed by my factory production thought?

Al
'Action this Day'
Winston Spencer Churchill
England - South West, United Kingdom
Joined: January 01, 2010
KitMaker: 717 posts
Armorama: 697 posts
Posted: Friday, July 08, 2011 - 05:54 AM UTC
I think its a highly original fantastic idea!

I'm just waiting for you to get on with it Al
England - East Anglia, United Kingdom
Joined: August 12, 2005
KitMaker: 14,499 posts
Armorama: 11,675 posts
Posted: Friday, July 08, 2011 - 06:06 AM UTC
Hi Chris,
It would be a good way to show off the interior and a tribute to the workers who made them.
i used to live opposite Vauxhall's which closed down about 6/7 years ago now. The only remaining parts of the factory are the building used by the Chamber of Commerce and the bit that was being used by GM. It was a sad day for the Town as they had passed their 100 years of production and provided work for many both in the factory and as external suppliers. Life!.
I'be been finishing off my Crusader Gun Tractor and writing some articles for the site that I needed to get done so progress this week hasn't been as quick as I thought, but I shoudl get the wheels on this evening or tomorrow all being well.
I shall have to make some empty bins but I can used the originals as templates so that shouldn't be a problem. I'll need a good colour mix for unpainted steel though.
Al
'Action this Day'
Winston Spencer Churchill
England - South West, United Kingdom
Joined: January 01, 2010
KitMaker: 717 posts
Armorama: 697 posts
Posted: Friday, July 08, 2011 - 06:28 AM UTC
Hi Alan
I was just kidding
Mopst of the bins in the kit now come unstowed anyway, especially the besa bin in the left pannier which is now in etch with parts to make it look stowed if you wish, but can be left completely empty
You will need to make new front left bin and the front right bins, but all the ammo stowage is empty and designed to look just like the real thing when empty (complete with inner inserts) there are also a couple of turret parts that should be left empty. I have also included the rack for the radio this time, so you can leave this one without a radio, use the rack and it will look right
Vallejo's Model Colour Dark Steel is quite good. I use it thinned through the AB. Alternatively I use their Black Grey mixed with a little silver
Chris
England - East Anglia, United Kingdom
Joined: August 12, 2005
KitMaker: 14,499 posts
Armorama: 11,675 posts
Posted: Friday, July 08, 2011 - 06:32 AM UTC
Hi Chris,
Thanks. How are thing progressing on that other item we spoke of? That would be handy
Al
'Action this Day'
Winston Spencer Churchill
North Carolina, United States
Joined: March 27, 2005
KitMaker: 56 posts
Armorama: 49 posts
Posted: Friday, July 08, 2011 - 07:02 AM UTC
Joined: April 09, 2011
KitMaker: 181 posts
Armorama: 175 posts
Posted: Friday, July 08, 2011 - 11:35 AM UTC
How about doing it as a broken down vehicle, then you can finish and detail it as a completed tank, but then display it in say a fitters bay, having some repair work done, you sort off get the best of both worlds then
Just a thought, the assembly line idea is a cracking idea as well, would be very origonal, not many people display a tank comming off a production line.
England - East Anglia, United Kingdom
Joined: August 12, 2005
KitMaker: 14,499 posts
Armorama: 11,675 posts
Posted: Thursday, August 25, 2011 - 11:16 PM UTC
Hi Pete and Matt,
Sorry for the delayed response I had been considering both options neither of which I've settled on yet. Matt I know what you're thinking lol, lol, I had similar thoughts too.
I also got side tracked with some builds I wanted to finish but as I have a few days off work so hope to get back on track with the build whilst I continue to ponder the final outcome
.
More later.
Al

'Action this Day'
Winston Spencer Churchill
England - East Anglia, United Kingdom
Joined: August 12, 2005
KitMaker: 14,499 posts
Armorama: 11,675 posts
Posted: Friday, August 26, 2011 - 02:03 AM UTC
Hi folks,
Well joined up the wheel supports and whilst waiting for those to dry cleaned up some of the other fittings and made the drive wheels. The inside of Parts A1 and A3 have some pin marks you might want to remove or just simply be aware of. I scrapped them down to remind myself they exist although all the lower ones will be hidden some of the upper ones may show.


I hope to get the suspension finished this evening and then I'll then be able to start to add some of the interior parts.
Al
'Action this Day'
Winston Spencer Churchill

#011
Jerusalem, Israel
Joined: February 06, 2009
KitMaker: 1,507 posts
Armorama: 1,304 posts
Posted: Friday, August 26, 2011 - 05:30 AM UTC
fantastic build Allan, keep on sharing
George: "If we do happen to step on a mine, Sir, what do we do ?"
Blackadder: "Normal procedure, Lieutenant, is to jump 200 feet in the air and scatter oneself over a wide area."
England - East Anglia, United Kingdom
Joined: August 12, 2005
KitMaker: 14,499 posts
Armorama: 11,675 posts
Posted: Friday, August 26, 2011 - 08:26 AM UTC
Hi Matan,
Thanks for dropping in. Suspension units are not completed.


Cheers
Al
'Action this Day'
Winston Spencer Churchill
England - East Anglia, United Kingdom
Joined: August 12, 2005
KitMaker: 14,499 posts
Armorama: 11,675 posts
Posted: Sunday, August 28, 2011 - 01:27 AM UTC
Hi folks,
A bit more work.
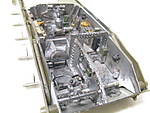
I added a plastic card floor to the side sponsons. The conversion kit comes with 2 nice brass fillers for the sides but these are only the length of the standard cnversion area ie up to the rear bulkhead in the fighting compartment. As I might add the engine and some additional details I thought it best to cover the whole area now.

I've added the drive wheels and surrounding framework and some time ago Chris sent me a couple of prototype front idler wheels. He has since gone on to produce the missing inserts in brass but given the finish I'm thinking on it seemed appropriate to try and utilise these in the build. Still a little clean up needed on the gaps.


I also spent some time yesterday cleaning up some of the resin parts. Hopefully next week will see some progres on the bins and items to stock up the side sponsons.
Al
'Action this Day'
Winston Spencer Churchill
Wisconsin, United States
Joined: April 05, 2007
KitMaker: 2,023 posts
Armorama: 1,234 posts
Posted: Sunday, August 28, 2011 - 05:20 AM UTC
Hi Alan,
I have a question for you. Yesterday, I started the MK.III AVRE and have finished step 2 of one of the sponsons and came across your build. Both you and Chris mentioned sanding down 0.6 MM of the suspension arms. Before I get too far along what parts are they ? BTW, thanks for sharing your build I am going to learn a lot following it and apply as much as I can to my build. Thanks again, Tom
On the bench :
A whole bunch of figures, Too many half built kits and a (gasp) wing thing
England - South West, United Kingdom
Joined: June 28, 2009
KitMaker: 340 posts
Armorama: 337 posts
Posted: Sunday, August 28, 2011 - 05:46 AM UTC
I think I can help there Ivan.
You need to shave that off from the top flats on part D5 - the pistons that hold the springs. (The ends that stick up inside the sponsons when completed.)
If you don't you won't get ITA's sponson floor to sit flush.
England - East Anglia, United Kingdom
Joined: August 12, 2005
KitMaker: 14,499 posts
Armorama: 11,675 posts
Posted: Sunday, August 28, 2011 - 06:30 AM UTC
Hi Ivan,
if you are building OOB and don't intend to add any interior structure then you don't need to do anything. The suspension was deisgned to flex.
If you're adding some form of interior in the sponsons then Ken's hit it on the head, you need to file them down to accept a top plate thus making the suspension static.
Cheers
Al
'Action this Day'
Winston Spencer Churchill
Wisconsin, United States
Joined: April 05, 2007
KitMaker: 2,023 posts
Armorama: 1,234 posts
Posted: Sunday, August 28, 2011 - 08:59 AM UTC
Thanks Ken & Al ! Then it's full speed ahead ! Al, please keep sharing !
Tom
On the bench :
A whole bunch of figures, Too many half built kits and a (gasp) wing thing
England - East Anglia, United Kingdom
Joined: August 12, 2005
KitMaker: 14,499 posts
Armorama: 11,675 posts
Posted: Wednesday, August 31, 2011 - 08:06 AM UTC
Hi folks,
Cleaned up the idler wheels and gave the suspension a coat of paint, much easier to do it now than later. Added in the mud scrapers, and the outer front and rear side hull parts.


Al
'Action this Day'
Winston Spencer Churchill
Joined: October 03, 2007
KitMaker: 1,388 posts
Armorama: 1,357 posts
Posted: Sunday, September 25, 2011 - 06:39 AM UTC
is there a U.S. supplier for the Inside The Armor resin castings and also Resicast products? I have two or three Churchill projects planned, and need to order these parts.
gary
England - East Anglia, United Kingdom
Joined: August 12, 2005
KitMaker: 14,499 posts
Armorama: 11,675 posts
Posted: Sunday, September 25, 2011 - 07:33 AM UTC
Hi Gary,
Contact Chris directly for ITA, you could do the same with Graham at Resicast. Sorry can't say about the suppliers US side.
Al
'Action this Day'
Winston Spencer Churchill
Joined: October 03, 2007
KitMaker: 1,388 posts
Armorama: 1,357 posts
Posted: Sunday, September 25, 2011 - 06:39 PM UTC
Quoted Text
Hi Gary,
Contact Chris directly for ITA, you could do the same with Graham at Resicast. Sorry can't say about the suppliers US side.
Al
I can do that. Just thought it might be easier with a local supplier.
gary
England - East Anglia, United Kingdom
Joined: August 12, 2005
KitMaker: 14,499 posts
Armorama: 11,675 posts
Posted: Sunday, September 25, 2011 - 11:35 PM UTC
Hi Gary,
Chris and Graham could probably tell you who their state side stockists are, but I might be just a cheap to buy direct, depends on the postage costs and exchange rates.
Good luck.
Al
Hi folks,
Builds on hold for a short while whilst ITA develop some new interesting internal elements!
Cheers
Al
'Action this Day'
Winston Spencer Churchill
Joel_W
 Associate Editor
New York, United States
Joined: December 04, 2010
KitMaker: 11,666 posts
Armorama: 1,143 posts
Posted: Monday, September 26, 2011 - 02:18 AM UTC
Alan, Being a relatively new armor builder (less then a year), I'm really not only learning quite a bit, but equally enjoying it as well. Looking forward to your continued updates.
On my Workbench:
Monogram 1/24 scale 427 Shelby Cobra
Just Completed:
Beemax 1/24 scale BMW M3 E30 1992 Evolution II
Yunnan, China / 简体
Joined: August 05, 2010
KitMaker: 449 posts
Armorama: 441 posts
Posted: Monday, September 26, 2011 - 03:23 AM UTC
Hi Alan
Complex and tedious work, but the result is always exciting. Look forward to more updates.
Cheers
Blackwater

England - East Anglia, United Kingdom
Joined: August 12, 2005
KitMaker: 14,499 posts
Armorama: 11,675 posts
Posted: Monday, September 26, 2011 - 03:51 AM UTC
Hi Joel and Blackwater,
Thanks for looking in. Builds been on hold for a few weeks, awaiting ITA developments and finishing off some other projects. Hope to kick start things again fairly soon.
Cheers
Al
'Action this Day'
Winston Spencer Churchill
England - East Anglia, United Kingdom
Joined: August 12, 2005
KitMaker: 14,499 posts
Armorama: 11,675 posts
Posted: Saturday, October 15, 2011 - 11:15 PM UTC
Hi folks,
You may be wondering why there has been such a long pause in the build. Well some things are worth waiting for:
https://armorama.kitmaker.net/news/9961 Things for Mr Churchill just keep getting better and better so hats off to Chris for these excellent developments. This will be so much fun to build. I had a lot of fun when I did the Mk III interior,

this new set has got to be the Dogs Bo----ks!
Al


'Action this Day'
Winston Spencer Churchill