Tamiya M4A3(75)W U.S. 3rd Armored Division
Ontario, Canada
Joined: February 04, 2009
KitMaker: 743 posts
Armorama: 549 posts
Posted: Friday, November 11, 2011 - 01:16 AM UTC
Hi Eddy,
Thanks for the endorsement. Much appreciated.
Please send a link to you panther build for the panther campaign I would like to see how things go for you.
All the best,
David.

http://ghmicro.wix.com/twis-first-cut

#135
California, United States
Joined: August 05, 2007
KitMaker: 1,501 posts
Armorama: 1,485 posts
Posted: Tuesday, November 15, 2011 - 06:30 PM UTC
@armour_dude –Dave,
Please excuse the long delay in replying back to you but I had been a little busy at my end. Dave, I would be honored to have you come over and take a look at my Panther build progress every now and then during the campaign. I will send you a message as soon as I begin my contribution build for the Panther Campaign. Listen, the campaign started this month and runs for 13 more months if your interested in enlisting in the campaign? It would be nice to see you join in on the fun!
I noticed that you also have an M4A3E8 build here too and I will also be following your progress on that build. I have yet to read through your build log but I’m sure I will post a comment when I finish.
~ Eddy

If you absolutely must have a city completely destroyed overnight . . . call the MARINES
Currently on the bench:
1:12 Bandia Star Wars K-2SO
1:35 Takom T-54B Late
Ontario, Canada
Joined: February 04, 2009
KitMaker: 743 posts
Armorama: 549 posts
Posted: Wednesday, November 16, 2011 - 01:03 AM UTC
Quoted Text
@armour_dude –Dave,
Please excuse the long delay in replying back to you but I had been a little busy at my end. Dave, I would be honored to have you come over and take a look at my Panther build progress every now and then during the campaign. I will send you a message as soon as I begin my contribution build for the Panther Campaign. Listen, the campaign started this month and runs for 13 more months if your interested in enlisting in the campaign? It would be nice to see you join in on the fun!
I noticed that you also have an M4A3E8 build here too and I will also be following your progress on that build. I have yet to read through your build log but I’m sure I will post a comment when I finish.
~ Eddy 
Hi Eddy,
Looking forward to seeing your panther. I have a panther that is partially done sitting on my bench. I didn't like the hard edge camo I did on it and after consulting with Panther expert Roddy McDougall I found out that for the tank I was doing I put on the smaller/earlier rear idler rather than the later/larger 655 mm idler which my tank was suppose to have. Since then I have ripped off the Magic tracks, removed the idler, ordered a new set from PanzerArt and repainted the tank in the basecoast of Dark Yellow. And thats where it is sitting at the moment. I would like to join the campaign but I would like to get my M4A3E8 finished first. Besides I don't think I can join the campaign with a partially finished panther.
Dave.
http://ghmicro.wix.com/twis-first-cut

#135
California, United States
Joined: August 05, 2007
KitMaker: 1,501 posts
Armorama: 1,485 posts
Posted: Wednesday, November 16, 2011 - 02:47 AM UTC
@armour_dude - Dave,
Yes, it would be nice to have you join in on the fun, but I do understand about finishing what's on the bench first. If you do manage some time it would be great to have someone like you post a build there as this campaign is geared more for leaving a detailed account of the build to help others wishing to pursue a similar Panther build. Also part of the emphases is to take the builds posted and turn them into a feature . . . better explained on the first few pages of the campaign postings. And yes, it would have to be a new build!
Anyhow, thanks again for the speedy reply. Keep this Sherman coming!
~ Eddy

If you absolutely must have a city completely destroyed overnight . . . call the MARINES
Currently on the bench:
1:12 Bandia Star Wars K-2SO
1:35 Takom T-54B Late
United States
Joined: November 17, 2011
KitMaker: 5 posts
Armorama: 2 posts
Posted: Friday, November 18, 2011 - 02:38 PM UTC
Great looking Sherman! Excellent paint job!
Ontario, Canada
Joined: February 04, 2009
KitMaker: 743 posts
Armorama: 549 posts
Posted: Sunday, November 20, 2011 - 01:31 AM UTC
Justin
Thanks very much for having a look and taking the time to comment.
Cheers,
David.
http://ghmicro.wix.com/twis-first-cut

#045
South Carolina, United States
Joined: September 23, 2005
KitMaker: 362 posts
Armorama: 350 posts
Posted: Tuesday, November 22, 2011 - 02:13 PM UTC
Hey Dave!
Sorry I missed this build log....holy cow I LOVE this Sherman. I just might might have to steal this idea. Looking forward to see this baby all weathered up and ready to go!
Keep up the great work!
Eric
Eric Rains
Greenwood, SC, USA
Ontario, Canada
Joined: February 04, 2009
KitMaker: 743 posts
Armorama: 549 posts
Posted: Wednesday, November 23, 2011 - 01:27 PM UTC
Thanks Eric,
Thought I would take a stab and one of the other M4A3's on the shelf.
Glad you like it.
Cheers,
Dave.
http://ghmicro.wix.com/twis-first-cut
Ontario, Canada
Joined: February 04, 2009
KitMaker: 743 posts
Armorama: 549 posts
Posted: Thursday, May 10, 2012 - 10:17 PM UTC
Well,
What can I say it's been a super long time since I updated my build log here. My apologies for that.
I had been working on getting my M4A3E8 build log completed and had also been working on my Ardennes Panther and wanting to get that one finished as well. Good news is I am nearing the finishing line on the Panther which has now allowed me to turn my attention to getting this M4A3 completed.
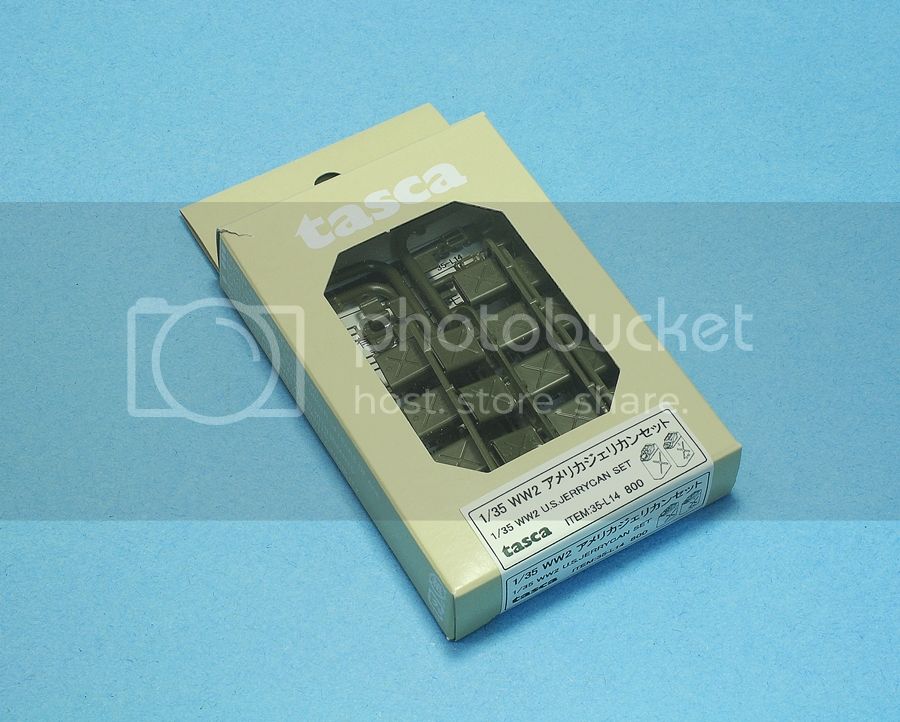
In anticipation of moving forward once again on this project I decided to purchase as set of Tasca U.S. Jerry Cans to go with the Tank. These Jerry cans are in my opinion the best ones available in Styrene and I would think in resin too. Tasca often gives you 1 or 2 of each water and gas can in their armour kits but for this project I wanted to load up the rear of the tank with them hence the purchase of this item.
Russ Arnott here on Armorama did a review of them which you can see here.
http://armorama.kitmaker.net/review/4342Here's a shot of them. More updates soon.
Cheers,
Dave.

http://ghmicro.wix.com/twis-first-cut
Ontario, Canada
Joined: February 04, 2009
KitMaker: 743 posts
Armorama: 549 posts
Posted: Monday, May 14, 2012 - 05:22 AM UTC
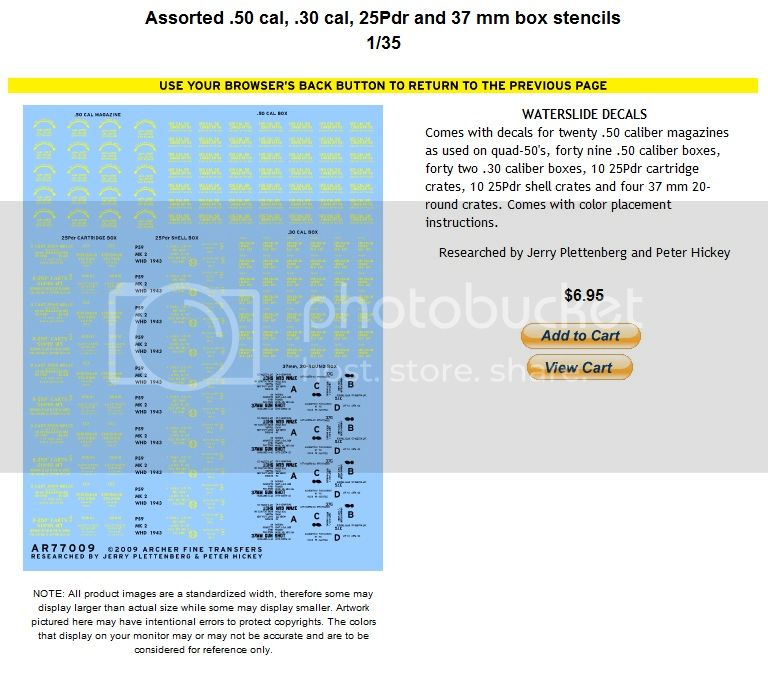
Also, ordered these Ammo Box decals from Archer.

http://ghmicro.wix.com/twis-first-cut
Ontario, Canada
Joined: February 04, 2009
KitMaker: 743 posts
Armorama: 549 posts
Posted: Wednesday, May 30, 2012 - 02:30 AM UTC
Okay guys,
Now that I am feeling better I got some time in on my U.S. 3rd Armoured Division M4A3. I spent an evening getting a good wash on her and I think it turned out well but let me know what you think.
I wanted to go a bit heavier on the wash than I normally do as this tank is suppose represent a tank that has been in the field for some time and has been subjected to the early spring weather in Germany which was probably rainy. The setting is Cologne March, 1945. For my base wash I used Windsor and Newton Raw Umber mostly with the patting technique.
Next up I will add some stowage on the rear of the tank and a number of musette bags on the turret sides which was common on 3rd AD tanks. I will also add more weathering.


]


http://ghmicro.wix.com/twis-first-cut
Texas, United States
Joined: March 08, 2010
KitMaker: 2,465 posts
Armorama: 2,383 posts
Posted: Wednesday, May 30, 2012 - 03:25 AM UTC
Dave, that is an awsome looking Sherman. I really like the stowed away 50cal. looking forward to the stowage. Well done!

Gary

Indiana, United States
Joined: June 10, 2005
KitMaker: 6,188 posts
Armorama: 5,960 posts
Posted: Wednesday, May 30, 2012 - 03:46 AM UTC
Oh Dave, what an awesome looking Sherman this turned out to be!
I really like the Sand Shield Strip work ... the welding looks real and well, just about everything else for that matter!
I don't know how long it's been but I feel another Sherman Campaign is needed and overdue as well. I served in one and had to bail on one, so keep it in mind!!

~ Jeff
Ohio, United States
Joined: August 12, 2010
KitMaker: 731 posts
Armorama: 711 posts
Posted: Wednesday, May 30, 2012 - 11:06 AM UTC
Hi Dave,
I think that thing looks absolutely fantastic! Weathering is right on the money. Will look even better once all the gear is installed.
Joined: September 19, 2007
KitMaker: 81 posts
Armorama: 36 posts
Posted: Wednesday, May 30, 2012 - 11:48 AM UTC
fantastic work, very realistic. thank you for sharing.

Ontario, Canada
Joined: February 04, 2009
KitMaker: 743 posts
Armorama: 549 posts
Posted: Wednesday, May 30, 2012 - 12:46 PM UTC
"Dave, that is an awsome looking Sherman. I really like the stowed away 50cal. looking forward to the stowage. Well done! "
Hey Gary,
Thanks for checking in and having a look. Glad to see you back int the saddle again with your Greif. Makes me itching to do a 250 that I have in the stash after seeing your work.
Cheers,
Dave.
http://ghmicro.wix.com/twis-first-cut
Ontario, Canada
Joined: February 04, 2009
KitMaker: 743 posts
Armorama: 549 posts
Posted: Wednesday, May 30, 2012 - 12:50 PM UTC
Quoted Text
Oh Dave, what an awesome looking Sherman this turned out to be!
I really like the Sand Shield Strip work ... the welding looks real and well, just about everything else for that matter!
I don't know how long it's been but I feel another Sherman Campaign is needed and overdue as well. I served in one and had to bail on one, so keep it in mind!! 
~ Jeff

Jeff,
Thanks a bunch. Glad you like the progress so far. I will definitely keep the campaign in mind. Never did one before but will keep in mind for sure.
http://ghmicro.wix.com/twis-first-cut
Ontario, Canada
Joined: February 04, 2009
KitMaker: 743 posts
Armorama: 549 posts
Posted: Wednesday, May 30, 2012 - 12:55 PM UTC
Quoted Text
Hi Dave,
I think that thing looks absolutely fantastic! Weathering is right on the money. Will look even better once all the gear is installed.
Hey John,
Thanks for checking back in. Not bad looking for an old girl eh? It took some effort to get this Old (by today's standards) kit up to snuff but with time and effort these Tamiya kits can look just as good as a Tasca or DML kit.

http://ghmicro.wix.com/twis-first-cut
Ontario, Canada
Joined: February 04, 2009
KitMaker: 743 posts
Armorama: 549 posts
Posted: Wednesday, May 30, 2012 - 01:00 PM UTC
Quoted Text
fantastic work, very realistic. thank you for sharing. 
Hi Rob,
Thank you very much for having a look at the build and taking the time to post your comments. It is very much appreciated.
Regards,
David.
http://ghmicro.wix.com/twis-first-cut
Ontario, Canada
Joined: October 17, 2002
KitMaker: 448 posts
Armorama: 306 posts
Posted: Saturday, June 02, 2012 - 04:08 AM UTC
Quoted Text
For my base wash I used Windsor and Newton Raw Umber mostly with the patting technique.
Sorry if this is a silly question, but what is the patting technique?
Inspiring work!
Cheers
Jeff
Go Green! Go White!
On the bench
1/32 BF-109 G-6
1/24 1968 Dodge Dart
Ontario, Canada
Joined: August 15, 2006
KitMaker: 282 posts
Armorama: 229 posts
Posted: Saturday, June 02, 2012 - 04:56 AM UTC
Hello Dave,
Great work on this kit. The colour modulation and weathering is very well done, as is the attention to detail.
Regards,
Garth
' Should Hitler decide to invade Hell, I would at least make favourable reference to the Devil in the House of Commons' - Winston Churchill
Luzon, Philippines
Joined: May 15, 2004
KitMaker: 1,086 posts
Armorama: 783 posts
Posted: Saturday, June 02, 2012 - 05:13 AM UTC
nice build and MG stowage..i often wonder what or how they're use.. thanks.
Ontario, Canada
Joined: February 04, 2009
KitMaker: 743 posts
Armorama: 549 posts
Posted: Saturday, June 02, 2012 - 10:52 AM UTC
Quoted Text
Quoted Text
For my base wash I used Windsor and Newton Raw Umber mostly with the patting technique.
Sorry if this is a silly question, but what is the patting technique?
Inspiring work!
Cheers
HI Jeff,
Thanks for having a look and commenting on the build.
The patting techniques is where you paint on a thinned layer of the wash then with a clean cloth(make sure it does not shed fibers; an old t-shirt is good) you pat the washed area until there is only a bit left on the model. You have have to use thumb and forefinger with the forefinger wrapped in the cloth. You cannot wipe just pat. Bob Letterman, master modeler uses this technique. I borrowed it from him.
Jeff

http://ghmicro.wix.com/twis-first-cut
Ontario, Canada
Joined: February 04, 2009
KitMaker: 743 posts
Armorama: 549 posts
Posted: Saturday, June 02, 2012 - 09:39 PM UTC
Quoted Text
Hello Dave,
Great work on this kit. The colour modulation and weathering is very well done, as is the attention to detail.
Regards,
Garth
Hey Garth,
Thanks a bunch for having a look at my build. It is coming along nicely. Just got to get some stowage on it now.
Cheers,
Dave.
http://ghmicro.wix.com/twis-first-cut

#023
Zurich, Switzerland
Joined: March 13, 2009
KitMaker: 2,058 posts
Armorama: 1,656 posts
Posted: Saturday, June 02, 2012 - 11:33 PM UTC
Dave, great work! Really like what you've done with the old Tamiya kit. Shows again what can be done with it.
Cheers!
Stefan
Too many models - too little time...


 ]
]


