Texas, United States
Joined: March 17, 2006
KitMaker: 1,117 posts
Armorama: 1,115 posts
Posted: Wednesday, April 11, 2012 - 05:22 PM UTC
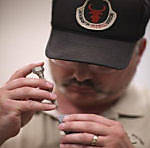
Here is just a quick update. I've begun some of the paint chipping on the turret would like to get some input before I go too far with it.


On the workbench:
T-62M
ZTZ 99 MBT
Lav-25A2 with MILES Gear
M7 Priest X2
Milano, Italy
Joined: July 13, 2010
KitMaker: 3,845 posts
Armorama: 3,543 posts
Posted: Wednesday, April 11, 2012 - 05:24 PM UTC
Wow dudes, these are great works! I really like also your "Eastern wreckages diorama"
Congrats indeed and many thanks for sharing your "ground recipe"
Update: How did you made that very convincing chipping job?
Cheers
...well in my opinion T-55 isn' t just a tank. Actually it is THE TANK...
Texas, United States
Joined: March 17, 2006
KitMaker: 1,117 posts
Armorama: 1,115 posts
Posted: Wednesday, April 11, 2012 - 05:34 PM UTC
Thanks Mauro

The wreckage dio is from the first chechan war with some russian tropps chat it up with some locals, have a hot cup of coffee or tea.
The chipping was done with vallejo US dark green with a tad bit of thinner added to it. A good steady hand and a 18/0 paintbrush.
Cheers
On the workbench:
T-62M
ZTZ 99 MBT
Lav-25A2 with MILES Gear
M7 Priest X2
Milano, Italy
Joined: July 13, 2010
KitMaker: 3,845 posts
Armorama: 3,543 posts
Posted: Wednesday, April 11, 2012 - 06:37 PM UTC
Quoted Text
Thanks Mauro
The wreckage dio is from the first chechan war with some russian tropps chat it up with some locals, have a hot cup of coffee or tea.
The chipping was done with vallejo US dark green with a tad bit of thinner added to it. A good steady hand and a 18/0 paintbrush.
Cheers
18/0?...Wow! Where did you find that tiny brush?
...well in my opinion T-55 isn' t just a tank. Actually it is THE TANK...
Austria
Joined: May 01, 2007
KitMaker: 608 posts
Armorama: 593 posts
Posted: Wednesday, April 11, 2012 - 08:41 PM UTC
Wow, what a nice chipping result so far!
Andreas

As long as there are humans there are problems. No humans no problems!

#284
Northern Ireland, United Kingdom
Joined: October 04, 2006
KitMaker: 3,094 posts
Armorama: 2,942 posts
Posted: Wednesday, April 11, 2012 - 10:17 PM UTC
That groundwork mix is really effective, I'll have to give the kitty litter a try at some point. That Chechnya dio is also very interesting- keep us updated on that if you get the time!!
I like the chipping too and as Mauro asked, where did you get an 18/0 brush?
On The Bench:
Ethiopian BMP-1 (Trumpeter 1/35)
AMX-13/75 (Takom 1/35)
Texas, United States
Joined: March 17, 2006
KitMaker: 1,117 posts
Armorama: 1,115 posts
Posted: Thursday, April 12, 2012 - 03:01 AM UTC
Thanks everyone for the great comments.
The paintbrush I believe I got at our hobby lobby here in town. I went there last week to get a few things, but their sellection has turned to crap

The store is mostly into old lady knitting stuff and weird nit nacks. Beyond that I have no clue where to buy new brushes other than online. I like to look at the tips before I buy them to make sure their in good shape, but I guess I'm between a rock and a hard place.
It's going to take me awhile to finish up the chipping as I plan to doing a little bit at a time. I don't want to over do it and ruin the paint job.
Cheers
On the workbench:
T-62M
ZTZ 99 MBT
Lav-25A2 with MILES Gear
M7 Priest X2
Texas, United States
Joined: March 17, 2006
KitMaker: 1,117 posts
Armorama: 1,115 posts
Posted: Thursday, April 12, 2012 - 03:08 AM UTC
On the workbench:
T-62M
ZTZ 99 MBT
Lav-25A2 with MILES Gear
M7 Priest X2
Texas, United States
Joined: March 08, 2010
KitMaker: 2,465 posts
Armorama: 2,383 posts
Posted: Thursday, April 12, 2012 - 03:39 AM UTC
Hey Christopher,
The chipping looks great!

Whats with the Hobby Lobby's, the two that are in my area are going to sh*t as well. I have purchased in the past more than 75% of my brushes there, not any more! I have a Michaels craft store down the street but its not much better and its more expensive. Now i have to go to Hobby Town USA to get decent paint brushes and its nearly 30 minutes away. Antways, the T-62 is looking amazing and im ready for more.

Gary
Minnesota, United States
Joined: March 04, 2003
KitMaker: 4,630 posts
Armorama: 4,498 posts
Posted: Thursday, April 12, 2012 - 09:30 AM UTC
Buy good cheap brushes from dick blick online. They are mail order, so you cannot see them first hand, but you can find good deals on good brushes. There are other good places online as well like cheapjoes.com ... Don't be afraid to buy online when the local stores decide to decline service.
Ex-34th ID MNANG - 13F and 63D
"Fire For Effect."
Ankara, Turkey / Türkçe
Joined: April 28, 2011
KitMaker: 434 posts
Armorama: 409 posts
Posted: Thursday, April 12, 2012 - 09:58 AM UTC
Awesome!!
This is one of the most realistic chippings that I've ever seen, a fine proof of "one can make a good chipping without hairspray"..
Any tutorial??

CC
On the bench:
T-72M4CZ
T-90
M60A3 TTS
England - East Anglia, United Kingdom
Joined: October 09, 2005
KitMaker: 2,556 posts
Armorama: 2,199 posts
Posted: Thursday, April 12, 2012 - 11:10 AM UTC
I've failed to keep up with this the past couple of days Chris (study is getting in the way of things!) But wow, this is looking awesome, the paint work so far is just superb, chipping looks perfect. This is going to look a real beauty once finished on the base.
'As all else failed we raised our fists and weapons,
Not born as soldiers, but driven to the end'
Texas, United States
Joined: March 17, 2006
KitMaker: 1,117 posts
Armorama: 1,115 posts
Posted: Thursday, April 12, 2012 - 02:21 PM UTC
Wow thanks everyone, glad you all like the work so far. I wasnt sure if the chipping would turn out just right or not. I dont want to go too overboard with it, but I want it to be weather beaten since most tanks in the desert go though a lot during their service life.
Cagkan Ill have to see about doing a tutorial. Right now my battery for the camera is recharging and Im not sure how to post videos on this website.
Gary I know how you feel buddy. The nearest hobby shop for me is an hour away, and I try to stay far away from them as I can. Their staff sucks, model selection is low ( mostly RC stuff their), and their prices are too high for my taste.
Thanks Jacques, I have to check out those websites. I dont have much choices around here, you figure for the size of Houston we would have more shops, but none in driving distance.
Well here is just a very quick update. Ive finish building the frame for the base today. It all starts with ½x3 popular wood cut to length. Ive glued and nail square wood strips to the inside of the frame that acts as a ledge for the base to site on. Ive also use some polymer injected molding around the frame. Tomorrow I will go back and paint and seal everything in with a high gloss clear coat.


On the workbench:
T-62M
ZTZ 99 MBT
Lav-25A2 with MILES Gear
M7 Priest X2
Texas, United States
Joined: March 08, 2010
KitMaker: 2,465 posts
Armorama: 2,383 posts
Posted: Thursday, April 12, 2012 - 02:43 PM UTC
Christopher,
Once again, LOVE IT!
Do you mean popular or poplar wood?
Just trying to get the right notes. Do you have wood working tools on hand or did you have it cut to lenght at the lumber store? I have a Lowes around the corner but no wood working tools. Really looks great Chris!
Gary
Texas, United States
Joined: March 17, 2006
KitMaker: 1,117 posts
Armorama: 1,115 posts
Posted: Thursday, April 12, 2012 - 03:07 PM UTC
Sorry Gary that was a typo, ment poplar. Yes a full garage of tools that me and my dad have collected over the years. Band saw, table saw, mitter saw, drill press, planer, joiner, etc etc etc. The only thing I don't have is a lathe, sure would love to have one, how many time I could have turned my own metal barrels.
Chris
On the workbench:
T-62M
ZTZ 99 MBT
Lav-25A2 with MILES Gear
M7 Priest X2
Texas, United States
Joined: March 08, 2010
KitMaker: 2,465 posts
Armorama: 2,383 posts
Posted: Thursday, April 12, 2012 - 03:13 PM UTC
Quoted Text
Sorry Gary that was a typo, ment poplar. Yes a full garage of tools that me and my dad have collected over the years. Band saw, table saw, mitter saw, drill press, planer, joiner, etc etc etc. The only thing I don't have is a lathe, sure would love to have one, how many time I could have turned my own metal barrels.
Chris
Chris, you start turning your own metal barrels some day, ill be your first customer!
Gary
Texas, United States
Joined: March 17, 2006
KitMaker: 1,117 posts
Armorama: 1,115 posts
Posted: Friday, April 13, 2012 - 12:34 PM UTC
On the workbench:
T-62M
ZTZ 99 MBT
Lav-25A2 with MILES Gear
M7 Priest X2
Texas, United States
Joined: March 08, 2010
KitMaker: 2,465 posts
Armorama: 2,383 posts
Posted: Friday, April 13, 2012 - 12:55 PM UTC
Just gets better and better! Beautiful work Chris!!!
Gary
Texas, United States
Joined: March 17, 2006
KitMaker: 1,117 posts
Armorama: 1,115 posts
Posted: Friday, April 13, 2012 - 06:13 PM UTC
Quick update, Ive added some creature comfort for the tank crew within the dugout they would have made. Ive made a bed mattress , some blankets, and pillows thrown onto the ground to make life somewhat more bearable. Once everything hardens, I can remove it and begin painting.


Here are the basic stuff I like to use when making traps and blankets from putty. Everyday household ceramic floor tile, baking powder (instead of talcum), two part apoxie sculpt, and good old exacto knife handle.

On the workbench:
T-62M
ZTZ 99 MBT
Lav-25A2 with MILES Gear
M7 Priest X2
Milano, Italy
Joined: July 13, 2010
KitMaker: 3,845 posts
Armorama: 3,543 posts
Posted: Friday, April 13, 2012 - 06:23 PM UTC
Many thanks for the advice about the brush
The diorama is simply awesome!
...well in my opinion T-55 isn' t just a tank. Actually it is THE TANK...
#284
Northern Ireland, United Kingdom
Joined: October 04, 2006
KitMaker: 3,094 posts
Armorama: 2,942 posts
Posted: Friday, April 13, 2012 - 10:28 PM UTC
This is coming together so well and the SBS of the base construction is very useful.
On The Bench:
Ethiopian BMP-1 (Trumpeter 1/35)
AMX-13/75 (Takom 1/35)
South Carolina, United States
Joined: September 28, 2005
KitMaker: 778 posts
Armorama: 763 posts
Posted: Friday, April 13, 2012 - 11:42 PM UTC
chris your killing me here how did you pain your main main search light i love it look so realy
dave

Texas, United States
Joined: March 17, 2006
KitMaker: 1,117 posts
Armorama: 1,115 posts
Posted: Saturday, April 14, 2012 - 06:18 AM UTC
Thanks guys for the comments, glad to be of help. After all we learn from each and I'm trying to post as much as I can on the build. Hell I've been in this hobby for 25 years and I'm still learning things as I go.
Dave I used vallejo black with a touch of panzer ace tail light red mixed in. Depending on the how you look at them and the lighting condition, the lense can have a sort of purple-redish tint to it.
Chris
On the workbench:
T-62M
ZTZ 99 MBT
Lav-25A2 with MILES Gear
M7 Priest X2
Texas, United States
Joined: March 17, 2006
KitMaker: 1,117 posts
Armorama: 1,115 posts
Posted: Tuesday, April 17, 2012 - 03:32 PM UTC
On the workbench:
T-62M
ZTZ 99 MBT
Lav-25A2 with MILES Gear
M7 Priest X2
Texas, United States
Joined: March 08, 2010
KitMaker: 2,465 posts
Armorama: 2,383 posts
Posted: Tuesday, April 17, 2012 - 04:01 PM UTC
Hey Chris,
I cant tell you how much im enjoying watching your build all come together. Really creative and masterfully done. You Have given me lots of ideas for future projects. Thanks for sharing all of this with us. Im saving your info and pics in a folder all its own. Model on man!!!
Gary