Campaigns
Where Armorama group builds can be discussed, organized, and updates posted.
APC / AFV Campaign
jkb_sprint
Visit this Community
Thessaloniki, Greece / Ελλάδα
Joined: April 23, 2012
KitMaker: 402 posts
Armorama: 394 posts
Posted: Tuesday, October 02, 2012 - 02:29 AM UTC
Hi guys.
@ Jon Dicks, the Puma looks great! Really nice work. You have an ability that i don't ..... you can restrain yourself from too much weathering.

My Staghound is finished. The decals finally came. I hope you like it.


JonDicks
Visit this Community
Queensland, Australia
Joined: October 13, 2009
KitMaker: 223 posts
Armorama: 224 posts
Posted: Tuesday, October 02, 2012 - 10:44 AM UTC
@jkb_sprint - It has taken me years to slow down on my heavy weathering. I found the only way to really stop myself from going too heavy (although that is a personal opinion anyway), was to use a fine brush for chipping instead of a sponge, and to limit my pigments and instead use oils, filters and washes to fade and dust the finish. This forced me to slow down, and therefore lets me ensure a subtle finish. I don't think your Staghound is too heavy on the weathering, by the way. Evewrytime I have seen pictures of these they have looked really muddy and grimy.

@Nito and Darren - Thanks guys. I will use your suggestions then take the final photos.
JediWookie
Visit this Community
South Australia, Australia
Joined: November 26, 2011
KitMaker: 113 posts
Armorama: 79 posts
Posted: Tuesday, October 02, 2012 - 04:52 PM UTC
@Jon Dicks
Paint and chipping on your Puma looks great. I have never done any chipping i think i might give it a go. My Puma will be similar to your colors, i was wondering what color you used for the chipping?

@John
I built most of the interior of my puma even though none of it can be seen. It just felt like the right thing to do

@John (jbk_sprint)
Nice job on the Staghound, looks great.

Managed to get a bit of time in the last few days, here are a couple pics of my progress. Really enjoying building the Dragon Puma but Damm these instructions are hard to follow sometimes.


G
JonDicks
Visit this Community
Queensland, Australia
Joined: October 13, 2009
KitMaker: 223 posts
Armorama: 224 posts
Posted: Tuesday, October 02, 2012 - 05:12 PM UTC
@JediWookie - I used Tamiya Wooden Deck Tan for the light chipping and Tamiya Dark Steel for the dark chips. All done with a really fine brush.
JediWookie
Visit this Community
South Australia, Australia
Joined: November 26, 2011
KitMaker: 113 posts
Armorama: 79 posts
Posted: Tuesday, October 02, 2012 - 05:19 PM UTC
Thanks Jon, I will give it a shot on mine and see what happens.

G
BBD468
Visit this Community
Texas, United States
Joined: March 08, 2010
KitMaker: 2,465 posts
Armorama: 2,383 posts
Posted: Wednesday, October 03, 2012 - 02:07 AM UTC
MAN...you guys are killin' it!!!

Darren - Looking nice my man!

Jon D. - your Puma is Awesome bud! Luv it!

John(jkb_sprint) - Nice Staghound man! Well done.

Gary - Comin' right along i see. You like the kit so far? After the suspension ofcourse. Looks great.

John(Nito74) - You got so much goin on John, i dont see how you do it....but, YOU DO IT!!! Lookin' nice bro!

Gary
1721Lancers
Visit this Community
England - East Anglia, United Kingdom
Joined: March 21, 2012
KitMaker: 1,673 posts
Armorama: 1,640 posts
Posted: Wednesday, October 03, 2012 - 02:48 AM UTC
Hi all,
I´ve been awy for a while and man theere´s some cool
stuff going on here:
@Jon Dicks: lovely mate very cool looking Puma, and it goes to show that you don´t need top of the range kits all the time

@Jon Bell: nice looking Hummer, and a damn good job on your first wash . I remember my first time and looked a lot different to that

@John Nito74: nice work on your 221, nice to see an interior on a plastic kit. I remember scratching mine based on fotos from "AFV Interiors". Cool site that was, shame they closed down. I´ll post some of the pictures if you wish, or have you enough ref. material?

@Darren Baker: great build, I gotta get one of them LAV´s too.

@John jkb-sprint: the Staghound is just right mate, looks cool and you have not gone over the top.

Well I´ve been back to the Cougar again, here we go then.
This dude has been around for a while and it´s not over yet:

Mud:


a black wash and more grime and dirt:


thats all for now
see you soon
Paul
Nito74
Visit this Community
Lisboa, Portugal
Joined: March 04, 2008
KitMaker: 5,386 posts
Armorama: 4,727 posts
Posted: Wednesday, October 03, 2012 - 05:06 AM UTC
@Gary

Thanks bro !
I don't know how I do it too... all I need is to keep building.. and building..

@Paul

Great weathering on your Cougar !!!!
Thanks for the offer but on this 223 most of the interior will be hardly visible.
I might do another of these Armoured cars but with no turret and all hatches opened.

That mud on the Cougar is awsome... the white paintjob, the decals...terrific build !!!!

Some more work on the interior details, seats & turret also the hatches on the enginne cover are on.


hofpig
Visit this Community
England - South East, United Kingdom
Joined: March 04, 2007
KitMaker: 1,330 posts
Armorama: 1,017 posts
Posted: Wednesday, October 03, 2012 - 10:22 PM UTC
The start at long last of my entry of a KIFV, it will actually be the Malaysian version ( it's the same or so I'm lead to believe.) in a destressed UN white paint job. So far all I have done except research is the road wheels (although they need cleaning up, the idlers.


P.s. Paul great work on that cougar!

Paul
Nito74
Visit this Community
Lisboa, Portugal
Joined: March 04, 2008
KitMaker: 5,386 posts
Armorama: 4,727 posts
Posted: Thursday, October 04, 2012 - 03:56 AM UTC
Some more work on the HobbyBoss 223.

Interior ready for primer, I'll paint some of the equipment first before adding them to the interior, also the steering wheel & seat.

Worked on the turret too.


mojo72
Visit this Community
Kuala Lumpur, Malaysia
Joined: September 05, 2010
KitMaker: 160 posts
Armorama: 130 posts
Posted: Friday, October 05, 2012 - 03:08 AM UTC
Hi guys

I would like to apologise for the confusion, of using the same photo for 2 different campaigns, even though this was not intentional (I guess being lazy was the main excuse 
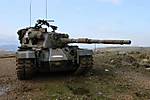
). I hope that the photo below clarifies things


The kit at the front had been primed and partly airbushed for this campaign, and the one behind will be used for another campaign. I'll post some more progress photos soon
1721Lancers
Visit this Community
England - East Anglia, United Kingdom
Joined: March 21, 2012
KitMaker: 1,673 posts
Armorama: 1,640 posts
Posted: Friday, October 05, 2012 - 04:54 AM UTC
Hi all,
thanks for positive comments. Well I´m calling the cougar
done before I really go over the top and you can´t see
any paint work on it. This is my third campaign and thankyou very much John, it was fun. This was a change for
me as it is a modern vehicle, a change from WWII
Well here you have it:


I should of added more dirt to the drivers windscreen, maybe later


For the gallery I´ll do some decent fotos with a real camera

Any critisism will be taken as a lesson
to learn, thanks for watching and keep up the good work
Paul
steph2102
Visit this Community
Isere, France
Joined: April 23, 2011
KitMaker: 735 posts
Armorama: 606 posts
Posted: Friday, October 05, 2012 - 05:08 AM UTC
PAUL, great job.
steph
Nito74
Visit this Community
Lisboa, Portugal
Joined: March 04, 2008
KitMaker: 5,386 posts
Armorama: 4,727 posts
Posted: Friday, October 05, 2012 - 08:32 AM UTC
I agree, great job Paul !
Fister30
Visit this Community
Iowa, United States
Joined: May 11, 2012
KitMaker: 195 posts
Armorama: 142 posts
Posted: Friday, October 05, 2012 - 08:47 AM UTC
You knocked this one out of the park Paul! Great Job!!!
Dragon164
#226
Visit this Community
British Columbia, Canada
Joined: February 20, 2012
KitMaker: 1,909 posts
Armorama: 1,066 posts
Posted: Friday, October 05, 2012 - 03:24 PM UTC
Yes Paul,
Very nicely done! and not because it's Canadian.

Cheers Rob.
JediWookie
Visit this Community
South Australia, Australia
Joined: November 26, 2011
KitMaker: 113 posts
Armorama: 79 posts
Posted: Friday, October 05, 2012 - 06:21 PM UTC
Very nice Paul, looks great

G
BBD468
Visit this Community
Texas, United States
Joined: March 08, 2010
KitMaker: 2,465 posts
Armorama: 2,383 posts
Posted: Saturday, October 06, 2012 - 02:00 AM UTC
Fantastic build and finish Paul - Well done!!!

Gary
PantherF
Visit this Community
Indiana, United States
Joined: June 10, 2005
KitMaker: 6,188 posts
Armorama: 5,960 posts
Posted: Saturday, October 06, 2012 - 02:21 AM UTC
Very realistic Paul!

I now like the Cougar.
Removed by original poster on 10/06/12 - 16:36:48 (GMT).
1721Lancers
Visit this Community
England - East Anglia, United Kingdom
Joined: March 21, 2012
KitMaker: 1,673 posts
Armorama: 1,640 posts
Posted: Saturday, October 06, 2012 - 04:40 AM UTC
Hello, Paul, Steph, John, Jon, Rob, Gary A, Gary E and Jeff.
Thanks very much guys, comments like that from all of you brilliant model makers makes me realy proud br />I hope to play with you all (everyone on the campaign) sometime soon again And hopefully without any broken bones .
Keep the good stuff coming, I shall be watching this campaign till the end
Paul
jkb_sprint
Visit this Community
Thessaloniki, Greece / Ελλάδα
Joined: April 23, 2012
KitMaker: 402 posts
Armorama: 394 posts
Posted: Sunday, October 07, 2012 - 08:36 AM UTC
Jon, Gary A, Gary E and Paul thanks a lot guys.

Gary A, nice clean work on that Puma. Have you decided what camo to paint?

Paul, very nice work. It actually looks like it has been too long on a peace keeping mission. It definately needs to get home for a refit!

John, (Nito 74) nice details on the 223, and a very clean work with those PE. Waiting to see more.
Anatoli
Visit this Community
United States
Joined: September 27, 2012
KitMaker: 85 posts
Armorama: 85 posts
Posted: Sunday, October 07, 2012 - 09:41 AM UTC
Count me in! Here are some WIP photos of a Stryker I started last month.


https://gallery.kitmaker.net/showphoto.php/photo/382330

https://gallery.kitmaker.net/showphoto.php/photo/382331
JediWookie
Visit this Community
South Australia, Australia
Joined: November 26, 2011
KitMaker: 113 posts
Armorama: 79 posts
Posted: Sunday, October 07, 2012 - 12:34 PM UTC
@John

My puma painting will be basic I am still a newbee to modelling so i don't want to attempt something i am not skilled enough to do or it won't end well.

I will paint the base colour Vallejo model Air Dark Yellow and i will do some green camouflage and then swear at the dogs if it looks like crap

G
hofpig
Visit this Community
England - South East, United Kingdom
Joined: March 04, 2007
KitMaker: 1,330 posts
Armorama: 1,017 posts
Posted: Tuesday, October 09, 2012 - 12:15 AM UTC
Quick update on the slow progress so far (I'm in no hurry!)


A few little tiny bits to add on the top of the main hull before I undercoat!

More later.

Paul