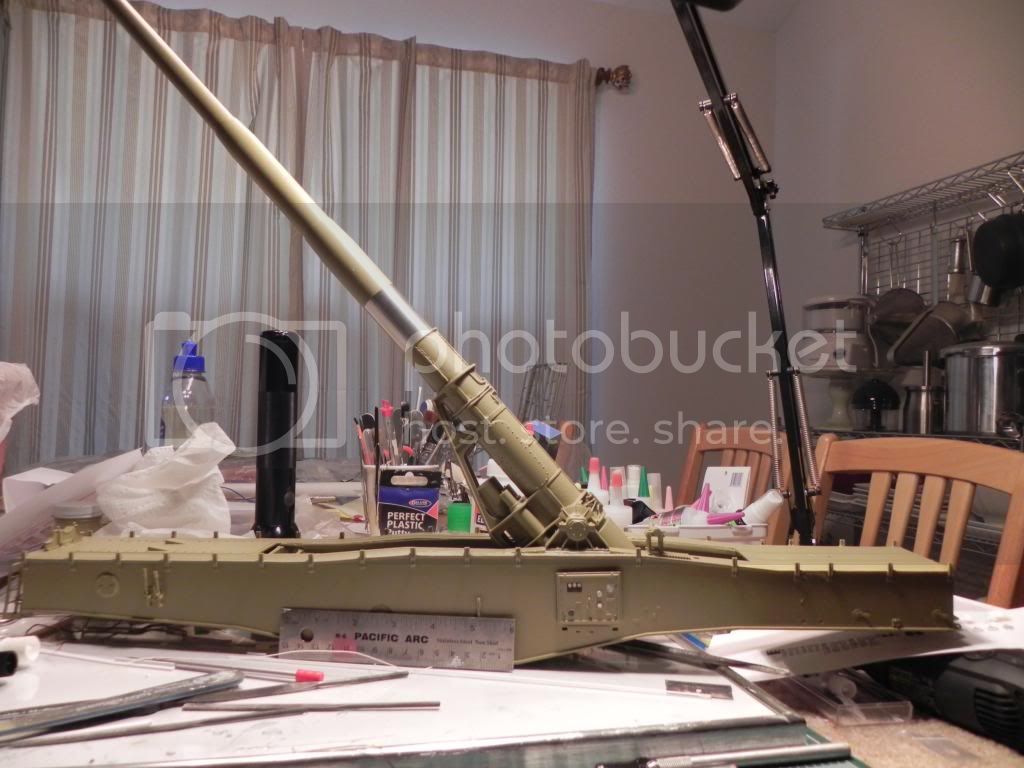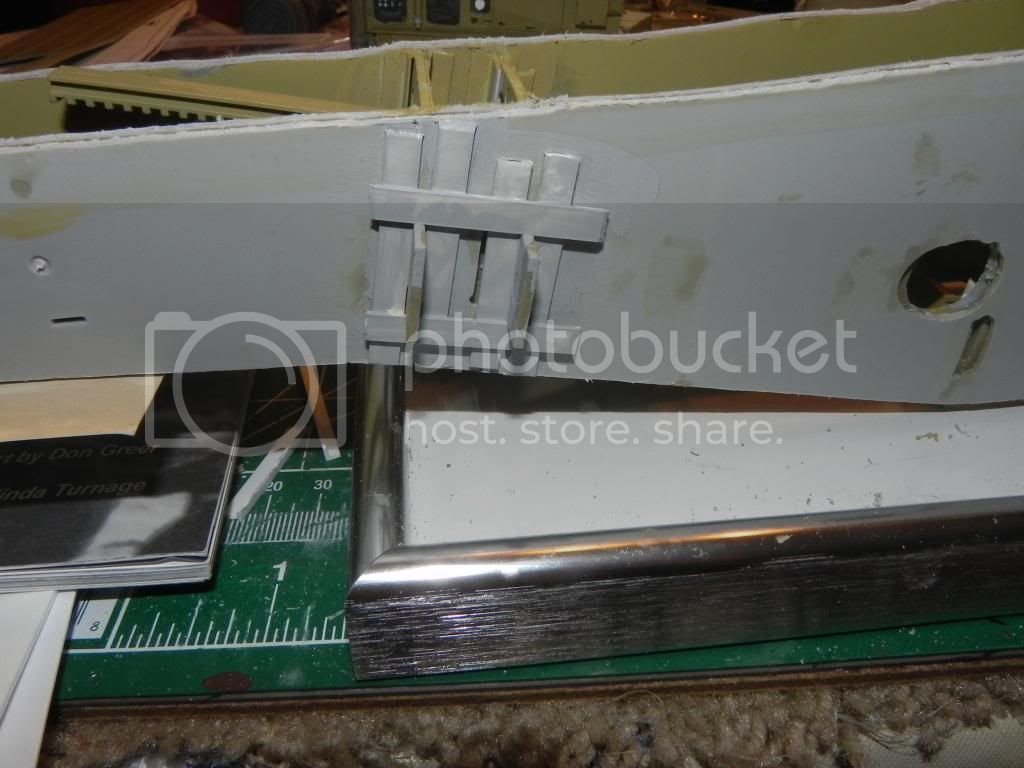
I don't understand what happened. I try again.
testing
Hosted by Darren Baker
I am new and starting my 1/35 Dragon Leopold
Scarlet_Guidon_6
Alabama, United States
Joined: December 29, 2012
KitMaker: 197 posts
Armorama: 186 posts
Joined: December 29, 2012
KitMaker: 197 posts
Armorama: 186 posts
Posted: Tuesday, April 30, 2013 - 12:33 PM UTC
Scarlet_Guidon_6
Alabama, United States
Joined: December 29, 2012
KitMaker: 197 posts
Armorama: 186 posts
Joined: December 29, 2012
KitMaker: 197 posts
Armorama: 186 posts
Posted: Tuesday, April 30, 2013 - 12:37 PM UTC
Here are the trunion photos
[IMG]http://i1273.photobucket.com/albums/y409/redleg99999/LEOPOLD%2028%20CM%20RAILGUN%20BUILD/DSCN1680_zps74904ce2.jpg" BORDER="0">8%20CM%20RAILGUN%20BUILD/DSCN1679_zpse150c4ff.jpg[/IMG]
[IMG]http://i1273.photobucket.com/albums/y409/redleg99999/LEOPOLD%2028%20CM%20RAILGUN%20BUILD/DSCN1680_zps74904ce2.jpg" BORDER="0">8%20CM%20RAILGUN%20BUILD/DSCN1679_zpse150c4ff.jpg[/IMG]
Scarlet_Guidon_6
Alabama, United States
Joined: December 29, 2012
KitMaker: 197 posts
Armorama: 186 posts
Joined: December 29, 2012
KitMaker: 197 posts
Armorama: 186 posts
Posted: Tuesday, April 30, 2013 - 12:38 PM UTC
Scarlet_Guidon_6
Alabama, United States
Joined: December 29, 2012
KitMaker: 197 posts
Armorama: 186 posts
Joined: December 29, 2012
KitMaker: 197 posts
Armorama: 186 posts
Posted: Tuesday, April 30, 2013 - 12:58 PM UTC
Anyone know why photos get listed as removed,when O loaded each one the same?
Scarlet_Guidon_6
Alabama, United States
Joined: December 29, 2012
KitMaker: 197 posts
Armorama: 186 posts
Joined: December 29, 2012
KitMaker: 197 posts
Armorama: 186 posts
Posted: Tuesday, April 30, 2013 - 01:00 PM UTC
Scarlet_Guidon_6
Alabama, United States
Joined: December 29, 2012
KitMaker: 197 posts
Armorama: 186 posts
Joined: December 29, 2012
KitMaker: 197 posts
Armorama: 186 posts
Posted: Friday, May 03, 2013 - 10:13 AM UTC
Here is more work fixing the trunions . I put more putty to square off and smooth. I still have sanding to do but it will now look like one piece
I have worked /glued some of the Eduard photo etch bits. They ate shown in one photo. I have also glued parts of other sub assemblies The barrel lock, the Brass canister catcher and the trunion cross over steps.Finally a $4.50 box I got from Hobby Lobby ,I use it to store sub assemblies. It keeps everything separate and helps prevent losing tiny bits,plus once off the sprue it keeps parts together for easier construction..
Scarlet_Guidon_6
Alabama, United States
Joined: December 29, 2012
KitMaker: 197 posts
Armorama: 186 posts
Joined: December 29, 2012
KitMaker: 197 posts
Armorama: 186 posts
Posted: Wednesday, May 08, 2013 - 09:06 AM UTC
First Thank you for the kind words! Getting older plays havoc with eye hand coordination. So here we go.Internet was down for 6 days.
As an Artilleryman I can see the mistakes,but since 99% of the viewers will not know the difference. The first pic is before,rough fixing of trunion misfit. The next few are the smoothed primed and finally the finished trunion. I also fixed the gaps in the carriage. I have added the breech block persuader.They used this when the breech block got jammed several men grasped the handle and whacked away at the block until it moved.
I have also decanted one spray can on Tayima TS-3 dark yellow,now I have touch up paint that matches the rest of the Leopold.The last photo is of the rear bulkhead ladders. I have used epoxy glue on several parts to ensure holding and even as a filler. Seems to work great. On one photo I have temp tacked the canister tray. I am sanding the ladders so they look better. one good thing the barrel will stay up and not fall.
I will be adding lots of bits soon. Will post then.
Oh I also just got new glasses.Perhaps I will be able to see better.
Villiers
Gauteng, South Africa
Joined: April 04, 2010
KitMaker: 50 posts
Armorama: 49 posts
Joined: April 04, 2010
KitMaker: 50 posts
Armorama: 49 posts
Posted: Wednesday, May 08, 2013 - 04:31 PM UTC
Awesome!
Regards,
Villiers
Regards,
Villiers
Scarlet_Guidon_6
Alabama, United States
Joined: December 29, 2012
KitMaker: 197 posts
Armorama: 186 posts
Joined: December 29, 2012
KitMaker: 197 posts
Armorama: 186 posts
Posted: Thursday, May 09, 2013 - 04:00 AM UTC
The internet is great.Thank you Villiers. To the build last night I completed the hoist. Photo to follow. I used some very thin braided wire. I want to thank Andrew G ,call sign APALELLA. He linked me to his 1/72 build. There I saw the CORRECT way of rigging it! I was planning to do it wrong!
There are gauges and dials to be done. I went online and downloaded pics of gauges etc. I plan on making decals. Will show and advise results..
I think I will stop gluing and do a bit of painting . I have discovered I like AV paints.Plus now I have touchup paint as I have decanted a Tamiya rattle can.
I need advice. I plan on adding the Rotbrun camo. I have a jar of paint and a rattle can. I want soft edges, I am pretty good at masking . the barrel is no problem but the carriage and rail trucks are? Don't say air brush. Ok I wait any suggestions. Right now off to Wally world to get my new glasses.
Villiers
Gauteng, South Africa
Joined: April 04, 2010
KitMaker: 50 posts
Armorama: 49 posts
Joined: April 04, 2010
KitMaker: 50 posts
Armorama: 49 posts
Posted: Thursday, May 09, 2013 - 07:09 PM UTC
Hello Lou,
I wish you well with your new glasses. I got myself one of those magnifying glasses on a stand with the light at the back that jewelers use.
Insofar the painting part, all the reference photographs that I saw on the internet shows a hard edge camouflage pattern. You may have two choices in my opinion: 1) Masking and airbrush, or 2) Use a brush and paint freehand.
Have fun!
Regards,
Villiers
Scarlet_Guidon_6
Alabama, United States
Joined: December 29, 2012
KitMaker: 197 posts
Armorama: 186 posts
Joined: December 29, 2012
KitMaker: 197 posts
Armorama: 186 posts
Posted: Friday, May 10, 2013 - 05:14 PM UTC
Thank you for the camo input! The photos I checked,again,do seem to be hard edge,so that's how I think I'll do it.
Now you old pros can laugh but I discovered something. On the gunners platform and the generator unit there are gauges. Painting too finicky and difficult. Of make decals. I GOOGLED industrial gauges. found some in white and in black. I also found some automobile dash pics. I used save inage,then used paint to reduce reduce reduce,until they were tiny enough to fit te kit gauge circles. I used my HP 8600 on best quality to print a test page. All different sizes etc. The sheet of very bright white looked good. Then I went on e bay and found some German labels signs etc. Saved images. Then I cut out the gauges and the signs with my exact. I used Elmer's glue(very thin) to glue the gauges(paper) to the kit) looked very good. Then I used a tiny drop of canopy glue(dries clear) to simulate glass on gauges. They are so tiny all you can see are some faint dials. I used some black w/white dials and some white with black indicators.Then I Googled German safety signs and found one with benzine and some electrical signs. I put them in several areas and darn if it doesn't look good I will take pics tomorrow for you.
I am trying to post a copy of the printed sheet.
Villiers
Gauteng, South Africa
Joined: April 04, 2010
KitMaker: 50 posts
Armorama: 49 posts
Joined: April 04, 2010
KitMaker: 50 posts
Armorama: 49 posts
Posted: Friday, May 10, 2013 - 11:29 PM UTC
A very creative solution! I would like to see how it turns out.
Regards,
Villiers
Regards,
Villiers
Scarlet_Guidon_6
Alabama, United States
Joined: December 29, 2012
KitMaker: 197 posts
Armorama: 186 posts
Joined: December 29, 2012
KitMaker: 197 posts
Armorama: 186 posts
Posted: Saturday, May 11, 2013 - 07:13 AM UTC
Villers AS promised here are some photos of the dials and warning signs on the Generator unit and the gunners platform. Also you can see the crane (Temp stuck ) to the Generator unit. You can see the rigging. I still need to straighten it and load the ammo tray to it but it is getting there.
I know that some of the signage is not shown on any pics but I should think they(Germans) would post electrical and fuel warning signs,if only to stop them from blowing themselves up!
Here are the photos hope you like my efforts.While not perfect I think they look realistic!
I know that some of the signage is not shown on any pics but I should think they(Germans) would post electrical and fuel warning signs,if only to stop them from blowing themselves up!
Here are the photos hope you like my efforts.While not perfect I think they look realistic!
Scarlet_Guidon_6
Alabama, United States
Joined: December 29, 2012
KitMaker: 197 posts
Armorama: 186 posts
Joined: December 29, 2012
KitMaker: 197 posts
Armorama: 186 posts
Posted: Saturday, May 11, 2013 - 07:14 AM UTC
This post is a test.Trying somhttp://i1273.photobucket.com/albums/y409/redleg99999/DSCN1662_zps11d55691.jpgething.
Scarlet_Guidon_6
Alabama, United States
Joined: December 29, 2012
KitMaker: 197 posts
Armorama: 186 posts
Joined: December 29, 2012
KitMaker: 197 posts
Armorama: 186 posts
Posted: Saturday, May 11, 2013 - 02:20 PM UTC
Picky picky,LOLOLOL
Retired yank good point, I just painted the wire oily steel. And I promise to trim up the frayed wire. In my Army days and cable with frays like that would be changed and condemned. By the bezels you mean the outer rim ,right? I plan on doing that with a permanent marker. Black or grey as the case may be.
As an aside I used several shades of pink and others to shade the figures faces and hands. Worked pretty well.
Re Trevor Snyder /Snorri23, Yes I found a set of carriage walls on e bay bought them and strengthened the carriage walls.I don't think you will be able to do that.
TO ALL WHO READ I STILL HAVE 2 OUTER CARRIAGE PIECES FOR THE TRUMPETER KIT THEY AREN'T IN PERFECT CONDITION BUT THEY ARE FREE TO A GOOD HOME. JUST LET ME KNOW AND I'LL MAIL THEM TO YOU. JUST TO USA. MAILING ELSEWHERE IS TOO EXPENSIVE.
I didn't cross brace ,I did not make new bulkheads. I greatly over killed. I got worried about the metal barrel weight. Then I glued the kit trunions and had to rip them out and use brass tubing(a bit too big), This means the I had to glut the barrel in one position. Lots of corrections and repairs as you can see.
I f you use the kit barrel you do not have to do anything extra at all..
Scarlet_Guidon_6
Alabama, United States
Joined: December 29, 2012
KitMaker: 197 posts
Armorama: 186 posts
Joined: December 29, 2012
KitMaker: 197 posts
Armorama: 186 posts
Posted: Sunday, May 19, 2013 - 12:36 PM UTC
Hello all. It is Sunday night and I have been getting some work done.Here are the current photos. I have started the Rotbrun Camo on the barrel,
I also have started on the rail trucks.I have tried to do the camouflage random and correct. I have glued the Generator unit crane on.put railings on and the open doors,so you can see the gauges
. I also have mocked up the ammo hoist and the ammo cart. The breech gun platform is on. I made the trunion grab handles ,the step over and other tiny parts. These are Eduard parts,the grab handles are wire I bent to shape. Tiny and a few were eaten by the carpet monster. So I just made another.
Ok I think it is starting to look like the K-3e that was painted and readied for the Africa Corps then stopped and sent with one named Robert to ANZIO where it became Anzio Annie and the Anzio Express.
As an artilleryman I think the Gun drill on this piece must have been interesting. I would love to see the gunbunny manual.he ballet of the process would be nice.
I also mocked up the gun-laying platform the interesting thing is I honestly just put gauges on ,but then I saw a movie and the gauges I made are pretty accurate.
Well here it is and it is coming together.
I also have started on the rail trucks.I have tried to do the camouflage random and correct. I have glued the Generator unit crane on.put railings on and the open doors,so you can see the gauges
. I also have mocked up the ammo hoist and the ammo cart. The breech gun platform is on. I made the trunion grab handles ,the step over and other tiny parts. These are Eduard parts,the grab handles are wire I bent to shape. Tiny and a few were eaten by the carpet monster. So I just made another.
Ok I think it is starting to look like the K-3e that was painted and readied for the Africa Corps then stopped and sent with one named Robert to ANZIO where it became Anzio Annie and the Anzio Express.
As an artilleryman I think the Gun drill on this piece must have been interesting. I would love to see the gunbunny manual.he ballet of the process would be nice.
I also mocked up the gun-laying platform the interesting thing is I honestly just put gauges on ,but then I saw a movie and the gauges I made are pretty accurate.
Well here it is and it is coming together.
Villiers
Gauteng, South Africa
Joined: April 04, 2010
KitMaker: 50 posts
Armorama: 49 posts
Joined: April 04, 2010
KitMaker: 50 posts
Armorama: 49 posts
Posted: Monday, May 20, 2013 - 05:43 AM UTC
Lou,
The gauges came out well. The camouflage pattern is also well captured.
Regards,
Villiers
The gauges came out well. The camouflage pattern is also well captured.
Regards,
Villiers
Scarlet_Guidon_6
Alabama, United States
Joined: December 29, 2012
KitMaker: 197 posts
Armorama: 186 posts
Joined: December 29, 2012
KitMaker: 197 posts
Armorama: 186 posts
Posted: Monday, May 20, 2013 - 10:09 AM UTC
Scarlet_Guidon_6
Alabama, United States
Joined: December 29, 2012
KitMaker: 197 posts
Armorama: 186 posts
Joined: December 29, 2012
KitMaker: 197 posts
Armorama: 186 posts
Posted: Saturday, May 25, 2013 - 07:51 AM UTC
HELP ME MAKE A DECISION!! YOU HAVE 24 HOURS TO GIVE ME YOUR OPINION.
The 28 cm rounds for my gun are painted(by me) a very dark grey black. I got a set of German decals for projo marking bu they are black and will barely if any show.
Should I forget it or should I paint the rounds a shade of gray?
Now another subject
THIS IN THE USA IS MEMORIAL DAY,A DAY DEDICATED TO THOSE WHO HAVE GIVEN THEIR LIVES FOR THIS COUNTRY!
I am flying (from top to bottom) Old Glory, my US ARMY retired flag and last my Ist Cavalry Division Flag( Garry Owen!!!)
so I propose a toast to those who have fallen( I remember to damm many)!!!
TO ABSENT COMRADES!!!!
Lonewolf7usa
Michigan, United States
Joined: March 24, 2009
KitMaker: 312 posts
Armorama: 296 posts
Joined: March 24, 2009
KitMaker: 312 posts
Armorama: 296 posts
Posted: Saturday, May 25, 2013 - 01:20 PM UTC
Quoted Text
HELP ME MAKE A DECISION!! YOU HAVE 24 HOURS TO GIVE ME YOUR OPINION.
The 28 cm rounds for my gun are painted(by me) a very dark grey black. I got a set of German decals for projo marking bu they are black and will barely if any show.
Should I forget it or should I paint the rounds a shade of gray?
Now another subject
THIS IN THE USA IS MEMORIAL DAY,A DAY DEDICATED TO THOSE WHO HAVE GIVEN THEIR LIVES FOR THIS COUNTRY!
I am flying (from top to bottom) Old Glory, my US ARMY retired flag and last my Ist Cavalry Division Flag( Garry Owen!!!)
so I propose a toast to those who have fallen( I remember to damm many)!!!
TO ABSENT COMRADES!!!!
Here! Here! To absent Comrades!!!!
Villiers
Gauteng, South Africa
Joined: April 04, 2010
KitMaker: 50 posts
Armorama: 49 posts
Joined: April 04, 2010
KitMaker: 50 posts
Armorama: 49 posts
Posted: Saturday, May 25, 2013 - 04:11 PM UTC
Quoted Text
HELP ME MAKE A DECISION!! YOU HAVE 24 HOURS TO GIVE ME YOUR OPINION.
The 28 cm rounds for my gun are painted(by me) a very dark grey black. I got a set of German decals for projo marking bu they are black and will barely if any show.
Should I forget it or should I paint the rounds a shade of gray?
Now another subject
THIS IN THE USA IS MEMORIAL DAY,A DAY DEDICATED TO THOSE WHO HAVE GIVEN THEIR LIVES FOR THIS COUNTRY!
I am flying (from top to bottom) Old Glory, my US ARMY retired flag and last my Ist Cavalry Division Flag( Garry Owen!!!)
so I propose a toast to those who have fallen( I remember to damm many)!!!
TO ABSENT COMRADES!!!!
Based on the sheer size of the gun, the ammunition will be dwarfed. I would recommend a lighter shade of grey.
To all servicemen and women, absent, past and present!
Regards
Scarlet_Guidon_6
Alabama, United States
Joined: December 29, 2012
KitMaker: 197 posts
Armorama: 186 posts
Joined: December 29, 2012
KitMaker: 197 posts
Armorama: 186 posts
Posted: Tuesday, May 28, 2013 - 08:31 AM UTC
Bonjour to all! The Memorial Day weekend is over. One plastic cabinet for garage,50 18x18 red brick patterned pavers purchased and hauled home and set in front of shed/barn,3 Hydrangeas planted and a bunch of gallon paint cans moved at the bosses directions.
So it is Tuesday and guess what I got more work done on my 28cm Railgun LEOPOLD
Pic one is the new German Grey painted round. Opinions on color. I used this as it will show the round markings details better. The decals are black. Pic 2 is how I glued the rounds.powder canisters and brass shell casings to sprue in order to paint them easier and better.
Pic 3 thru 13 are of the gun,the aft truck with generator unit all with the redbrown german camo. No in a few spots you will note incomplete coverage, I will be touching them up to cover brush strokes etc,
XXX
Villiers
Gauteng, South Africa
Joined: April 04, 2010
KitMaker: 50 posts
Armorama: 49 posts
Joined: April 04, 2010
KitMaker: 50 posts
Armorama: 49 posts
Posted: Tuesday, May 28, 2013 - 03:35 PM UTC
The camouflage pattern looks great and I believe that the shade of grey on the ammunition is spot on and the decal will be visible.
Best regards,
Villiers
Best regards,
Villiers
Scarlet_Guidon_6
Alabama, United States
Joined: December 29, 2012
KitMaker: 197 posts
Armorama: 186 posts
Joined: December 29, 2012
KitMaker: 197 posts
Armorama: 186 posts
Posted: Tuesday, June 04, 2013 - 02:46 PM UTC
Thank you Villiers for your kind input!
I used Tamiya XF-22 RLM Grey on the rounds,with AV Brass for the Brass canisters,and the copper rotating bands.
I used Paddinhaus decals for the lettering on the rounds ,powder canisters and powder bagsI used AV matte acrylic to dull the decals.
I used chain from a hobbyshop for the chain on the Generator unit. To my eyeball it looked more realistic.
The photos show a mock up of how I plan to display them.I have a full service charge on the loading cart, a full service charge on the basket hanging from the crane finally I have a ready pallet that will sit in the ground, With rounds,powder bags, canisters etc. I plan on having figures working on the rounds.
I also put chain on the generator unit. As you can see I put the carriage onto the generator truck to my surprise it fits great. I also put a brass canister on the eject holder,it will be waiting to be thrown over the side.
Finally I need a suggestion. The aiming platform is to small to put a figure there. It has a roof and a floor. I am thinking I detach the floor and re glue it lower so as to put a figure there/That seems easier than cutting a figure/
Thank you
Villiers
Gauteng, South Africa
Joined: April 04, 2010
KitMaker: 50 posts
Armorama: 49 posts
Joined: April 04, 2010
KitMaker: 50 posts
Armorama: 49 posts
Posted: Tuesday, June 04, 2013 - 04:24 PM UTC
Lou,
The shade of gray used on the ammunition allowed for the stenciling to be visible. Very nice.
You have captured the hard edge on the camouflage pattern well.
The cable on the ammunition platform need to be to taut to replicate the weight of the ammunition?
Keep up the awesome work!
Regards,
Villiers