Яusso-Soviэt Forum: Cold War Soviet Armor
For discussions related to cold war era Russo-Soviet armor.
Trumpeter BMP-1 in depth build BLOG
Jacques
Visit this Community
Minnesota, United States
Joined: March 04, 2003
KitMaker: 4,630 posts
Armorama: 4,498 posts
Posted: Friday, November 08, 2013 - 04:53 AM UTC
Ok, sorry for neglecting this BLOG. You know how it is, you hit a wall, you find a new exciting kit to play with.

Where I am at:


Still mulling the turret, which is where I am stuck, trying to replicate the missing additional armor layers on the front "cheeks". I can use VERY thin plastic sheet to replicate it, but it will involve glue...so I am not terribly excited about it. I could use paper, much more forgiving, but the texture is VERY poor and hard to fix. I am thinking of a few different "fixes":

1. Plastic cut out slowly...fit, trim, test fit, trim...etc... Slow, but may win the day.

2. Paper cut to fit as a template for plastic.

3. Paper cut to fit and then dipped in future to remove texturing.

Honestly, 2 seems like a winner and I think I am just dithering.
seanmcandrews
Visit this Community
Pennsylvania, United States
Joined: May 09, 2009
KitMaker: 561 posts
Armorama: 553 posts
Posted: Friday, November 08, 2013 - 05:23 AM UTC
Hi Jacques,
good to see this blog back. I think you and Zdenek have the right idea for adding the stepped armor layers on the turret but for a few small changes. Using .010" sheet cut just to the approximate size you need, tack one end of it alongside the mantlet with superglue to give you an anchorpoint. Now trim the opposite end to where it needs to be and then tack the whole thing down with cement. trimming the top and bottom edges flush with the turret edges after it dries and repeat for the other side. If you're concerned about the stiffness of the plastic you could even pre-curl it by running it between your thumb and steel scale. I used this technique on my DML BMP-2 turret ( same issue ) and it worked great.
Alright now, get in there and get to work !

Sean
Jacques
Visit this Community
Minnesota, United States
Joined: March 04, 2003
KitMaker: 4,630 posts
Armorama: 4,498 posts
Posted: Friday, November 08, 2013 - 05:52 AM UTC
Sean, that is a great idea and kinda what I had planned. The problem is the thinness of the styrene...I have had trouble with deforming of the thin sheets of plastic because of the liquid plastic glue eating through it...or the super glue bulging underneath it as it cured. Yeah, I am a ninny right now about making a boo-boo.

I will try to get to it tonight or this weekend. Promise (mostly).
seanmcandrews
Visit this Community
Pennsylvania, United States
Joined: May 09, 2009
KitMaker: 561 posts
Armorama: 553 posts
Posted: Friday, November 08, 2013 - 06:27 AM UTC
Jacques,
looking thru past blog postings. in your Jan. 8th posting regarding the idlers it looks like the first series of photos show the "spokes" cast in place and machined flush when the wheel is turned to size while it looks like they may be welded in place on the example of the last photo, style #2.
As far as your plastic melting issues ,maybe try a cement that's not quite as "hot". I just switched to using Tamiya extra thin which seems much more potent to me than the old Testors cement I was used to and has caused me a few problems from time to time. It's not all bad, though, as i've taken advantage of this characteristic to get nice weld seams around small irregular parts by pushing the part down and letting molten plastic squash out around the edges.


Sean
Jacques
Visit this Community
Minnesota, United States
Joined: March 04, 2003
KitMaker: 4,630 posts
Armorama: 4,498 posts
Posted: Tuesday, November 19, 2013 - 10:55 AM UTC
Cut the pieces out (roughly) and I am sizing them up to make them correct. Once done, I will try to make a template available for all on here.

Compound organic curves are a PAIN!
Jacques
Visit this Community
Minnesota, United States
Joined: March 04, 2003
KitMaker: 4,630 posts
Armorama: 4,498 posts
Posted: Wednesday, December 04, 2013 - 10:03 AM UTC
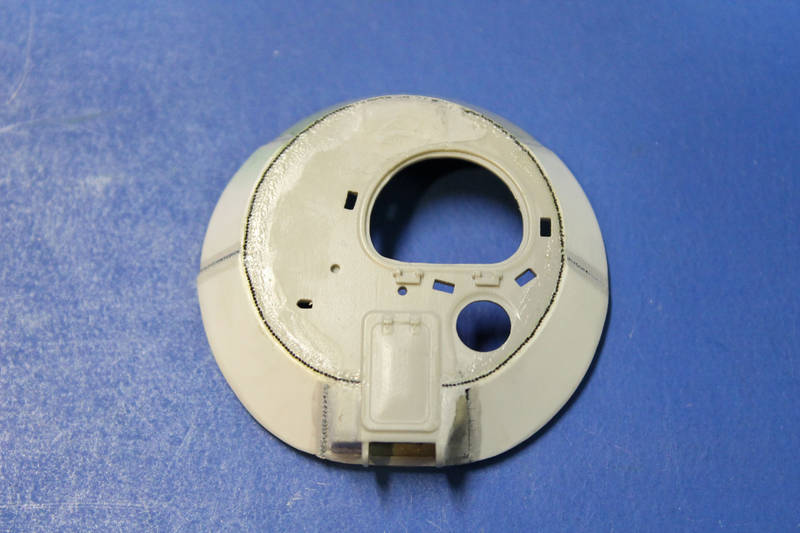
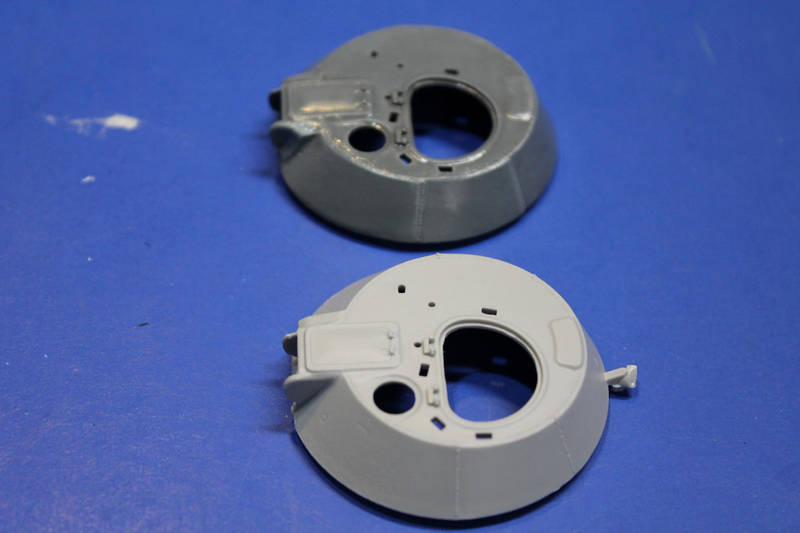
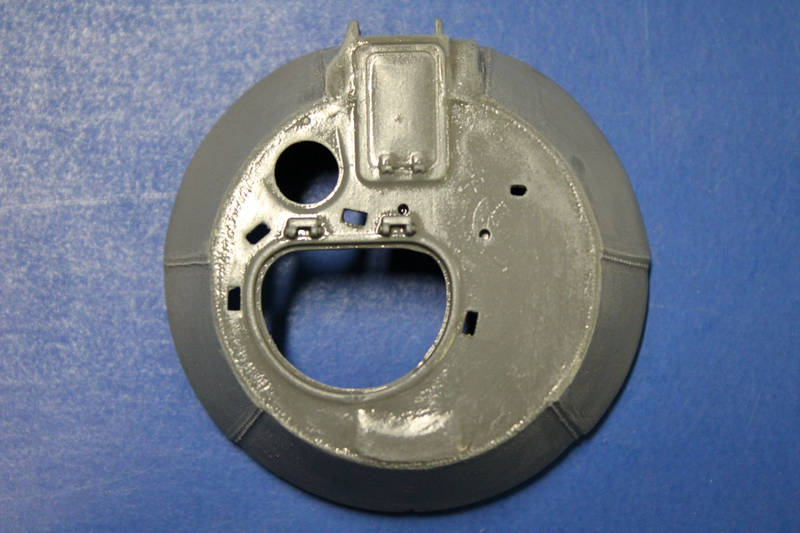
Update: Working on that turret. This took a bit of time. Fixes include:

1. Turret "face/side" armor added with .005 styrene.

2. Weld beads

3. Fixed the left side mantlet issue (missing a whole chunk)

4. Fixed the "hump" behind the hatch to have parallel sides instead of the way they cant in toward the turret center.

Here is the end result before primer:


I used archers surface details #6, arc weld beads various scales, for the welds, AR88006. These needed to be chopped into bits for the weld around the turret top, but the end result was better and easier than doing it with putty. Glad it is done though.

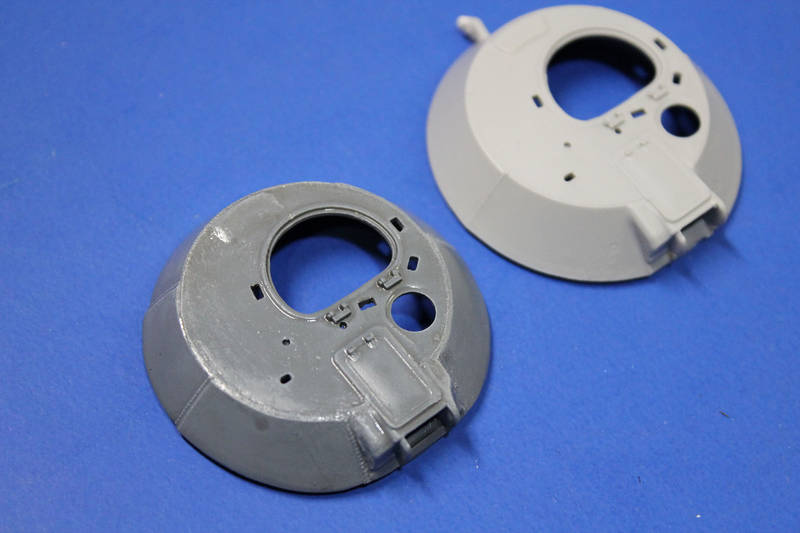
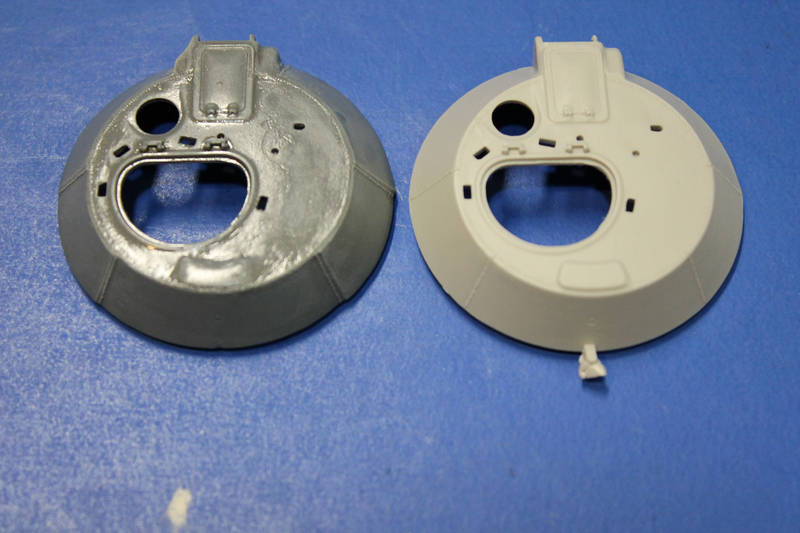
I then primed, washed, and drybrushed the turret quick to show off the work next to a untouched kit turret:


Solo top view:


and side front view showing the mantlet change:


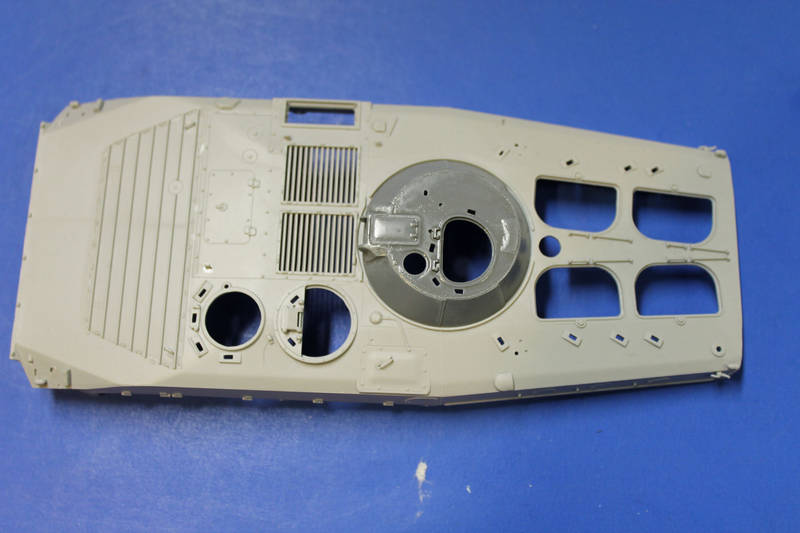
and here I put it on the upper hull to show that not only does it still fit fine (and it does rotate 360 without impediment) it also, in my opinion, looks better in the turret race:


3 things left to "fix' and then the parts will go off to SP Designs to make a correction kit.

So:
1. turret fix (done)
2. Rear upper hatches fix (done)
3. Air intake fix (not done)
4. fuel cap for rear upper hull (not done)

Jacques
Visit this Community
Minnesota, United States
Joined: March 04, 2003
KitMaker: 4,630 posts
Armorama: 4,498 posts
Posted: Thursday, December 05, 2013 - 07:35 AM UTC
So, the hatches. The larger of the 2 hinges needed to be split and a "bracket" added on the interior of the hinge. Next, Trumpeter completely omitted the CLEARLY VISIBLE and TOTALLY OBVIOUS fuel port on the rear upper roof. Yeesh.

Picture from Prime Portal showing both items being worked on:


My rendition of the fuel port:


My work on the hinges:


I may try to clean up the hinges a bit more so they look nicer, but at this level it is tough. One swipe of the sanding stick or hobby knife and a major change ensues...
seanmcandrews
Visit this Community
Pennsylvania, United States
Joined: May 09, 2009
KitMaker: 561 posts
Armorama: 553 posts
Posted: Friday, December 06, 2013 - 02:33 AM UTC
The turret looks great! That hump you refer to behind the hatch is clearance for the top of the autoloader drive motor.

Sean
Jacques
Visit this Community
Minnesota, United States
Joined: March 04, 2003
KitMaker: 4,630 posts
Armorama: 4,498 posts
Posted: Friday, December 06, 2013 - 10:00 AM UTC
Yeah, but what to call it? I think hump captures it as best as I can think, or is there a better name for it? Knowing it is the for the autoloader drive motor clearance does not make it easy to roll off the tongue (or type out) every time!

seanmcandrews
Visit this Community
Pennsylvania, United States
Joined: May 09, 2009
KitMaker: 561 posts
Armorama: 553 posts
Posted: Friday, December 06, 2013 - 10:27 AM UTC
don't get me wrong, hump works just fine! I just wanted to let you know why it's there.

Sean
Jacques
Visit this Community
Minnesota, United States
Joined: March 04, 2003
KitMaker: 4,630 posts
Armorama: 4,498 posts
Posted: Friday, December 06, 2013 - 11:39 AM UTC
I know Sean. I like to know exact names if things have them so that we all know we are talking about the same thing. I am a bit reluctant to use "hump" if there is a better definition. No harm, no foul.
asmodeuss
Visit this Community
Quebec, Canada
Joined: November 19, 2011
KitMaker: 1,389 posts
Armorama: 1,388 posts
Posted: Friday, March 21, 2014 - 04:08 AM UTC
As always Jacques an impecable build! This is priceless!
Phil.
Jacques
Visit this Community
Minnesota, United States
Joined: March 04, 2003
KitMaker: 4,630 posts
Armorama: 4,498 posts
Posted: Friday, March 21, 2014 - 07:19 AM UTC
Thanks. Just waiting for the new parts from SP Desings to come in and then I will finish it up.
VonArnim
Visit this Community
North Carolina, United States
Joined: April 10, 2004
KitMaker: 48 posts
Armorama: 35 posts
Posted: Sunday, May 04, 2014 - 06:19 AM UTC
Hi Jacques ,


Any update on the BMP-1 ? Also noticed that the update set

from SP Designs is being shown on their website , but not for

sale yet! Any idea when it will be available ?

Thanks
JOEY
Karl187
#284
Visit this Community
Northern Ireland, United Kingdom
Joined: October 04, 2006
KitMaker: 3,094 posts
Armorama: 2,942 posts
Posted: Monday, September 15, 2014 - 04:05 AM UTC
I was taking a look here while doing my own BMP-1 and its a fantastic thread. I just wanted to add one feature that is missing on the kit but I don't believe was mentioned here.

The kit is missing the un-ditching log tie downs at the rear. Here you can see the detail in Robert De Craecker's walk around from Prime Portal:


As you can see each restraint is basically a long strap between two handles and a bolt at the end which passes through two eyelets above the rear doors.
The only thing included in the Trumpeter kit is the eyelets above the doors- they are PE parts.

Hope this is useful !
Jacques
Visit this Community
Minnesota, United States
Joined: March 04, 2003
KitMaker: 4,630 posts
Armorama: 4,498 posts
Posted: Monday, September 15, 2014 - 05:06 AM UTC
Good point. I will have to look into this when I get back to building. (House projects and helping in-laws, as well as just having teenage children really eats up a lot more time than I thought! )
Ellevenbravo
Visit this Community
Massachusetts, United States
Joined: April 08, 2007
KitMaker: 269 posts
Armorama: 261 posts
Posted: Friday, April 24, 2015 - 08:54 PM UTC
Any update? I've got the Trumpy kit sitting in the stash, hoping to get some motivation from your build. Also found a nice resin turret that seems to address the issues you noted with the side armor plates.

Regards,

John
Jacques
Visit this Community
Minnesota, United States
Joined: March 04, 2003
KitMaker: 4,630 posts
Armorama: 4,498 posts
Posted: Saturday, April 25, 2015 - 03:59 AM UTC
I have AMPS NATS coming up next week. After that I have a month until Wonderfest. After THAT, I plan to revisit and finish up my lost threads, including this. Look for an update on this the begining of June, but if you have any questions, let me know.

Which SP Designs updated turret did you get?
Ellevenbravo
Visit this Community
Massachusetts, United States
Joined: April 08, 2007
KitMaker: 269 posts
Armorama: 261 posts
Posted: Friday, November 27, 2015 - 08:22 PM UTC
How's it going?

pgb3476
Visit this Community
Texas, United States
Joined: March 11, 2007
KitMaker: 977 posts
Armorama: 976 posts
Posted: Friday, November 27, 2015 - 10:20 PM UTC

Quoted Text

Any update? I've got the Trumpy kit sitting in the stash, hoping to get some motivation from your build. Also found a nice resin turret that seems to address the issues you noted with the side armor plates.

Regards,

John


John, who makes the turret?
Ellevenbravo
Visit this Community
Massachusetts, United States
Joined: April 08, 2007
KitMaker: 269 posts
Armorama: 261 posts
Posted: Saturday, November 28, 2015 - 05:21 AM UTC
http://modelsua.com/SP-DESIGNS.html

SP Designs based in the Ukraine. They have a few BMP-1/1P correction sets that include the turret, hatches and a few other bits.

Here's the direct link to the set I ordered:

http://modelsua.com/BMP-1-with-Tucha-correction-and-detail-set-turret-troop-hatches-and-doors-etc.-1-35-SP-Designs-280.html

Paypal only, the USD price for this set was $5.60!!! No idea how they rate for delivery time / quality but for that price, it's pretty hard to go wrong. If the quality is good, I would have expected to pay significantly more.

I'm planning on modeling a circa-1996 Chechyna BMP-1P. Also ordered a turret-mounted AT-4 ATGM.

Still a bit surprised that no one seemed interested in offering a resin interior for this kit.

John

Jacques
Visit this Community
Minnesota, United States
Joined: March 04, 2003
KitMaker: 4,630 posts
Armorama: 4,498 posts
Posted: Monday, November 30, 2015 - 06:33 AM UTC
Yeah, I helped Sergej (the owner/operator of SP Designs) with the turret and details. The current set includes a very nice fuel filler port and a air intake with screens and bracing, among other things. And the quality is top notch, even for it being so inexpensive.

As for my build...trying to get the energy to cross the finish line. Pray to the model gods for me...
Ellevenbravo
Visit this Community
Massachusetts, United States
Joined: April 08, 2007
KitMaker: 269 posts
Armorama: 261 posts
Posted: Tuesday, December 01, 2015 - 08:28 PM UTC

Quoted Text

Yeah, I helped Sergej (the owner/operator of SP Designs)

As for my build...trying to get the energy to cross the finish line. Pray to the model gods for me...


Hope you get your mojo back and complete the project! I've been there, it can be tough to stay interested sometimes.

Good luck!
Jacques
Visit this Community
Minnesota, United States
Joined: March 04, 2003
KitMaker: 4,630 posts
Armorama: 4,498 posts
Posted: Saturday, January 23, 2016 - 10:24 PM UTC
Will get off my duff and finish this up.
hugohuertas
Visit this Community
Buenos Aires, Argentina
Joined: January 26, 2007
KitMaker: 1,024 posts
Armorama: 1,013 posts
Posted: Monday, January 25, 2016 - 03:55 AM UTC

Quoted Text

Will get off my duff and finish this up.


Glad to read this!!!