

Thanks for your replies.
The heads up on the desert pink is interesting. Thanks Keith.
I tried to add some lenses to the binoculars using Micro Crystal Clear but it didn't take too well against the black. I've got some of those small AK optics colour lenses at home so I will try those when I get home.
The fire extinguishers... I'd love to add a decal to them but not sure if there are any out there for my purposes.
Can anybody help on that?
I'm not very good at painting straight white lines & VERY small 'lettering'!
If there is a decal I could use it would be great!
Pete, the Carl Gustav 84mm rocket launcher is made by a company called Firing Line. Google David J Parkins into your computer & it will come up.
I needed to add a bit more extra detail to it but its still a good rendition of the real thing.
The 84mm ammo containers come with the new Legend Pink Panther stowage set (you can see a photo of the box at the beginning of this thread).
Still, its good to hear from you both!
Joe.
Hosted by Darren Baker
SAS Pink Panther Build Log.

joegrafton

Joined: October 04, 2009
KitMaker: 1,209 posts
Armorama: 1,143 posts
Posted: Friday, October 04, 2013 - 12:57 AM UTC

AlanL

Joined: August 12, 2005
KitMaker: 14,499 posts
Armorama: 11,675 posts
Posted: Friday, October 04, 2013 - 01:38 AM UTC
Hi Joe,
Coming along really well. Inside the Armour did some brass etchings for fire extinguishers that might be of use. Don't forget to weather the webbing, the tops and bottom on the pouches got a fair amount of abuse. Also anything in the desert tends to get very dusty very quickly as sand and dust are in abundance when your on the move and it gets everywhere.
Well done.
Al
joegrafton
Joined: October 04, 2009
KitMaker: 1,209 posts
Armorama: 1,143 posts
Posted: Friday, October 04, 2013 - 04:05 AM UTC
Hi Al,
I'll have a look at Inside the Armour & see what I can come up with.
The webbing & other kit has all been painted (highlights & shadow) & will be weathered once all the kit has been added.
I'm looking forward to that bit so I can sort out this 'extreme desert weathering'! LOL
Joe.
I'll have a look at Inside the Armour & see what I can come up with.
The webbing & other kit has all been painted (highlights & shadow) & will be weathered once all the kit has been added.
I'm looking forward to that bit so I can sort out this 'extreme desert weathering'! LOL
Joe.
RKinsella

Joined: September 29, 2007
KitMaker: 603 posts
Armorama: 575 posts

Posted: Friday, October 04, 2013 - 11:31 AM UTC
Joe the build blog is great, really looking forward to the end result! I've a "green panther" on the bench so following this closely for inspiration!
I would ignore some comments about the pink paint finish.
It's nothing to worry about,Any color that bright can be a nightmare to work with.
Intense Close-up shots ALWAYS bring out the worst of any finish but the model never looks that bad to the MK.I eyeball, it's usually the flash from the camera combined with the fine pixels of the Macro setting that exaggerates the effect..
Keep up the good work!
joegrafton
Joined: October 04, 2009
KitMaker: 1,209 posts
Armorama: 1,143 posts
Posted: Sunday, October 06, 2013 - 01:13 AM UTC
Thanks for the backup, Roy! Really appreciated!
I'm glad you like the build, mate.
I have another one of these kits to do a green panther too.
What wheels will you be using for it?
I got some of those non-directional Land Rover wheels from Mouse House but they seem way too small.
When held against the Hussar sand tyres the sand tyres are much bigger.
Any ideas?
Joe.
panorama

Joined: January 18, 2013
KitMaker: 254 posts
Armorama: 253 posts
Posted: Sunday, October 06, 2013 - 01:40 AM UTC
an idea for the binoculars might be to paint a silver base on which Tamiya Sky is applied in a few thin layers. It worked to my satisfaction on some googles.
Here you get an idea of the effect: https://armorama.kitmaker.net/forums/203114&ord=&page=2
When I weather a vehicle in a desert environment I like to start with a sand coloured wash which in my eyes resembles quite well the gathering of dust in nooks and crannies before I apply pigments.
Looking forward for your progress
Cheers Michael
RKinsella
Joined: September 29, 2007
KitMaker: 603 posts
Armorama: 575 posts
Posted: Wednesday, October 09, 2013 - 03:26 PM UTC
Maybe the Tamiya Ambulance kit wheels?
..PM in bound mate
..PM in bound mate
joegrafton
Joined: October 04, 2009
KitMaker: 1,209 posts
Armorama: 1,143 posts
Posted: Monday, November 11, 2013 - 12:20 AM UTC
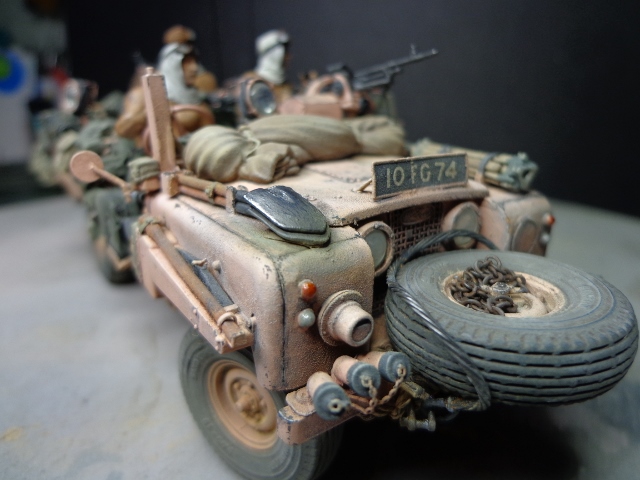
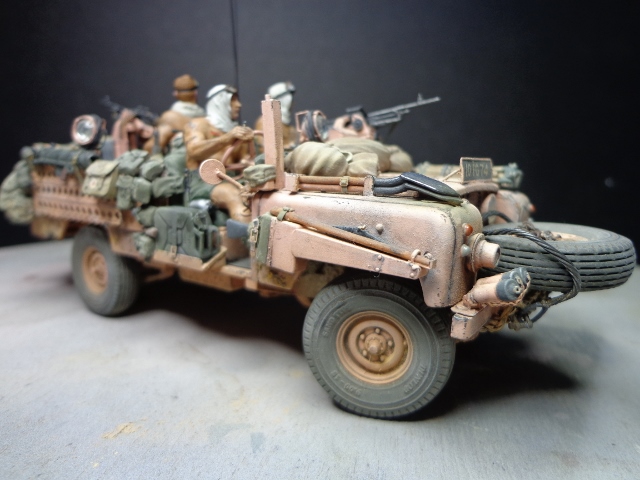
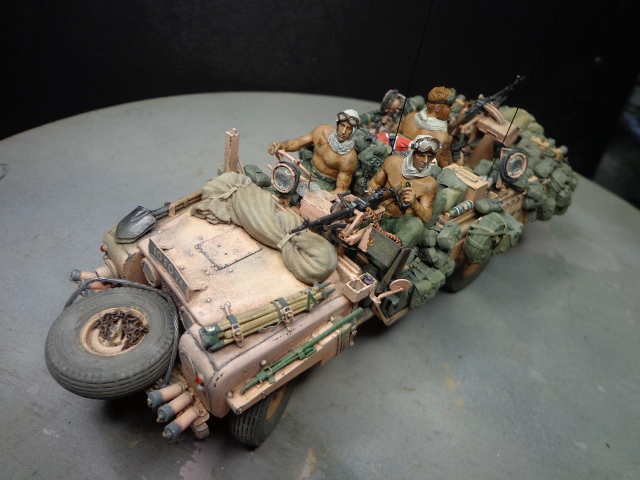
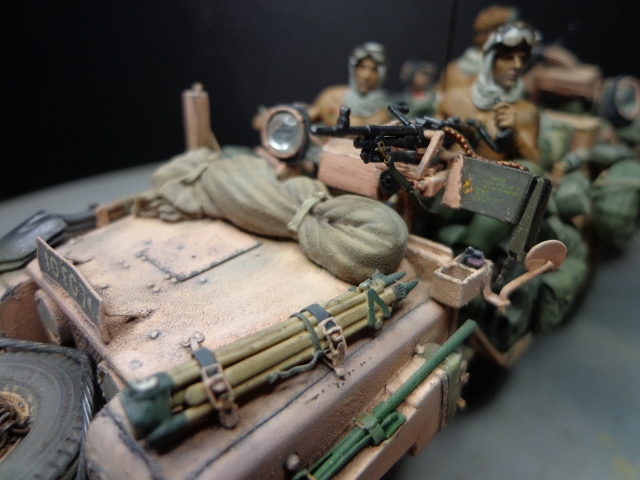
Okay fellas, next instalment...
Sorry for the wait. It's taken an age to paint all this kit!
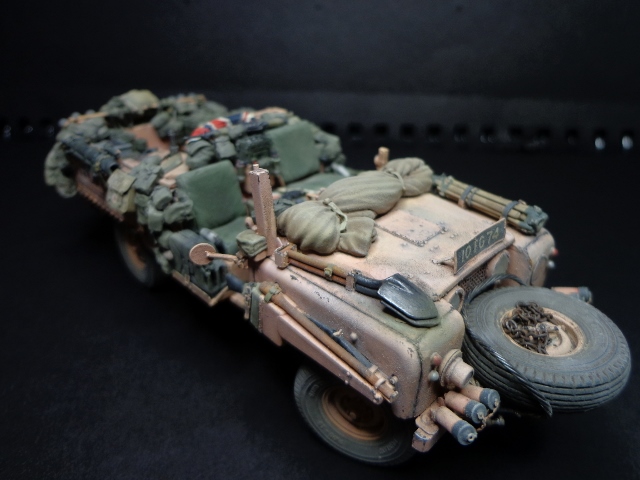

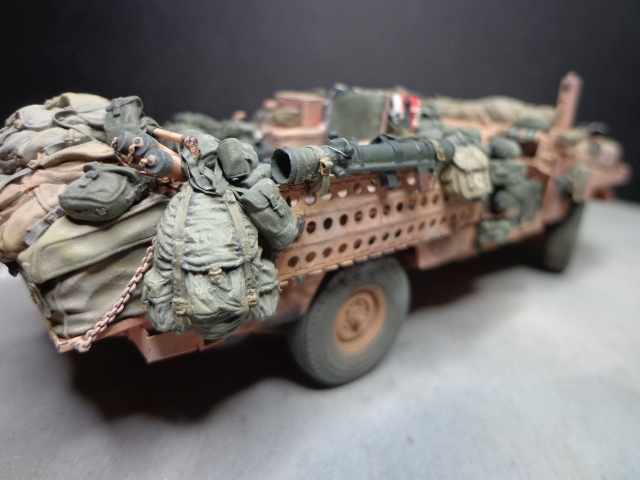
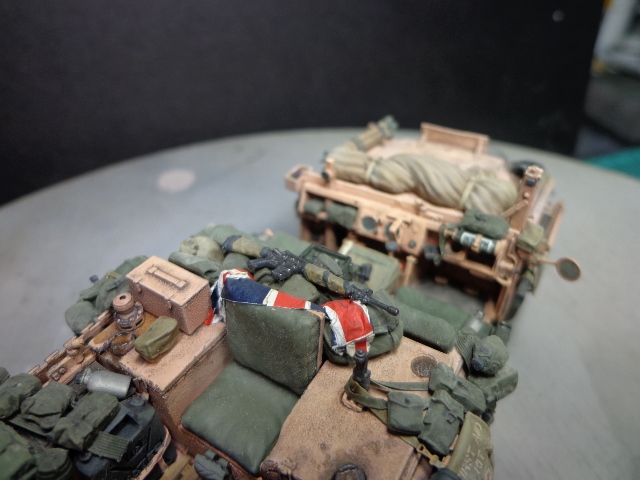
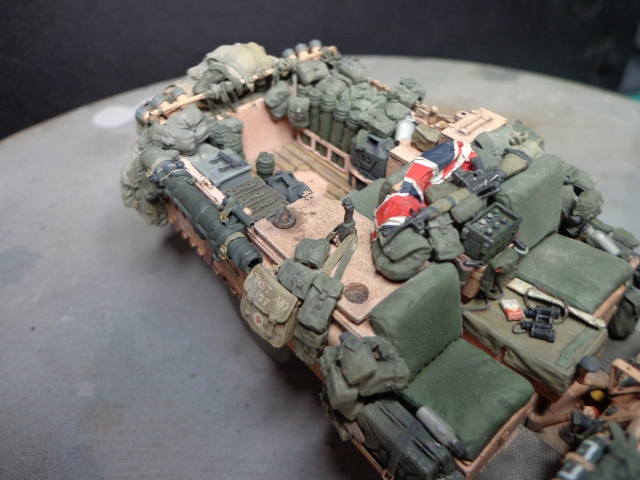
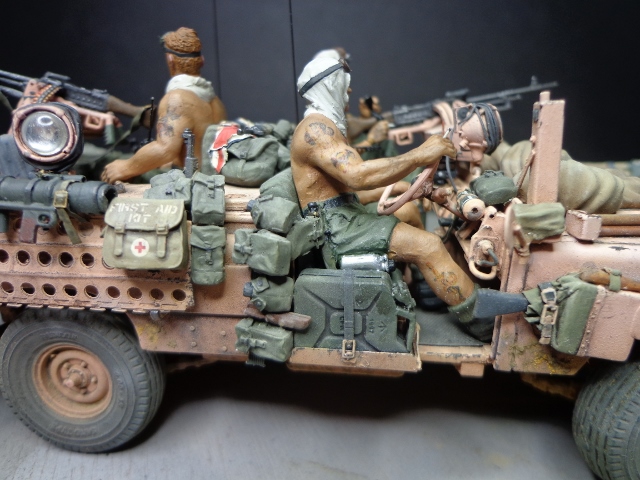
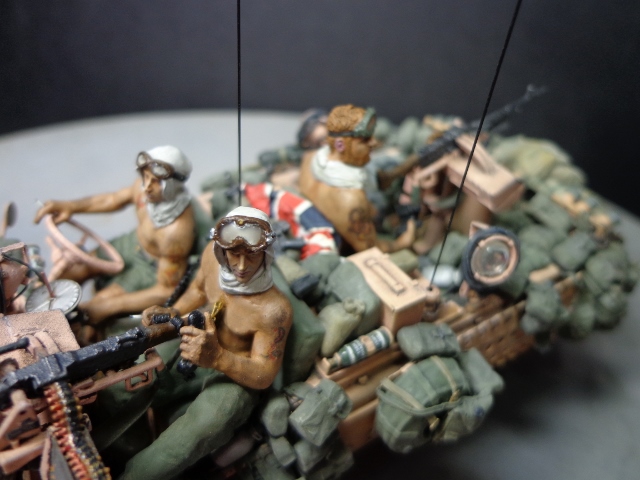
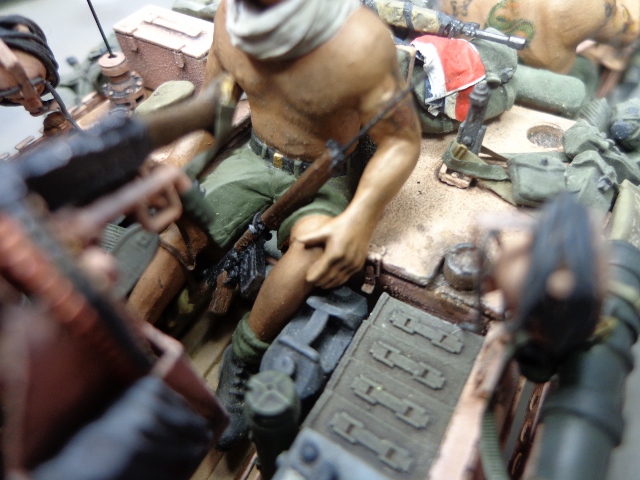
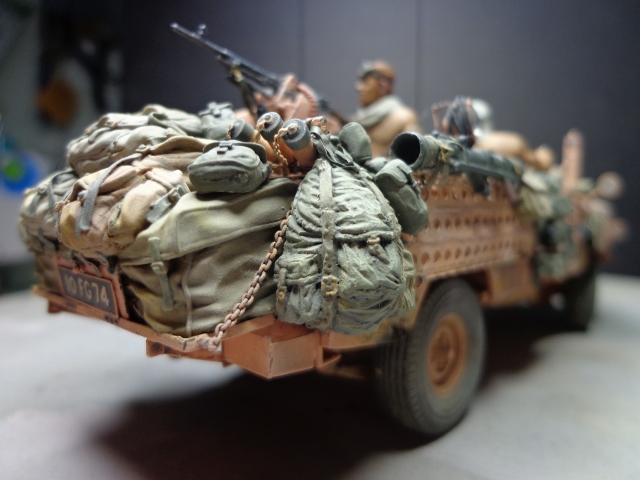
The first aid kit is actually an US M36 rucksack taken from Royal Models US Infantry equipment set with Archer transfers on it.
The Union Jack is also Archer & the Carl Gustav 84mm rocket launcher is from Firing Line with some extra detail added.
The 'aluminium' water bottles are taken from the new Bravo6 water bottle set.
Note the fire extinguisher. I had to improvise the decal using some white lines & very small lettering taken from some Archer transfer sheets.
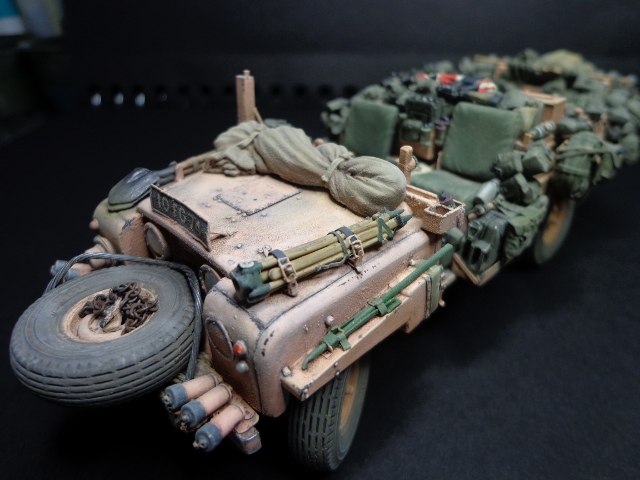
The chain is from the Legend set.
I've wrapped the AR15 in some very thin plumbers tape to give the effect of being wrapped with khaki coloured sack cloth.
Note the map & cigarette packet.

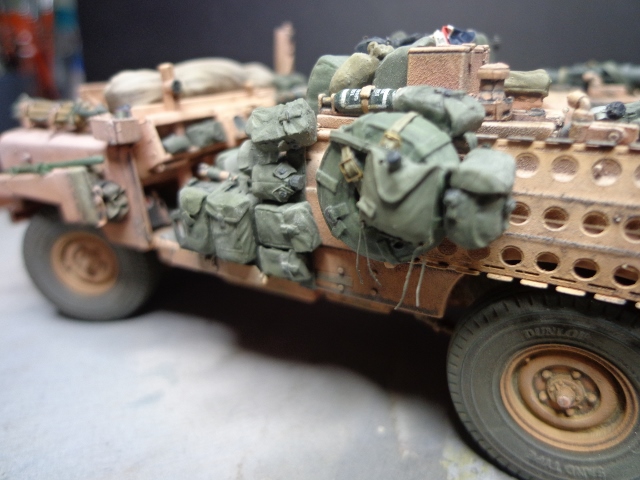
The 5 quart collapsible canteen is from the new Bravo6 water bottle set but note the addition of the laces at the bottom of it.
Again, the chain was taken from the Legend set but the ALICE pack is from the Plus Model Vietnam kit bags set with the addition of a couple of Bravo6 water bottles with nylon covers.
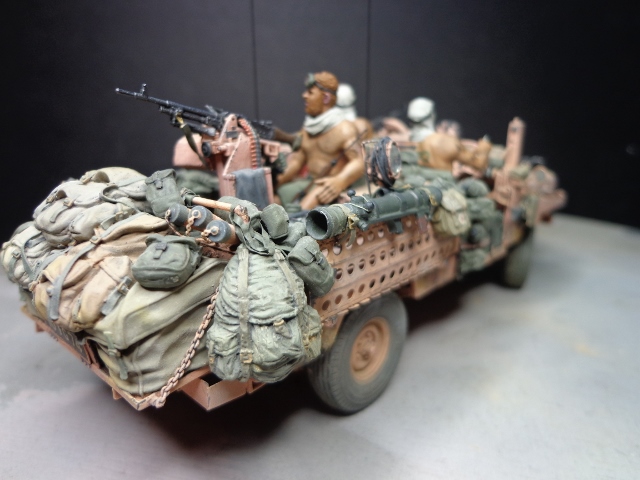
Much of the kit in the back is taken from the Legend set with the exception of the British Boiling Vessel & British jerry cans for water (Accurate Armour), the 'aluminium' water bottle (Bravo6), the Claymore mine bag (Plus Model) & various '58 pattern ammo pouches (Accurate Armour, Bravo6).
More photos inbound...
Sorry for the wait. It's taken an age to paint all this kit!
The first aid kit is actually an US M36 rucksack taken from Royal Models US Infantry equipment set with Archer transfers on it.
The Union Jack is also Archer & the Carl Gustav 84mm rocket launcher is from Firing Line with some extra detail added.
The 'aluminium' water bottles are taken from the new Bravo6 water bottle set.
Note the fire extinguisher. I had to improvise the decal using some white lines & very small lettering taken from some Archer transfer sheets.
The chain is from the Legend set.
I've wrapped the AR15 in some very thin plumbers tape to give the effect of being wrapped with khaki coloured sack cloth.
Note the map & cigarette packet.
The 5 quart collapsible canteen is from the new Bravo6 water bottle set but note the addition of the laces at the bottom of it.
Again, the chain was taken from the Legend set but the ALICE pack is from the Plus Model Vietnam kit bags set with the addition of a couple of Bravo6 water bottles with nylon covers.
Much of the kit in the back is taken from the Legend set with the exception of the British Boiling Vessel & British jerry cans for water (Accurate Armour), the 'aluminium' water bottle (Bravo6), the Claymore mine bag (Plus Model) & various '58 pattern ammo pouches (Accurate Armour, Bravo6).
More photos inbound...
joegrafton
Joined: October 04, 2009
KitMaker: 1,209 posts
Armorama: 1,143 posts
Posted: Monday, November 11, 2013 - 12:30 AM UTC
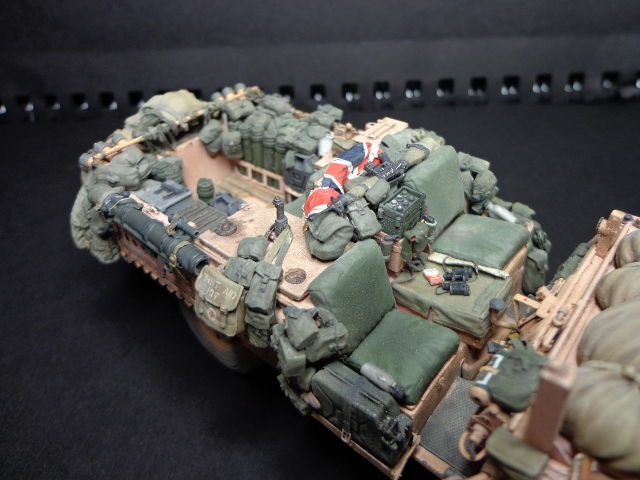
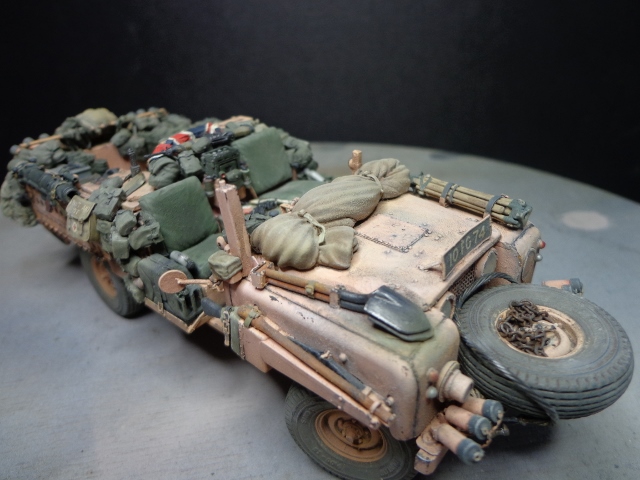
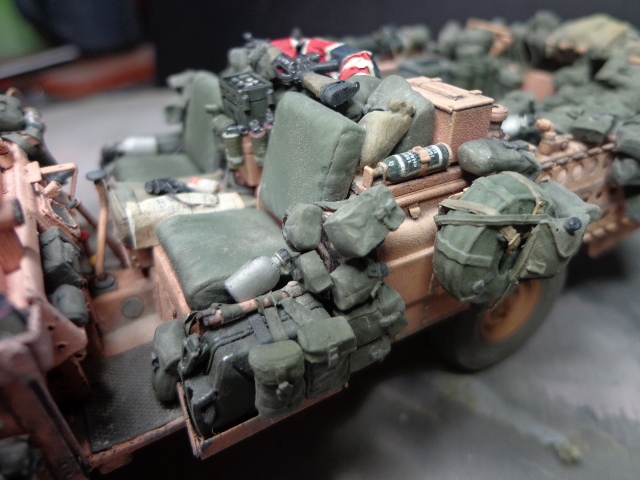
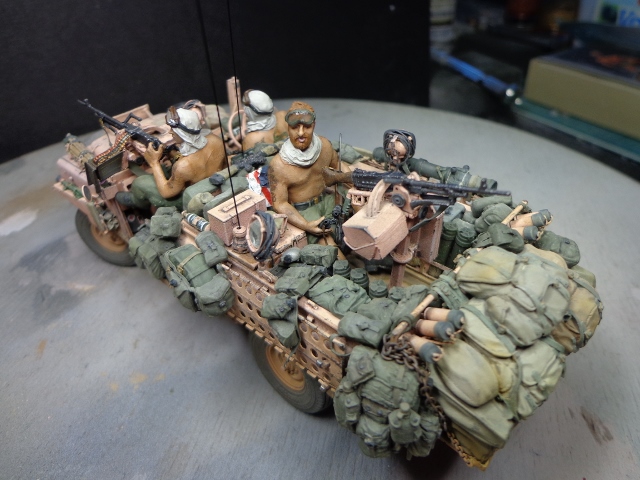
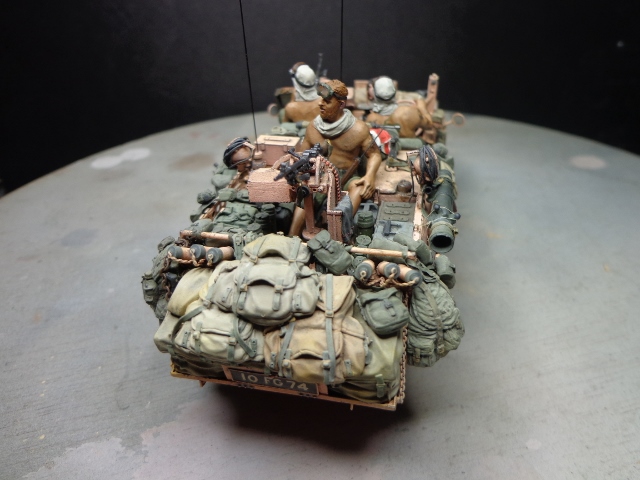
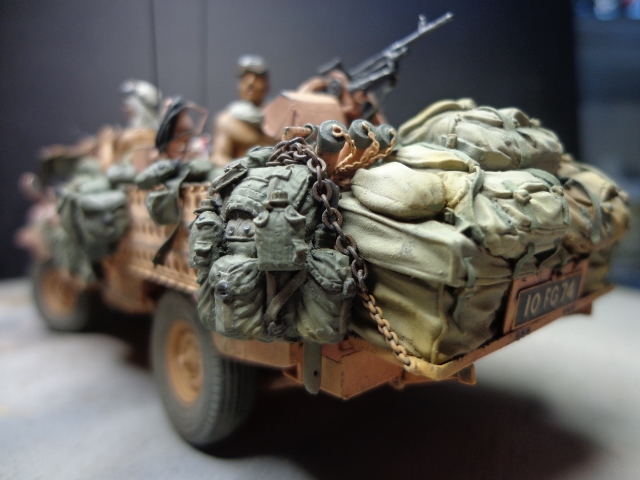
This rucksack is taken from the Plus Models Vietnam kit bag set.
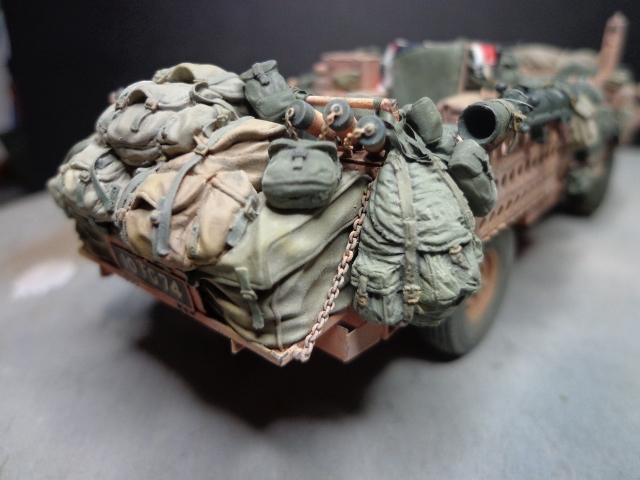
Note the addition of an Accurate Armour aerial base & a grenade pot for the rear seat crew member taken from the Legend set.
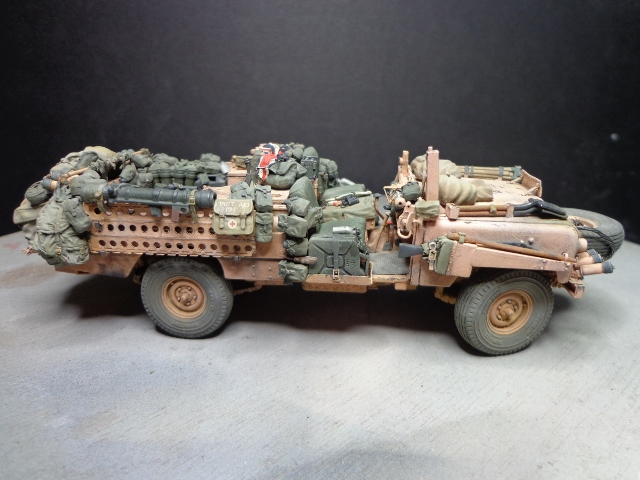

Hope you like them.
Next step is searchlights & machine guns!!!
Joe.

Keef1648

Joined: January 23, 2008
KitMaker: 1,240 posts
Armorama: 1,192 posts

Posted: Monday, November 11, 2013 - 12:33 AM UTC
Now that is looking exceptional, very well done Sir!
Keith...
Keith...

Maki


Joined: February 13, 2002
KitMaker: 5,579 posts
Armorama: 2,988 posts
Posted: Monday, November 11, 2013 - 01:16 AM UTC
Amazing, you can hardly see the vehicle under all this kit. The details are absolutely wonderful, especially that first aid kit stencils. Wow!
Mario
Mario


SDavies

Joined: January 09, 2010
KitMaker: 979 posts
Armorama: 959 posts

Posted: Monday, November 11, 2013 - 01:28 AM UTC
That certainly is alot of equipment, very nice looking kit
AlanL
Joined: August 12, 2005
KitMaker: 14,499 posts
Armorama: 11,675 posts
Posted: Monday, November 11, 2013 - 06:00 AM UTC
Hi Joe,
Coming together very nicely. A really well kitted out truck excellent progress.
Thanks for the updates.
Al
Coming together very nicely. A really well kitted out truck excellent progress.
Thanks for the updates.
Al
grimmo

Joined: January 17, 2006
KitMaker: 752 posts
Armorama: 569 posts
Posted: Monday, November 11, 2013 - 11:04 PM UTC
fantastic work joe!
would the ends of the Charlie g be covered up?
sorry I couldn't help with the water bottles!
would the ends of the Charlie g be covered up?
sorry I couldn't help with the water bottles!
darreng
Joined: January 21, 2006
KitMaker: 789 posts
Armorama: 382 posts
Posted: Monday, November 11, 2013 - 11:33 PM UTC
Excellent work Joe.
I hope mine turns out as well. But mine will be a "greenie"
I hope mine turns out as well. But mine will be a "greenie"
Paulinsibculo

Joined: July 01, 2010
KitMaker: 1,322 posts
Armorama: 1,239 posts

Posted: Tuesday, November 12, 2013 - 12:34 AM UTC

Wow! What a superb painting job you did!
Amazing to see a nicely detailed 110 Defender being burried under a complete SAS ware house! (And knowing that, in real, it was still able to climb steep hills off road.)
Looking forward to see the driver of this miltary collection.........
Or aren't you not adding him? I asume you do, since the wheel is still 'missing'.Please, keep us informed.
joegrafton
Joined: October 04, 2009
KitMaker: 1,209 posts
Armorama: 1,143 posts
Posted: Tuesday, November 12, 2013 - 02:44 AM UTC
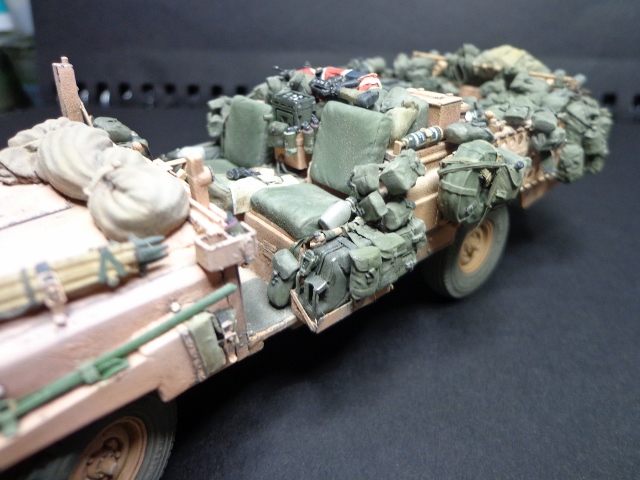
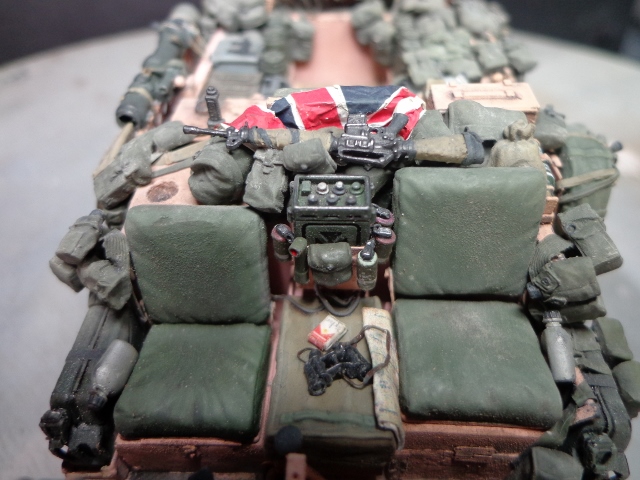
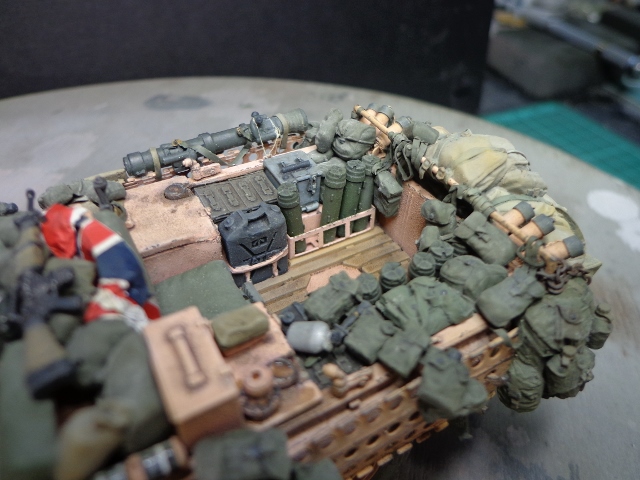
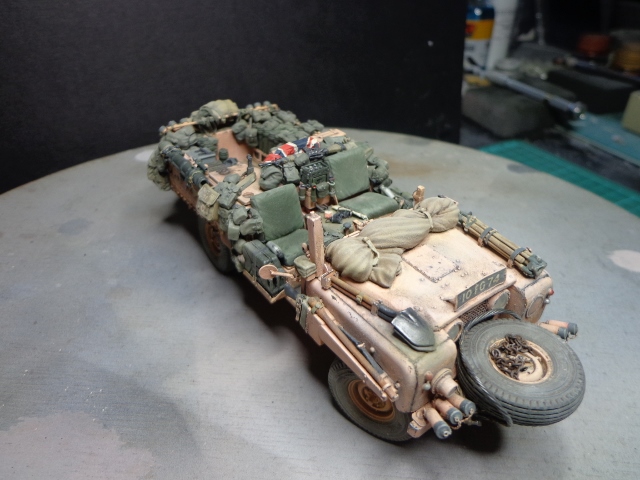
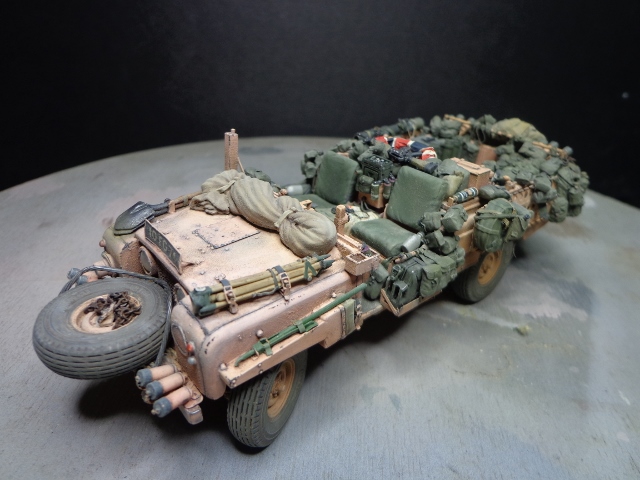
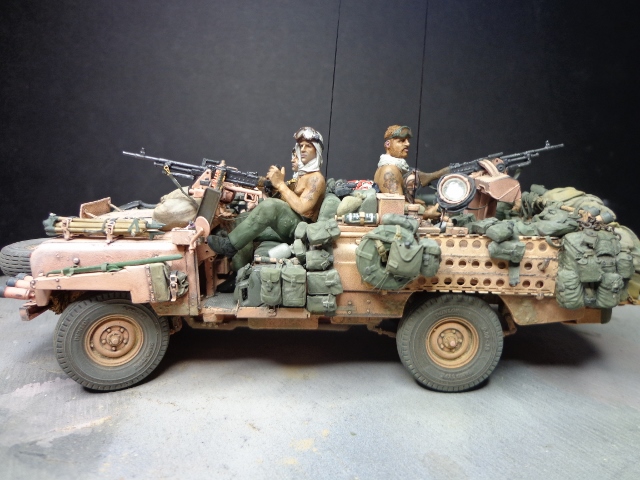
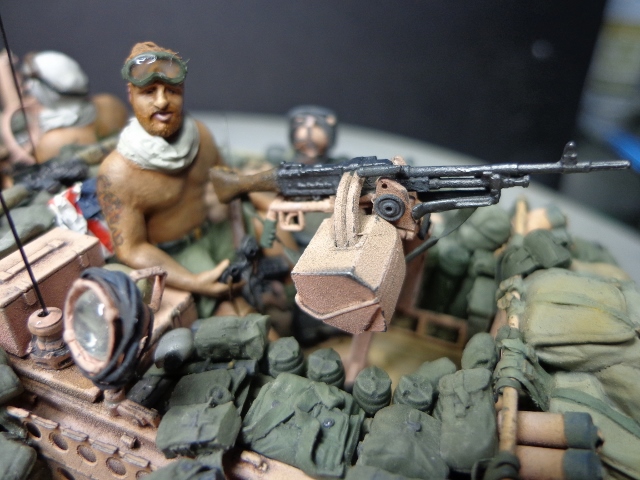
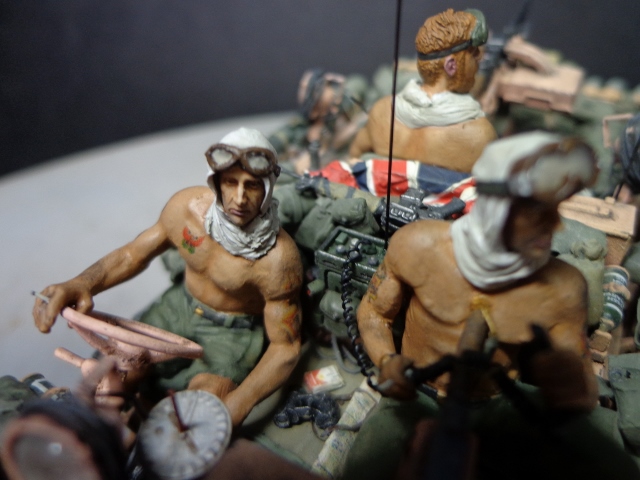
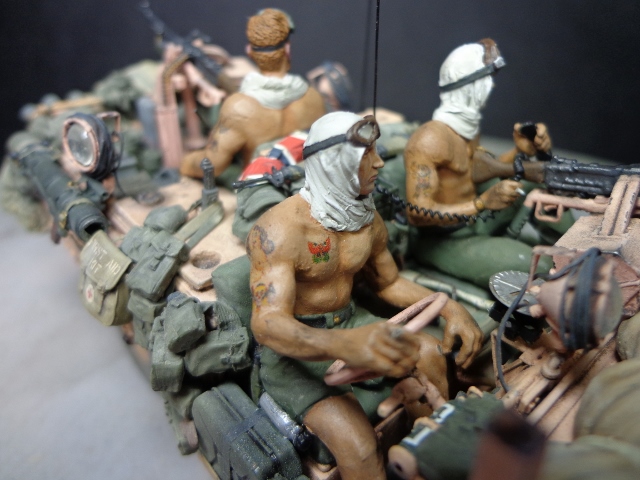
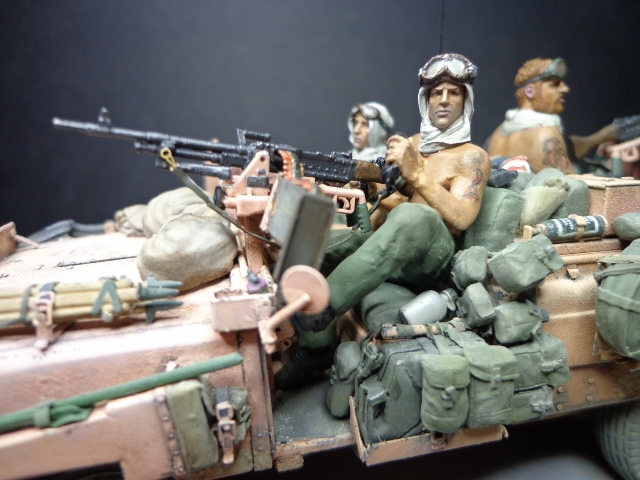
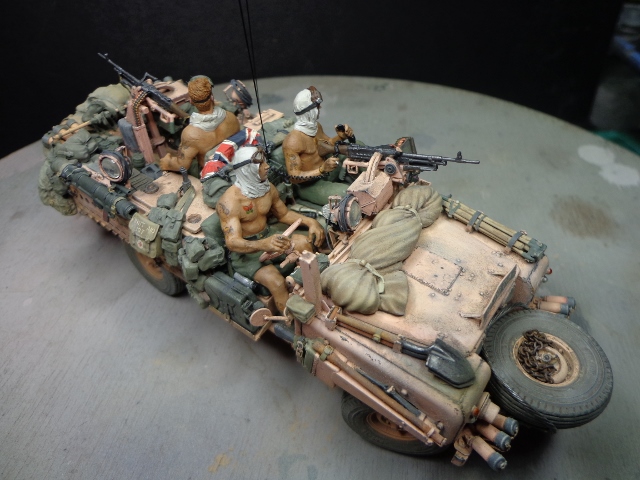
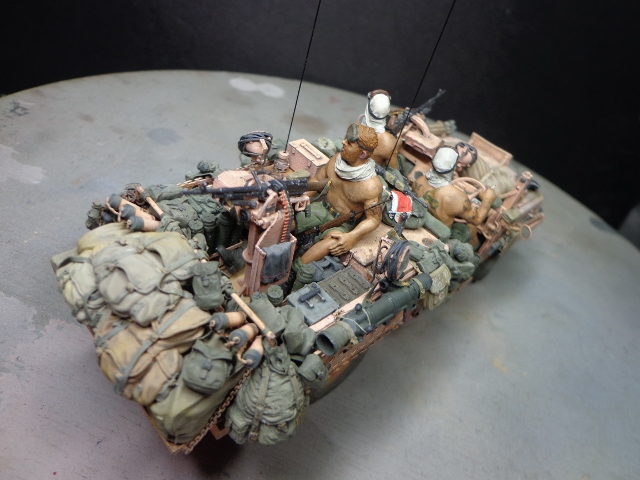
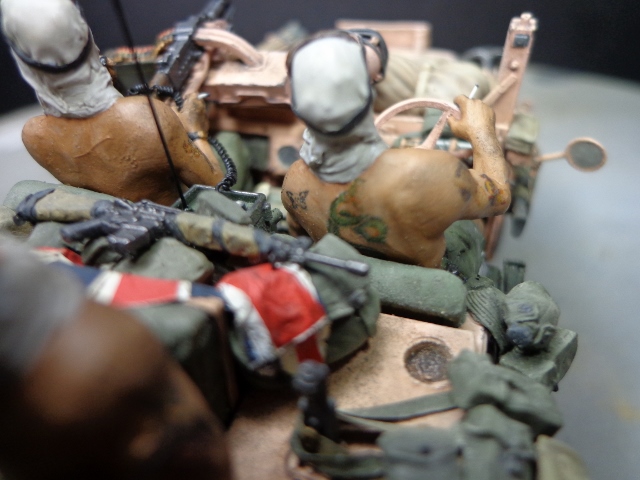
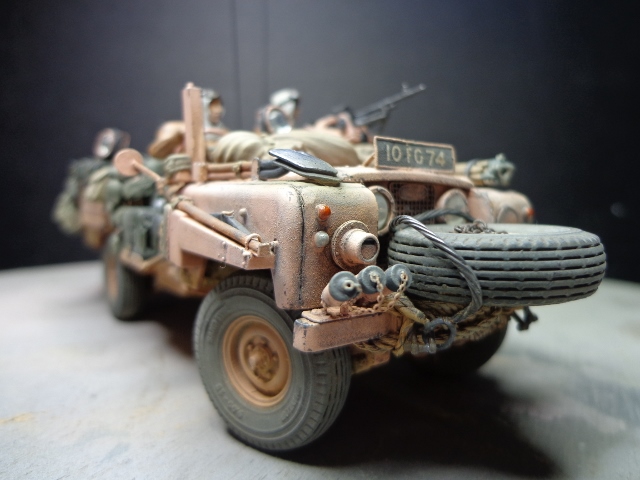
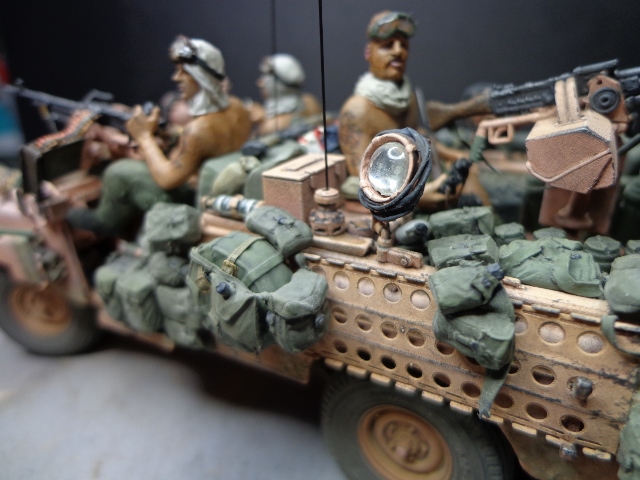
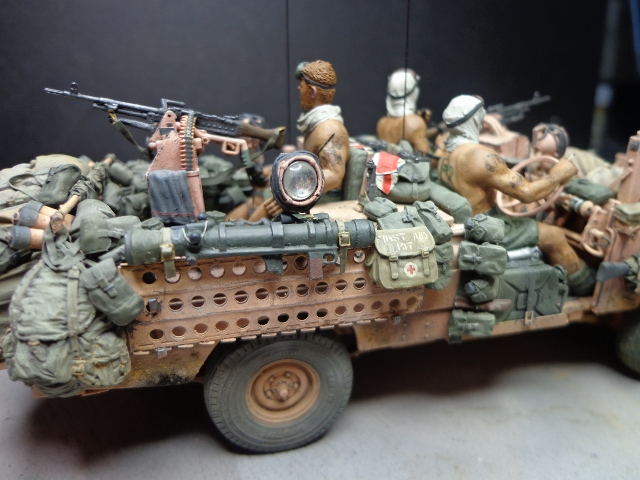
Okay then, searchlights, machine guns &...crew added!
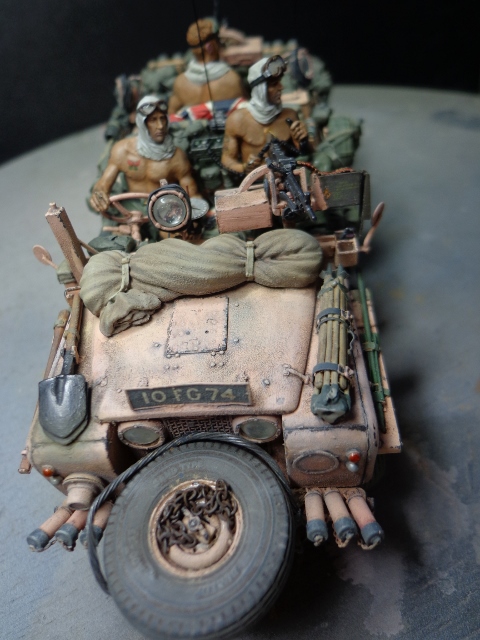
The Legend searchlight 'lenses' were carefully drilled out & replaced by AK Interactive 5mm white lenses which fit perfectly.
The aerials are from Accurate Armour.
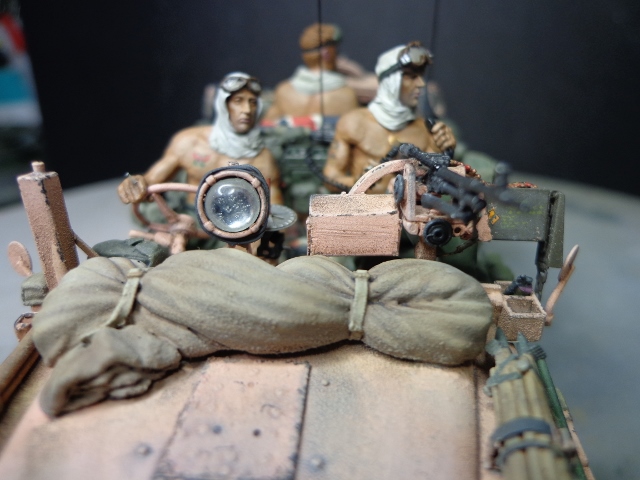

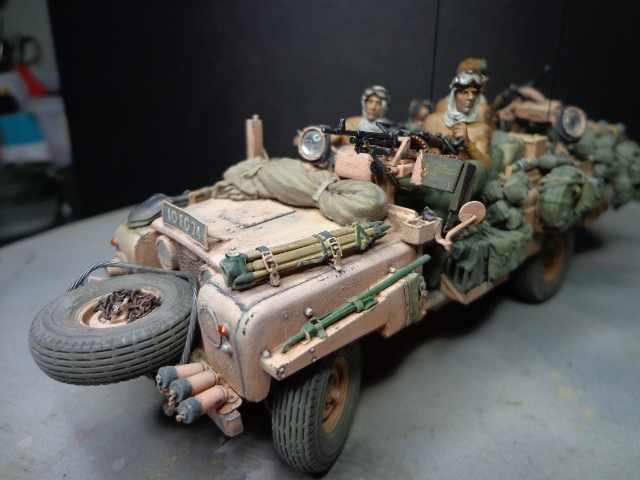
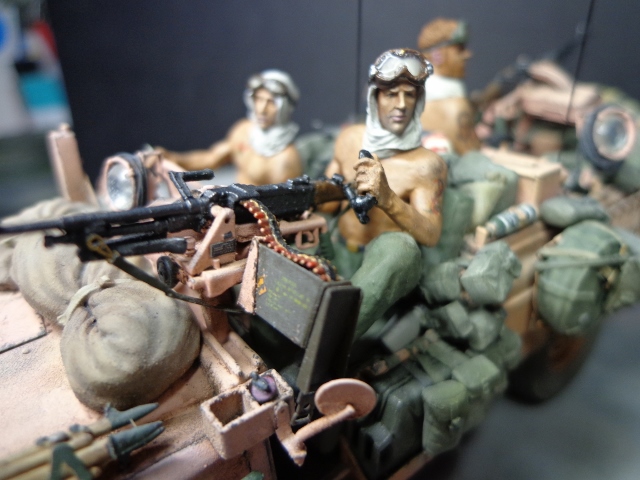
More to follow...
The Legend searchlight 'lenses' were carefully drilled out & replaced by AK Interactive 5mm white lenses which fit perfectly.
The aerials are from Accurate Armour.
More to follow...
joegrafton
Joined: October 04, 2009
KitMaker: 1,209 posts
Armorama: 1,143 posts
Posted: Tuesday, November 12, 2013 - 02:51 AM UTC
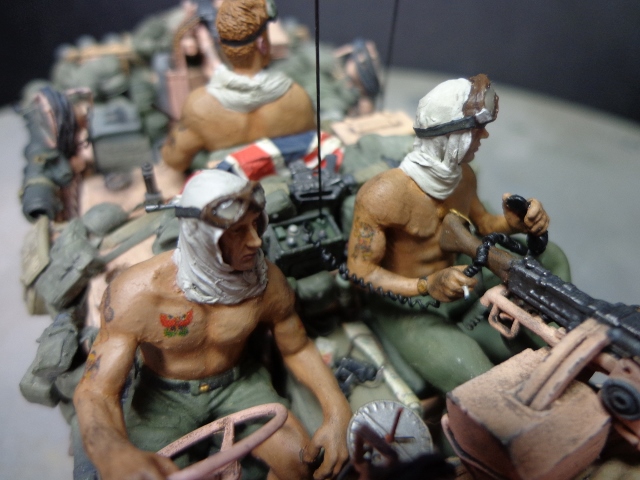
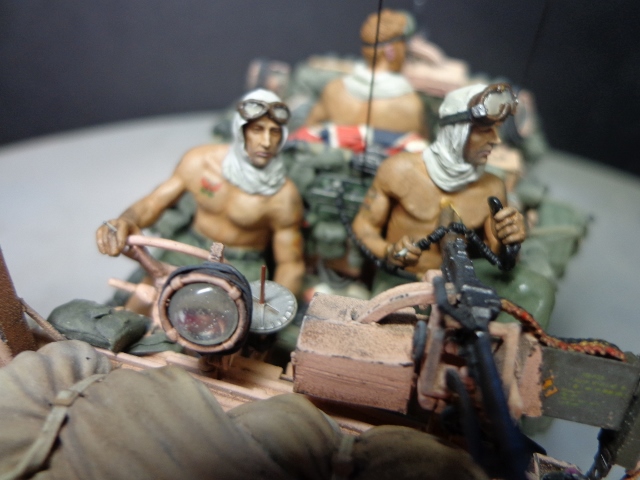
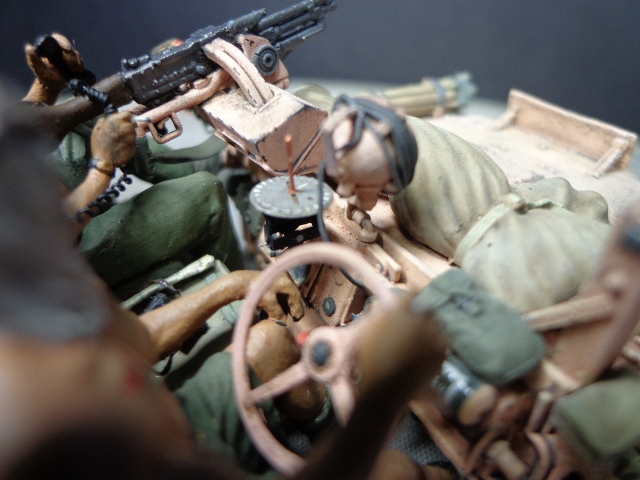
The sun compass had a little extra detail added. A couple of wing nuts, among other things. Very tricky! (#@*$!)
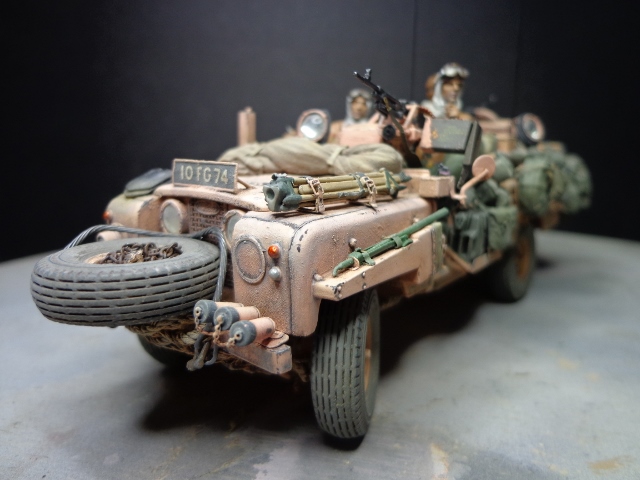
More to follow...
joegrafton
Joined: October 04, 2009
KitMaker: 1,209 posts
Armorama: 1,143 posts
Posted: Tuesday, November 12, 2013 - 02:56 AM UTC


More to follow...
joegrafton
Joined: October 04, 2009
KitMaker: 1,209 posts
Armorama: 1,143 posts
Posted: Tuesday, November 12, 2013 - 03:01 AM UTC
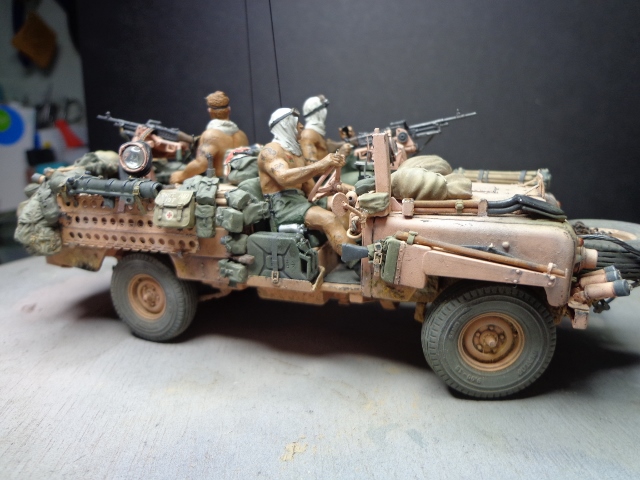
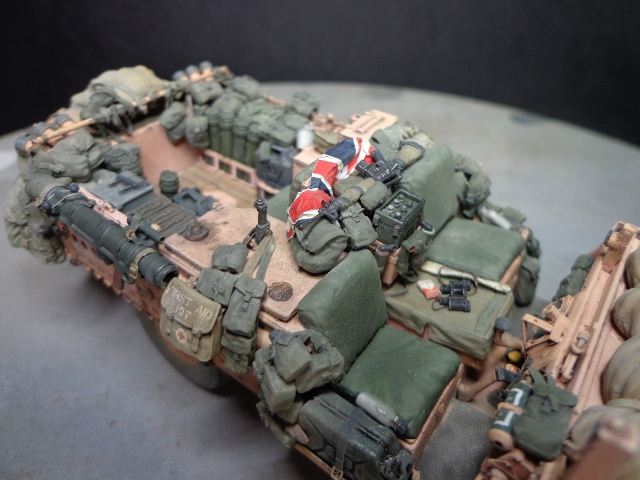
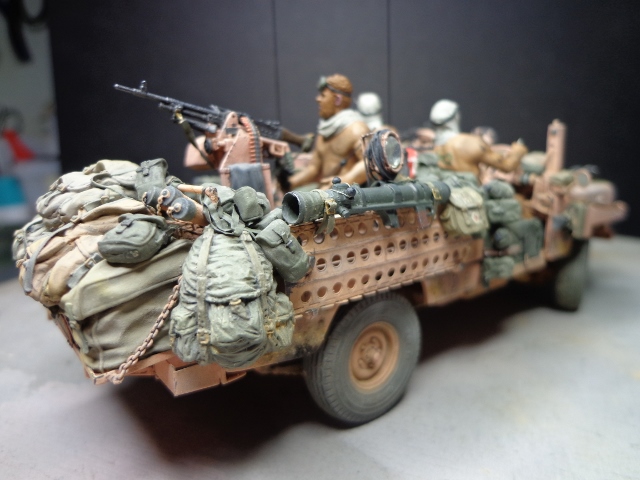
Well that just about wraps up the build for this one.
Next step is to sort out a base for it to sit on.
Check back in a while to see the base progress.
Hope you like the finished model.
Joe.
RKinsella
Joined: September 29, 2007
KitMaker: 603 posts
Armorama: 575 posts
Posted: Friday, November 15, 2013 - 11:38 AM UTC
Simply AMAZING joe!!!!!
I love how this model has turned out and I really love the figures, something very different. The Union Jack is such a cool touch and is really eye catching too.
I could sit here commenting on everything and how well it looks, stores, lamps, weapons etc etc, the model is simply spectacular!!
I've saved this to my favourites bar now for reference
WELL DONE MATE, BRAVO!!!!
..hope you intend to do the Green Hornet next wink wink
AlanL
Joined: August 12, 2005
KitMaker: 14,499 posts
Armorama: 11,675 posts
Posted: Friday, November 15, 2013 - 07:16 PM UTC
Hi Joe,
Excellent work, turned out a treat. The tats on the figures are a nice touch and the level of detail terrific.
Congrats on getting the build complete, so much to look at.
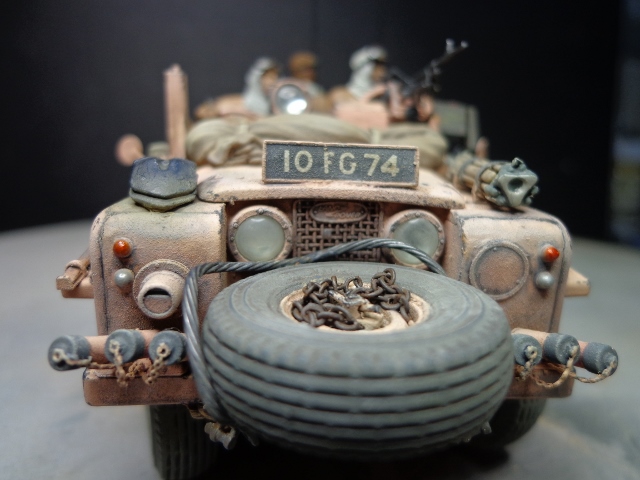
One query, would the steering wheel have been pink?
A fine kit for your collection. Great work.
Al
Excellent work, turned out a treat. The tats on the figures are a nice touch and the level of detail terrific.
Congrats on getting the build complete, so much to look at.
One query, would the steering wheel have been pink?
A fine kit for your collection. Great work.
Al
Keef1648
Joined: January 23, 2008
KitMaker: 1,240 posts
Armorama: 1,192 posts
Posted: Saturday, November 16, 2013 - 12:22 AM UTC
As has been stated, a first class finish and build.
The ONLY comment and 'nit pick' is the amount/quantity and degree of tattoo's worn by the crew.
The time period depicted by this vehicle and equipment and personal shoulder rub with some of these fine young men during my service years has me making this point.
While it it MAY be somewhat different in today's modern military (even the British forces)... back then this level of 'body art' would not be found within the SAS and SBS, in fact, within the British forces of the time....
However it still doesn't fault the high degree of modeling skills and painting of this build...
Keith..

SpeedyJ

Joined: September 17, 2013
KitMaker: 1,617 posts
Armorama: 1,150 posts
Posted: Saturday, November 16, 2013 - 01:46 AM UTC

This is so cool. I very much like the tattoo's. Lovely details to be seen on this 'gunship of the desert'.
Best regards,
Robert Jan
joegrafton
Joined: October 04, 2009
KitMaker: 1,209 posts
Armorama: 1,143 posts
Posted: Saturday, November 16, 2013 - 06:52 PM UTC
Hi fellas,
Thanks for your comments.
As I've mentioned already, I am in the process of making a small base for it to sit on just to set it off nicely.
Roy, I will be going for that green hornet next! I was thinking of running a build log for it only this time showing each step of the actual build as opposed to just showing the built model pre-painting as in this log.
Al, as far as I understand it everything was painted pink; sometimes even the tyres!
Keith, sorry you dont like the tats, mate (but thanks for your comments on the overall build!) & Rob, I'm glad you do like them!
Joe.
 |

WEB HOSTING BY


Copyright ©2021 Armorama and Kitmaker Network, a subsidiary of Silver Star Enterprises
All Rights Reserved. Please read our Conditions of Use and Privacy Policy.
All Rights Reserved. Please read our Conditions of Use and Privacy Policy.