Todd,will you add the anti-slip coat over the "turret" of the D9?!in some photos that Frenchy posted it's visible.
Ciro
Hosted by Darren Baker
Meng 1/35 D9R Armored Bulldozer
Wakemeup

Joined: September 02, 2006
KitMaker: 880 posts
Armorama: 874 posts

Posted: Thursday, August 22, 2013 - 07:56 AM UTC

TRM5150

Joined: January 03, 2010
KitMaker: 2,159 posts
Armorama: 707 posts

Posted: Thursday, August 22, 2013 - 08:13 AM UTC
LOL..was just looking at the pics in the DEP book and the anti-skid was up there...Yup, on the list!! Plotting some work right now as I have some time!!! 

henkp

Joined: September 30, 2005
KitMaker: 1,080 posts
Armorama: 1,064 posts

Posted: Saturday, August 24, 2013 - 09:16 PM UTC
AFVFan

Joined: May 17, 2012
KitMaker: 1,980 posts
Armorama: 1,571 posts

Posted: Saturday, August 24, 2013 - 09:54 PM UTC
Quoted Text
great news is coming from voyager slat armor for d9r
Oh, now that looks like a fun way to spend an hour or two.


TRM5150

Joined: January 03, 2010
KitMaker: 2,159 posts
Armorama: 707 posts

Posted: Sunday, August 25, 2013 - 12:46 AM UTC
Thanks for posting this Henk!!
Bob, that slat looks like a cool way to spend an afternoon!!
Bob, that slat looks like a cool way to spend an afternoon!!

grunf

Joined: October 25, 2005
KitMaker: 89 posts
Armorama: 69 posts

Posted: Sunday, August 25, 2013 - 01:20 AM UTC
It's a very impressive box and looking to be very ejoiable built! Time ago i was made my scratchbuilt D9 following the instruction of the big BARV.
For me was a big deal, but enjoi my time during erection and paint.
In which way you want to display?
Ciao
Piero
For me was a big deal, but enjoi my time during erection and paint.
In which way you want to display?
Ciao
Piero

TRM5150

Joined: January 03, 2010
KitMaker: 2,159 posts
Armorama: 707 posts

Posted: Sunday, August 25, 2013 - 02:13 AM UTC
Hello Piero,
Thanks!! This has been a lot of fun so far!! Sounds like you had a nice little project out of yours! I plan on the IDF version but as for the setting, I am not completely set on anything. I like to just build and see where it takes me!!
Thanks!! This has been a lot of fun so far!! Sounds like you had a nice little project out of yours! I plan on the IDF version but as for the setting, I am not completely set on anything. I like to just build and see where it takes me!!

grunf

Joined: October 25, 2005
KitMaker: 89 posts
Armorama: 69 posts

Posted: Sunday, August 25, 2013 - 07:17 PM UTC
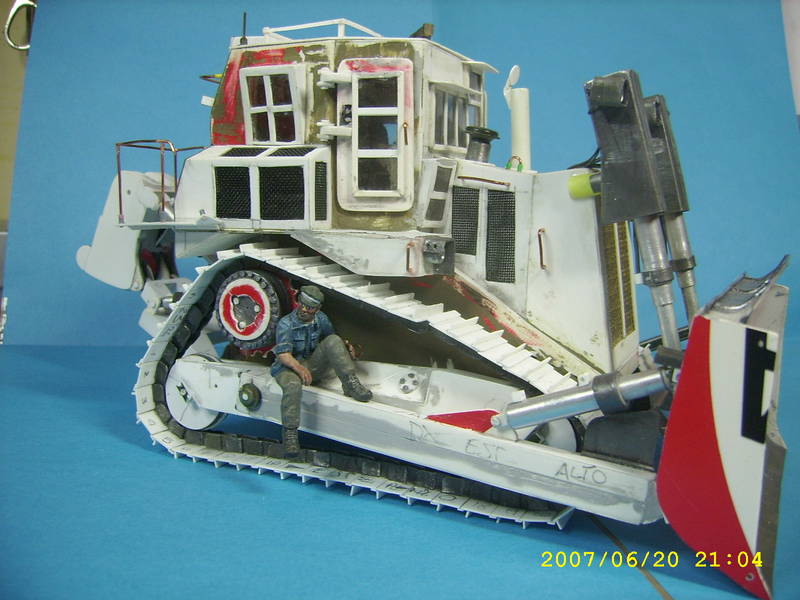
This is my scratch built, done time ago, now I do not have time to spend on modeling, I was starting a new one tipe R (this is the connection if you would like to have a lookhttp://www.smf-modellismo.net/olympus/viewtopic.php?f=2&t=2365), but no time to finish, and now with this model......

I follow your work with interest
ciao
I follow your work with interest
ciao
henkp

Joined: September 30, 2005
KitMaker: 1,080 posts
Armorama: 1,064 posts

Posted: Monday, August 26, 2013 - 12:59 AM UTC
woow nice scratchbuilt looks great pierluigi
henk
henk
grunf

Joined: October 25, 2005
KitMaker: 89 posts
Armorama: 69 posts

Posted: Monday, August 26, 2013 - 01:26 AM UTC
Removed by original poster on 08/26/13 - 13:30:00 (GMT).
jvazquez

Joined: September 26, 2006
KitMaker: 857 posts
Armorama: 811 posts

Posted: Monday, August 26, 2013 - 02:16 AM UTC
Wow, that is some amazing scratch work!
MAD_DUCK

Joined: March 05, 2002
KitMaker: 434 posts
Armorama: 406 posts

Posted: Monday, August 26, 2013 - 02:24 AM UTC
This maybe a dumb question, But If I entered mine in a model show, what category would it fit in? Its diffidently not a soft skin, But its not a tank either.
grunf

Joined: October 25, 2005
KitMaker: 89 posts
Armorama: 69 posts

Posted: Monday, August 26, 2013 - 03:46 AM UTC
In Italy they accept my D9 into a section called "mezzi militari" i don't know how trans late in english there is no difference between tanks and trucks or cars more important that must be a military use.
Ciao
Piero
Ciao
Piero

TRM5150

Joined: January 03, 2010
KitMaker: 2,159 posts
Armorama: 707 posts

Posted: Monday, August 26, 2013 - 04:40 AM UTC
Well... 
Piero, Excellent scratchwork...on the modelling site and on the finished product!! Great concept and nice execution of the project!!
Vince, I would think under either closed top or open top Armor...would do. This could be considered a prime mover, AFV, Armor...I am sure more. Also depends on What the forum or judges consider it as well as what is offered on the list. I had a wingy thing change four catagories in one day of judging. LOL!!


TRM5150

Joined: January 03, 2010
KitMaker: 2,159 posts
Armorama: 707 posts

Posted: Tuesday, August 27, 2013 - 01:29 PM UTC
Well well well, it must seem like I am sleeping at the wheel on this...LOL! A little matter of painting the interior got in the way and slowed the pace a bit.
So here is what I have been up to...for the most part!
A little prime-time had to fall first!

The ceiling! I added a grab handle as well as a little wiring to the rack mounted equipment.

Not wasting to much time on the interior end of the one here is where the painting stands now, minus any Decs that will go on in about 5 minutes after I stop typing here....

Needless to say, the walls are not fixed here yet, hence the gaps. I still need to move around to get the decs on and maybe a touch or two of weathering.


I have to admit that I am impressed with how this comes together with a little paint. The detailing in the cabin is pretty much just enough to add some interest once this will be done. I did have to bend and add some grab bars to the interior. the one over the console is the only on provided with the kit. There were molded nubs where the other are (all in red of course).


Please disregard that small white thread between the pedals...not sure how that got there, but no, it is not some sort of weird electrical connection. Also, there are a couple parts missing at the moment as the glazing will need to be installed prior to their installation...next...I first need to work out some masking for the glass.
As always, thanks for dropping by!!!
So here is what I have been up to...for the most part!
A little prime-time had to fall first!

The ceiling! I added a grab handle as well as a little wiring to the rack mounted equipment.

Not wasting to much time on the interior end of the one here is where the painting stands now, minus any Decs that will go on in about 5 minutes after I stop typing here....

Needless to say, the walls are not fixed here yet, hence the gaps. I still need to move around to get the decs on and maybe a touch or two of weathering.


I have to admit that I am impressed with how this comes together with a little paint. The detailing in the cabin is pretty much just enough to add some interest once this will be done. I did have to bend and add some grab bars to the interior. the one over the console is the only on provided with the kit. There were molded nubs where the other are (all in red of course).


Please disregard that small white thread between the pedals...not sure how that got there, but no, it is not some sort of weird electrical connection. Also, there are a couple parts missing at the moment as the glazing will need to be installed prior to their installation...next...I first need to work out some masking for the glass.
As always, thanks for dropping by!!!
hliu24

Joined: November 19, 2010
KitMaker: 798 posts
Armorama: 797 posts

Posted: Tuesday, August 27, 2013 - 01:58 PM UTC
Look great! did you do hand brush or spray?
thanks
Jay
thanks
Jay
Taylornic

Joined: January 10, 2005
KitMaker: 337 posts
Armorama: 332 posts

Posted: Tuesday, August 27, 2013 - 02:22 PM UTC
Very nice work!

Belt_Fed

Joined: February 02, 2008
KitMaker: 1,388 posts
Armorama: 1,325 posts

Posted: Tuesday, August 27, 2013 - 04:09 PM UTC
Amazing work so far. I have always been in love with construction equipment, ever since i was a toddler! The interior looks good, but it looks like there is still an EP mark on the back wall that you might want to consider filling/ sanding again.
henkp

Joined: September 30, 2005
KitMaker: 1,080 posts
Armorama: 1,064 posts

Posted: Tuesday, August 27, 2013 - 04:39 PM UTC
nice job the cabin looks great
henk
henk
Maki


Joined: February 13, 2002
KitMaker: 5,579 posts
Armorama: 2,988 posts

Posted: Tuesday, August 27, 2013 - 05:20 PM UTC
Very nice and clean build so far. The interior looks great... the decals will lift it up to the next level. Are you planning to dirty it up a bit? Perhaps adding some smaller items like cigarette boxes or something like that?
Mario
Mario
Wakemeup

Joined: September 02, 2006
KitMaker: 880 posts
Armorama: 874 posts

Posted: Tuesday, August 27, 2013 - 06:36 PM UTC
Very nice work!!!!
It's a shame that you can't use the voyager sets...I'm waiting mine from HK and I'm pretty sure that in September the pe sets will be available.
I love the slat armor!
Cheers
Ciro
It's a shame that you can't use the voyager sets...I'm waiting mine from HK and I'm pretty sure that in September the pe sets will be available.
I love the slat armor!
Cheers
Ciro
mvaiano

Joined: January 24, 2012
KitMaker: 1,054 posts
Armorama: 1,050 posts

Posted: Wednesday, August 28, 2013 - 12:50 AM UTC
Wow, great work Todd. I'm waiting mine...
Cheers!
Marco
Cheers!
Marco

TRM5150

Joined: January 03, 2010
KitMaker: 2,159 posts
Armorama: 707 posts

Posted: Wednesday, August 28, 2013 - 02:01 AM UTC
Jay - Thank you!! I spray all of the big parts, walls and floor; hand painted fixtures the bottom section of the gunner's chair and consoles. 
Taylor - Thank you !!
Jon - Thank you Sir! I would like to see some more constructtion vehicle kits come out soon too! Just Different! LOL...I will check the rear wall again when I get home, thinking it might be a shadow but certainly quite posible!!
Henk - Thanks a bunch!!
Mario - Thank you sir! I will start with washes but will end up adding some dirt/dust as well. Few and far between when these are pristine machines! Decals went on last night, they do help add a bit inside. Once the roof is on and this is buttoned up, I think she will look just fine!
Ciro - Thank you! I too like the slat armor very much and I was tempted to scratch some....I am thinking for the $35 to $45 range for the kit, maybe pick one up down the road and the voyager set...these big girls can travel in packs!!
Marco - Thank you !! I am sure you will enjoy yours as much as I am enjoying this one!

Taylor - Thank you !!

Jon - Thank you Sir! I would like to see some more constructtion vehicle kits come out soon too! Just Different! LOL...I will check the rear wall again when I get home, thinking it might be a shadow but certainly quite posible!!

Henk - Thanks a bunch!!

Mario - Thank you sir! I will start with washes but will end up adding some dirt/dust as well. Few and far between when these are pristine machines! Decals went on last night, they do help add a bit inside. Once the roof is on and this is buttoned up, I think she will look just fine!
Ciro - Thank you! I too like the slat armor very much and I was tempted to scratch some....I am thinking for the $35 to $45 range for the kit, maybe pick one up down the road and the voyager set...these big girls can travel in packs!!

Marco - Thank you !! I am sure you will enjoy yours as much as I am enjoying this one!

grunf

Joined: October 25, 2005
KitMaker: 89 posts
Armorama: 69 posts

Posted: Wednesday, August 28, 2013 - 02:22 AM UTC
nice 

 |


