Hello. The hull interior has recieved some weathering, the pedals have to be scratched and washed yet. The lower side skirts were attached. The instructions have you attach these prior to attaching the wheels, I thought I goofed by attaching the wheels first but they went on with no problems. The collasped antenna pole is made up from 5 parts as is the extended version. Thanks for looking and all the help, Wingman out.
Hosted by Darren Baker
AFV Club Panzer FunkWagen
wingman

Joined: December 09, 2003
KitMaker: 880 posts
Armorama: 209 posts

Posted: Thursday, October 31, 2013 - 06:13 AM UTC
Hello. The hull interior has recieved some weathering, the pedals have to be scratched and washed yet. The lower side skirts were attached. The instructions have you attach these prior to attaching the wheels, I thought I goofed by attaching the wheels first but they went on with no problems. The collasped antenna pole is made up from 5 parts as is the extended version. Thanks for looking and all the help, Wingman out.
Posted: Thursday, October 31, 2013 - 11:28 AM UTC
Absolutely GREAT work!
Mike
Mike
Hohenstaufen

Joined: December 13, 2004
KitMaker: 2,192 posts
Armorama: 1,615 posts

Posted: Tuesday, November 05, 2013 - 10:30 AM UTC
Looking good! Hmmm, that star aerial is going to take some getting off the sprue in one piece...!
wingman

Joined: December 09, 2003
KitMaker: 880 posts
Armorama: 209 posts

Posted: Tuesday, November 05, 2013 - 12:06 PM UTC
Thanks Mike. I'll start adding Mig pigments to the underside of the fenders before attaching them to the hull, it will be easier that way since the wheels will be in the way. Wingman out.
wingman

Joined: December 09, 2003
KitMaker: 880 posts
Armorama: 209 posts

Posted: Tuesday, November 05, 2013 - 12:08 PM UTC
Thanks Steve. Yeah, I'll take my time with that. The hard part will be shaving off what's left over after I clip them off the sprue. Thanks for looking, Wingman out.
wingman

Joined: December 09, 2003
KitMaker: 880 posts
Armorama: 209 posts

Posted: Wednesday, November 06, 2013 - 12:12 AM UTC
Quoted Text
Quoted TextHello. Can anyone tell me where I can get some accesories for this build, I'd like to fill the stowage bins on this build. I saw some cool stick grenades somehwere, can't remember where I saw them. Thanks, Wingman out.
Armorama::Dioramas:"Box of Grenades"
This is a pretty nice looking set of Stick Grenades made by Hauler. Looks like you get about 30, resin Model 24 Stielhandgranate along with resin and PE shipping boxes along with a PE shipping label painting stencil.
The new announcement title and forum placement makes finding the review and new product hard. If the new title had been something like: "Hauler Resin and PE Stick Grenade Set" it might have caught my attention sooner.
Still, these might help you.
Be aware that the Germans had a fairly standardized stowage rack on the walls of most of their armored cars just for the Stielhandgranate.
Stick Grenade Rack SdKfz 222
Here's a diagram of the steering angles on the German heavy 8-wheeled armored cars. Note that the angles shown here are for the tightest turn possible and that lesser steering angles are, of course, possible. However, you can see the amount of difference between the front and rear wheel angles and the center wheel angles. Also note that the inside wheel angles are higher than the outside wheel angles.
HTH,
Hey Mike. I just installed two lights, one on each side on the interior of the upper hull that point down lining up with a hole that lets the light shine outside. On the outside of the hull there is a metal flap that can be opened up with the push of a metal stake. I was wondering if you had any info on this.Thanks for the help, Wingman out.

HipKitty

Joined: February 14, 2011
KitMaker: 390 posts
Armorama: 387 posts

Posted: Friday, November 15, 2013 - 03:56 PM UTC
Love the work so far! This is my favorite DAK vehicle after falling in love with Shep Paine's work many years ago. Keep up the good work! 

wingman

Joined: December 09, 2003
KitMaker: 880 posts
Armorama: 209 posts

Posted: Saturday, December 21, 2013 - 04:18 AM UTC
Thanks Neal. It's been awhile between posts. A new job has taken priority. Hatches and such have been weathered and the underside of the fenders dirtied up. The lower half of the hull has been attached. The upper half is not attached yet but the fit looks really good. Thanks for looking, Wingman out.
wingman

Joined: December 09, 2003
KitMaker: 880 posts
Armorama: 209 posts

Posted: Tuesday, December 24, 2013 - 08:35 AM UTC
Hello. The fenders, tow hooks, rear license plates and photo-etch parts where the front width indicators attach have been added. The upper hull has not been attached yet but the fit looks good. Some of the parts seem to be made from a different color plastic, not sure why, it doesn't effect the fit at all. Thanks for looking, everyone have a very Merry Christmas.
wingman

Joined: December 09, 2003
KitMaker: 880 posts
Armorama: 209 posts

Posted: Monday, February 03, 2014 - 08:10 AM UTC
Hello. The paint on the wheels have been worn away via the hairspray method and some tan and black pastel chalks mixed together and applied to the bottom of the vehicle. The exhaust have been attached. I've gotten lucky so far with the photo etch exhaust covers. Using very thin paint to paint these so it won't close up the fine holes in the mesh. Thanks for looking, Wingman out.
wingman

Joined: December 09, 2003
KitMaker: 880 posts
Armorama: 209 posts

Posted: Saturday, March 29, 2014 - 05:15 AM UTC
Hello. Tamiya Desert Yellow has been applied with some paint chipping with a sponge coming up along with some touch ups, thanks for looking, Wingman out.
thebear

Joined: November 15, 2002
KitMaker: 3,960 posts
Armorama: 3,579 posts

Posted: Saturday, March 29, 2014 - 07:23 AM UTC
Great work ... I really want one of these kits .. Keep the pictures coming !
Rick
Rick
wingman

Joined: December 09, 2003
KitMaker: 880 posts
Armorama: 209 posts

Posted: Saturday, April 05, 2014 - 02:28 AM UTC
Thanks for the kind words Richard. The paint chipping has started using the sponge method with Tamiya German Grey. Not sure what type of wash will be used. Thanks for looking, Wingman out.
wingman

Joined: December 09, 2003
KitMaker: 880 posts
Armorama: 209 posts

Posted: Monday, April 21, 2014 - 11:35 AM UTC
Hello. The antenna has been attached along with some crew hatches and such. Still have to add some dust and some minor touch ups. The telescoping antenna mast will be attached last. Thanks for looking, Wingman out.
chefchris

Joined: February 06, 2006
KitMaker: 1,544 posts
Armorama: 1,464 posts

Posted: Monday, April 21, 2014 - 12:35 PM UTC
Awesome build!
wingman

Joined: December 09, 2003
KitMaker: 880 posts
Armorama: 209 posts

Posted: Sunday, May 18, 2014 - 08:20 AM UTC
Thanks Chris. Just added a dust layer to the fenders and hull, have to hit the wheels and tires yet and just a bit to the flat surface on the upper hull. A little will be added to the antenna frame as well. Thanks for looking, Wingman out.
Posted: Friday, May 23, 2014 - 05:25 PM UTC
 Great job on this kit. I really like your painting and weathering. I have this kit....it scares me. Hopefully I'll get up the courage to build it before I'm too old!!
Jeff

wingman

Joined: December 09, 2003
KitMaker: 880 posts
Armorama: 209 posts

Posted: Monday, June 02, 2014 - 09:05 AM UTC
Thanks Jeff. Thanks for the kind words. Nothing to be afraid of, this kit goes together wonderfully, a joy to build. Just take your time. Thanks for looking Wingman out.
wingman

Joined: December 09, 2003
KitMaker: 880 posts
Armorama: 209 posts

Posted: Sunday, July 27, 2014 - 03:42 AM UTC
Hello. Dust has been applied to the tires and wheels along with a bit on the antenna frame. I forgot to put the rag and red oil can in the rack with the water cans. The red can will add a touch of color. A tow cable has been stowed behind the frontal armor. A short length of stretched sprue needs to be painted and attached to its connection point on the hull from the antenna frame. That's it for now, thanks for looking, Wingman out.
wingman

Joined: December 09, 2003
KitMaker: 880 posts
Armorama: 209 posts

Posted: Saturday, February 28, 2015 - 08:49 PM UTC
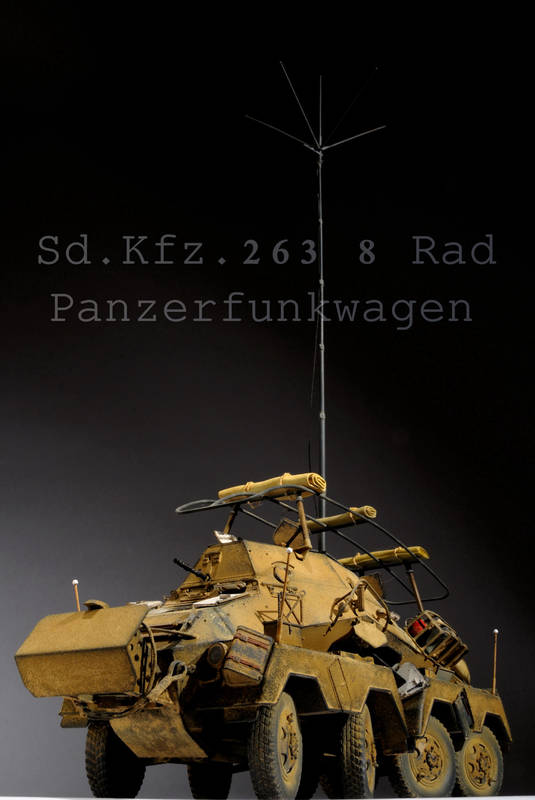
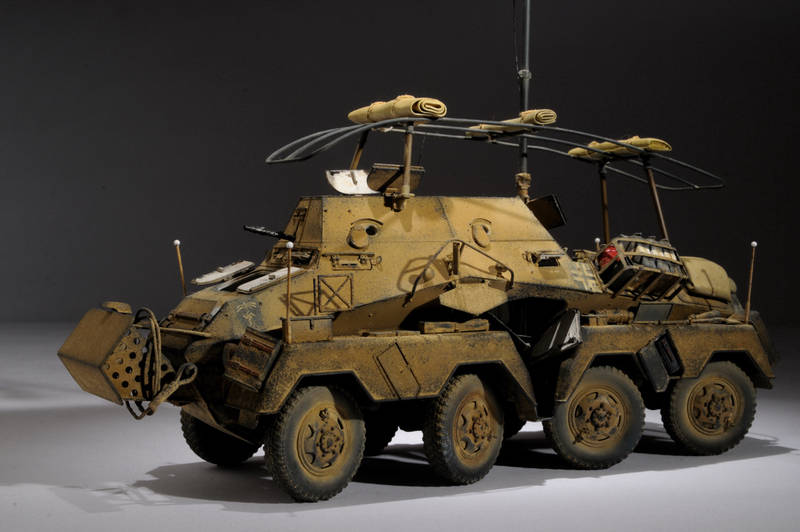
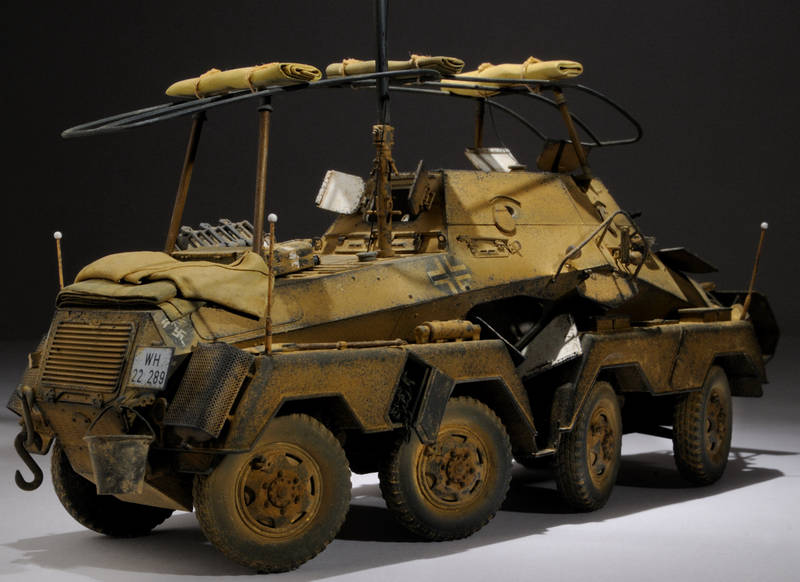
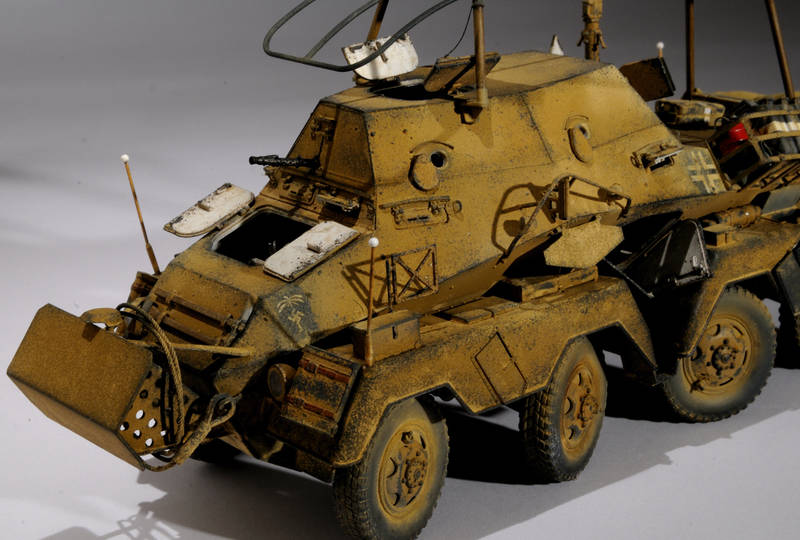
Hello. Finally done. This was a very enjoyable build. Would highly recommend this kit. High marks. Thanks for looking.
thebear

Joined: November 15, 2002
KitMaker: 3,960 posts
Armorama: 3,579 posts

Posted: Saturday, February 28, 2015 - 11:30 PM UTC
Well Mr. Wolf ..It feels like you went into my head and stole my idea on how I wanted to finish my 263 when I build it ... You nailed it man!! Awesome build .. your weathering is just right ... congrats sir.. 
Did I mention that I liked it ...lol
Rick

Did I mention that I liked it ...lol
Rick

Hohenstaufen

Joined: December 13, 2004
KitMaker: 2,192 posts
Armorama: 1,615 posts

Posted: Sunday, March 01, 2015 - 04:39 PM UTC
Stonkin' build! Superb weathering, I love everything about it. That extended aerial is a piece of work! How long is it?
wingman

Joined: December 09, 2003
KitMaker: 880 posts
Armorama: 209 posts

Posted: Tuesday, March 03, 2015 - 05:33 AM UTC
Richard, thanks for the very kind words. I used the sponge method to wear away the paint I think my tarps could lay more naturally. When you build your model, make sure you don't turn the 2nd and 3rd wheels too much, they shouldn't be all the same angle as the others. Mine are turned too much. I had no problems what so ever with the rubber tiers that came with the kit. Thanks again Richard, thanks for looking.
wingman

Joined: December 09, 2003
KitMaker: 880 posts
Armorama: 209 posts

Posted: Tuesday, March 03, 2015 - 05:37 AM UTC
Steve, thank you. It was a pleasure to build. The telescoping antenna is about 9 1/2 inches all together. It's going to drive me crazy when I take this to a show in King of Prussia,PA with the antenna whipping around due to the bad roads on the way. Thanks for looking Steve.
 |


