

Hosted by Darren Baker
Pascal's M2A3 Bradley (Meng 1/35)

iowabrit

Joined: November 06, 2007
KitMaker: 585 posts
Armorama: 557 posts

Posted: Sunday, March 30, 2014 - 02:29 PM UTC
wow, thats a pretty neat build you have there. I love the treatment on the rubber dustguards. One question. Should the mg be co-axial with the chaingun?
Removed by original poster on 04/07/14 - 02:14:08 (GMT).

2CAVTrooper
Joined: October 21, 2005
KitMaker: 310 posts
Armorama: 302 posts

Posted: Sunday, April 06, 2014 - 02:15 PM UTC
Quoted Text
wow, thats a pretty neat build you have there. I love the treatment on the rubber dustguards. One question. Should the mg be co-axial with the chaingun?
Yes it should

165thspc

#521
Joined: April 13, 2011
KitMaker: 9,465 posts
Armorama: 8,695 posts
Posted: Tuesday, April 15, 2014 - 01:31 AM UTC
Fantastic build!

pascalbausset

Joined: February 05, 2002
KitMaker: 1,416 posts
Armorama: 1,379 posts

Posted: Saturday, May 03, 2014 - 04:46 AM UTC
Thanks Michael !
Removed by original poster on 05/03/14 - 22:54:18 (GMT).
terminators
Joined: February 20, 2012
KitMaker: 1,932 posts
Armorama: 1,907 posts
Posted: Saturday, May 03, 2014 - 10:55 AM UTC
"FRONT" markings are often present on duke antennas on several US vehicles.
This is the first kit in plastic which include them in decals. Great !

What these colored spots decals 33; 34;...? Did you used them on your kit ?
This is the first kit in plastic which include them in decals. Great !
What these colored spots decals 33; 34;...? Did you used them on your kit ?
pascalbausset
Joined: February 05, 2002
KitMaker: 1,416 posts
Armorama: 1,379 posts
Posted: Saturday, May 03, 2014 - 07:26 PM UTC
I used this one of these decal. They will represent paint stains that can be done sometime on vehicule to hide wrong markings. The decal colour is not really beautiful so I redo it

terminators
Joined: February 20, 2012
KitMaker: 1,932 posts
Armorama: 1,907 posts
Posted: Saturday, May 03, 2014 - 08:29 PM UTC
OK, thank you Pascal.

18Bravo
Joined: January 20, 2005
KitMaker: 7,219 posts
Armorama: 6,097 posts
Posted: Sunday, May 04, 2014 - 02:28 AM UTC
Quoted Text
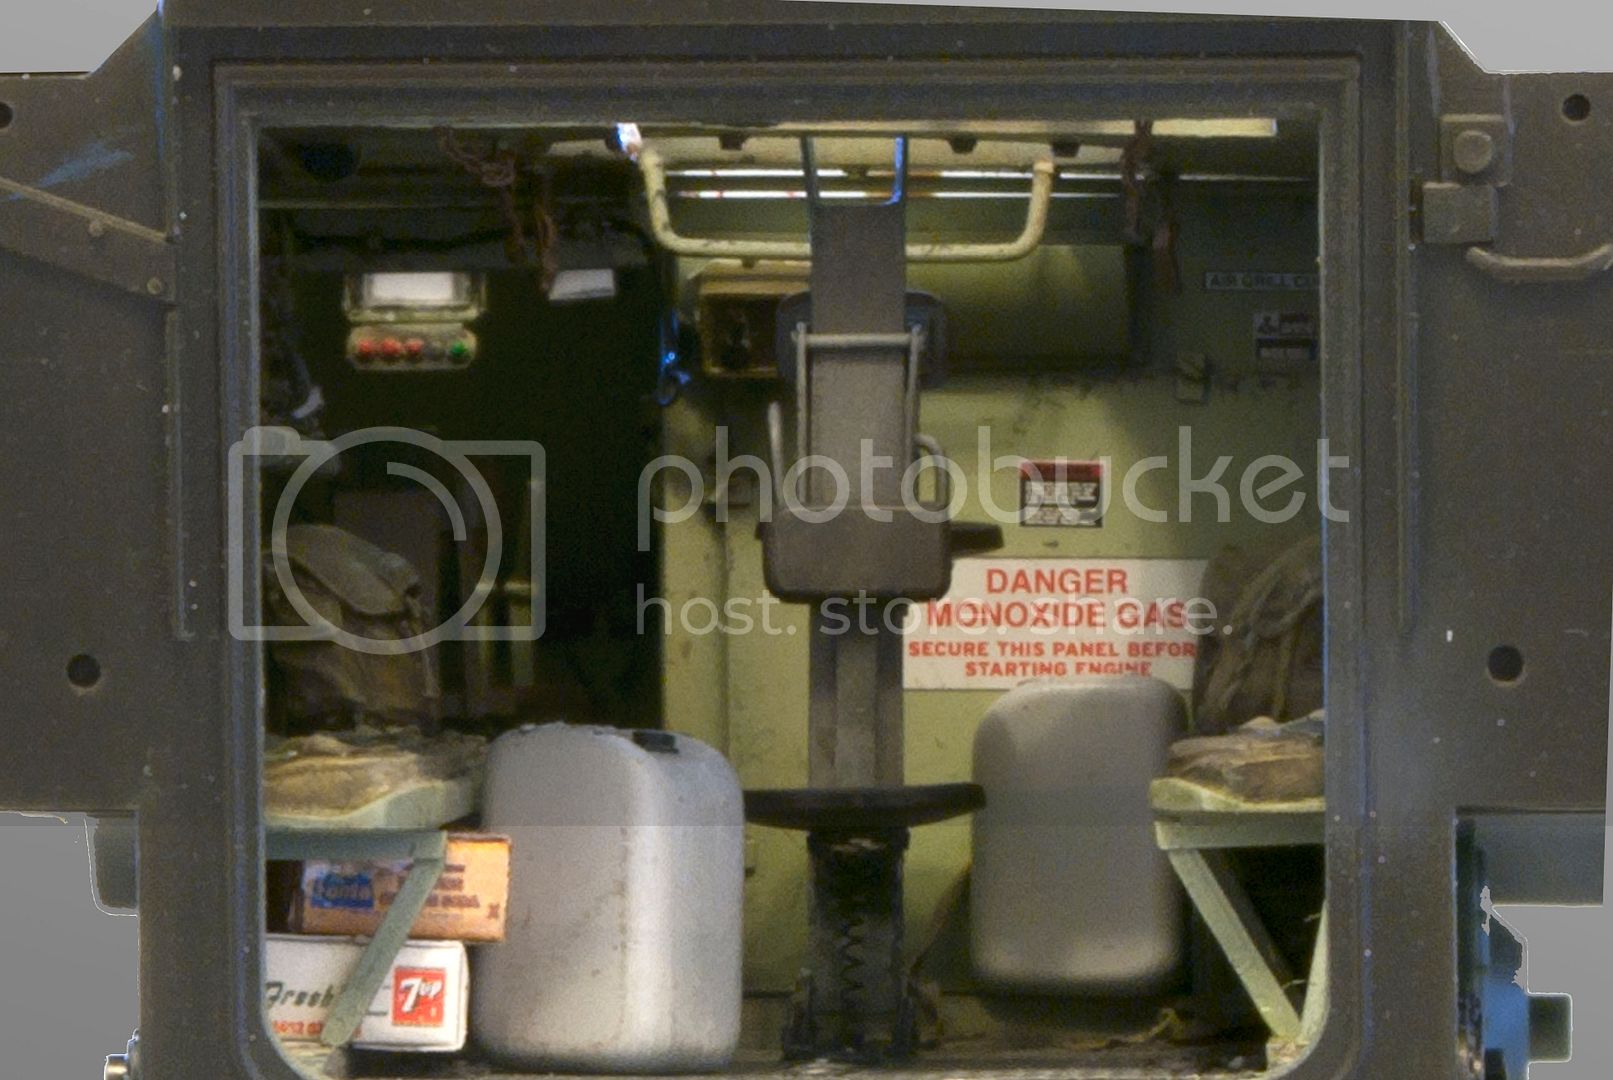
Quoted TextVery nice. How about some shots of the interior through open hatches and the rear ramp?
Thankls Gino, I've tried to do pics from interior but without success. I need to try again.
You've been quite vague about that. I think you're hiding a surprise from us - maybe for your article?

pascalbausset
Joined: February 05, 2002
KitMaker: 1,416 posts
Armorama: 1,379 posts
Posted: Sunday, May 04, 2014 - 02:34 AM UTC
Sorry no surprise this time.
Till some time ago I don't find how to make good rear pic with door open.
Now I have the solution, so I need to try again. But today I'am working on the Buffalo.
Till some time ago I don't find how to make good rear pic with door open.
Now I have the solution, so I need to try again. But today I'am working on the Buffalo.
18Bravo
Joined: January 20, 2005
KitMaker: 7,219 posts
Armorama: 6,097 posts
Posted: Sunday, May 04, 2014 - 03:40 AM UTC
You've helped me resurrect an idea I had several years ago.
I have two CCD Cameras about the size of postage stamps. They'll fit down through the turret hatches or the reloader's hatch in the rear, and give a view from inside the model. I should be able to capture some stills from the video.
Of course, I have to finish the kit first...
I have two CCD Cameras about the size of postage stamps. They'll fit down through the turret hatches or the reloader's hatch in the rear, and give a view from inside the model. I should be able to capture some stills from the video.
Of course, I have to finish the kit first...
pascalbausset
Joined: February 05, 2002
KitMaker: 1,416 posts
Armorama: 1,379 posts
Posted: Sunday, May 04, 2014 - 04:42 AM UTC
The solution is more easy?
Make two pics, one from the outside, second from the inside and mix them with a soft like Photoshop or another
Make two pics, one from the outside, second from the inside and mix them with a soft like Photoshop or another

acebatau
Joined: February 10, 2008
KitMaker: 730 posts
Armorama: 616 posts

Posted: Monday, May 19, 2014 - 02:42 PM UTC
Awesome built! So much like a real one, congrats

SHAKY962

Joined: May 21, 2012
KitMaker: 765 posts
Armorama: 438 posts
Posted: Monday, May 19, 2014 - 03:34 PM UTC
Amazing work!!!!!
Congratulations
Congratulations
Grymson

Joined: December 22, 2012
KitMaker: 32 posts
Armorama: 32 posts

Posted: Tuesday, May 20, 2014 - 02:48 AM UTC
Rly amazing. My congratulation.
Regerads
Regerads
pascalbausset
Joined: February 05, 2002
KitMaker: 1,416 posts
Armorama: 1,379 posts
Posted: Wednesday, June 11, 2014 - 12:37 PM UTC
Thanks guys !!! 
gastec

Joined: February 03, 2014
KitMaker: 1,042 posts
Armorama: 871 posts
Posted: Saturday, July 05, 2014 - 06:54 PM UTC
Nice work indeed Pascal and certainly inspirational enough for me to get one of these too
Frustratingly though that even though I've found the kit a nice build, the engine cover ERA frame (part R15) is mis-moulded and about 25% of it is missing . I'm hoping my LHS still has some kits in stock so they can swap a sprue out otherwise it'll be a bit of a wait for a replacement
Gary
Frustratingly though that even though I've found the kit a nice build, the engine cover ERA frame (part R15) is mis-moulded and about 25% of it is missing
. I'm hoping my LHS still has some kits in stock so they can swap a sprue out otherwise it'll be a bit of a wait for a replacement Gary
ryally

Joined: July 29, 2005
KitMaker: 879 posts
Armorama: 330 posts
Posted: Wednesday, August 20, 2014 - 09:09 AM UTC
Great work mate
I bought this kit after seeing your build, very very well done!!!!
Can someone tell me the earliest timeframe this version was used in Iraq
Thanks
I bought this kit after seeing your build, very very well done!!!!
Can someone tell me the earliest timeframe this version was used in Iraq
Thanks
pascalbausset
Joined: February 05, 2002
KitMaker: 1,416 posts
Armorama: 1,379 posts
Posted: Wednesday, August 20, 2014 - 02:55 PM UTC
Quoted Text
Thanks Rob, but the question is for the lower armor tiles as side skirt !
I just found this pic taken in 2010 at Camp Liberty
headquarter :
What I've said in page 2
young_sven

Joined: May 14, 2010
KitMaker: 749 posts
Armorama: 743 posts
Posted: Wednesday, August 20, 2014 - 05:43 PM UTC
Hello Pascal,
Very nice work, lovely model.
Regarding photography of the interior through the hatches, why is it necessary to do all that Photoshop magic with combined pics etc?
A pic through the rear ramp is easy enough to take by tipping up the rear of the vehicle so a light source from above can be used.
Kind of like this:
 [/URL
[/URL
Or is there some other cooler effect you are trying to achieve?
Very nice work, lovely model.
Regarding photography of the interior through the hatches, why is it necessary to do all that Photoshop magic with combined pics etc?
A pic through the rear ramp is easy enough to take by tipping up the rear of the vehicle so a light source from above can be used.
Kind of like this:
[/URLOr is there some other cooler effect you are trying to achieve?
pascalbausset
Joined: February 05, 2002
KitMaker: 1,416 posts
Armorama: 1,379 posts
Posted: Wednesday, August 20, 2014 - 08:16 PM UTC
Have you try a picture with the 2 A/C pods. Your pic is from a M113, easy to take a picture from this
And I use most of my pics for publishing article in modelling magazines
And I use most of my pics for publishing article in modelling magazines
young_sven
Joined: May 14, 2010
KitMaker: 749 posts
Armorama: 743 posts
Posted: Wednesday, August 20, 2014 - 10:44 PM UTC
Pascal, first of all my model is an M113, and yes I have used images of several of my models in magazine articles where the publishers required high photographic standards.
My photography is not up to your high standards, though, it would seem - which is fine for me. Just trying to help :-)
My photography is not up to your high standards, though, it would seem - which is fine for me. Just trying to help :-)
Xtophe007

Joined: August 15, 2016
KitMaker: 3 posts
Armorama: 3 posts
Posted: Tuesday, April 09, 2019 - 08:05 AM UTC
Very nice job, just incredible !
One question : which colour did you use for the interior ?
One question : which colour did you use for the interior ?

jvazquez
Joined: September 26, 2006
KitMaker: 857 posts
Armorama: 811 posts
Posted: Wednesday, April 10, 2019 - 11:27 PM UTC
Holy thread resurrection! 
 |

WEB HOSTING BY


Copyright ©2021 Armorama and Kitmaker Network, a subsidiary of Silver Star Enterprises
All Rights Reserved. Please read our Conditions of Use and Privacy Policy.
All Rights Reserved. Please read our Conditions of Use and Privacy Policy.