

CA works every time dude. Trust me,tried and tested.
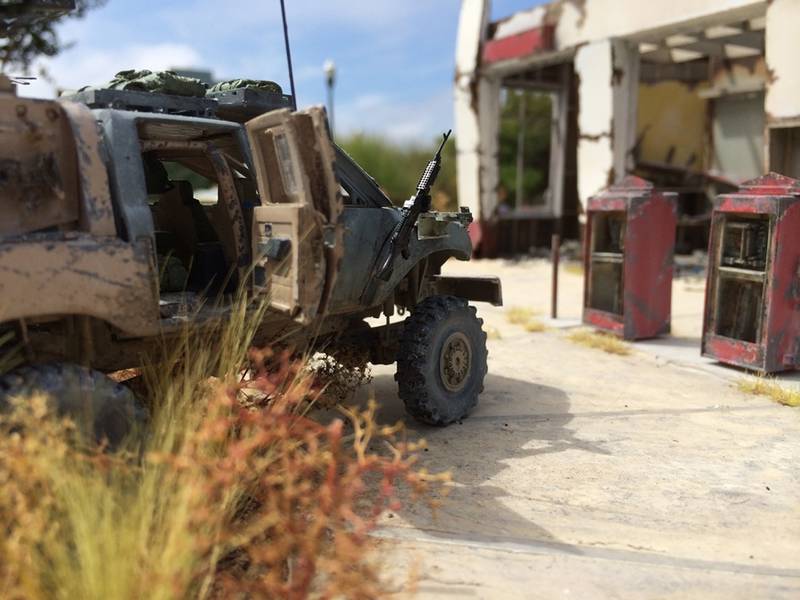
The truck need no comment obviously. Are those a/c ejection seats up front?
Cool curved armour.
J
Hosted by Darren Baker
Where do you think you are going?

jrutman

Joined: April 10, 2011
KitMaker: 7,941 posts
Armorama: 7,934 posts
Posted: Saturday, July 12, 2014 - 12:42 AM UTC

justsendit
Joined: February 24, 2014
KitMaker: 3,033 posts
Armorama: 2,492 posts
Posted: Saturday, July 12, 2014 - 01:24 AM UTC
Quoted Text
CA works every time dude. Trust me, tried and tested.
In addition, try Aloe Vera Gel, it actually accelerates the healing process. Before hitting the sack, carefully sand away some of the dead skin and apply Aloe Vera Gel.
Thirty years of rock climbing experience here, I know a few things about finger injuries.

--mike
Stickframe

#362
Joined: December 01, 2013
KitMaker: 1,661 posts
Armorama: 1,202 posts

Posted: Sunday, July 13, 2014 - 04:48 PM UTC
Hey Jerry and Mike - 'ol CA thumb here!
With my modelbuilders first aid being applied....I did get some work done -
first tho, Jerry - good eye!
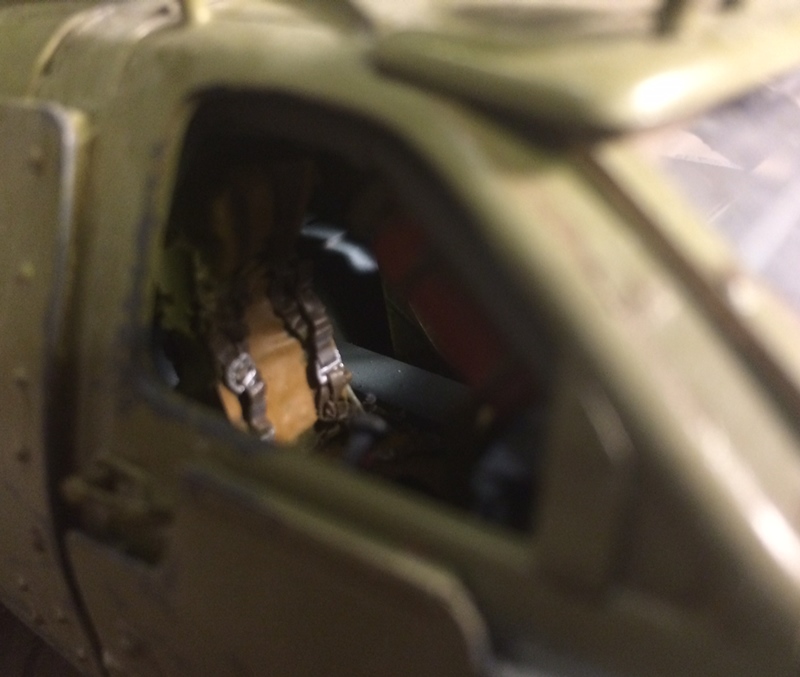
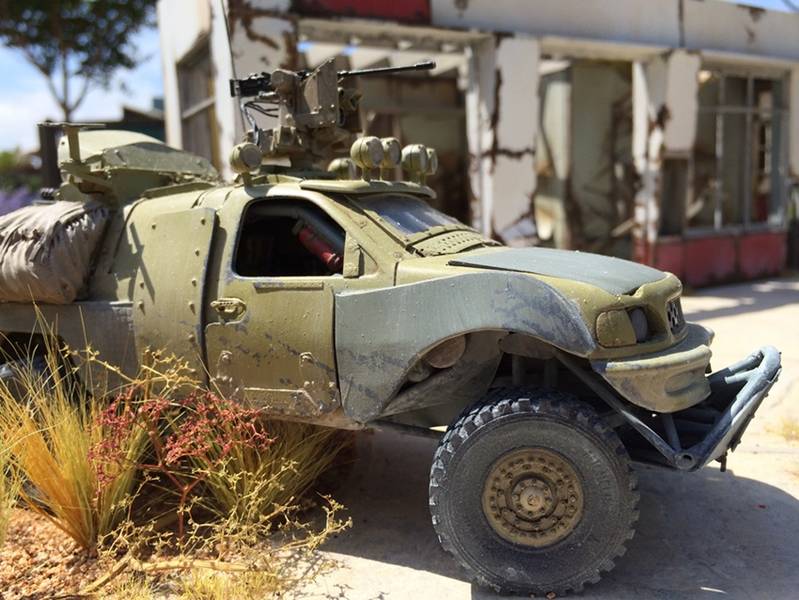
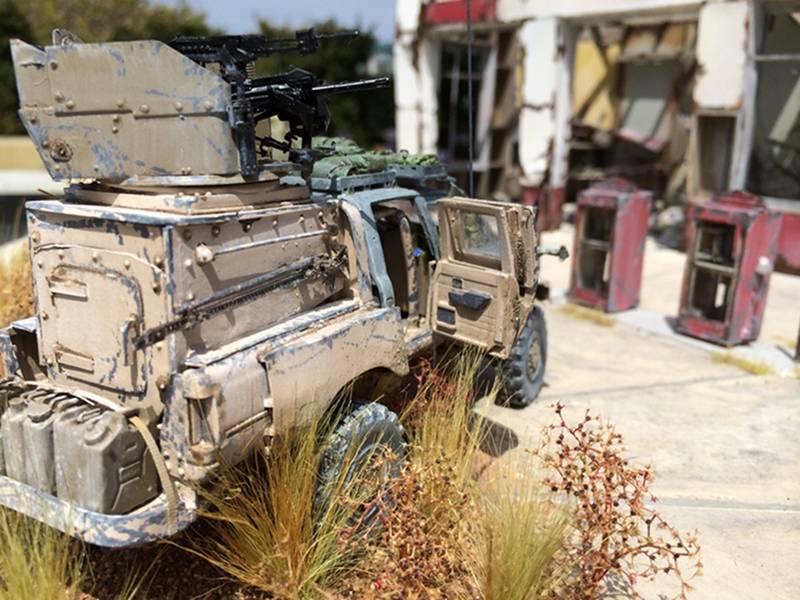
Yes - as this was all scratch built and a bit full on, some cool seats were needed - so, a quick search at one of our favorite on-line shops....and voila! some 1/32 scale aircraft seats! yes - they were cut, filed etc to fit, but did the job pretty well and didn't cost a fortune! sorry about the crappy photo post build photo!
Ok - I did make some progress on the base -
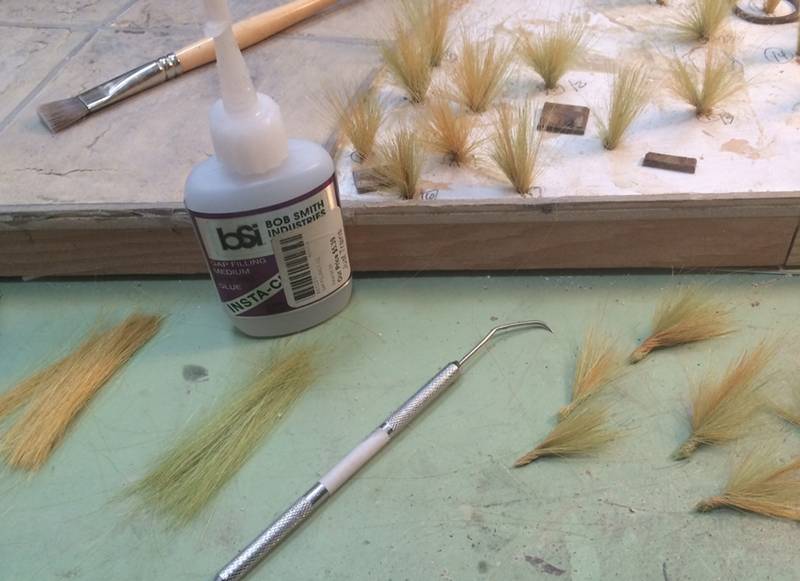
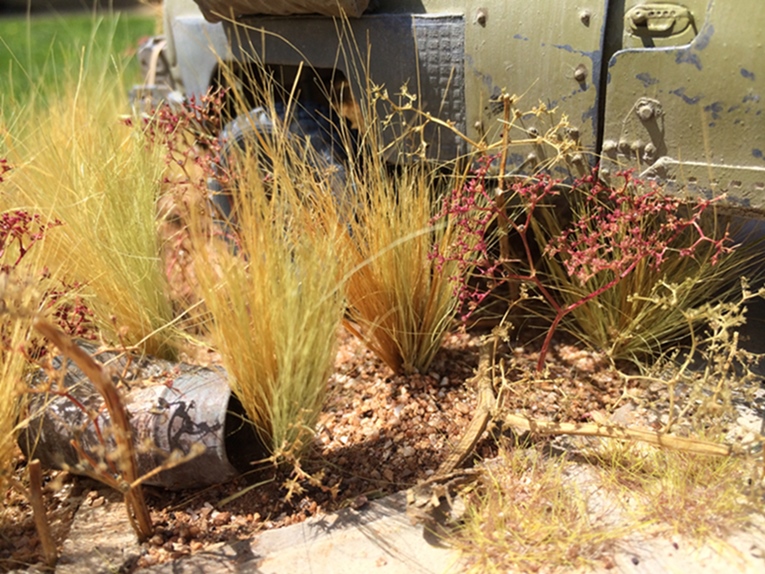
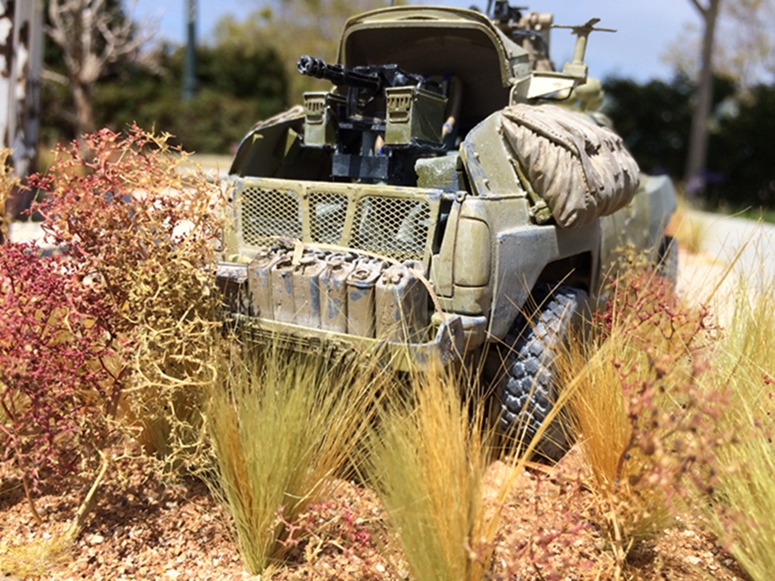
No - I'm not learning to tie flies! instead, tall grasses...in fact about 100 of these little clumps!...I picked two woodland scenic colors, some of each color in each clump...
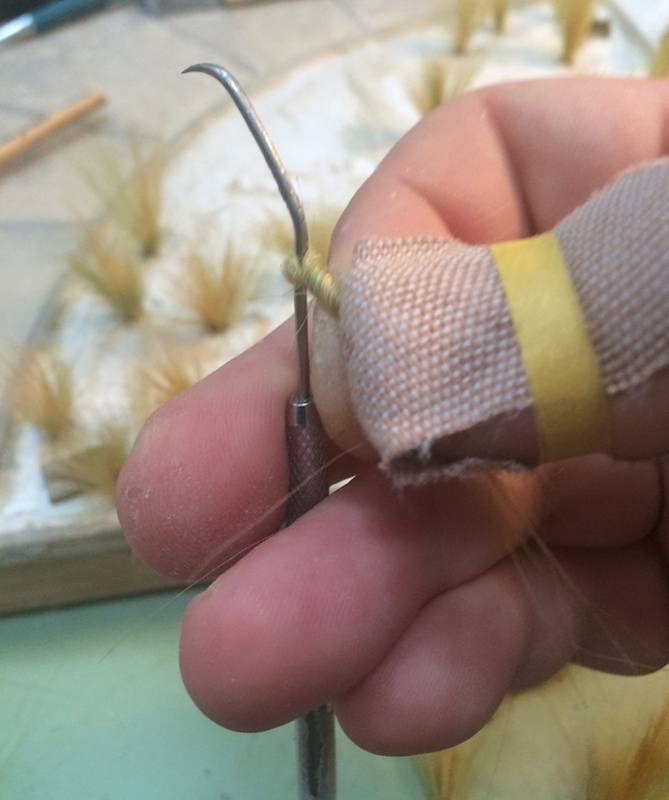
Mix the two "grass" colors into a little bundle - then, wrap around the tip of this pick - then, hit with an ample amount of CA....oh, yea, the bandage + yellow Tamiya tape is of course the "fix" for the damaged thumb! - the CA helped keep it from springing leaks too often!
I drilled lots of little holes in the base, and glued and stuck a clump into each one...yes, slow and eventually tedious...finally:
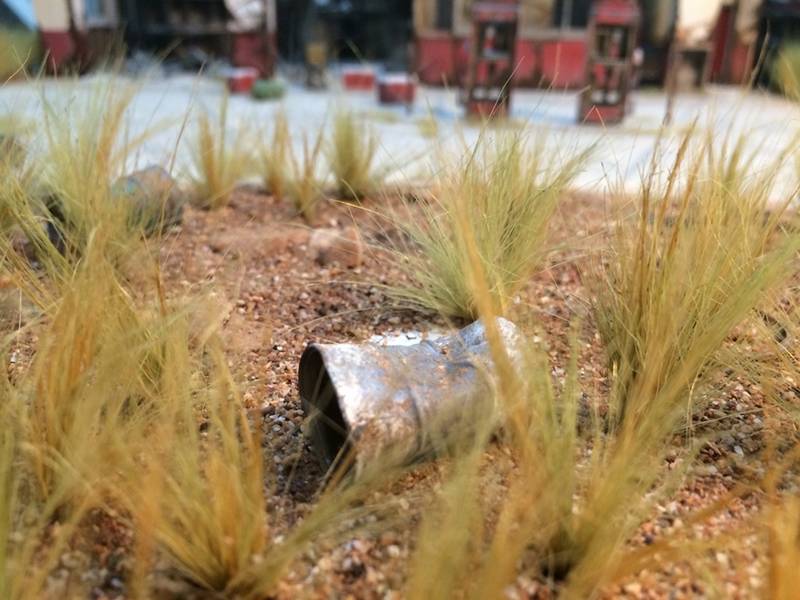
Next, down went some debris - various crumpled barrels, scraps of metal, then my dirt....this is supposed to be used as ballast on model RR tracks - but, is good for this too! Sorry about the mediocre workbench photo, but you get the point - there are three big areas around the driveway that received this.
The next layer will be scrubby bushes ala tumble weed or mesquite bush, followed by heavily weathered planks and boards - not too many of the bushes or wood - just enough to make it read as a pretty desolate and neglected place -
OK - thanks for having a look!
Nick
With my modelbuilders first aid being applied....I did get some work done -
first tho, Jerry - good eye!
Yes - as this was all scratch built and a bit full on, some cool seats were needed - so, a quick search at one of our favorite on-line shops....and voila! some 1/32 scale aircraft seats! yes - they were cut, filed etc to fit, but did the job pretty well and didn't cost a fortune! sorry about the crappy photo post build photo!
Ok - I did make some progress on the base -
No - I'm not learning to tie flies! instead, tall grasses...in fact about 100 of these little clumps!...I picked two woodland scenic colors, some of each color in each clump...
Mix the two "grass" colors into a little bundle - then, wrap around the tip of this pick - then, hit with an ample amount of CA....oh, yea, the bandage + yellow Tamiya tape is of course the "fix" for the damaged thumb! - the CA helped keep it from springing leaks too often!
I drilled lots of little holes in the base, and glued and stuck a clump into each one...yes, slow and eventually tedious...finally:
Next, down went some debris - various crumpled barrels, scraps of metal, then my dirt....this is supposed to be used as ballast on model RR tracks - but, is good for this too! Sorry about the mediocre workbench photo, but you get the point - there are three big areas around the driveway that received this.
The next layer will be scrubby bushes ala tumble weed or mesquite bush, followed by heavily weathered planks and boards - not too many of the bushes or wood - just enough to make it read as a pretty desolate and neglected place -
OK - thanks for having a look!
Nick

panzerconor
Joined: February 08, 2012
KitMaker: 1,271 posts
Armorama: 1,253 posts
Posted: Tuesday, July 15, 2014 - 03:11 AM UTC
The amount of effort and work going into this one (and the fabrication shop for that matter) are incredible. You could write off the outside pics as the real thing, it's impossible to tell the difference. Those trucks though...still love those.
-Conor
PS I saw this picture today & this diorama came to mind. I know it's a different them altogether, but hey, it's a gas station, right?

-Conor
PS I saw this picture today & this diorama came to mind. I know it's a different them altogether, but hey, it's a gas station, right?
Stickframe
#362
Joined: December 01, 2013
KitMaker: 1,661 posts
Armorama: 1,202 posts
Posted: Saturday, July 19, 2014 - 11:34 AM UTC
Hi Connor -haha! gas station dio number 2!?! 
Progress shots of last week's progress! lots and lots of clumps of grass and bushes, and some roof work
Please have a look:
The pic above gives a pretty good view of the progress - me, as the worst gardener ever! and some work on the roof
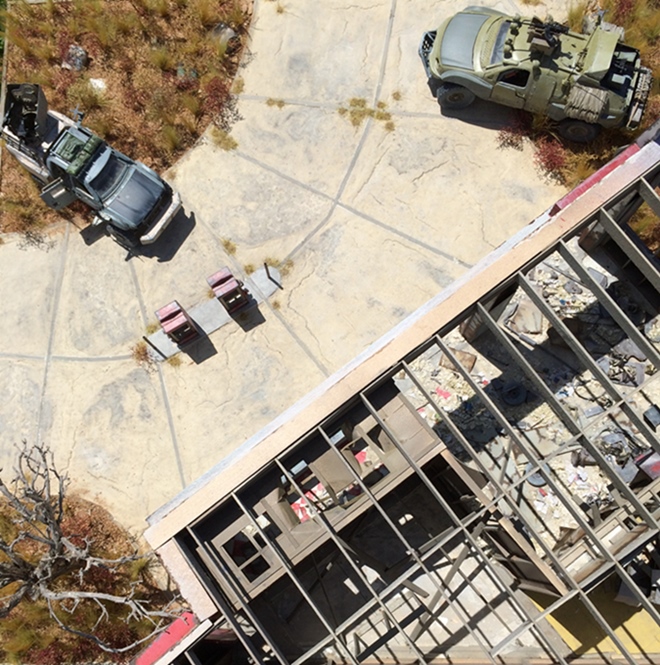
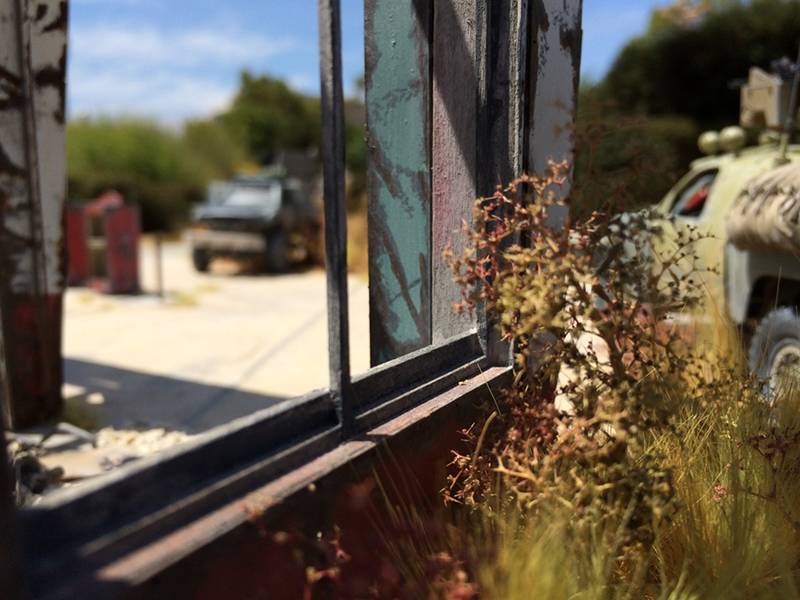
In addition to planting the weeds and scrub, I planted a Ford too!
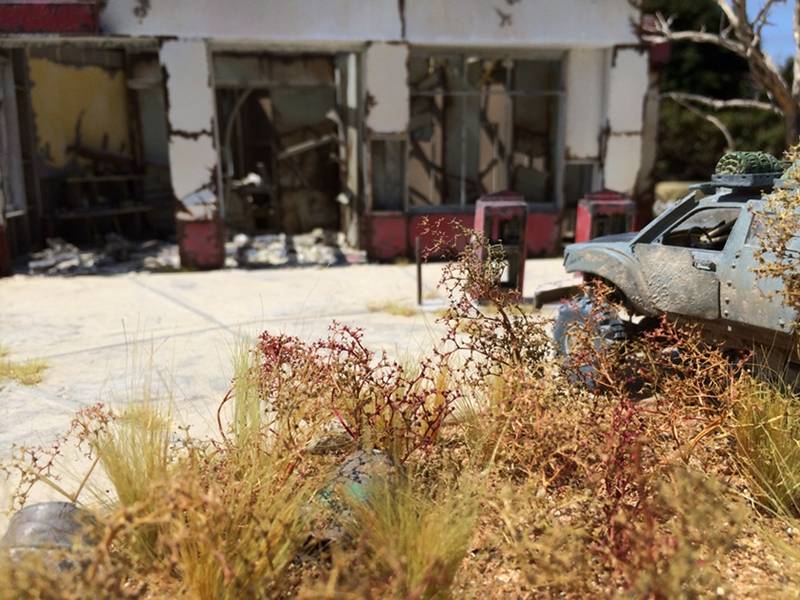
....I also planted a pretty well fortified Toyota!
I "planted" up to most of the footprint of each truck, then, glued the truck in place, and added more "vegetation" to try to make it look like they are really "in" the vegetation, and not placed "on" the vegetation.

The Toyota is the "visitor" - came driving right up through the "garden"!!! The Ford, one of the patrol trucks "camped out" at the decrepit building...and wondering "who is this guy?"
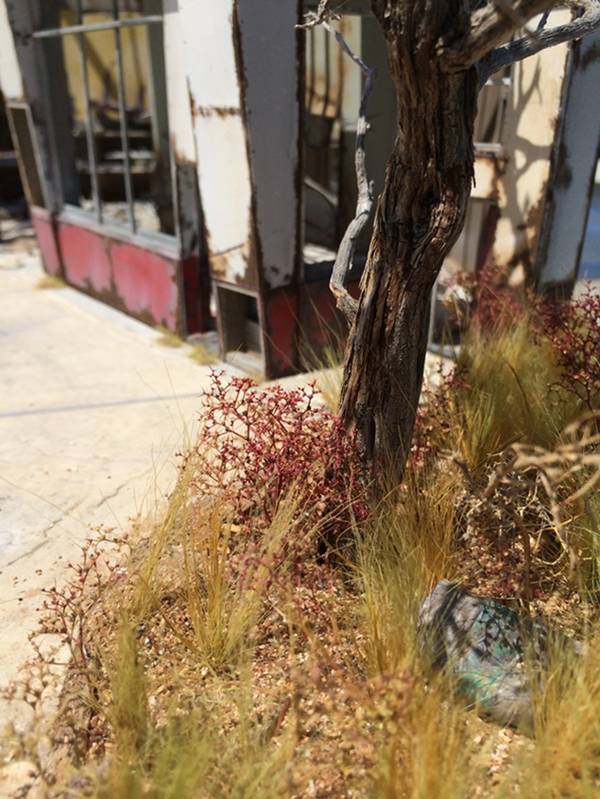
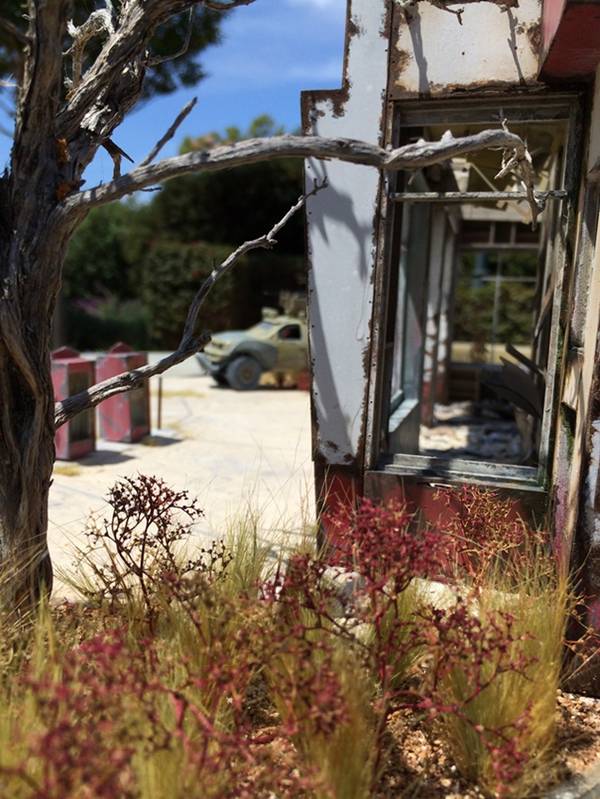
and a nice and dead tree....The branches add some nice shadows!
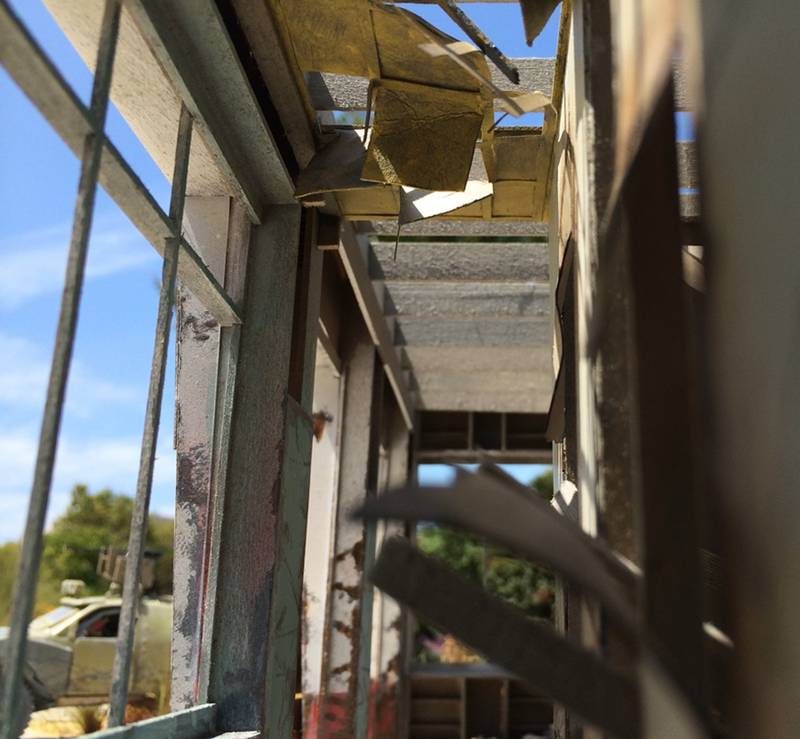
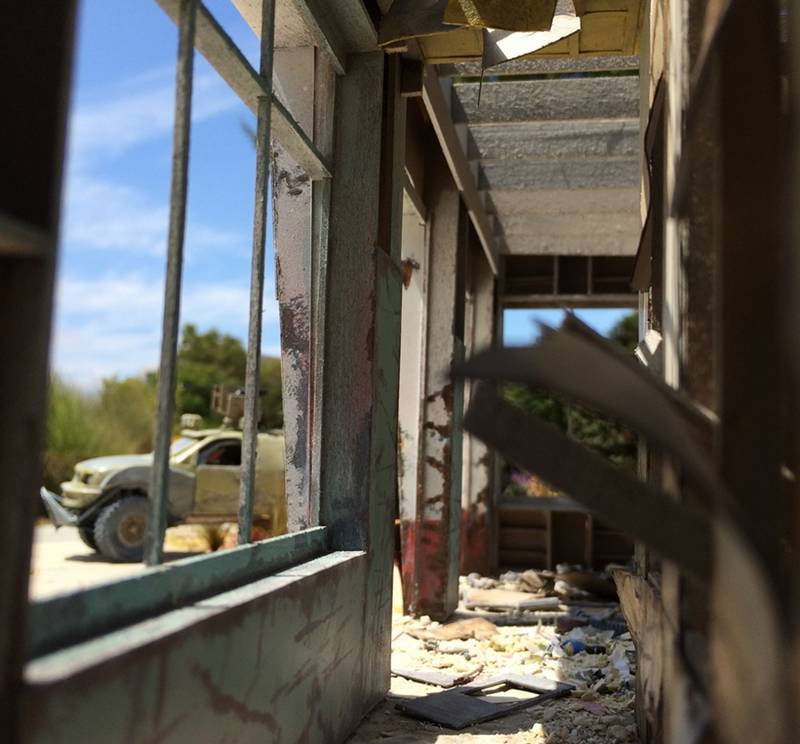
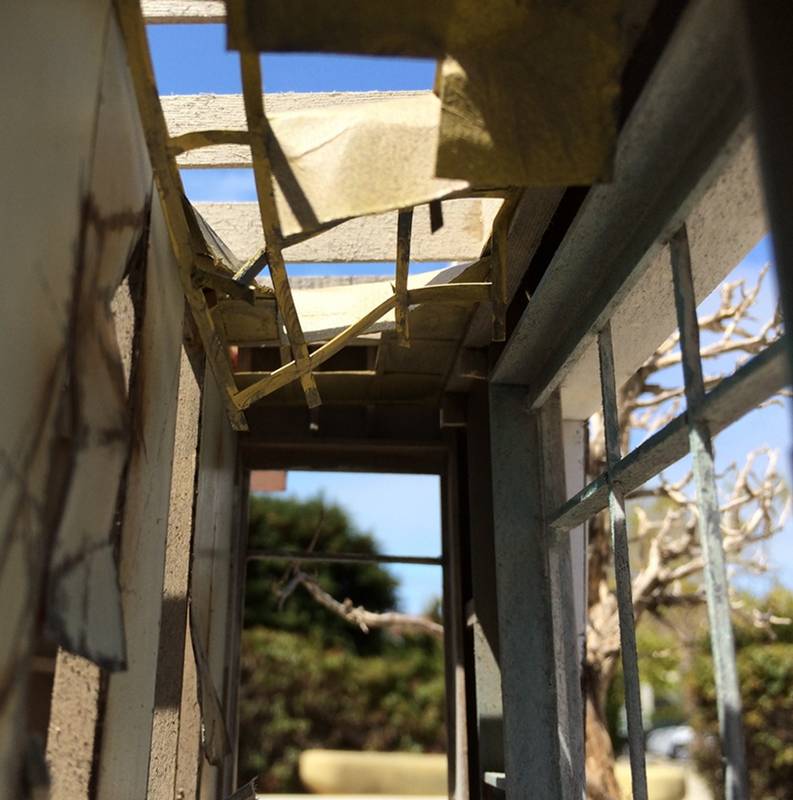
So, to explain all the debris on the floor, I assume the ceiling, or most of it has collapsed, and decided it would be a neat idea to make a dilapidated drop ceiling, to show the twisted frame and a few tiles in place...so I did. The upside is that it looks pretty good - the non-upside is that unless you crawl and look in...you'll never see it!
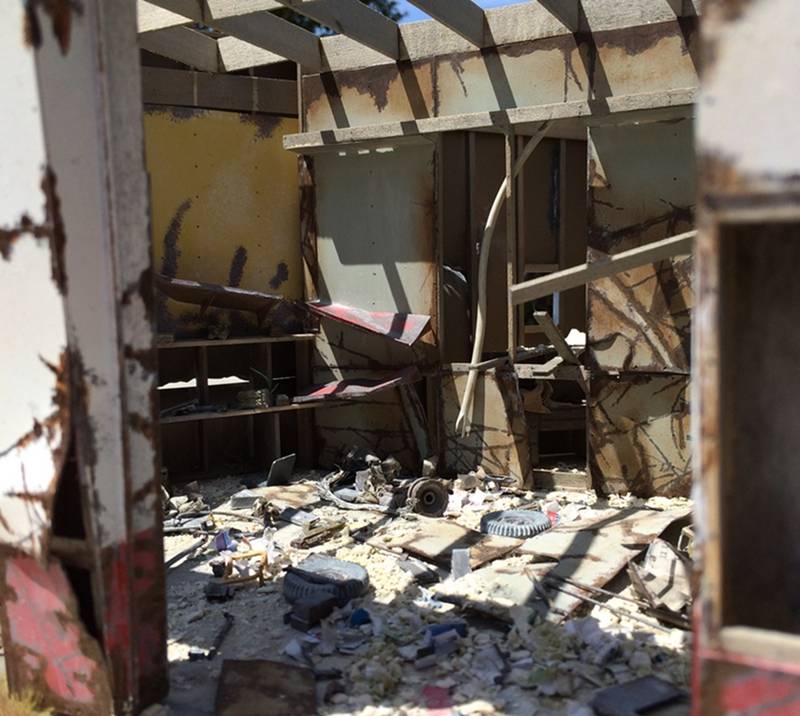
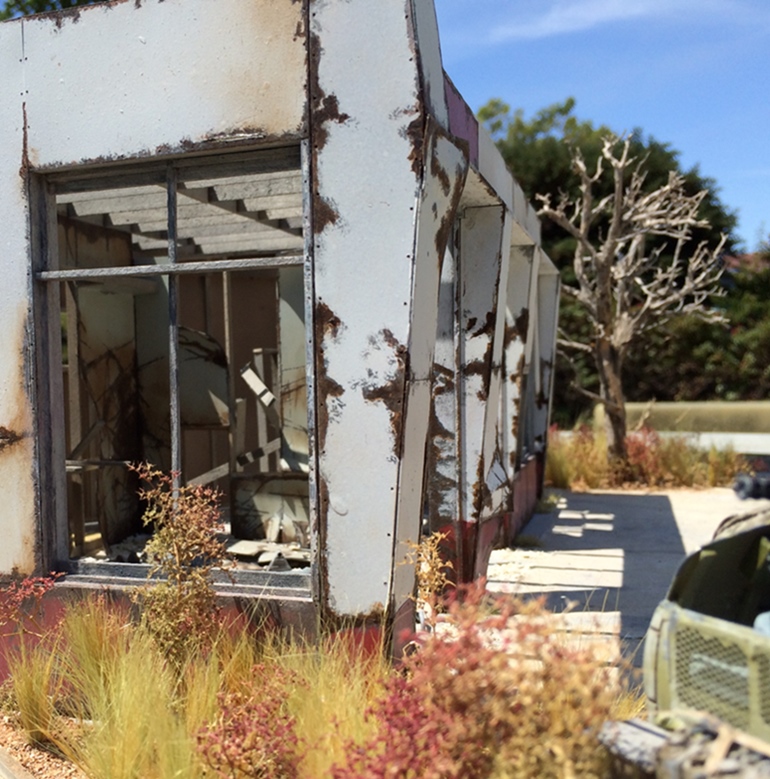
In the two pics above, you can see the roof framing, and also, the fallen roof and interior wall framing visible behind the middle-ground walls - through the gaps created by fallen wall panels. There will be some roof panels above, but I won't cover the whole roof. I really like the shadows and sunlight inside, so I will only selectively add roof panels - some areas might be completely covered, but not the entire roof.
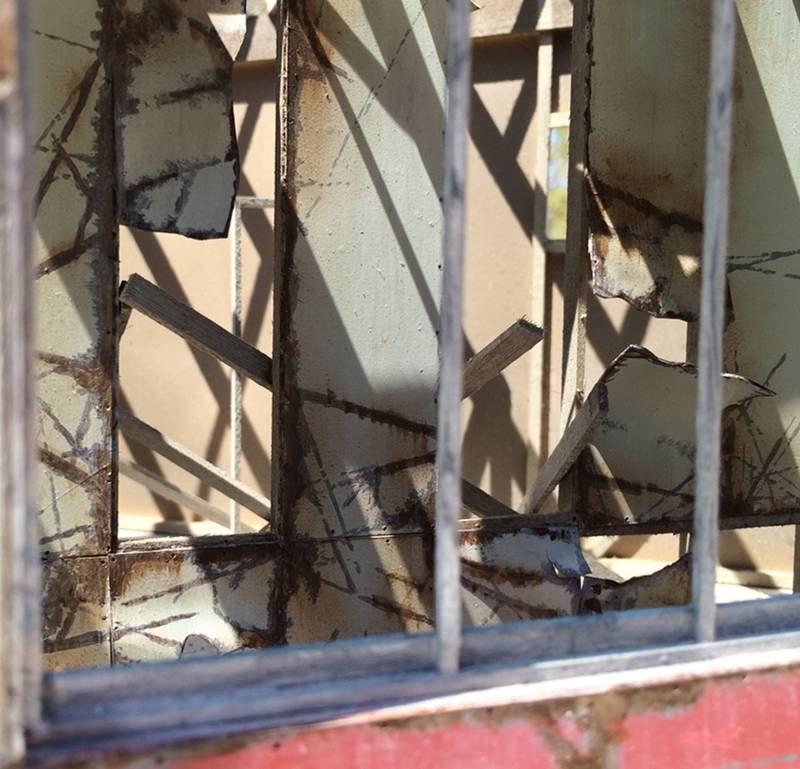
The last two just focus on the wall corner -
I still have a few "building" projects to go - as I mentioned above, installing some roof panels, and then, weathering the canopy for the driveway.
After that, the toughest job of all....building and painting the figures....the secret code here will be, if they area all either mostly screened from view or in deep, dark shadow, I really messed up the painting! if not - well, they must be at least OK!!! mercifully, many are still enroute via the mail!...maybe they won't arrive!
thanks for checking it out -
Nick
Progress shots of last week's progress! lots and lots of clumps of grass and bushes, and some roof work
Please have a look:
The pic above gives a pretty good view of the progress - me, as the worst gardener ever! and some work on the roof
In addition to planting the weeds and scrub, I planted a Ford too!
....I also planted a pretty well fortified Toyota!
I "planted" up to most of the footprint of each truck, then, glued the truck in place, and added more "vegetation" to try to make it look like they are really "in" the vegetation, and not placed "on" the vegetation.
The Toyota is the "visitor" - came driving right up through the "garden"!!! The Ford, one of the patrol trucks "camped out" at the decrepit building...and wondering "who is this guy?"
and a nice and dead tree....The branches add some nice shadows!
So, to explain all the debris on the floor, I assume the ceiling, or most of it has collapsed, and decided it would be a neat idea to make a dilapidated drop ceiling, to show the twisted frame and a few tiles in place...so I did. The upside is that it looks pretty good - the non-upside is that unless you crawl and look in...you'll never see it!
In the two pics above, you can see the roof framing, and also, the fallen roof and interior wall framing visible behind the middle-ground walls - through the gaps created by fallen wall panels. There will be some roof panels above, but I won't cover the whole roof. I really like the shadows and sunlight inside, so I will only selectively add roof panels - some areas might be completely covered, but not the entire roof.
The last two just focus on the wall corner -
I still have a few "building" projects to go - as I mentioned above, installing some roof panels, and then, weathering the canopy for the driveway.
After that, the toughest job of all....building and painting the figures....the secret code here will be, if they area all either mostly screened from view or in deep, dark shadow, I really messed up the painting! if not - well, they must be at least OK!!! mercifully, many are still enroute via the mail!...maybe they won't arrive!
thanks for checking it out -
Nick
ahandykindaguy

Joined: August 20, 2008
KitMaker: 1,295 posts
Armorama: 1,191 posts

Posted: Saturday, July 19, 2014 - 11:53 AM UTC
Nick, with how your last figures on the fabrication shop dio came out, I'm sure then that there will be nearly no figures pushed back into the deep dark recesses o this unbelievable scene!!!
Your tree looks perfect from these couple shots... tell me more aboot it if you please.
Thanks for the update.
Later skater
Your tree looks perfect from these couple shots... tell me more aboot it if you please.
Thanks for the update.
Later skater
ahandykindaguy
Joined: August 20, 2008
KitMaker: 1,295 posts
Armorama: 1,191 posts
Posted: Saturday, July 19, 2014 - 11:55 AM UTC
Ps. I love the roof tiles and the groundwork is stunning sir.
jrutman
Joined: April 10, 2011
KitMaker: 7,941 posts
Armorama: 7,934 posts
Posted: Sunday, July 20, 2014 - 03:13 AM UTC
Those overhead shots are awesome. I always show some of your pics to my girlfriend and her daughter and they never know if it's real or memorex. Can't get any better than that!!
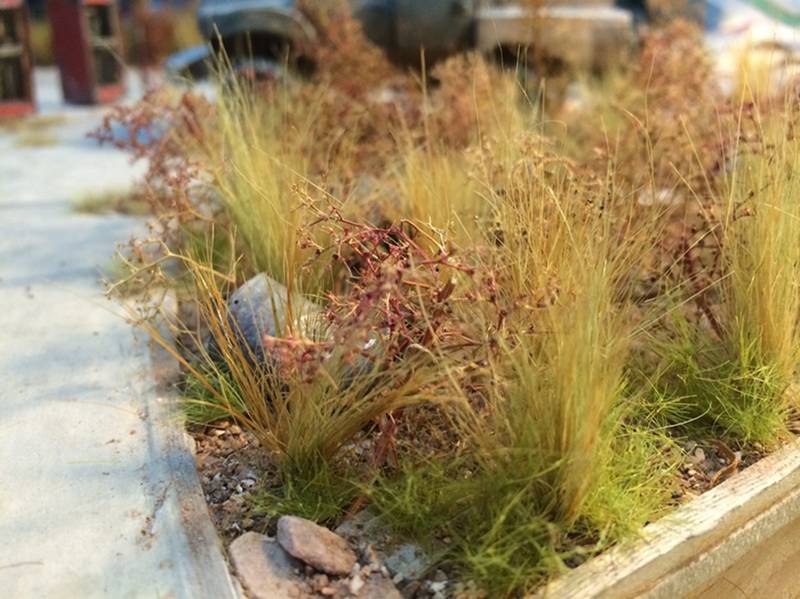
The only thing that doesn't fool my eye in your pics are the clumps of tall grass up close. I think they may be a tad "clumpy" with too small of a base area? But you can only notice it in the close ups.
J
The only thing that doesn't fool my eye in your pics are the clumps of tall grass up close. I think they may be a tad "clumpy" with too small of a base area? But you can only notice it in the close ups.
J
justsendit
Joined: February 24, 2014
KitMaker: 3,033 posts
Armorama: 2,492 posts
Posted: Sunday, July 20, 2014 - 03:47 AM UTC
Nick,
Looking better and better! I admire your gardening skills. Hopefully your "green thumb" isn't actually turning green!
--mike
Looking better and better! I admire your gardening skills. Hopefully your "green thumb" isn't actually turning green!
--mike
Stickframe
#362
Joined: December 01, 2013
KitMaker: 1,661 posts
Armorama: 1,202 posts
Posted: Sunday, July 20, 2014 - 06:23 AM UTC
Hi Dave - thanks for the comments - as for the tree, it was supposed to be used on a model railroad - but, here it is! It's sagebrush - the company that sold it is closed now. But - there might be hope! The Scenic Factory is now selling sagebrush material and looks pretty similar.
I think my biggest problem with figures is the most obvious - I can't get them to look how they should!!!! What else is new? Seems I can do anything I want with acrylics on non-human models, but on figures - that's a different story...keep trying
Hi Jerry - thanks for dropping in. Thanks - the realistic part is fun to do - in fact it's a real challenge, sort of an extra layer of model building. With that said....I was emailing a certain European model builder last week - I won't mention his name, but will just call him "Romain" - who made the same observation about "the clumps" shows that "great minds..." and that I have some way to go!!
At this point I'm not sure how I would change/modify them? The bummer is I don't think I can "add" too much to each - maybe a bit of middle ground debris to block some views? Something to think about....?
The next project is intended to be built in an arid place too, so, I'll need to think of a new/different way to do make these clumps - what I like about this method is how firmly placed they are in the base - the little pieces of "grass" stay put and keep their shape. Any ideas for both wider/broader clumps and how to make them are appreciated :-)
Hi Mike - ha! The multi colored thumb indeed! In spite of the bandage, tape, CA layers, I was going to finish that ground plane!!! But - to Jerry's point - it's almost, almost, exactly right - except for the close ups of the grass clumps....keeps it interesting....better next time
Thanks for your comments and having a look.
Nick
1stjaeger

Joined: May 20, 2011
KitMaker: 1,744 posts
Armorama: 1,727 posts

Posted: Sunday, July 20, 2014 - 10:09 AM UTC
Hi Nick,
Perhaps by joining 2 clumps together, i.e. planting some inbetween 2 separate ones (different heights of course).
Photos in real light...there's nothing like it!!!
Jerry is right...some do raise the question....!!!
Cheers
Romain
justsendit
Joined: February 24, 2014
KitMaker: 3,033 posts
Armorama: 2,492 posts
Posted: Sunday, July 20, 2014 - 10:19 AM UTC
Speaking of 'The Scenic Factory,' have you ever tried their 'Root Material?' ... Gnarly, twisted, evil looking stuff! Just some plant food for thought.
--mike
--mike
jrutman
Joined: April 10, 2011
KitMaker: 7,941 posts
Armorama: 7,934 posts
Posted: Sunday, July 20, 2014 - 10:59 AM UTC
You can actually buy clumps of grass already to go from several different companies.
J
J

Trisaw
Joined: December 24, 2002
KitMaker: 4,105 posts
Armorama: 2,492 posts
Posted: Sunday, July 20, 2014 - 12:13 PM UTC
Wow, awesome kitbashing! It's really nice how all the parts came together. Your time, effort, and resources spent on your models really shows. Great job! 

matt
Joined: February 28, 2002
KitMaker: 5,957 posts
Armorama: 2,956 posts
Posted: Sunday, July 20, 2014 - 11:19 PM UTC
Sheesh... go on vacation for a week... (and try to stay away from electronics in the down time) and came back to this!!!!
Stickframe
#362
Joined: December 01, 2013
KitMaker: 1,661 posts
Armorama: 1,202 posts
Posted: Monday, July 21, 2014 - 08:28 AM UTC
Hi - thanks for checking this out -
Mike - no, I haven't seen the roots - but, will look for them! I'm assuming you mean something other than Jimmy Fallon's band? (hahaha)
Peter - thanks for having a look - this has been an interesting build - really ever-changing...weird, a bit like the name of the project....
Well Matt...out of town for a few days...and there goes the neighborhood!
Jerry and Romain...yes - you are both right! this AM while gulping down the coffee, and with minutes to spare before running for the door for work....in went some more weeds:
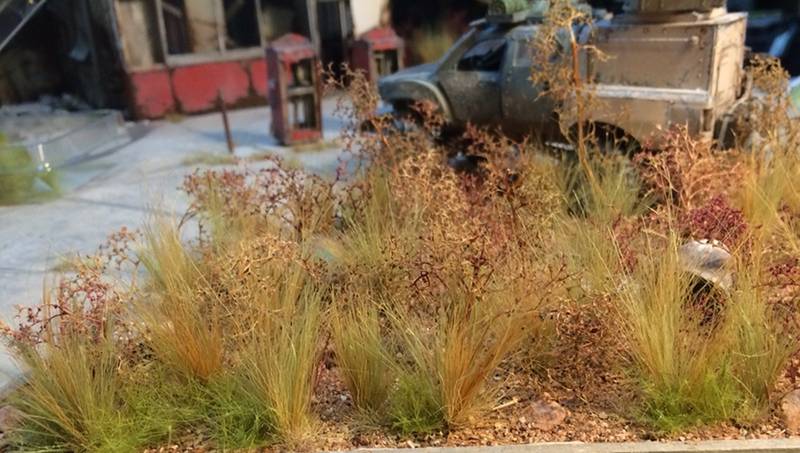
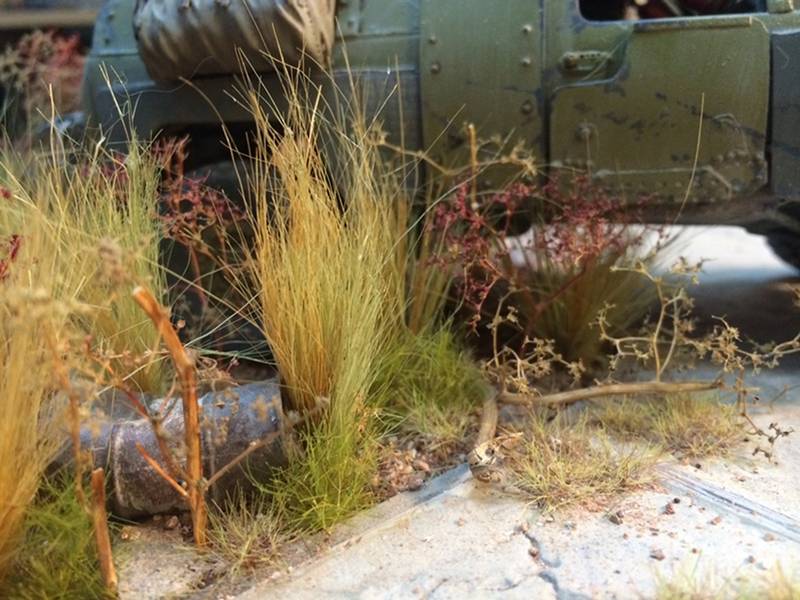
sorry about the bad pictures and lighting...but you can get the point...better? - maybe?
Mike - no, I haven't seen the roots - but, will look for them! I'm assuming you mean something other than Jimmy Fallon's band? (hahaha)
Peter - thanks for having a look - this has been an interesting build - really ever-changing...weird, a bit like the name of the project....
Well Matt...out of town for a few days...and there goes the neighborhood!
Jerry and Romain...yes - you are both right! this AM while gulping down the coffee, and with minutes to spare before running for the door for work....in went some more weeds:
sorry about the bad pictures and lighting...but you can get the point...better? - maybe?
jrutman
Joined: April 10, 2011
KitMaker: 7,941 posts
Armorama: 7,934 posts
Posted: Monday, July 21, 2014 - 08:41 AM UTC
Yep. Mucho better. That last little touch to make it almost perfect ( nothing is EVER perfect which is a good thing because otherwise what would we strive for?)
J
J
J
J
1stjaeger
Joined: May 20, 2011
KitMaker: 1,744 posts
Armorama: 1,727 posts
Posted: Monday, July 21, 2014 - 06:08 PM UTC
Jerry is right....mucho, mucho!!
Have you considered giving the whole weeds area a soft, light airbrush overspray with a yellowish/brownish/greyish colour?? Like giving the thing a desertish look...dusty and thirsty!!
Or maybe the reddish colour of your "mesquite" is simply too strong..!??!??
Isn't the area too colourful???!??!
Or else maybe just a few smaller spots need a little less colour!?!??
I don't know if I make myself clear...or even if I make any sense at all, but the idea struck me when I saw the photos!
Cheers
Romain
Stickframe
#362
Joined: December 01, 2013
KitMaker: 1,661 posts
Armorama: 1,202 posts
Posted: Tuesday, July 22, 2014 - 04:05 AM UTC
Hi guys - fortunately/unfortunately - I agree with each of you - Jerry, thanks, I think it looks better too - and Romain, it's better -
But, Jerry - you're right - it's not too close to perfect, and Romain, yes, it's become very colorful - Ahhh, spring in the desert...but - not really right....it's getting a bit messy.
I'm going to stand down on the landscape and think about what, if anything to do...
In the meantime - other parts of the project to work on.
Thanks for following up guys
Nick
Stickframe
#362
Joined: December 01, 2013
KitMaker: 1,661 posts
Armorama: 1,202 posts
Posted: Tuesday, July 22, 2014 - 09:30 AM UTC
Hi Again - during lunch at work today, I took another look at the pictures - I'm glad I decided to not make a decision about what I might do just yet. As these pictures are REALLY zoomed in on specific clumps of vegetation, they don't show much if any context - and were taken under the light of my desk lamp - - neither of which best describe "the story"....so, I will carry on with other part of the build, and reevaluate this with fresh eyes in a few days
thanks
Nick
thanks
Nick
justsendit
Joined: February 24, 2014
KitMaker: 3,033 posts
Armorama: 2,492 posts
Posted: Tuesday, July 22, 2014 - 09:36 AM UTC
Quoted Text
....so, I will carry on with other part of the build, and reevaluate this with fresh eyes in a few days.
Sometimes you just need to walk away, brother ... But "where do you think you are going?" ...
--mike
matt
Joined: February 28, 2002
KitMaker: 5,957 posts
Armorama: 2,956 posts
Posted: Tuesday, July 22, 2014 - 09:41 PM UTC
Walking away to gain perspective... or figure out where you want it to go.... at least for me leads to quite a few unfinished projects.... maybe it's just the ADD though...LOL 
jrutman
Joined: April 10, 2011
KitMaker: 7,941 posts
Armorama: 7,934 posts
Posted: Wednesday, July 23, 2014 - 02:20 AM UTC
Maybe you are overthinking this or putting too much emphasis on it?
The addition of the smaller clumps is brilliant and they are well placed. It's maybe the colors that clash? Too contrasting?. A liitle tone down on the bright green should do it?
You may have missunderstood me. There is no such thing as a "perfect" dio. That is what I meant.
J
The addition of the smaller clumps is brilliant and they are well placed. It's maybe the colors that clash? Too contrasting?. A liitle tone down on the bright green should do it?
You may have missunderstood me. There is no such thing as a "perfect" dio. That is what I meant.
J
Stickframe
#362
Joined: December 01, 2013
KitMaker: 1,661 posts
Armorama: 1,202 posts
Posted: Wednesday, July 23, 2014 - 03:41 AM UTC
Mike and Matt - depending on your preferred iconic quote:
1) "I shall return"
2) "I'll be back"
Coffee infused, work interrupted, ADD or not - I will take this "across the finish line" !
Hi Jerry - yeah - I get your point - it was the coffee talking! You're right in any event, and I agree - perfect for a "model", hmmm...well, it ain't a goal of mine. I do want "it" to look "right" and that's really a subject of opinion I suppose - but, that's part of the fun (for me) of doing this in the first place.
I added my comment about walking away and reconsidering once I realized....I was overthinking it!
Have a good one!
Nick
Trisaw
Joined: December 24, 2002
KitMaker: 4,105 posts
Armorama: 2,492 posts
Posted: Wednesday, July 23, 2014 - 05:33 AM UTC
Hi, you may have answered this before, but what did you use to make the Ford technical? Was it a 1/32 truck or 1/25 truck? How did you get the scales to match with the 1/35 seats and minigun? That's a really good kitbash and I wouldn't mind having something like that.
Could you give a list of the donor kits you used to create that Ford technical? Thanks.
Could you give a list of the donor kits you used to create that Ford technical? Thanks.
 |

WEB HOSTING BY


Copyright ©2021 Armorama and Kitmaker Network, a subsidiary of Silver Star Enterprises
All Rights Reserved. Please read our Conditions of Use and Privacy Policy.
All Rights Reserved. Please read our Conditions of Use and Privacy Policy.