Earlier I spoke of cutting out the unrealistic "pan" around the underside of the engine. Whenever I do this to a model that doesn't have a full engine I try to add some rudimentary detail. This gives the engine more visual depth when viewed from below. My practice is to build up the lower part of the engine block, add a starter motor, generator and the main crank pulley.
It is not exactly super detailing but it does add some additional complexity and visual interst to the model.
- In competitions I like to exhibit my models on a mirror in an attempt to show off some of this additional underbody detail.
I will be adding air lines, drain cocks and brake lines to this model as well.
Armor/AFV
For discussions on tanks, artillery, jeeps, etc.
Hosted by Darren Baker, Mario Matijasic
White 666 Semi-Tractor
Posted: Saturday, June 13, 2015 - 11:42 PM UTC
Posted: Saturday, June 13, 2015 - 10:34 PM UTC
Posted: Saturday, June 13, 2015 - 10:20 PM UTC
F.Y.I.- I used the after market fifth wheel recently made available from the folks at "Custom Factory" in the Ukraine.
customfactory.org.ua
or e-mail to:
[email protected]
This detail was originally intended for converting the KrAZ-258 and 255 into semi-tractors
but it looked right to me for use on the White truck.
customfactory.org.ua
or e-mail to:
[email protected]
This detail was originally intended for converting the KrAZ-258 and 255 into semi-tractors
but it looked right to me for use on the White truck.
Posted: Saturday, June 13, 2015 - 09:57 PM UTC
A couple of other underbody items that I did not care for:
#1: The open undersides of the battery and tool boxes that form the steps up to the cab. I suspect the actual boxes looked a bit different than this but I think enclosing them in some way or other greatly increases the apparent mass of the vehicle when viewed from below. Being able to view right into these hollow boxes just did not look right!.
And #2: Definitely did not like the pushed up box shapes molded into the cab underfloor that are used to support the seat bottoms. They could be seen on the underside of the floorboard so I filled them in with a scratched floorboard and some "imagineered" structural supports.
Above: Under the hood you will notice a couple of frame mounting tabs that help keep the cab more correctly centered and some strengthening blocks that reinforce the union between the hood sides and the fenders.
There you have it, the finished assembly: I know it won't show all that much but that is just the kind of guy I am.
I will still have to add oil drain plugs to the transmission, transfer case and differentials.
Posted: Saturday, June 13, 2015 - 09:23 PM UTC
One thing I really liked about the HobbyBoss model was that the front wheel hubs freely rotate around the constant velocity ball joints until final gluing. This allows the modeler to locate the wheels at whatever steering angle they might wish.
One word of caution though, as I say the hubs rotate freely around the CV joints in ALL directions and there is nothing to keep them at a vertical angle while the glue is drying. Care must be taken to set the hub/axle assembly on a flat surface and weight the hubs so they will end up at 90 degrees to the ground.
p.s. You might notice that I cut out the unrealistic "pan" that HobbyBoss chose to use to enclose the bottom of the engine area. I just hate that fake effect!
Posted: Saturday, June 13, 2015 - 09:23 PM UTC
Nice work! Is the fifth wheel scratch, or an AM part?
Posted: Saturday, June 13, 2015 - 09:06 PM UTC
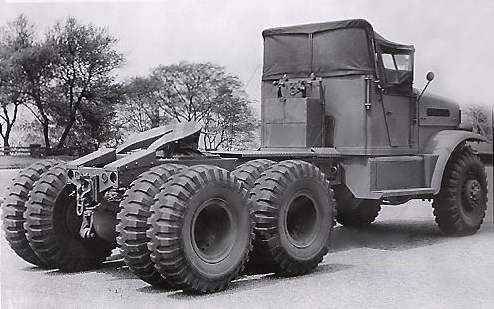
Have not found a lot of reference on the semi-tractor out there but there is a bit.
Notice the truck above is rolling on larger than standard rims and tires. I am told this was a post-war Army upgrade.
Now THAT might make for an interesting conversion!
In the lower photo it looks like the tractor just might have a front mounted winch as well.
Notice the truck above is rolling on larger than standard rims and tires. I am told this was a post-war Army upgrade.
Now THAT might make for an interesting conversion!
In the lower photo it looks like the tractor just might have a front mounted winch as well.
Posted: Saturday, June 13, 2015 - 09:03 PM UTC
Posted: Saturday, June 13, 2015 - 09:00 PM UTC
WHITE 666 SEMI-TRACTOR WITH SOFT TOP
Not a difficult conversion but one that offers something a bit different.
You start by shortening the rear frame by 25 scale inches and foregoing the bumperettes.
You will also need to remove the load box support beams from the top of the frame members. (Do wish HB had molded these rails separately or attached them to the bottom of the load box like so many other manufactures have done.)
Scratch building that rear cross member was a bit fiddly especially with the round cut outs for the protected tail lights. My hole punch set took care of that!