

Hey Nick,
You've made some excellent progress on this project since the last time I looked. I think it is awesome how you are able to crank these vehicles out so quickly yet maintain high standards of construction and painting.
Can't wait to see the completed diorama.
Cheers,
James
Dioramas
Do you love dioramas & vignettes? We sure do.
Do you love dioramas & vignettes? We sure do.
Hosted by Darren Baker, Mario Matijasic
The Battle of Debecka Pass

ReconTL3-1

Joined: June 07, 2006
KitMaker: 726 posts
Armorama: 687 posts
Posted: Sunday, October 04, 2015 - 05:49 AM UTC
Stickframe

#362
Joined: December 01, 2013
KitMaker: 1,661 posts
Armorama: 1,202 posts

Posted: Monday, October 05, 2015 - 10:09 PM UTC
Hi Guys,
another day, another GMV.
Jerry, I see your point about those big ammo boxes - as you'll see below I modified a few regular version to make them bigger. I don't know if the size is exactly right, but they are big.
Kurt - nice to hear from you! hope all is good - thanks for checking it out.
Hi James, thanks for the comments - yes, I promise, this is leading to a dio...
OK, on today's post - the first few are of the last GMV. The pics are a bit better, and I touched up some of the details - like hitting the wheels with a light wash. If nothing else, they now read better:


Now, on to GMV number three. In an effort to not go broke on this, I'm not buying more parts unless I absolutely have to - like for weapons (BTW, the Live Resin parts are really nice!!). So, I'm scratching what I can. The rear seats are from the kit plus styrene - to make them look like bucket seats - the front grill guard is from an old Italeri kit, and the rear bumper is layers of styrene - it looks fine - I'll add bolts etc.
I still need to detail the rocker panels w/ ammo boxes and armor. If you look carefully, you'll see the front wheels are turned. I cut off the hub assembly from the front axle. Then inserted a bent rod in the cv joint where it meets the hub gear assembly. Not graceful but not bad either. Take a look:

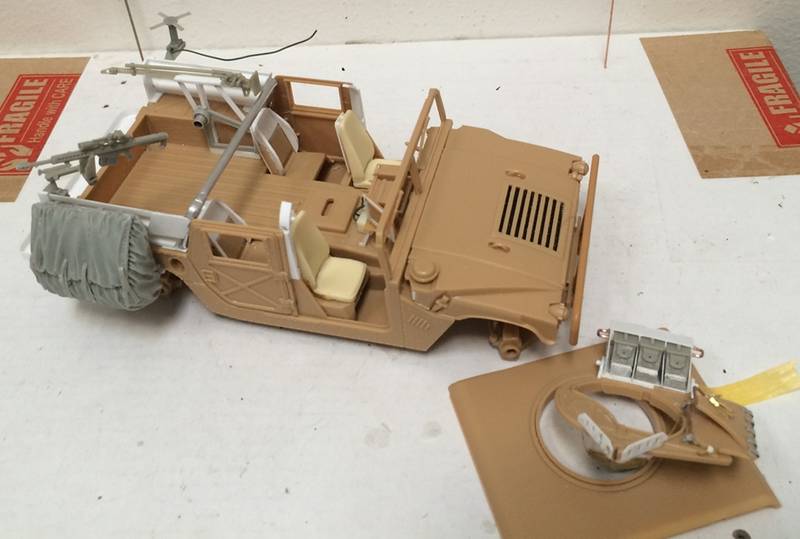

And there you have it. Yes, I'm getting pretty good at making these modifications, so I'm looking for some variation - like that large sack on the rt rear. I have a pic of one of those ca 2004 - it was black. I'm not sure mine will be. Next, you see the sniper rifle, The book makes reference to this as std eqpt with this ODA - so, I feel OK about showing it.
And, yes, one last thing - the driver. He's a Legend guy - and I'm sure he fits fine into something, just not the Academy truck - it took plenty of cutting, pining, and filling to get him to fit reasonably well - each arm was cut and pinned in three places. I hope he looks good when painted and installed!
thanks for having a look
Nick
another day, another GMV.
Jerry, I see your point about those big ammo boxes - as you'll see below I modified a few regular version to make them bigger. I don't know if the size is exactly right, but they are big.
Kurt - nice to hear from you! hope all is good - thanks for checking it out.
Hi James, thanks for the comments - yes, I promise, this is leading to a dio...
OK, on today's post - the first few are of the last GMV. The pics are a bit better, and I touched up some of the details - like hitting the wheels with a light wash. If nothing else, they now read better:
Now, on to GMV number three. In an effort to not go broke on this, I'm not buying more parts unless I absolutely have to - like for weapons (BTW, the Live Resin parts are really nice!!). So, I'm scratching what I can. The rear seats are from the kit plus styrene - to make them look like bucket seats - the front grill guard is from an old Italeri kit, and the rear bumper is layers of styrene - it looks fine - I'll add bolts etc.
I still need to detail the rocker panels w/ ammo boxes and armor. If you look carefully, you'll see the front wheels are turned. I cut off the hub assembly from the front axle. Then inserted a bent rod in the cv joint where it meets the hub gear assembly. Not graceful but not bad either. Take a look:
And there you have it. Yes, I'm getting pretty good at making these modifications, so I'm looking for some variation - like that large sack on the rt rear. I have a pic of one of those ca 2004 - it was black. I'm not sure mine will be. Next, you see the sniper rifle, The book makes reference to this as std eqpt with this ODA - so, I feel OK about showing it.
And, yes, one last thing - the driver. He's a Legend guy - and I'm sure he fits fine into something, just not the Academy truck - it took plenty of cutting, pining, and filling to get him to fit reasonably well - each arm was cut and pinned in three places. I hope he looks good when painted and installed!
thanks for having a look
Nick
jrutman
Joined: April 10, 2011
KitMaker: 7,941 posts
Armorama: 7,934 posts
Posted: Monday, October 05, 2015 - 10:23 PM UTC
More of your blindingly fast pace!! What the heck was carried in that gi-normous stowage bag? The Taj-Mahal of tents maybe?
J
J
Stickframe
#362
Joined: December 01, 2013
KitMaker: 1,661 posts
Armorama: 1,202 posts
Posted: Monday, October 05, 2015 - 11:09 PM UTC
Hi jerry - ha! maybe there's a full banquet tent in there!, or? well, I don't know - according to the story, these truck were loaded down with lots and lots of stuff....
This is the pic I thought of - yes, the bag I show is bigger, but, you'll get the point. I needed some variety! no more ammo boxes along that part of the truck...

what do you think? I guess if its completely hated I can cut it off, but as of now, would rather not.
thank
Nick
This is the pic I thought of - yes, the bag I show is bigger, but, you'll get the point. I needed some variety! no more ammo boxes along that part of the truck...
what do you think? I guess if its completely hated I can cut it off, but as of now, would rather not.
thank
Nick
jrutman
Joined: April 10, 2011
KitMaker: 7,941 posts
Armorama: 7,934 posts
Posted: Monday, October 05, 2015 - 11:53 PM UTC
I don't hate it,just never saw one before. With all the newer stuff that in use now over there I imagine there is a great deal of stuff I haven't seen already.
Variety is always nice anyway.
J
Variety is always nice anyway.
J
Stickframe
#362
Joined: December 01, 2013
KitMaker: 1,661 posts
Armorama: 1,202 posts
Posted: Tuesday, October 06, 2015 - 12:12 AM UTC
HI Jerry - yeah - I get it, I just was kidding, about you hating it  You have a good idea for scale and fit tho, and I listen to what you say.
thanks
Nick
You have a good idea for scale and fit tho, and I listen to what you say.thanks
Nick

justsendit
Joined: February 24, 2014
KitMaker: 3,033 posts
Armorama: 2,492 posts
Posted: Tuesday, October 06, 2015 - 03:35 AM UTC
Hi Nick, Looking good! I liked that bag the minute I saw it!
mike
mike
mvaiano

Joined: January 24, 2012
KitMaker: 1,054 posts
Armorama: 1,050 posts

Posted: Tuesday, October 06, 2015 - 03:39 PM UTC
Yes, the big bag is great and I think let more space inside the truck and this way the guys have more space to use all the weapons and eletronics.
Great Nick!
Cheers!
Marco
Great Nick!
Cheers!
Marco
Stickframe
#362
Joined: December 01, 2013
KitMaker: 1,661 posts
Armorama: 1,202 posts
Posted: Tuesday, October 06, 2015 - 11:08 PM UTC
Today will be two updates - some on the truck - other on a new figure -
Mike and Marco - alright, glad you guys like what you see so far. Marco, thanks for confirming! Your point reflects what was said in the book about the really remarkable amount of gear these truck packed.
OK - for today, two quick shots of the truck:


As promised...not too many new parts, but plenty of styrene and cobbling stuff together from leftovers. This is almost done.
Next, in the spirit of not spending too much on this...a few months back I got a great deal on some CMK figures very nice, and a few pairs for about $7USD each...not bad. The catch, they are nearly but not really correct. This is OK - Jerry - you know how I'm one of the guys thanking you for posting your WIP? well, I'm now getting a bit more bold, when considering what I want, and what I've seen you do.
Let the lead foil roll, and voila, a knight in shining armor:


My donor (bottle) for this kit was a western Sonoma County Pinot Noir, from the Russian River Valley - nice place and good wine - useful to fix a model too. Anyway, it's turning out better than I thought it might, so I posted it.
thanks
Nick
Mike and Marco - alright, glad you guys like what you see so far. Marco, thanks for confirming! Your point reflects what was said in the book about the really remarkable amount of gear these truck packed.
OK - for today, two quick shots of the truck:
As promised...not too many new parts, but plenty of styrene and cobbling stuff together from leftovers. This is almost done.
Next, in the spirit of not spending too much on this...a few months back I got a great deal on some CMK figures very nice, and a few pairs for about $7USD each...not bad. The catch, they are nearly but not really correct. This is OK - Jerry - you know how I'm one of the guys thanking you for posting your WIP? well, I'm now getting a bit more bold, when considering what I want, and what I've seen you do.
Let the lead foil roll, and voila, a knight in shining armor:
My donor (bottle) for this kit was a western Sonoma County Pinot Noir, from the Russian River Valley - nice place and good wine - useful to fix a model too. Anyway, it's turning out better than I thought it might, so I posted it.
thanks
Nick
jrutman
Joined: April 10, 2011
KitMaker: 7,941 posts
Armorama: 7,934 posts
Posted: Wednesday, October 07, 2015 - 12:12 AM UTC
There you go buddy! Now you know the main reason I like using the foil from that source! LoL
Nothing like a glass of the fruit of the earth each night! Good for the blood and the soul methinks.
I see you are rapidly taking charge of that foil technique! Just keep your eye open and you can find various thicknesses of lead as well. Some of the older bottles have pretty thick stuff.
Your guy is lookin' good brother,next,you'll be rolling out thin pieces of epoxy putty and making your own tarps,etc. Romain is shedding tears of joy!
J
justsendit
Joined: February 24, 2014
KitMaker: 3,033 posts
Armorama: 2,492 posts
Posted: Wednesday, October 07, 2015 - 10:12 AM UTC
 Go, you lead-head! ... outstanding detail, after detail, after detail! ...
mike
Stickframe
#362
Joined: December 01, 2013
KitMaker: 1,661 posts
Armorama: 1,202 posts
Posted: Monday, October 12, 2015 - 03:52 AM UTC
Hi fellow model builders -
Hi Jerry yes...the "wine confidence" got a grip on me! hopefully Romain isn't shedding tears of laughter at this point! As you'll see below, way below, I think I am getting better at figures. I'm not sure what threshold of "not bad" I have crossed, but I want to get better!
Mike - hahah! a leadhead indeed - I love the stuff!
OK, on to the post. Today's will be a bit scattered - It's fleet week here and over the weekend, the Blue Angels put on a couple of shows - awesome stuff - better yet, is practice week when the buzz downtown San Francisco! they rock the mid-rise concrete bunker I work in! unnerves some, others, like me, like it! So first a couple of pics from SFGate, the on-line version of the local paper:


if you go to SFGate and look around, I'm sure you'll find more.
OK, back to business - first up, turns out I've become a Javelin farmer:


While not that hard to do, a bit slow. I used a segment of aluminum tube, and two layers of styrene tube for the ends. The rest was filing, more pieces of styrene, a bit of lead foil, and paint - not bad and cheap! Some will go into the GMVs, others the GRV.
On to GMV #3 - sorry about the crappy pics, as this one looks better in real life - anyway, have a look:


And there you have it - I really like the turned wheels (turning left that is) for some variety. I think the big bag + sniper rifle are nice too.
Now, only one more to go - I think I'm going to try to make the suspension look sagged. With all the stuff piled into this, it's riding too high, like the day it rolled out of the factory. Improved suspension or not, the pictures and common sense say it should be riding lower, so, I'm going to figure out how to do that next.
Into the department of "not picking on the guy who can't paint figures", take a look - again, sorry about the pic quality. He's not as bad as all that, but along way from much better than good:

This guy will eventually be seen loading Javelins.
Ok, that's it for today - bye
Nick
Hi Jerry yes...the "wine confidence" got a grip on me! hopefully Romain isn't shedding tears of laughter at this point! As you'll see below, way below, I think I am getting better at figures. I'm not sure what threshold of "not bad" I have crossed, but I want to get better!
Mike - hahah! a leadhead indeed - I love the stuff!
OK, on to the post. Today's will be a bit scattered - It's fleet week here and over the weekend, the Blue Angels put on a couple of shows - awesome stuff - better yet, is practice week when the buzz downtown San Francisco! they rock the mid-rise concrete bunker I work in! unnerves some, others, like me, like it! So first a couple of pics from SFGate, the on-line version of the local paper:
if you go to SFGate and look around, I'm sure you'll find more.
OK, back to business - first up, turns out I've become a Javelin farmer:
While not that hard to do, a bit slow. I used a segment of aluminum tube, and two layers of styrene tube for the ends. The rest was filing, more pieces of styrene, a bit of lead foil, and paint - not bad and cheap! Some will go into the GMVs, others the GRV.
On to GMV #3 - sorry about the crappy pics, as this one looks better in real life - anyway, have a look:
And there you have it - I really like the turned wheels (turning left that is) for some variety. I think the big bag + sniper rifle are nice too.
Now, only one more to go - I think I'm going to try to make the suspension look sagged. With all the stuff piled into this, it's riding too high, like the day it rolled out of the factory. Improved suspension or not, the pictures and common sense say it should be riding lower, so, I'm going to figure out how to do that next.
Into the department of "not picking on the guy who can't paint figures", take a look - again, sorry about the pic quality. He's not as bad as all that, but along way from much better than good:
This guy will eventually be seen loading Javelins.
Ok, that's it for today - bye
Nick

airborne1

Joined: April 15, 2006
KitMaker: 915 posts
Armorama: 797 posts

Posted: Monday, October 12, 2015 - 06:00 AM UTC
Excellent work Nick ,
It's all coming together and looks good.
Michael
It's all coming together and looks good.
Michael
kurnuy

Joined: August 22, 2009
KitMaker: 1,491 posts
Armorama: 997 posts
Posted: Monday, October 12, 2015 - 09:26 AM UTC
Hi Nick ,
cool , i like your style man.
At least you don't need forced perspective to be impressive .
.
Great job.
Kurt
cool , i like your style man.
At least you don't need forced perspective to be impressive
. Great job.
Kurt
jrutman
Joined: April 10, 2011
KitMaker: 7,941 posts
Armorama: 7,934 posts
Posted: Monday, October 12, 2015 - 06:58 PM UTC
Yep,figs are getting way better! Those AT rockets remind me of the repetition in my last vignette with all the rifles. Fun times.
J
J
Stickframe
#362
Joined: December 01, 2013
KitMaker: 1,661 posts
Armorama: 1,202 posts
Posted: Monday, October 19, 2015 - 12:25 AM UTC
Hi Michael, thanks very much -
Kurt - well, as you're a very clever guy, I need to look for other ways to make interesting projects! I do really like what you're doing tho with the dogfight!
Hi Jerry - you are the master of all of this! I suspect you've already crossed many of the bridges I'm just stumbling across - like that pile of weapons, like your pile of rifles....I think your stuff makes up about half of my reference file!
Ok - on to the update. In an effort to not bore everyone enough into not pay attention to this thread - I'm starting with pictures of the nearly built GMV #4. Now that I've built several of these, this one went together quickly, and so far I like the results.
You'll see more scratch work than on the last one - I AM NOT buying any more parts for these trucks!!! so, scratch built grill guard/winch, computer monitor, etc etc. Please take a look:


You'll see even the antenna mounts on this are styrene -
Next, for some variety, I began another figure. I want this guy to be sitting on the roof, in the gunner's turret -but somewhat casually. He received a fair amount of work - lots of cutting and reassembling. His pose works on the kit, even though it looks a bit odd, as it is out of context.
The first picture is what he was supposed to look like as a kit:

and the next of what he looks like now:


and that's where we are today - I'll prime the gmv tonight -
I will eventually build a dio for this!!
Thanks for having a look
Nick
Kurt - well, as you're a very clever guy, I need to look for other ways to make interesting projects! I do really like what you're doing tho with the dogfight!
Hi Jerry - you are the master of all of this! I suspect you've already crossed many of the bridges I'm just stumbling across - like that pile of weapons, like your pile of rifles....I think your stuff makes up about half of my reference file!
Ok - on to the update. In an effort to not bore everyone enough into not pay attention to this thread - I'm starting with pictures of the nearly built GMV #4. Now that I've built several of these, this one went together quickly, and so far I like the results.
You'll see more scratch work than on the last one - I AM NOT buying any more parts for these trucks!!! so, scratch built grill guard/winch, computer monitor, etc etc. Please take a look:
You'll see even the antenna mounts on this are styrene -
Next, for some variety, I began another figure. I want this guy to be sitting on the roof, in the gunner's turret -but somewhat casually. He received a fair amount of work - lots of cutting and reassembling. His pose works on the kit, even though it looks a bit odd, as it is out of context.
The first picture is what he was supposed to look like as a kit:
and the next of what he looks like now:
and that's where we are today - I'll prime the gmv tonight -
I will eventually build a dio for this!!
Thanks for having a look
Nick
mvaiano
Joined: January 24, 2012
KitMaker: 1,054 posts
Armorama: 1,050 posts
Posted: Monday, October 19, 2015 - 12:34 AM UTC
Nick, you are in your 4th GMV and no one looks like the other. It's fantastic and hard to get...
Oh man! Terrific!
Cheers!
Marco
Oh man! Terrific!
Cheers!
Marco
jrutman
Joined: April 10, 2011
KitMaker: 7,941 posts
Armorama: 7,934 posts
Posted: Monday, October 19, 2015 - 12:51 AM UTC
As I said several times before,I don't know how you keep/maintain this optempo.
J
J
kurnuy
Joined: August 22, 2009
KitMaker: 1,491 posts
Armorama: 997 posts
Posted: Monday, October 19, 2015 - 01:32 AM UTC
Quoted Text
As I said several times before,I don't know how you keep/maintain this optempo.
J
Could it be the cup(s) of coffee in the morning ???
It takes more efforts to make such a project like yours Nick and you're doing great , really. The forced perspective i'm using is nothing more than just a quick way to create something and it works really well. I am a fan of your work !
Kurt
justsendit
Joined: February 24, 2014
KitMaker: 3,033 posts
Armorama: 2,492 posts
Posted: Monday, October 19, 2015 - 07:31 PM UTC
Hi Nick,
Load those babies up till the tires pop! I see that you're using sagged tires for this one ... nice! And I'm a big fan of the occasional turned steering too! It's details like these which bring your work to life. The figures are looking great too!
Amazing high-standard work as usual!
mike
Load those babies up till the tires pop! I see that you're using sagged tires for this one ... nice! And I'm a big fan of the occasional turned steering too! It's details like these which bring your work to life. The figures are looking great too!
Amazing high-standard work as usual!
mike
Stickframe
#362
Joined: December 01, 2013
KitMaker: 1,661 posts
Armorama: 1,202 posts
Posted: Monday, October 26, 2015 - 12:04 AM UTC
Marco, Jerry, Kurt and Mike - thanks! and, the group response, because the answer to each: Coffee!! good, strong Peet's coffee!! haha - the trucks and I are both loaded with it! 
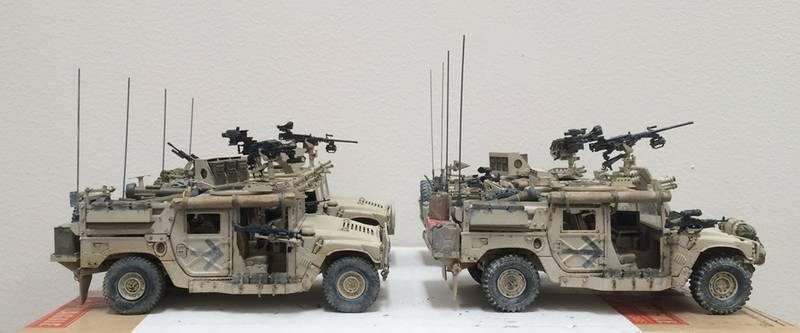
The GMV's are about done. I still need to add straps in the back to hold on fuel/water containers, but there mostly done! Please take a look at the group. See if you can tell which one is version 4 - and, if you can tell that I reworked the suspension to make it sit lower. I cut off and repositioned each A-arm, which is two per wheel. It was not that hard to do, but your comments will let me know if it was worth the effort or not - can you even tell??
Take a look:


And that is my squad - so far so good. They seem to look like they belong together, but are not identical.

and as a reminder, they will be placed generally around this truck.

As for the dio itself - the plan above spells it out pretty well. I'm building something around the area called "SF Team Positions". The book describes this area in some detail. Essentially an uphill and out of line-of-sight position from the T-55s etc below. I'll describe this in greater detail next time.
The following pictures show the character I'll be trying to achieve, with some flat land, and some hilly. Again, I'll describe in more detail another time. Please take a look:


The reason I'm considering each image above is because of the variety in landscape shown - some tall grass flat land, some rolling land with sparse grass and some rocky areas. I want to draw from each.
Ok, thanks for checking it out!
Nick
The GMV's are about done. I still need to add straps in the back to hold on fuel/water containers, but there mostly done! Please take a look at the group. See if you can tell which one is version 4 - and, if you can tell that I reworked the suspension to make it sit lower. I cut off and repositioned each A-arm, which is two per wheel. It was not that hard to do, but your comments will let me know if it was worth the effort or not - can you even tell??
Take a look:
And that is my squad - so far so good. They seem to look like they belong together, but are not identical.
and as a reminder, they will be placed generally around this truck.
As for the dio itself - the plan above spells it out pretty well. I'm building something around the area called "SF Team Positions". The book describes this area in some detail. Essentially an uphill and out of line-of-sight position from the T-55s etc below. I'll describe this in greater detail next time.
The following pictures show the character I'll be trying to achieve, with some flat land, and some hilly. Again, I'll describe in more detail another time. Please take a look:
The reason I'm considering each image above is because of the variety in landscape shown - some tall grass flat land, some rolling land with sparse grass and some rocky areas. I want to draw from each.
Ok, thanks for checking it out!
Nick
jrutman
Joined: April 10, 2011
KitMaker: 7,941 posts
Armorama: 7,934 posts
Posted: Monday, October 26, 2015 - 12:18 AM UTC
I would like to give an honest opinion about your work with the lowered suspension but the pics you showed don't really lend themselves to compare? Maybe a pic from lower down?
I like your concept pics.
J
I like your concept pics.
J
Stickframe
#362
Joined: December 01, 2013
KitMaker: 1,661 posts
Armorama: 1,202 posts
Posted: Monday, October 26, 2015 - 05:26 AM UTC
Hi Jerry -
Take a look at the third picture down - the truck on the left is contestant #4 (the winner!), featuring both cut and reset suspension/A-arms front and rear, and tires that have a flat spot (suggesting a sag). Considering the amount of hassle associated with doing this, and the almost imperceptible change, I'm not sure I'd do it again.
The headache to value ratio associated with making the front wheels turn seems to be more worth the effort.
Glad you like those character images. In addition to making several figures, getting the setting right will be a challenge. I think making only a vast expanse of tall grass would be a bit/lot dull, and a pain to build. But, to go too light on the amount of tall grass would be a disservice to the actual story - in addition to the photos, the story refers to the tall grass more than once. The text also though refers to the importance of the dirt road, various dips and ditches, and rolling hills. The photos above also include some rocks scattered about.
I'll be working toward a balance of the elements. Obviously, I can't do a dio that fully reflects the setting, but, I have some ideas for making something credible.
thanks
Nick
Stickframe
#362
Joined: December 01, 2013
KitMaker: 1,661 posts
Armorama: 1,202 posts
Posted: Monday, October 26, 2015 - 09:48 PM UTC
As I became curious, I did the following edits to the pic -you can actually see the difference with the redline comparing fender openings between the two. It still might be more work than it's actually worth, it's hard to say? - you tell me:

thanks
Nick
thanks
Nick
justsendit
Joined: February 24, 2014
KitMaker: 3,033 posts
Armorama: 2,492 posts
Posted: Monday, October 26, 2015 - 10:56 PM UTC
Hi Nick,
I thought that was the one ... I like the sag! Personally, I think that subtle change was really worth the effort. ⭐️⭐️⭐️⭐️⭐️
mike
I thought that was the one ... I like the sag! Personally, I think that subtle change was really worth the effort. ⭐️⭐️⭐️⭐️⭐️
mike
 |

WEB HOSTING BY


Copyright ©2021 Armorama and Kitmaker Network, a subsidiary of Silver Star Enterprises
All Rights Reserved. Please read our Conditions of Use and Privacy Policy.
All Rights Reserved. Please read our Conditions of Use and Privacy Policy.