Thank you, Paul!
As a reminder to everyone: Only those participants that have a finished model posted to the gallery by the date the campaign officially ends will also receive the badge.
Campaigns: Active Campaigns
Campaigns that are either in planning or underway should be grouped here.
Campaigns that are either in planning or underway should be grouped here.
Hosted by Richard S.
Campaign 500+
Armored76

Joined: September 30, 2013
KitMaker: 1,615 posts
Armorama: 1,500 posts

Posted: Thursday, June 09, 2016 - 12:16 PM UTC
The_musings_of_NBNoG

Joined: January 08, 2012
KitMaker: 520 posts
Armorama: 516 posts

Posted: Friday, June 10, 2016 - 01:30 PM UTC
Quoted Text
The build looks great but... it is kind of an unspoken rule that a kit needs to be painted in order to be considered finished for a campaign... Are you still planning to do that?
I have never participated in a build before
I was worried that I didn't post a gallery photo....
I asked you...In a private(site) message
you responded next day private(site) message) that the matter was settled a while back....
I went searching through all the pages to see the answer quoted above....
I'm really sorry I don't understand "UNSPOKEN" rules
This was one of the most wide open campaigns....
about the Number of Pieces....
I've been a participant for 4 years and built a nice stash (5K) of current and future builds.
if it had stated that this campaign was about how good you can paint a model ....I'd have NEVER looked twice.
PLEASE BE CLEARER ABOUT THE RULES> including the "UNSPOKEN" ones.
It will help "Modelers" make better choices , about how to participate.
.
.
.
as a personal note. I spend most my evenings here - on this site, and its associated webs.
I feel I have now been brought up 'short', ,, as a 'Modeler'
and need to re-evaluate how my participation 'as a "builder-only"' - will be viewed by the people I have found such common interest...
--(and ... yes ...comfort... from 99.9% of the members and THEIR interests (and how the archive their completion/fulfillment with.."their Builds")--
The_musings_of_NBNoG

Joined: January 08, 2012
KitMaker: 520 posts
Armorama: 516 posts

Posted: Friday, June 10, 2016 - 02:40 PM UTC
(and how they achieve their completion/fulfillment from .. "their Builds")--
sorry.. auto correct blows
A thought crossed my mind as I sought sleep....
500+ piece kits don't actually come with the paints included. And this was a 500+ centered campaign.
I hope,,, One could clearly see 'My' confusion.

sorry.. auto correct blows
A thought crossed my mind as I sought sleep....
500+ piece kits don't actually come with the paints included. And this was a 500+ centered campaign.
I hope,,, One could clearly see 'My' confusion.

Armored76

Joined: September 30, 2013
KitMaker: 1,615 posts
Armorama: 1,500 posts

Posted: Friday, June 10, 2016 - 03:04 PM UTC
I have added an additional entry to the contest rules to make things clear but would like to keep the rest of the discussion private, if you don't mind.
Still, if anybody else would like to chime in on the discussion, let's hear it! Should it be the case, I'd be glad to admit I was the only one seeing a kit complete once it is at least decaled and painted.
I can only hope this incident won't stop you from participating in the forums and/or future campaigns!

Thirian24

Joined: September 30, 2015
KitMaker: 2,493 posts
Armorama: 2,344 posts

Posted: Monday, June 13, 2016 - 09:59 PM UTC
Armored76

Joined: September 30, 2013
KitMaker: 1,615 posts
Armorama: 1,500 posts

Posted: Tuesday, June 14, 2016 - 12:16 AM UTC
A very clean build, Dustin! Looking forward to seeing more of it!
Thirian24

Joined: September 30, 2015
KitMaker: 2,493 posts
Armorama: 2,344 posts

Posted: Tuesday, June 14, 2016 - 02:00 AM UTC

PRH001

Joined: June 16, 2014
KitMaker: 681 posts
Armorama: 603 posts

Posted: Friday, June 17, 2016 - 04:03 AM UTC
Dustin,
I'm definately looking forward to seeing it painted. Very nice build so far.
Cheers,
Paul H
I'm definately looking forward to seeing it painted. Very nice build so far.
Cheers,
Paul H

Ranger74

Joined: April 04, 2002
KitMaker: 1,290 posts
Armorama: 658 posts

Posted: Friday, June 17, 2016 - 08:27 PM UTC
I am finally back from a 9,000 mile, 10-week odyssey. Additionally, had to help SWMBO with removing wallpaper from walls in master bedroom and master bath. Master bedroom is completed with new paint, but bath is still in-progress. I have a lot of catching-up with reading of this forum.
I have added mud to the Mk IV. I have kept it light compared to some photos I have found of the prototype, but I want the model to be center-of-attraction, not the mud:


It's great to be back at the workbench!.


Quoted Text
Congratulations on the family growth, Jeff! That's awesome news!
The build looks very-very nice, as well. Those tracks are formally screaming for some dirt build-up!
I have added mud to the Mk IV. I have kept it light compared to some photos I have found of the prototype, but I want the model to be center-of-attraction, not the mud:


It's great to be back at the workbench!.


Armored76

Joined: September 30, 2013
KitMaker: 1,615 posts
Armorama: 1,500 posts

Posted: Saturday, June 18, 2016 - 12:51 AM UTC
Good to have you back, Jeff!
Thirian24

Joined: September 30, 2015
KitMaker: 2,493 posts
Armorama: 2,344 posts

Posted: Monday, June 20, 2016 - 09:01 AM UTC
Paul, thank you very much for the kind words!
I'm finally done with assembly. That didn't take as long as I thought it would. I was kina dreading this kit. I did have some issues with it. I didn't care for the plastic, it was brittle and the sprue gates are huge and thick. I did have some fit issues also. But, for being only a handful of kits into this hobby, I'm pretty happy with the outcome of the build. I do still have to address the "canvas" cover that goes over the mantlet gun area. The kit piece was trash, so I must make one. I'll install the shields armored glass after painting. I just wasn't so sure of my masking abilities. So we will see how that turns out.
Also, I dd give the lower hull a gloss coat a few days ago, so it got a wash this morning.
Can anybody give any advice on how much gear/stowage this should have? I'm not sure which time period this M3a3 represents in the war. I read that later war vehicles didn't have as much stowage because they came back to base everyday. As early war vehicles would have a lot of stowage.
Here are a couple of pics.


Cheers,
Dustin
I'm finally done with assembly. That didn't take as long as I thought it would. I was kina dreading this kit. I did have some issues with it. I didn't care for the plastic, it was brittle and the sprue gates are huge and thick. I did have some fit issues also. But, for being only a handful of kits into this hobby, I'm pretty happy with the outcome of the build. I do still have to address the "canvas" cover that goes over the mantlet gun area. The kit piece was trash, so I must make one. I'll install the shields armored glass after painting. I just wasn't so sure of my masking abilities. So we will see how that turns out.
Also, I dd give the lower hull a gloss coat a few days ago, so it got a wash this morning.
Can anybody give any advice on how much gear/stowage this should have? I'm not sure which time period this M3a3 represents in the war. I read that later war vehicles didn't have as much stowage because they came back to base everyday. As early war vehicles would have a lot of stowage.
Here are a couple of pics.


Cheers,
Dustin

Ranger74

Joined: April 04, 2002
KitMaker: 1,290 posts
Armorama: 658 posts

Posted: Monday, June 20, 2016 - 07:03 PM UTC
Dustin,
Nice work on the Bradley. I recommend you go on line and check photos/videos for an idea of stowage. That way you will also get a good idea how the equipment is secured to the vehicle and also the colors and weathering (dust/mud etc.) on the equipment.
Jeff
Nice work on the Bradley. I recommend you go on line and check photos/videos for an idea of stowage. That way you will also get a good idea how the equipment is secured to the vehicle and also the colors and weathering (dust/mud etc.) on the equipment.
Jeff
Posted: Tuesday, June 21, 2016 - 02:17 AM UTC
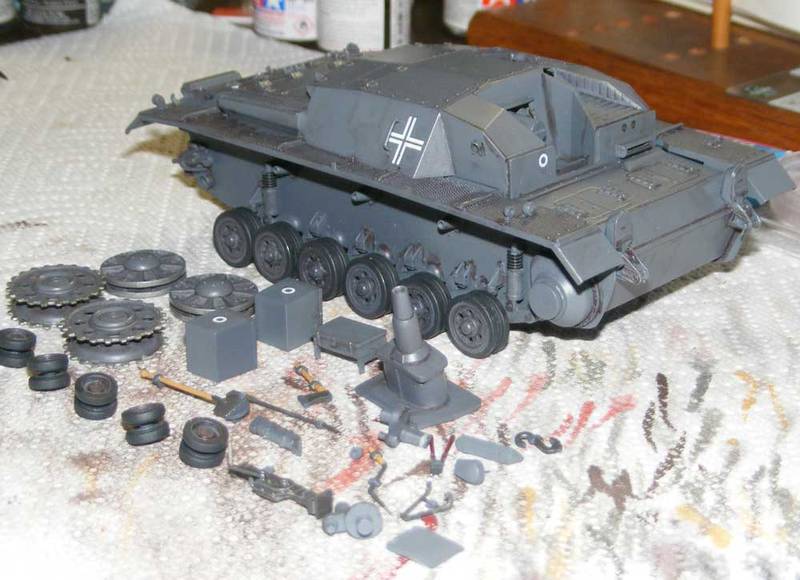
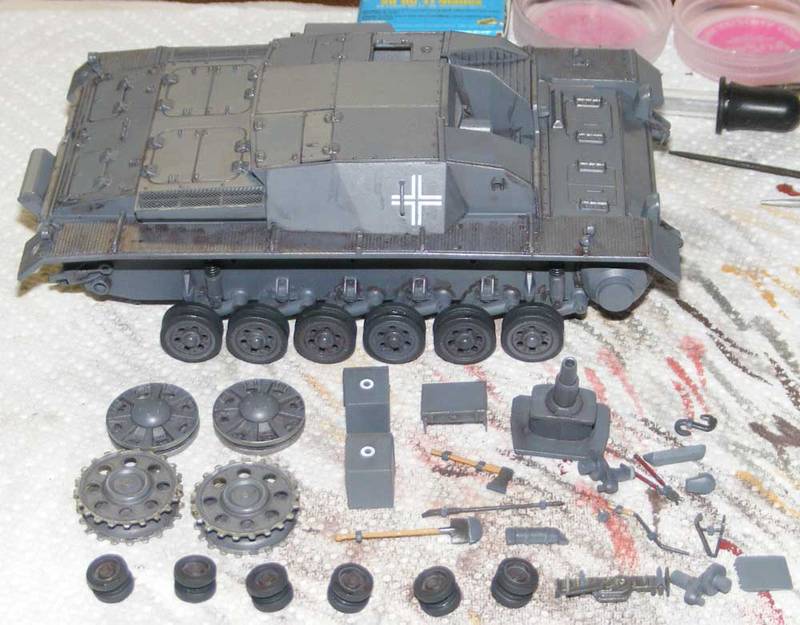
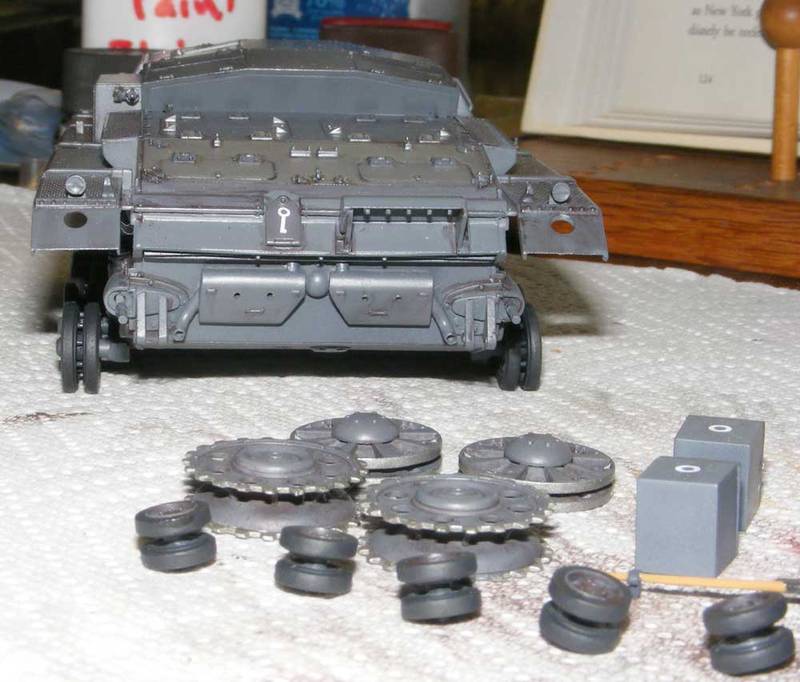
I have been on the road and working on the backlog at work and not looking at the forums. Wow, what a lot has been going on here! The pics below were short back in May before I went on the road and show the Stug as it was just after the dry transfers were applied and a brown gunge wash applied.
Vintage Paul
Vintage Paul


Posted: Wednesday, June 22, 2016 - 04:04 AM UTC
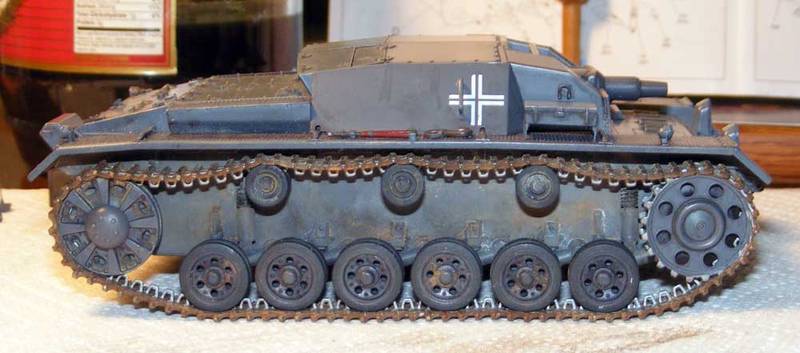
We had a long hot miserable weekend in SoCal and that means modeling in air conditioned comfort. Lots of work done since the last pictures including more pin washes, paint on various bits and installation of the Fruil tracks. This turned out to be a bit of a trial as the Dragon kit was designed for glue together link tracks. I don't see how the hull could be painted and weathered if built as directed and so I reordered the steps somewhat.
Also, I really begin to appreciate the way Tamiya engineers their wheels & sprockets so they not only rotate but can be trial fitted and removed. This allows the Fruils to be sized right on the model. As Dragon did it, this would have been difficult. As it happened I had a set of the HobbyTrax tools on hand for the early Panzer III and these were pressed into service like one of those clothes makers dummies and the fit was just as I had hoped it would be once the Fruils were fitted to the model.
I like to get the hull completely painted and weathered before the wheels & tracks are added.
I started assembly by gluing the return rollers into place with CA gel glue and setting it aside for several hours to cure. Holding the model with its nose up the tracks were threaded between the rollers & the fenders. The drive sprockets were then glued on and, once again, the model was set aside while the glue cured. Once all was good & solid, the tracks were wrapped around and the final wire pin was installed. Then the idler was teased into the tracks and glued into place. This was a bit of a job as there is little mechanical strength to hold it into place and each idler needed to be held into position until the glue firmed up.
The tracks fit a bit loose but look nice when carefully positioned. More work to come, tophamper needs to be added and more detail painting & some pigments.
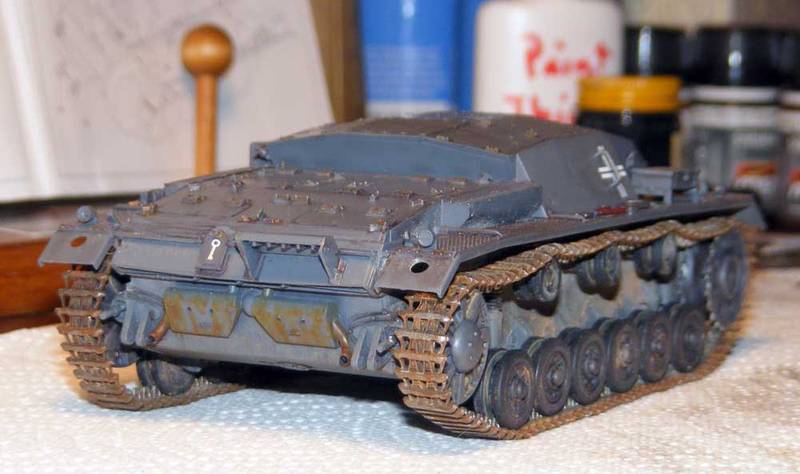
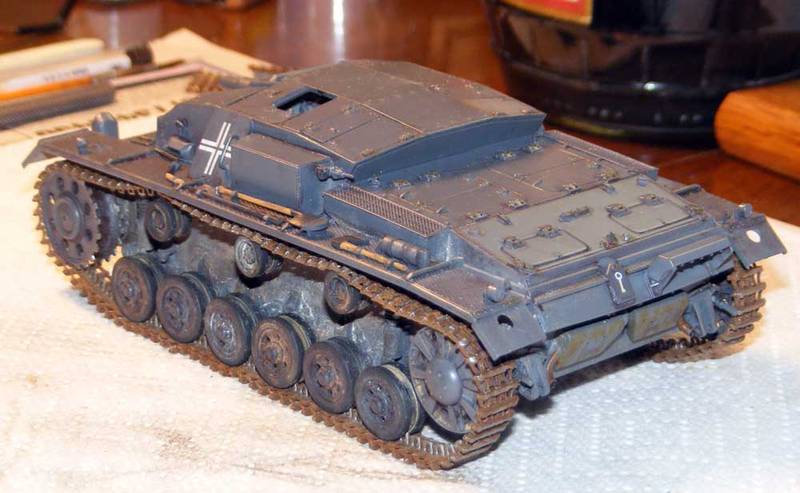
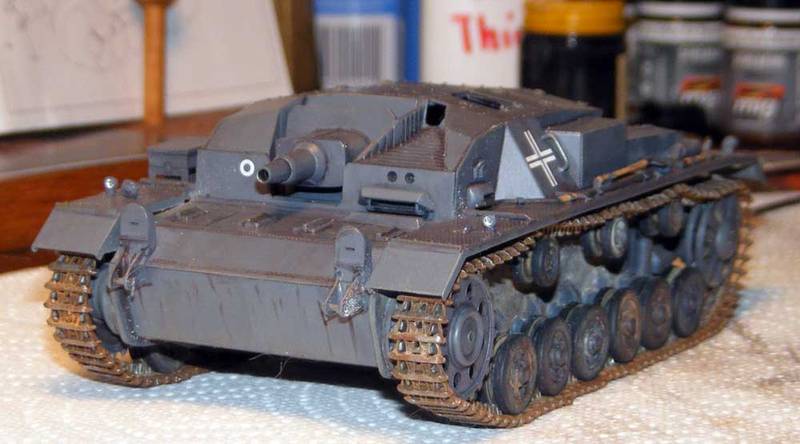
Vintage Paul
Also, I really begin to appreciate the way Tamiya engineers their wheels & sprockets so they not only rotate but can be trial fitted and removed. This allows the Fruils to be sized right on the model. As Dragon did it, this would have been difficult. As it happened I had a set of the HobbyTrax tools on hand for the early Panzer III and these were pressed into service like one of those clothes makers dummies and the fit was just as I had hoped it would be once the Fruils were fitted to the model.
I like to get the hull completely painted and weathered before the wheels & tracks are added.
I started assembly by gluing the return rollers into place with CA gel glue and setting it aside for several hours to cure. Holding the model with its nose up the tracks were threaded between the rollers & the fenders. The drive sprockets were then glued on and, once again, the model was set aside while the glue cured. Once all was good & solid, the tracks were wrapped around and the final wire pin was installed. Then the idler was teased into the tracks and glued into place. This was a bit of a job as there is little mechanical strength to hold it into place and each idler needed to be held into position until the glue firmed up.
The tracks fit a bit loose but look nice when carefully positioned. More work to come, tophamper needs to be added and more detail painting & some pigments.


Vintage Paul

PRH001

Joined: June 16, 2014
KitMaker: 681 posts
Armorama: 603 posts

Posted: Wednesday, June 22, 2016 - 04:21 AM UTC
Paul,
It's coming along very nicely. I'm looking forward to seeing the finished project.
Cheers,
PH
It's coming along very nicely. I'm looking forward to seeing the finished project.
Cheers,
PH
Posted: Wednesday, June 22, 2016 - 09:01 PM UTC
Thanks Paul, I'm learning a lot just by struggling with the various issues that have cropped up during this build. I like these build campaigns because they motivate me to move forward and not get stalled and I profit by watching how others have solved their issues.
Vintage Paul
Vintage Paul
Armored76

Joined: September 30, 2013
KitMaker: 1,615 posts
Armorama: 1,500 posts

Posted: Wednesday, June 22, 2016 - 11:13 PM UTC
Looks very good indeed, Paul! Will there be more weathering to it or you'll keep it light?
Armorsmith

Joined: April 09, 2015
KitMaker: 1,063 posts
Armorama: 1,000 posts

Posted: Wednesday, June 22, 2016 - 11:22 PM UTC
Paul-A very nice looking Stug in Panzer grey. Especially like he stains and streaking. The dirt/mud on the lower hull and running gear is also very well done.
Posted: Thursday, June 23, 2016 - 07:20 AM UTC
Thanks guys, I value your comments. I used a number of tools to try to make the weathering on the hull look like something that might be found on a vehicle only a few weeks out of the factory but already on a campaign. One trick was a bit of sponge on a stick to stipple a very thin paint on in layers.
The top will get only a little more work, mostly a light dusting in areas where the crew would not have rubbed it off and some pencil accents on some of the hard edges that might have seen the most wear even on a new vehicle.
Two areas that I'm not sure about yet. First is the stop light. I have used Tamiya red on previous builds but this seems too bright. In that era, the lens would almost certainly have been real glass rather than plastic. I have a number of prewar cars and those glass lenses are very dark red unless the bulb is on. If I mix an accurate color it will tend to get lost on the grey housing. Thoughts?
Another area is the periscope. I have it painted a semi-gloss black now. The business end should have a lens which I can replicate with a dollop of the clear white glue. Being optical, it should have some sort of iridescence - possibly a translucent blue over the black but under the glue lens? Ideas?
Vintage Paul
Thirian24

Joined: September 30, 2015
KitMaker: 2,493 posts
Armorama: 2,344 posts

Posted: Friday, June 24, 2016 - 05:32 AM UTC
Posted: Friday, June 24, 2016 - 10:19 AM UTC
Hello,
I guess it's time to get mine started:


Boxtop reads more than 750 parts -- I wonder what's the count when it's finally built (?) Spent a couple of days reviewing the instructions and read thru some build logs as well.

The instructions start off with the drives / road wheel assembly. There's a choice of using a sprocket either having the bolts molded or not. I chose to torture myself and went on to put 24 of these per sprocket assembly.
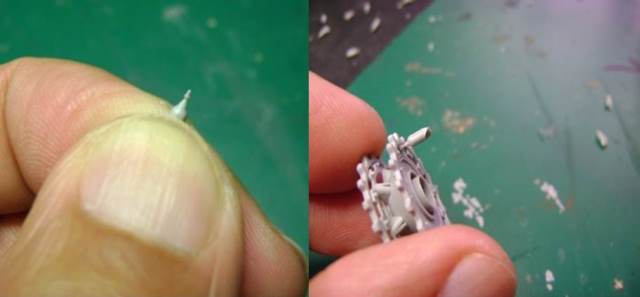
The kit provides 64 of these bolts but you'll only need a total of 48. I've lost 2 in the process, but I still have 14 more of these extra in case I get crazy to build another of these DML super-kits again

Done with the sprockets. Finished the return rollers as well. I haven't finished Step 1 but I've already racked up 78 parts used, and two lost. Man, this will be a long one
Till next update.
Tat
I guess it's time to get mine started:
Boxtop reads more than 750 parts -- I wonder what's the count when it's finally built (?) Spent a couple of days reviewing the instructions and read thru some build logs as well.
The instructions start off with the drives / road wheel assembly. There's a choice of using a sprocket either having the bolts molded or not. I chose to torture myself and went on to put 24 of these per sprocket assembly.

The kit provides 64 of these bolts but you'll only need a total of 48. I've lost 2 in the process, but I still have 14 more of these extra in case I get crazy to build another of these DML super-kits again

Done with the sprockets. Finished the return rollers as well. I haven't finished Step 1 but I've already racked up 78 parts used, and two lost. Man, this will be a long one

Till next update.
Tat
Armored76

Joined: September 30, 2013
KitMaker: 1,615 posts
Armorama: 1,500 posts

Posted: Friday, June 24, 2016 - 11:06 AM UTC
The preshading looks good, Dustin! Is that black you've been using? Won't it be too dark for the sand color?
Glad to see your build started, Tat! You are sure not taking the easy way on this one But this is what makes modelling fun.
Glad to see your build started, Tat! You are sure not taking the easy way on this one
 But this is what makes modelling fun.
Armorsmith

Joined: April 09, 2015
KitMaker: 1,063 posts
Armorama: 1,000 posts

Posted: Friday, June 24, 2016 - 04:22 PM UTC
The glass on the periscope should look greenish as it was very thick. AFAIK there was no optical coating on it like on modern vehicles. As for the red lenses I use Tamiya clear red. IF you thing its too bright, a light dusting during the weathering will tone it down. Good luck.
Armorsmith

Joined: April 09, 2015
KitMaker: 1,063 posts
Armorama: 1,000 posts

Posted: Friday, June 24, 2016 - 04:25 PM UTC
Pre shade looks good. Your lines are a lot straighter than mine ever are. Good luck.
Thirian24

Joined: September 30, 2015
KitMaker: 2,493 posts
Armorama: 2,344 posts

Posted: Friday, June 24, 2016 - 06:56 PM UTC
Cristian - Thank you for the kind words. I primed the entire lower hull in black and then painted it sand, I think it came out ok. I guess we will see how the upper hull turns out. Lol
Armorsmith - Thank you sir!
Armorsmith - Thank you sir!
 |


