Paul,
Armorsmith is correct concerning the absence of the anti-laser coatings found on modern optics. Periscope glass is either clear or will have a green tint that is not as dark as found on a Coke bottle. At a distance the periscopes do appear a shiny black color.
If the pericopes in the kit are opaque plastic, I would go with the gloss black. If they are clear plastic you could try a highly diluted clear green coat, or just paint the periscope frame/case black of OD and leave the lenses clear. At the distance most kits are viewed the green tint may not be discernible.
Campaigns: Active Campaigns
Campaigns that are either in planning or underway should be grouped here.
Campaigns that are either in planning or underway should be grouped here.
Hosted by Richard S.
Campaign 500+

Ranger74

Joined: April 04, 2002
KitMaker: 1,290 posts
Armorama: 658 posts

Posted: Friday, June 24, 2016 - 11:58 PM UTC

ColinEdm


Joined: October 15, 2013
KitMaker: 1,355 posts
Armorama: 1,229 posts

Posted: Saturday, June 25, 2016 - 01:21 AM UTC
Finally spent some time on my second Marder II, camo on and weathering progressing.


Also finished off the radio finally!

Have to put the vision block back on and fix a bracket I see.
Lots of awesome builds in this campaign everyone, keep 'em coming!


Also finished off the radio finally!

Have to put the vision block back on and fix a bracket I see.
Lots of awesome builds in this campaign everyone, keep 'em coming!

PRH001

Joined: June 16, 2014
KitMaker: 681 posts
Armorama: 603 posts

Posted: Saturday, June 25, 2016 - 03:08 AM UTC
Colin,
The Marder is coming along beautifully!
PH
The Marder is coming along beautifully!
PH
Posted: Saturday, June 25, 2016 - 03:40 AM UTC
Thanks for the tips on the periscope & tail light lenses. I'll tackle those this weekend. This Stug is close to being done.
Colin - the radio on your Marder looks like you could turn the radio on with a pair of tweezers and hear it squawk . . .
Vintage Paul
Colin - the radio on your Marder looks like you could turn the radio on with a pair of tweezers and hear it squawk . . .
Vintage Paul
Posted: Saturday, June 25, 2016 - 05:26 AM UTC
Quoted Text
The preshading looks good, Dustin! Is that black you've been using? Won't it be too dark for the sand color?
Glad to see your build started, Tat! You are sure not taking the easy way on this oneBut this is what makes modelling fun.
Thanks Christian!
Colin, nice camo on the Marder. The interior detail's a killer as well!
Cheers,
Tat
Armored76

Joined: September 30, 2013
KitMaker: 1,615 posts
Armorama: 1,500 posts

Posted: Saturday, June 25, 2016 - 12:32 PM UTC
That Marder is beautiful, Colin! Excellent attention to details on the interior!

Ranger74

Joined: April 04, 2002
KitMaker: 1,290 posts
Armorama: 658 posts

Posted: Sunday, June 26, 2016 - 12:03 AM UTC
Colin,
Very nice work on the Marder! The radio with the wiring is the focal point for the gun compartment, particularly as it is not camo painted.
Very nice work on the Marder!
 The radio with the wiring is the focal point for the gun compartment, particularly as it is not camo painted.
 Thirian24

Joined: September 30, 2015
KitMaker: 2,493 posts
Armorama: 2,344 posts

Posted: Sunday, June 26, 2016 - 04:16 AM UTC

PRH001

Joined: June 16, 2014
KitMaker: 681 posts
Armorama: 603 posts

Posted: Sunday, June 26, 2016 - 05:11 AM UTC
Dustin,
I learned a while back that you can thin the AK Interactive paints using lacquer thinner like you can Tamiya. I tried it and it works beautifully. Start with 3 parts paint and work your way to a thinner mix as needed. I've been able to thin to a 2 parts paint and 1 part thinner with AK and spray reliably through .2mm tips.
Hope this helps,
Paul H
Thirian24

Joined: September 30, 2015
KitMaker: 2,493 posts
Armorama: 2,344 posts

Posted: Sunday, June 26, 2016 - 06:31 AM UTC
Paul, thank you very much for that info. I'll give it a try.
Posted: Sunday, June 26, 2016 - 10:25 PM UTC
Tat - I'm amazed at the level of detail on that Dragon Pz IV Ausf A. Individual bolt heads adds a new level from anything I have tried. I'll be watching to see what else you encounter with this kit.
Vintage Paul
Vintage Paul
Posted: Tuesday, June 28, 2016 - 12:04 PM UTC
Thanks Paul. I believe having such multi-part sub-assemblies is one of the features of these DML superkits. I can try and live with small plastic bits -- it's the upcoming PE assembly that I'm bracing up for 
After a couple of nights I managed to finish Step 1 (no typo there!)

The road wheels, though a 5-part assembly each, were a breeze to build. I like it that the "rubber" tires were molded separately and not much cleaning involved.
The suspension was a bit tricky. It's a working suspension -- my only plaint here was that the instructions were not clear as to which bit needed glue as opposed to none. I think I spent close to an hour just trying to figure out how best to build the a suspension's 8-part assembly, making sure its in working mode. But after that, the succeeding ones were relatively easier. Reading thru similar Pz IV builds online was a great help as well.
Oh, as there are right and left sides of these suspension assemblies, one part of the instructions got it wrong. To correct, just swap the placement of parts A7 and A8.
Started to keep count on parts used and lost: 230 so far and it's only Step 1! I lost 2 of those sprocket bolts.
Hmmm...if I add 230 to the magic tracks total of 204, then I should be about 70 parts shy of the 500 part minimum -- I guess I can call my build done even before I get to the turret
Till next update.
Cheers,
Tat

After a couple of nights I managed to finish Step 1 (no typo there!)
The road wheels, though a 5-part assembly each, were a breeze to build. I like it that the "rubber" tires were molded separately and not much cleaning involved.
The suspension was a bit tricky. It's a working suspension -- my only plaint here was that the instructions were not clear as to which bit needed glue as opposed to none. I think I spent close to an hour just trying to figure out how best to build the a suspension's 8-part assembly, making sure its in working mode. But after that, the succeeding ones were relatively easier. Reading thru similar Pz IV builds online was a great help as well.
Oh, as there are right and left sides of these suspension assemblies, one part of the instructions got it wrong. To correct, just swap the placement of parts A7 and A8.
Started to keep count on parts used and lost: 230 so far and it's only Step 1! I lost 2 of those sprocket bolts.
Hmmm...if I add 230 to the magic tracks total of 204, then I should be about 70 parts shy of the 500 part minimum -- I guess I can call my build done even before I get to the turret

Till next update.
Cheers,
Tat

Ranger74

Joined: April 04, 2002
KitMaker: 1,290 posts
Armorama: 658 posts

Posted: Wednesday, June 29, 2016 - 01:33 AM UTC
I am declaring victory with completion of my build of the Takom Mk IV Heavy Tank.


Citadel makes many useful paints/coatings, mainly for Warhammer miniatures, but great for scale modeling. The mud is made of two products: first Citadel Texture "Stirland Mud", which is gritty and stiff. Over that I use the darkest brown pastel I had, which toned down the grittiness. I also added the pastel to edges of mud to represent smaller grained dirt falling off of the mud, to include down sides of the hull. The Citadel Mud is stiff and a little difficult to apply, but once it is dry it is stuck in place. After all this I cleaned off the tops of the track ridges and rubbed with a graphite stick to get back the metallic shine.
Still working on finalizing the Mk V.
Highly recommend the Takom kits if you want one or more of these rhomboid tanks.
ltb073

Joined: March 08, 2010
KitMaker: 3,662 posts
Armorama: 3,078 posts

Posted: Friday, July 01, 2016 - 06:36 AM UTC
Ok running a little late here  I pulled this kit out of the stash

Its got over 400 gray plastic parts
109 pieces of Magic tracks per side
12 Clear, 8 'U" hooks, 2 frets of PE and I need to get some AM Zimm, so Im sure this fits the bill
I took i with me last weekend to the lake house and got started on it

Im to the point that I need to order that AM

 I pulled this kit out of the stash
Its got over 400 gray plastic parts
109 pieces of Magic tracks per side
12 Clear, 8 'U" hooks, 2 frets of PE and I need to get some AM Zimm, so Im sure this fits the bill

I took i with me last weekend to the lake house and got started on it

Im to the point that I need to order that AM


Armored76

Joined: September 30, 2013
KitMaker: 1,615 posts
Armorama: 1,500 posts

Posted: Friday, July 01, 2016 - 09:46 AM UTC
Turned out great, Jeff! Great job!!!
Glad to have you join in, Sal!
Glad to have you join in, Sal!

Ranger74

Joined: April 04, 2002
KitMaker: 1,290 posts
Armorama: 658 posts

Posted: Friday, July 01, 2016 - 07:45 PM UTC
Tanks, Cristian.

ColinEdm


Joined: October 15, 2013
KitMaker: 1,355 posts
Armorama: 1,229 posts

Posted: Friday, July 01, 2016 - 08:01 PM UTC
Quoted Text
Tanks, Cristian.
I see what you did there👀😝
Posted: Saturday, July 02, 2016 - 08:13 AM UTC
Hello,
Nice finish Jeff -- I especially like the texture of the mud / dirt on it! Sal, looking forward to that Elefant!
Continued on my Pz IV A build. Am awed by the number of parts to detail this kit. This one needs four parts to complete, but what blows me away are those small molded stubs -- pity that most of such details will not be seen when built.

Here's another one -- the internals of the final drive (hope I called that out correctly). On the outside you'll have put 4 of these tiny bolts, each side:

Here's where it's currently at, after Step 3:

I found out that the idler arms can be fixed to the tension one wants, so I'm not gluing it till I get to the tracks. Likewise the wheels, sprockets are just dry-fitted for the photo ops.
My tally so far: 301 parts used, 2 parts lost.
Cheers,
Tat
Nice finish Jeff -- I especially like the texture of the mud / dirt on it! Sal, looking forward to that Elefant!
Continued on my Pz IV A build. Am awed by the number of parts to detail this kit. This one needs four parts to complete, but what blows me away are those small molded stubs -- pity that most of such details will not be seen when built.
Here's another one -- the internals of the final drive (hope I called that out correctly). On the outside you'll have put 4 of these tiny bolts, each side:
Here's where it's currently at, after Step 3:
I found out that the idler arms can be fixed to the tension one wants, so I'm not gluing it till I get to the tracks. Likewise the wheels, sprockets are just dry-fitted for the photo ops.
My tally so far: 301 parts used, 2 parts lost.
Cheers,
Tat

PRH001

Joined: June 16, 2014
KitMaker: 681 posts
Armorama: 603 posts

Posted: Saturday, July 02, 2016 - 08:27 AM UTC
I see that the lovely work continues on the 500+ Campaign...
Jeff, Well done on the Mk IV!
Sal, a weekends work for you would have taken me 3 months!
Tat, the Pz IV you are working on certainly has my attention. I've heard about these DML super kits, but never built one. What other vehicles do they do with that level of detail?
Paul H
Jeff, Well done on the Mk IV!
Sal, a weekends work for you would have taken me 3 months!
Tat, the Pz IV you are working on certainly has my attention. I've heard about these DML super kits, but never built one. What other vehicles do they do with that level of detail?
Paul H
Armored76

Joined: September 30, 2013
KitMaker: 1,615 posts
Armorama: 1,500 posts

Posted: Saturday, July 02, 2016 - 01:01 PM UTC
@Tat: It becomes more and more clear that this kit is aimed at modelling masochists 

Posted: Saturday, July 02, 2016 - 05:00 PM UTC
Quoted Text
Tat, the Pz IV you are working on certainly has my attention. I've heard about these DML super kits, but never built one. What other vehicles do they do with that level of detail?
Paul H
Thanks Paul. What I know are Pz IV kits 6264 (E), 6265 (D), 6291 (C), and 6301 (E Vorpanzer). Ah yes, there is also the limited-run CyberHobby Ausf B from which it is said that these kits were derived from. Can't seem to recall where I read -- but there seems to be about seven or so kits (not only Pz IV) that were deemed as a super kit. I believe it's more the modelling community that has put this tag on these 1000+ part, complex-assembly kits that eventually caught on with DML (I could be wrong though). The kit I'm building, 6747, is labeled as a Smart Kit -- so technically it may be argued as not really being one of those deemed as super kits. But hey, putting-in 24-bolts per sprocket is definitely not something I'd do on my regular builds

Quoted Text
@Tat: It becomes more and more clear that this kit is aimed at modelling masochists
LOL. Pleasure is derived at varying levels
 I must say though that this (for me, at least) borders towards crazyness -- kept asking myself why bother with these four bolts when it will not be seen when completed! Seriously though, I believe we should, at times, try to stretch ourselves and be out of our comfort zones.
 Cheers,
Tat

PRH001

Joined: June 16, 2014
KitMaker: 681 posts
Armorama: 603 posts

Posted: Saturday, July 02, 2016 - 08:16 PM UTC
Tat,
Thanks for the information. I don't collect and build WW II German armor so I wasn't sure if DML limited that level of detail to those kits or if some of the Shermans and such were equivalent. Either way, I'll enjoy watching y our build, and I can hardly wait to see the finished project.
Cheers,
Paul H

Ranger74

Joined: April 04, 2002
KitMaker: 1,290 posts
Armorama: 658 posts

Posted: Saturday, July 02, 2016 - 10:27 PM UTC
Qoute: Here's another one -- the internals of the final drive (hope I called that out correctly). On the outside you'll have put 4 of these tiny bolts, each side:
Tat, You are correct with the terminology. Like the chain drive on my Mk IV kit, it is wasted out of site.
You have great patience
Tat, You are correct with the terminology. Like the chain drive on my Mk IV kit, it is wasted out of site.
You have great patience

Posted: Friday, July 08, 2016 - 06:01 AM UTC
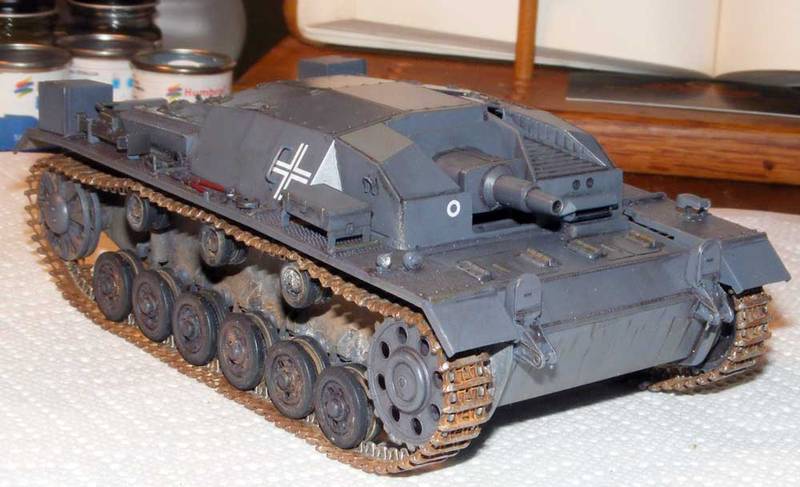
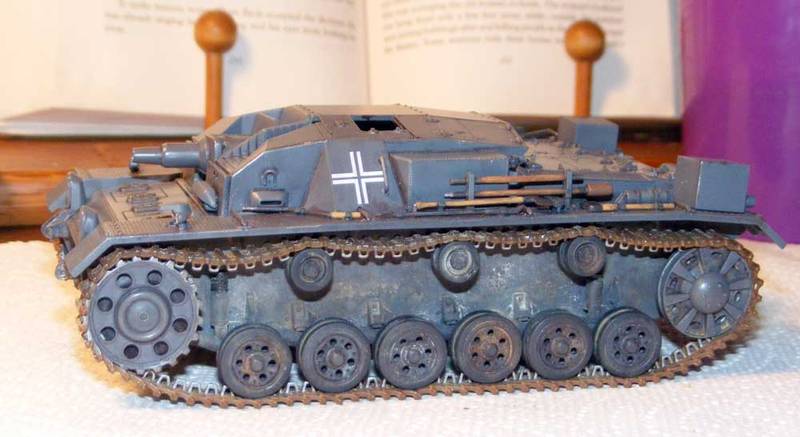
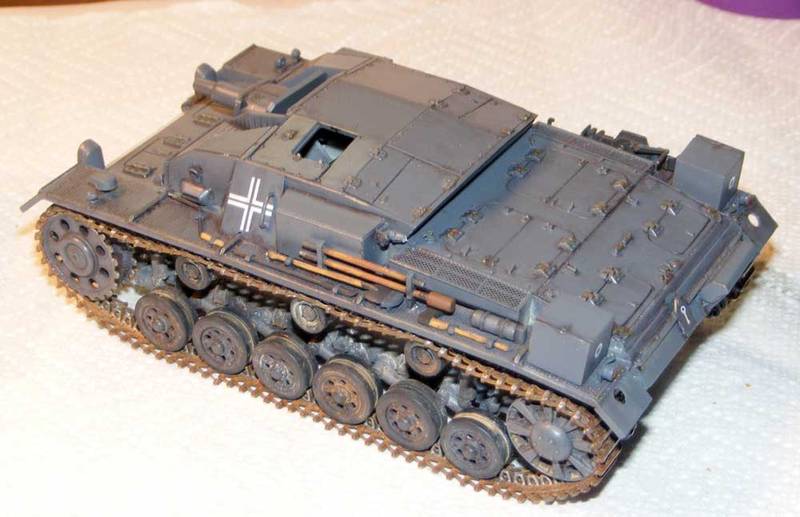
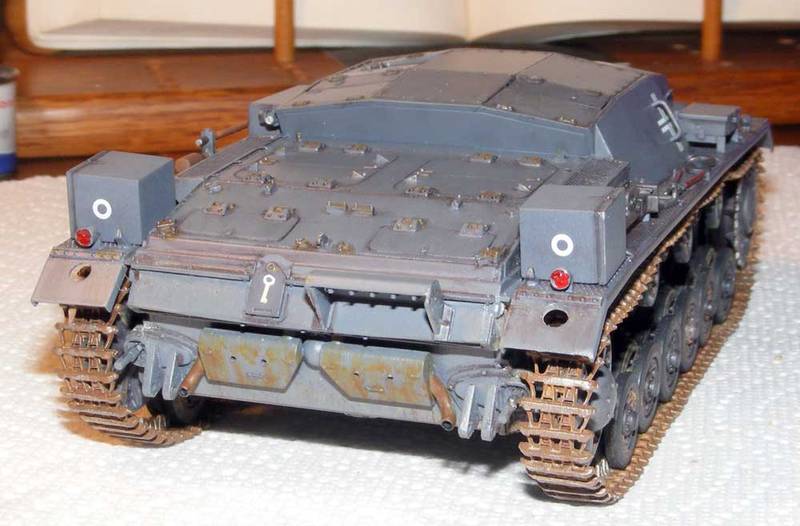
It has been a while since I contributed anything here but I have made some progress. The Stug is getting close to be being done. I found out by looking at my research material that the kit left some things out that are in the drawings and photos. The cleaning rods, radio mast & tow cable all are missing or not mentioned in the destructions. Also I'm going to add some smoke bombs to the rack in the back. A few pics are below.
I LOVE the WW1 tank. I have wanted to build one of these for years and the build here provides some motivation to get a kit & start it.
Tat - I have one or two of these Super Kits, the C model in France at the gas pump comes to mind. I had no idea they had so many parts! If there is a 1000+ build mebbee I'll get mine out . . .
Vintage Paul


Ranger74

Joined: April 04, 2002
KitMaker: 1,290 posts
Armorama: 658 posts

Posted: Friday, July 08, 2016 - 08:51 AM UTC
Paul,
The Stug is looking good! Great work on the tracks and the weathering makes it look "lived in", but not neglected...
Jeff
The Stug is looking good! Great work on the tracks and the weathering makes it look "lived in", but not neglected...
Jeff
 |


