

Campaigns
Where Armorama group builds can be discussed, organized, and updates posted.
Where Armorama group builds can be discussed, organized, and updates posted.
Hosted by Darren Baker, Richard S.
AFV Club Campaign

ClaytonFromEllijay

#454

Joined: July 10, 2016
KitMaker: 1,273 posts
Armorama: 1,138 posts
Posted: Saturday, September 10, 2016 - 10:02 PM UTC
Paul, looking great! If I may ask, what super glue/method of application do you use? I see no residue whatsover on your hull!
PRH001
Joined: June 16, 2014
KitMaker: 681 posts
Armorama: 603 posts
Posted: Saturday, September 10, 2016 - 11:59 PM UTC
Thanks Clayton! I just use Original Super Glue Gel in the tube with the green top. Not because it's the best, just because I know how it works and how long my working time is. I apply a couple of small dots to the surface of the model with a toothpick and set the parts in place. Any excess glue that is in the area cures slowly enough for me to scrape it off with the other end of the toothpick. You can do minor repositioning at that time before it sets. The gel bonds to itself before it will to the model so you can usually leave a pretty clean surface. For any other residual, I use a chisel tip xacto blade to remove residue before the gel fully cures. If the part ends up in the wrong place, you can still pop it free scrape the model surface clean and use a flame to remove residue from the part for a second attempt.
I know some people touch the part to the glue and place them, but that way never worked as well for me as I got too much glue on the part and had way more cleanup.
Not really a special way of doing things, just the way I figured out that works for me.
Hope you find the info useful. Cheers,
PH
I know some people touch the part to the glue and place them, but that way never worked as well for me as I got too much glue on the part and had way more cleanup.
Not really a special way of doing things, just the way I figured out that works for me.
Hope you find the info useful. Cheers,
PH
ClaytonFromEllijay
#454
Joined: July 10, 2016
KitMaker: 1,273 posts
Armorama: 1,138 posts
Posted: Sunday, September 11, 2016 - 01:58 AM UTC
Thanks for the info, I'll be trying that out right away! Very clean work!

TacFireGuru
Joined: December 25, 2004
KitMaker: 3,770 posts
Armorama: 2,263 posts

Posted: Sunday, September 11, 2016 - 03:15 AM UTC
Test fit:

Mike

Mike

PRH001
Joined: June 16, 2014
KitMaker: 681 posts
Armorama: 603 posts
Posted: Sunday, September 11, 2016 - 07:42 AM UTC
Wow, Mike is test fitting his beautiful 88 already and I spent my weekend modeling time working on something that you can cover with your thumb... Lots of miscues and rework to get to this point, but its coming around. Just need to put the tie downs on the basket and the assembly will be good to go.
PH

PH

brekinapez
Joined: July 26, 2013
KitMaker: 2,272 posts
Armorama: 1,860 posts
Posted: Sunday, September 11, 2016 - 08:35 AM UTC
Yow!

GaryKato
Joined: December 06, 2004
KitMaker: 3,694 posts
Armorama: 2,693 posts
Posted: Sunday, September 11, 2016 - 09:45 AM UTC
I'm betting Mike will be the first to finish, though David is close behind him.
Paul, your PE work is amazing!
Paul, your PE work is amazing!

SgtRam
#197

Joined: March 06, 2011
KitMaker: 3,971 posts
Armorama: 2,859 posts

Posted: Monday, September 12, 2016 - 04:13 AM UTC
Some more work on the Matador done, nicely detailed under carriage.

And I added a little more detail with the air lines from the air tank using copper wire.

And I added a little more detail with the air lines from the air tank using copper wire.
PRH001
Joined: June 16, 2014
KitMaker: 681 posts
Armorama: 603 posts
Posted: Monday, September 12, 2016 - 04:14 AM UTC
Thanks guys! Glad to know someone else likes it. I'm still thinking of doing enough of an interior for the turret for me to open the hatches. Not sure yet, but I guess we'll see how the rest of the build goes..
Cheers,
PH
Cheers,
PH
PRH001
Joined: June 16, 2014
KitMaker: 681 posts
Armorama: 603 posts
Posted: Monday, September 12, 2016 - 04:20 AM UTC
Kevin,
The plumbing really ties the look of things together. I'll be following along closely on your build as I'm a sucker for early WWII British equipment.
Cheers,
PH
The plumbing really ties the look of things together. I'll be following along closely on your build as I'm a sucker for early WWII British equipment.
Cheers,
PH

ColinEdm

Joined: October 15, 2013
KitMaker: 1,355 posts
Armorama: 1,229 posts
Posted: Monday, September 12, 2016 - 04:37 AM UTC
Wow, amazing PE work Paul! Builds are coming along nicely, going to be another month at least before I can start my Nashorn.
PRH001
Joined: June 16, 2014
KitMaker: 681 posts
Armorama: 603 posts
Posted: Monday, September 12, 2016 - 05:02 AM UTC
Thanks Colin, I'm really looking forward to watching your Nashorn build!
PH
PH
TacFireGuru
Joined: December 25, 2004
KitMaker: 3,770 posts
Armorama: 2,263 posts
Posted: Monday, September 12, 2016 - 06:07 AM UTC
Regarding that PE box:
Gorgeous work Paul. Double-dayum!
Mike
Gorgeous work Paul. Double-dayum!
Mike
ClaytonFromEllijay
#454
Joined: July 10, 2016
KitMaker: 1,273 posts
Armorama: 1,138 posts
Posted: Monday, September 12, 2016 - 06:14 AM UTC
Ok, Paul, I'll mail you my PE and you can do your voodoo and send it back to me, LOL...beautiful work!
PRH001
Joined: June 16, 2014
KitMaker: 681 posts
Armorama: 603 posts
Posted: Monday, September 12, 2016 - 07:17 AM UTC
You guys are funny! I still think it's crazy that some of you can build 2/3 of a model in the same time I can patch together a tool box. I guess I could build faster if I didn't keep screwing things up and having to fix them. Luckily, brass is pretty forgiving...
Again, thanks for the comments!
PH
Again, thanks for the comments!
PH

tatbaqui

#040

Joined: May 06, 2007
KitMaker: 2,713 posts
Armorama: 2,451 posts

Posted: Monday, September 12, 2016 - 08:01 AM UTC
Hats off to your PE work Paul -- you sure can work these brass bits out! A brass bit with more than two bends just freaks me out 
PRH001
Joined: June 16, 2014
KitMaker: 681 posts
Armorama: 603 posts
Posted: Monday, September 12, 2016 - 09:25 AM UTC
Thanks Tat, but there are lots of parts on that tool box that I only took one or two bends. I'm sure you'd be able to power right through it, no sweat! 

Dukie99

Joined: March 10, 2014
KitMaker: 9 posts
Armorama: 9 posts
Posted: Monday, September 12, 2016 - 10:16 AM UTC
At last some progress, spent about 30 minutes every night after putting the kids to bed. Got me to step 5 after a full week. So far this kit is a joy to build, the engineering is very impressive and the fit is good. Here is where I stand
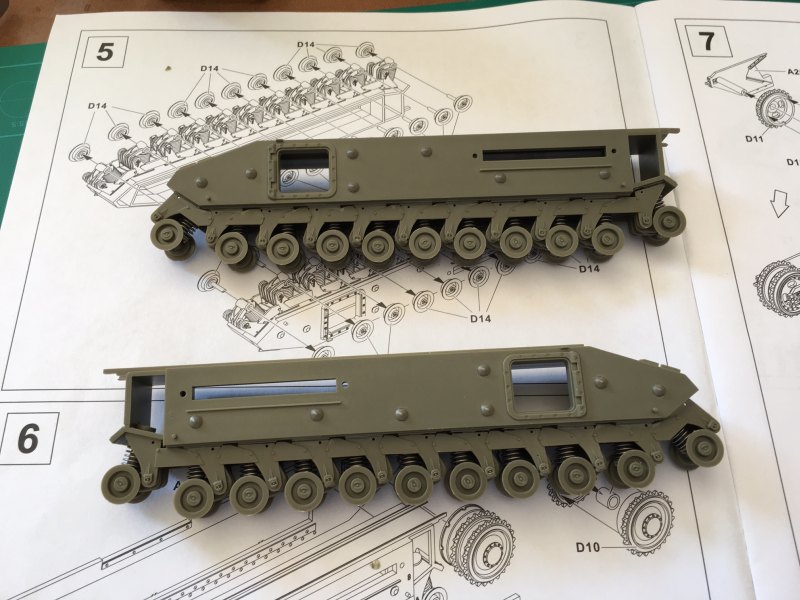
Very impressed by the other build going on and especially Paul's PE work, that's something to look up to.
David
Very impressed by the other build going on and especially Paul's PE work, that's something to look up to.
David
GaryKato
Joined: December 06, 2004
KitMaker: 3,694 posts
Armorama: 2,693 posts
Posted: Monday, September 12, 2016 - 10:19 AM UTC
Good to see a Churchill finally joining the campaign.
PRH001
Joined: June 16, 2014
KitMaker: 681 posts
Armorama: 603 posts
Posted: Wednesday, September 14, 2016 - 06:51 AM UTC
Lower hull of the Stuart V has a bit of paint on it and the upper hull has been joined. Fit is good on this portion of the kit since I got rid of the warp.
PH

PH

PRH001
Joined: June 16, 2014
KitMaker: 681 posts
Armorama: 603 posts
Posted: Friday, September 16, 2016 - 09:08 AM UTC
I managed to get a little more done on the Stuart tonight. Front portion of the upper hull was installed, and more rear upper hull fittings were put in place. The PE makes for slow going but it will look the part later on.
Cheers,
PH


Cheers,
PH


SgtRam
#197
Joined: March 06, 2011
KitMaker: 3,971 posts
Armorama: 2,859 posts
Posted: Friday, September 16, 2016 - 05:26 PM UTC
Paul - looking very good, nice work on the tie-downs
PRH001
Joined: June 16, 2014
KitMaker: 681 posts
Armorama: 603 posts
Posted: Friday, September 16, 2016 - 08:29 PM UTC
Quoted Text
Paul - looking very good, nice work on the tie-downs
Thanks Kevin! It's alway nice to hear good comments.
Cheers,
PH
PRH001
Joined: June 16, 2014
KitMaker: 681 posts
Armorama: 603 posts
Posted: Saturday, September 17, 2016 - 08:58 AM UTC
The hull gun on the Stuart V kit was completely out of round and the PE set didn't come with one, so I had to turn one on the lathe. The barrel jacket took several tries to form but I finally managed to get it done. Also spent quite a while thinning the fenders by 3/4 of their thickness. Doesn't look like much progress, but at least now the front of kit won't irritate me every time I look at it...
PH


PH


ClaytonFromEllijay
#454
Joined: July 10, 2016
KitMaker: 1,273 posts
Armorama: 1,138 posts
Posted: Saturday, September 17, 2016 - 06:07 PM UTC
Looks great!
 |

WEB HOSTING BY


Copyright ©2021 Armorama and Kitmaker Network, a subsidiary of Silver Star Enterprises
All Rights Reserved. Please read our Conditions of Use and Privacy Policy.
All Rights Reserved. Please read our Conditions of Use and Privacy Policy.