

Those resin parts look great! Nice job on the tracks and suspension, too.
Gaz
Hosted by Darren Baker
Sd. Kfz. 4/1 Panzerwerfer 42

GazzaS

#424

Joined: April 23, 2015
KitMaker: 4,648 posts
Armorama: 2,248 posts

Posted: Monday, April 04, 2016 - 01:47 AM UTC

Armorsmith

Joined: April 09, 2015
KitMaker: 1,063 posts
Armorama: 1,000 posts
Posted: Monday, April 04, 2016 - 02:09 AM UTC
Coming along very nicely. Congrats on the tracks! As you have already discovered the clean up is the most tedious part but the assembly is not as intimidating as you feared.

easyco69

Joined: November 03, 2012
KitMaker: 2,275 posts
Armorama: 2,233 posts
Posted: Monday, April 04, 2016 - 02:39 AM UTC
very nice , love the tracks.

Modelrob
Joined: October 20, 2015
KitMaker: 304 posts
Armorama: 293 posts
Posted: Tuesday, April 05, 2016 - 05:26 PM UTC
Thanks Dustin, Gary, Armorsmith and David.
Modelrob
Joined: October 20, 2015
KitMaker: 304 posts
Armorama: 293 posts
Posted: Tuesday, April 12, 2016 - 03:05 AM UTC
Just a fast update to let you all know the build is still going. We had some heavy rains here and I airbrush in the garage, I normally try and avoid airbrushing during the rain, I have had some bad experiences, though truth be told it was probable operator error and not the rain. I primed the base and the interior with Vallejo Black primer. I know that a lot of people have problems with it and I do agree that it is a little delicate but I just love the way that it levels out. I have found that if I let it set for 2 or 3 days it works great. So the detail painting of the interior should start in 2 days.

Thirian24
Joined: September 30, 2015
KitMaker: 2,493 posts
Armorama: 2,344 posts
Posted: Tuesday, April 12, 2016 - 03:24 AM UTC
Looking very nice sir! Can't wait to see some color on this!
Carol81

Joined: April 27, 2015
KitMaker: 41 posts
Armorama: 39 posts
Posted: Tuesday, April 12, 2016 - 03:47 AM UTC
I just photographed one last week. Maybe it helps your project :


rover5700
Joined: February 22, 2015
KitMaker: 47 posts
Armorama: 47 posts
Posted: Tuesday, April 12, 2016 - 06:07 AM UTC
Any chance you got a better pic of this end Carol? Thanks for uploading those btw...
http://www.panzerphotos.com/pictures/00065.jpg

http://www.panzerphotos.com/pictures/00065.jpg
Carol81
Joined: April 27, 2015
KitMaker: 41 posts
Armorama: 39 posts
Posted: Tuesday, April 12, 2016 - 11:03 AM UTC
No sadly I don't , there was an fence in front so I couldn't get to the back of it 
Modelrob
Joined: October 20, 2015
KitMaker: 304 posts
Armorama: 293 posts
Posted: Wednesday, April 13, 2016 - 04:30 PM UTC
Quoted Text
Looking very nice sir! Can't wait to see some color on this!
Thanks Dustin I am looking forward to seeing paint on it.
Robert
Modelrob
Joined: October 20, 2015
KitMaker: 304 posts
Armorama: 293 posts
Posted: Wednesday, April 13, 2016 - 04:31 PM UTC
Quoted Text
I just photographed one last week. Maybe it helps your project :
Thanks for sharing the pics they should help out a lot.
Robert
Modelrob
Joined: October 20, 2015
KitMaker: 304 posts
Armorama: 293 posts
Posted: Tuesday, April 19, 2016 - 02:26 AM UTC
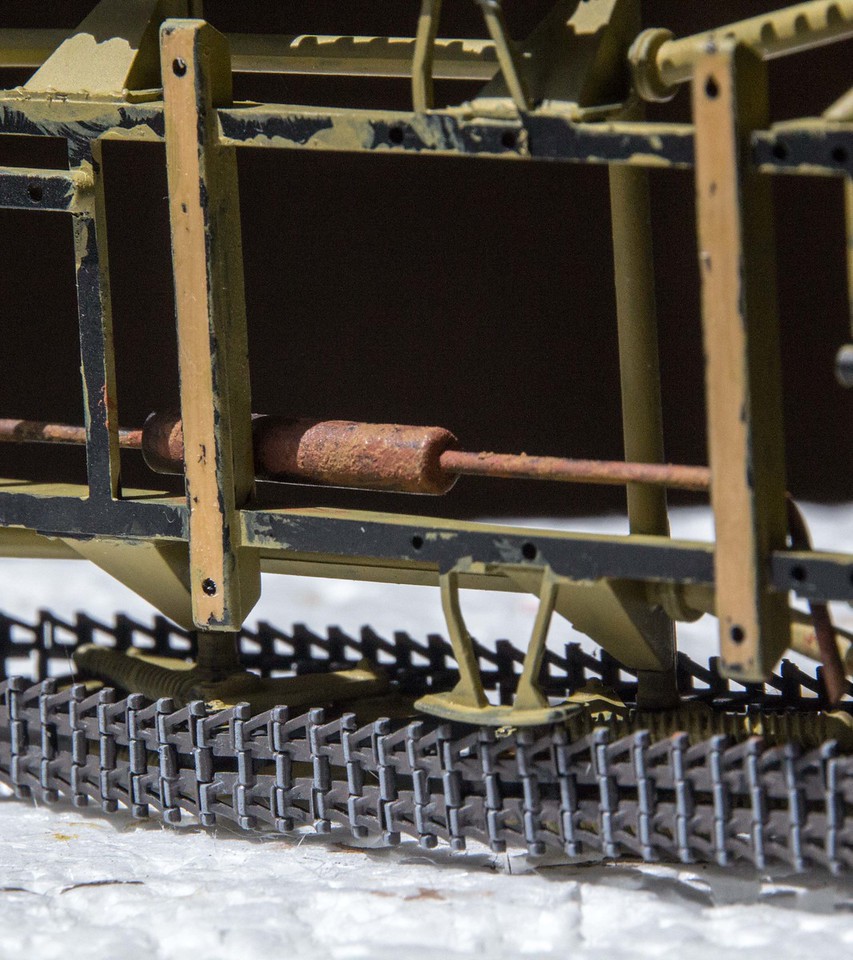
Hi everyone just wanted to share my current progress. It is not much because I am a slow painter. Any slower I would be going backwards. I have been working on the lower part of the track. I have got my Vallejo Dark Yellow painted. I am not too sure about the color but we will see. The tracks have been painted with panzer aces track primer and dry brushed with light gray. I still need to put a wash on them. Painted the rubber on the wheels. Working on the engine right now. If anyone has any suggestions or comments I am more than happy to hear them.
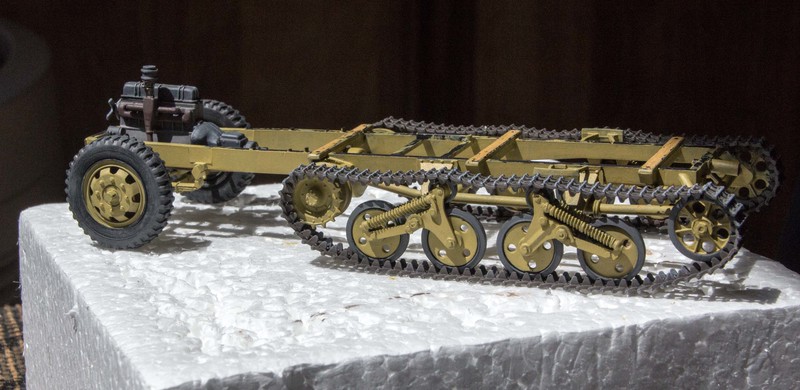
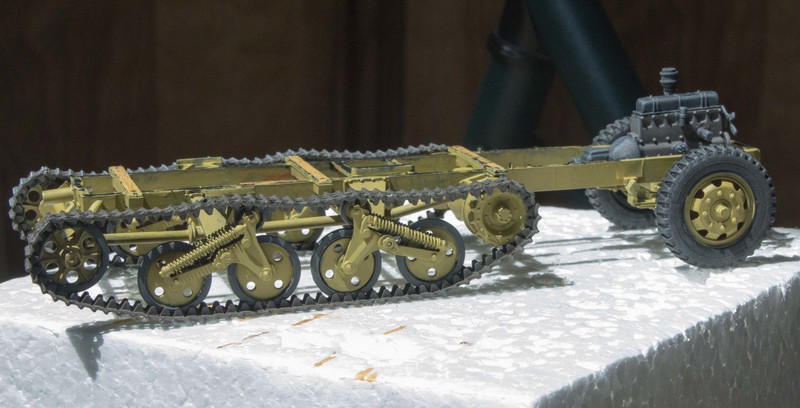


One thing I was really happy with was the way the muffler came out. I forgot to texture the muffler be fore I primed it and I have no rust colored pigments. I used European dirt pigment and add rust colored paint to them and stippled them onto the muffler. I think it worked out ok.
One thing I was really happy with was the way the muffler came out. I forgot to texture the muffler be fore I primed it and I have no rust colored pigments. I used European dirt pigment and add rust colored paint to them and stippled them onto the muffler. I think it worked out ok.
Thirian24
Joined: September 30, 2015
KitMaker: 2,493 posts
Armorama: 2,344 posts
Posted: Tuesday, April 19, 2016 - 03:20 AM UTC
Rob, everything looks awesome. I really like the tracks and muffler. They came out great!
Modelrob
Joined: October 20, 2015
KitMaker: 304 posts
Armorama: 293 posts
Posted: Tuesday, April 19, 2016 - 02:52 PM UTC
Quoted Text
Rob, everything looks awesome. I really like the tracks and muffler. They came out great!
Thanks Dustin
Modelrob
Joined: October 20, 2015
KitMaker: 304 posts
Armorama: 293 posts
Posted: Monday, April 25, 2016 - 04:22 AM UTC
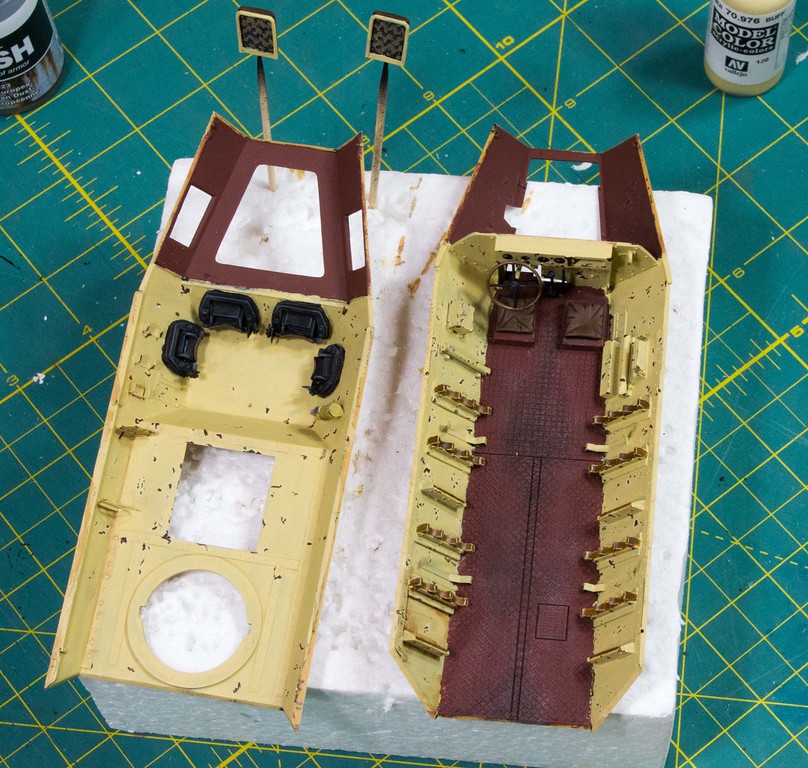
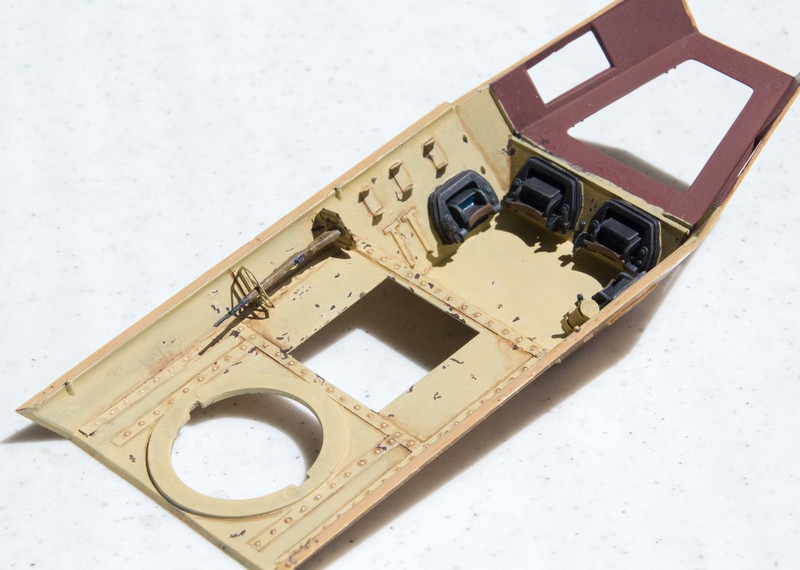
Just a quick update I still have not finished the painting of the interior yet but I I am getting closer. I paint the interior walls and ceilings with Model color Buff. I think the color comes close for me on the interior color of German AFV. I was going to paint the floor buff like a lot of builds and then I decided to do some research and found out the floor color was a couple of different colors but buff was not one. I found out that in 1943 they started to paint the floors primer red. I decided to go that way but of course I did not have that color so a winged it. I like the color but I think it might be a little to red but It will work. Of course I had to chip the inside I just like the way it looks, probable a little heavy for a lot of people. I still need to pin wash and finish weathering the inside.


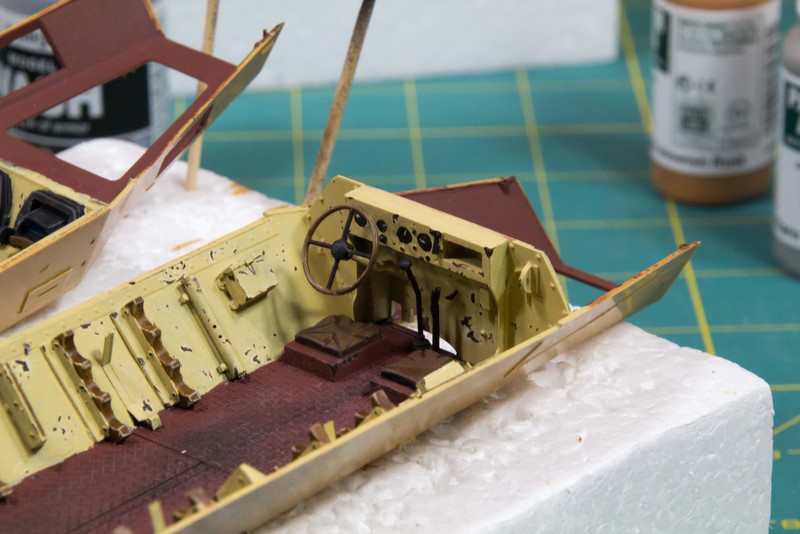


Lesson Learned: Do not glue on steering wheel till the dash is painted. It would make painting much easier.
Lesson Learned: Do not glue on steering wheel till the dash is painted. It would make painting much easier.
Thirian24
Joined: September 30, 2015
KitMaker: 2,493 posts
Armorama: 2,344 posts
Posted: Monday, April 25, 2016 - 04:27 AM UTC
Rob, that primer red looks spot on to me. I like the chipping too. Can't wait to see it all come together.
Modelrob
Joined: October 20, 2015
KitMaker: 304 posts
Armorama: 293 posts
Posted: Monday, April 25, 2016 - 03:59 PM UTC
Quoted Text
Rob, that primer red looks spot on to me. I like the chipping too. Can't wait to see it all come together.
Thanks Dustin
Modelrob
Joined: October 20, 2015
KitMaker: 304 posts
Armorama: 293 posts
Posted: Tuesday, May 03, 2016 - 03:53 AM UTC
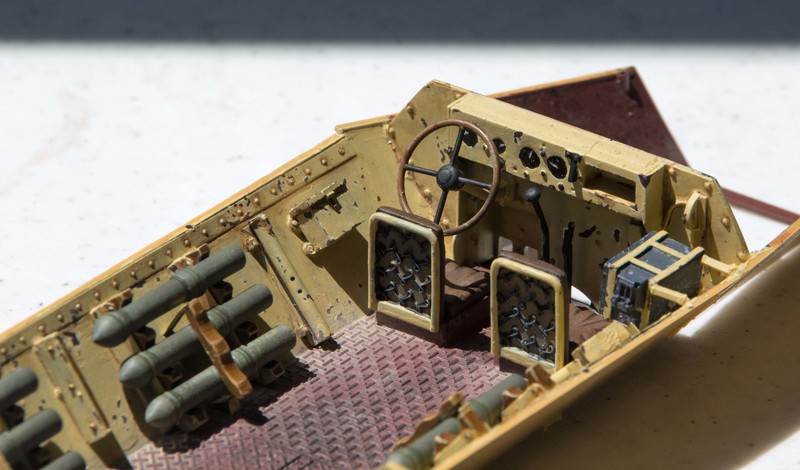
Finally got the interior painted and weathered. The rockets were painted field gray and dry brushed and used some pigments on the floor. I think that it has a very well used look. It is a shame that 80% of the work will never be seen. The better half asked why I was doing it and I told her it is great practice. Tomorrow I will be getting the halfs glued together. We will see how the fit is with all those angles. Thanks for stopping by to see how everything is going.


tatbaqui

#040

Joined: May 06, 2007
KitMaker: 2,713 posts
Armorama: 2,451 posts

Posted: Tuesday, May 03, 2016 - 04:06 AM UTC
Been following this blog as reference to a future Panzerwerfer build. Nice progress on the interior. Not to be a PITA, as I'm in a dilemma as well on a current build with an exposed floor anti-slip floor. Shouldn't the lighter / weathered area be more on the middle rather than at the edges / corners, as this would have had more foot traffic from the crew? 
Modelrob
Joined: October 20, 2015
KitMaker: 304 posts
Armorama: 293 posts
Posted: Tuesday, May 03, 2016 - 04:37 AM UTC
Quoted Text
Been following this blog as reference to a future Panzerwerfer build. Nice progress on the interior. Not to be a PITA, as I'm in a dilemma as well on a current build with an exposed floor anti-slip floor. Shouldn't the lighter / weathered area be more on the middle rather than at the edges / corners, as this would have had more foot traffic from the crew?
Thanks for following along. Youre not being a PITA, The light area's on the floor are built up dust. I went with the middle of the floor area darker like bear aged metal with little dust because that is where most of the traffic would be. In a lot of vehicles I was in the field the dirt had a tendency of building up in the corners and the centers would be clear during the summer. If it was raining then it seemed to work in reverse mud in center clear and cleaner on sides. I hope that helps a little.
Robert
Thirian24
Joined: September 30, 2015
KitMaker: 2,493 posts
Armorama: 2,344 posts
Posted: Tuesday, May 03, 2016 - 05:53 AM UTC
Looks killer Rob. Keep up the great work.
tatbaqui
#040
Joined: May 06, 2007
KitMaker: 2,713 posts
Armorama: 2,451 posts
Posted: Tuesday, May 03, 2016 - 09:24 AM UTC
Quoted Text
Quoted TextBeen following this blog as reference to a future Panzerwerfer build. Nice progress on the interior. Not to be a PITA, as I'm in a dilemma as well on a current build with an exposed floor anti-slip floor. Shouldn't the lighter / weathered area be more on the middle rather than at the edges / corners, as this would have had more foot traffic from the crew?
Thanks for following along. Youre not being a PITA, The light area's on the floor are built up dust. I went with the middle of the floor area darker like bear aged metal with little dust because that is where most of the traffic would be. In a lot of vehicles I was in the field the dirt had a tendency of building up in the corners and the centers would be clear during the summer. If it was raining then it seemed to work in reverse mud in center clear and cleaner on sides. I hope that helps a little.
Robert
Got that, thanks Robert! Cheers, Tat
GazzaS
#424
Joined: April 23, 2015
KitMaker: 4,648 posts
Armorama: 2,248 posts
Posted: Tuesday, May 03, 2016 - 10:38 AM UTC
Rob,
That interior looks fantastic! I really get a feeling of the 3d-ness of it.
Gaz
That interior looks fantastic! I really get a feeling of the 3d-ness of it.
Gaz
Modelrob
Joined: October 20, 2015
KitMaker: 304 posts
Armorama: 293 posts
Posted: Tuesday, May 03, 2016 - 03:08 PM UTC
Dustin and Gaz thanks for stopping by and taking a look.
Robert
Robert
Modelrob
Joined: October 20, 2015
KitMaker: 304 posts
Armorama: 293 posts
Posted: Friday, May 06, 2016 - 03:25 AM UTC
Hi everyone, the build is progressing nicely. Just finished up the main body of the vehicle and luckily all the angles worked out. I just needed a little putty around one side of the front of the vehicle. I used the liquid testors plastic cement and the extra working time allowed me to get the angles to come out right. Of course I had a great blunder that I dumped over the glue and lost ½ the bottle that stuff is good it eat my lines off the cutting mat and drenched the end on one finder side of my model. Luckily I remembered not to touch the plastic and just let it dry, no damage was done. I have decided that I am going to leave the body off the chasse till I finish painting it and then I will put them to gather for weathering, It will be easier than typing off the bottom part of the running gears. These pictures show it just temporally sitting on the chasse.


Well its off to glue more plastic together just need to finish up the rocket launcher and then I am ready to paint it. Also need to build some form of glue holder so I cant knock over another bottle, that stuff isnt cheap as my wife let me know.
Happy modeling
Robert
Well its off to glue more plastic together just need to finish up the rocket launcher and then I am ready to paint it. Also need to build some form of glue holder so I cant knock over another bottle, that stuff isnt cheap as my wife let me know.
Happy modeling
Robert
 |

WEB HOSTING BY


Copyright ©2021 Armorama and Kitmaker Network, a subsidiary of Silver Star Enterprises
All Rights Reserved. Please read our Conditions of Use and Privacy Policy.
All Rights Reserved. Please read our Conditions of Use and Privacy Policy.