Sd. Kfz. 4/1 Panzerwerfer 42
Arizona, United States
Joined: October 20, 2015
KitMaker: 304 posts
Armorama: 293 posts
Posted: Wednesday, March 23, 2016 - 02:49 AM UTC
Hi everyone I figured that I am going to try and do a build log to document my first adventurer into the aftermarket up grade set. I am hoping that it may help me to keep focused and also any feedback my help me improve my skills. I also hope that it may help some builders that just like to lurk in the shadows find a helpful hint or to, even if it is not to make the same mistakes that I do.
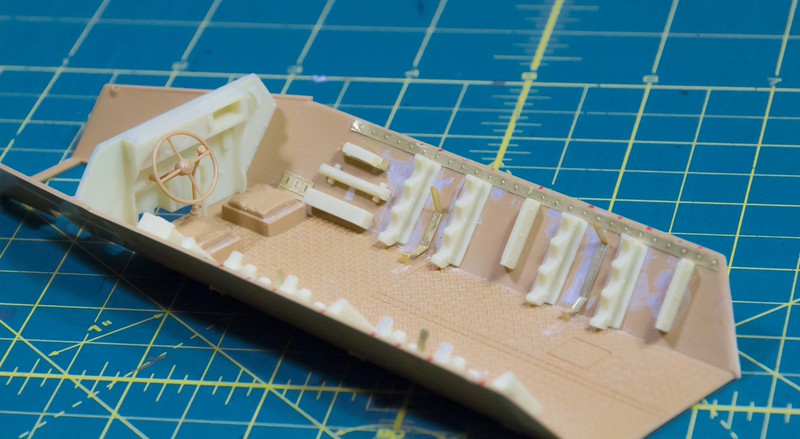
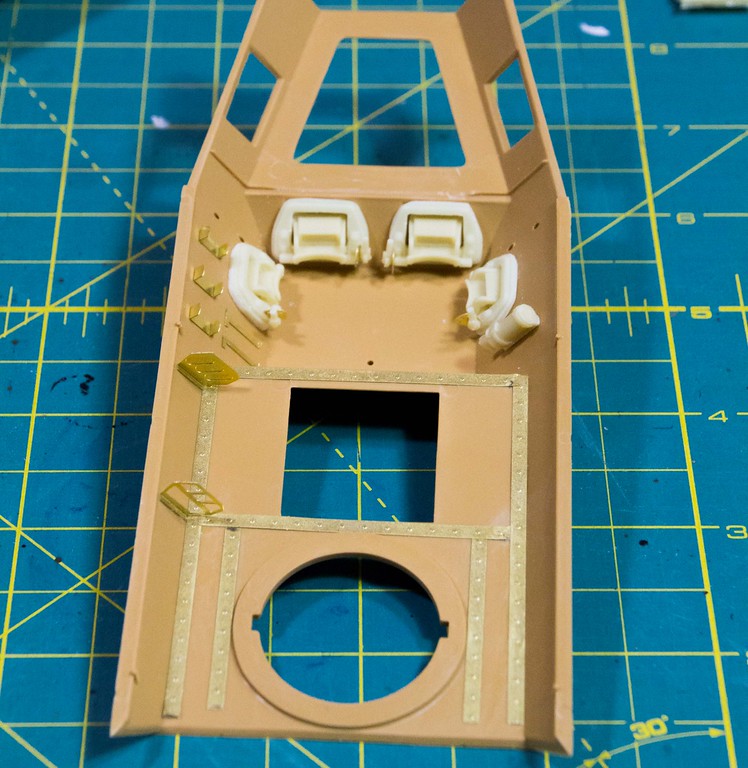
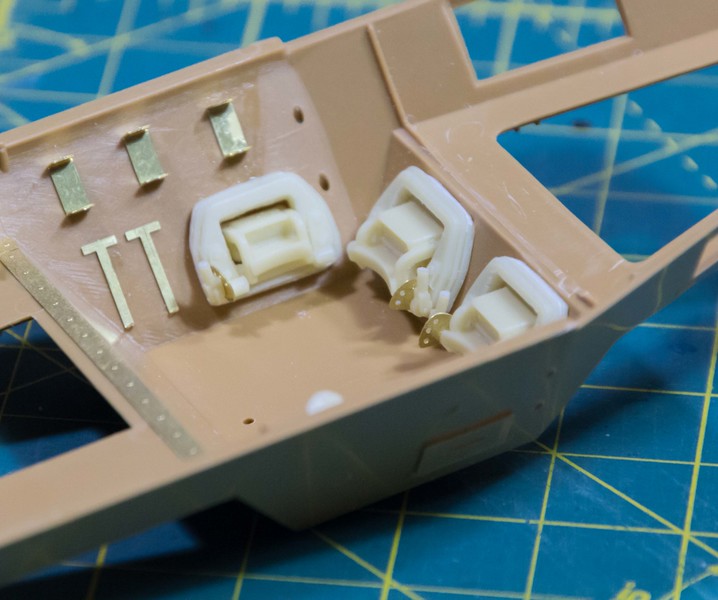
Well on to the kit I am doing the Tamiya re-box of the Italeris Sd. Kfz. 4/1 Panzerwerfer 42, self-propelled rocket launcher with the Verlinden update set for it. This will be the first time I have worked with resin or photo etch the plus is most of it is inside the fighting compartment if I make mistakes. I am also going to do a Dio that has the vehicle being rearmed and one mechanic looking at the engine.
This could take a while because I am a pretty slow builder and easily side tracked. The first step is I am currently reviewing the instructions.

This is where I learned lesson #1 for the build.
Lesson #1: Always make sure you have the tools that you need for construction. I rember to order the paint for the interior but I forgot that I needed a saw for cutting the resin and a chisel blade for scrapping off the raised detail. So now it is off to a shop to get it the tools need on Friday.
Till the next update
Robert

Alaska, United States
Joined: February 22, 2015
KitMaker: 47 posts
Armorama: 47 posts
Posted: Wednesday, March 23, 2016 - 06:23 AM UTC
Looks like a fun project.
Arizona, United States
Joined: October 20, 2015
KitMaker: 304 posts
Armorama: 293 posts
Posted: Wednesday, March 23, 2016 - 02:09 PM UTC
Thanks Mark I am looking forward to the build. I have been wanting to do it since I got back into modeling.

#424
Queensland, Australia
Joined: April 23, 2015
KitMaker: 4,648 posts
Armorama: 2,248 posts
Posted: Wednesday, March 23, 2016 - 02:31 PM UTC
I've never seen em' modelled, so I'll be watching, too.
"Artillery adds dignity, to what would otherwise be an ugly brawl."
Frederick The Great
Oklahoma, United States
Joined: September 30, 2015
KitMaker: 2,493 posts
Armorama: 2,344 posts
Posted: Wednesday, March 23, 2016 - 04:36 PM UTC
Can't wait to see updates! Looks like a nice project.
"Only the dead have seen the end of war." - Plato
New York, United States
Joined: May 02, 2013
KitMaker: 4,403 posts
Armorama: 4,078 posts
Posted: Wednesday, March 23, 2016 - 04:39 PM UTC
Quoted Text
Hi everyone I figured that I am going to try and do a build log to document my first adventurer into the aftermarket up grade set. I am hoping that it may help me to keep focused and also any feedback my help me improve my skills. I also hope that it may help some builders that just like to lurk in the shadows find a helpful hint or to, even if it is not to make the same mistakes that I do.
Well on to the kit I am doing the Tamiya re-box of the Italeris Sd. Kfz. 4/1 Panzerwerfer 42, self-propelled rocket launcher with the Verlinden update set for it. This will be the first time I have worked with resin or photo etch the plus is most of it is inside the fighting compartment if I make mistakes. I am also going to do a Dio that has the vehicle being rearmed and one mechanic looking at the engine.
This could take a while because I am a pretty slow builder and easily side tracked. The first step is I am currently reviewing the instructions. This is where I learned lesson #1 for the build.
Lesson #1: Always make sure you have the tools that you need for construction. I rember to order the paint for the interior but I forgot that I needed a saw for cutting the resin and a chisel blade for scrapping off the raised detail. So now it is off to a shop to get it the tools need on Friday.
Till the next update
Robert
Hi, Robert! I've never submitted a build article or a review of any kits on this site, either- I don't have a digital camera, and I'm not quite sure of how to actually post photos of my work. I'll be looking forward to seeing your build take shape, even though I've been building models since 1958.
It'll be interesting to see your first impressions in taking on an aftermarket upgrade to an already fine kit. I did the very same thing quite a few years ago with the original ITALERI kit, so it will no doubt stir up memories of some of my experiences and impressions of my build.

The very first thing I did was to ditch the kit-supplied Tracks, in lieu of a set of MODELKASTEN Carden-Lloyd Tracks... Boy, what a revelation in frustration THAT turned out to be!

After THAT episode, I set the whole project aside for about 6 months and went on to other things- I usually have about a half-dozen other projects going on my workbenches... I DID eventually complete this vehicle, and after all was said and done, I'm glad that I DID! I should have mentioned that I was simultaneously building the ITALERI Opel "Maultier" kit, which used the same MODELKASTEN Carden-Lloyd Track set...

Arizona, United States
Joined: October 20, 2015
KitMaker: 304 posts
Armorama: 293 posts
Posted: Thursday, March 24, 2016 - 04:06 PM UTC
Dustin and Gary thanks for taking the time to stop bye and look. I will work hard to keep it interesting.
Robert
Arizona, United States
Joined: October 20, 2015
KitMaker: 304 posts
Armorama: 293 posts
Posted: Thursday, March 24, 2016 - 04:13 PM UTC
Thanks for stopping bye Dennis. Those tracks could scare anyone. Lucky for me the tracks were updated to individual links when Tamiya re-boxed the kit. That will be another first for me.
These track links are sure small
Arizona, United States
Joined: October 20, 2015
KitMaker: 304 posts
Armorama: 293 posts
Posted: Friday, March 25, 2016 - 04:06 PM UTC
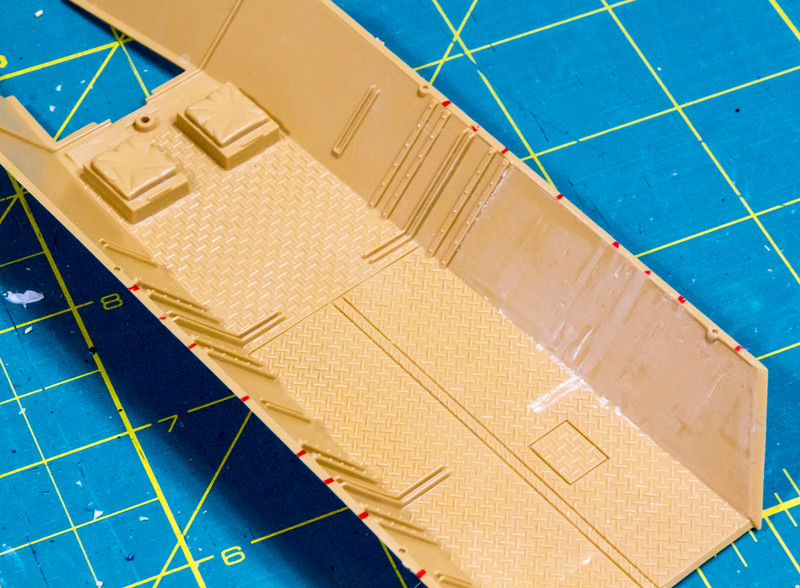
It is time for the first update on the project. First things first I washed all the parts both plastic and resin and let them dry. I do this to remove the release agent that is on the models and spruce. Here is the model laid out to dry.

Had to make the run to the Hobby Lobby in Lake Havasu City before I could get going because I needed both chisel blades and a razor saw to work with the resin aftermarket parts. You just cant beat a 40% off coupon. Well make that 2 the wife bought one of the Items. Here is my haul on tools.

Well its time to get on to some serious modeling. I completed the first two steps of the build. The parts are fitting nicely and most of the ejection pin marks are in locations that they do not show. The first step has you install the front suspension.
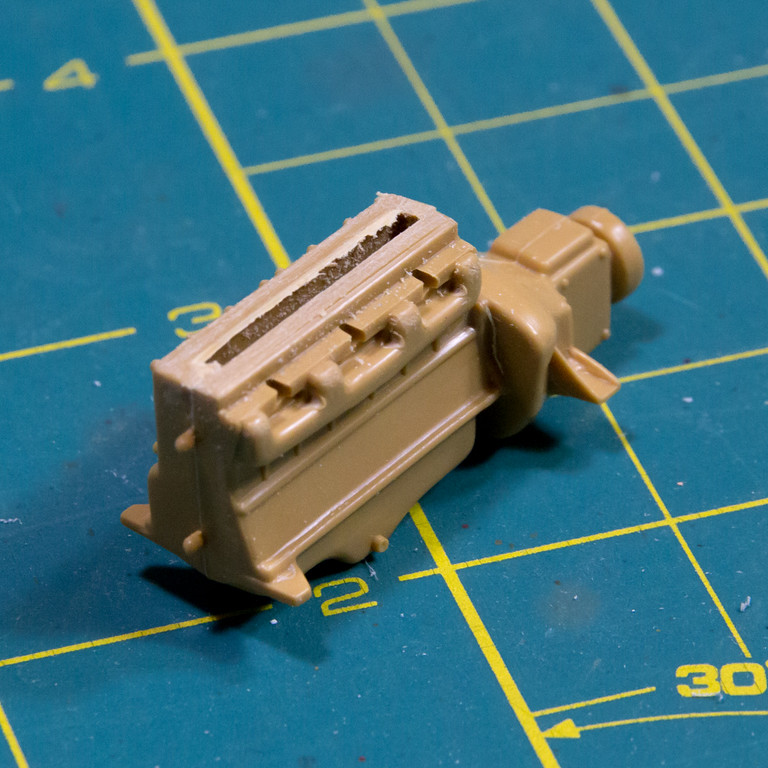
Step two has you move onto constructing the engine and installing the front hitch. This is where I worked with my first resin parts. I had to cut the kit valve cover off so the new resin on could be installed. I can see why you need to make sure you have some reference available because some of the aftermarket parts had some very vague instructions on were the parts go. I really do like the detail that the resin parts add to the engine.


So here ends this update. Hopefully I will get more done this weekend. If anyone has comments or suggestions I am always ready to hear them.
I did have a question on what color did the German military paint their engines?
Robert
United Kingdom
Joined: February 25, 2007
KitMaker: 3,033 posts
Armorama: 2,953 posts
Posted: Friday, March 25, 2016 - 04:31 PM UTC
Hi
If you are detailing that much maybe you might consider the Voyager PE detailing set.
PE350661/35 Pz.WF.42 Auf Maultier(For ITALERI 227)
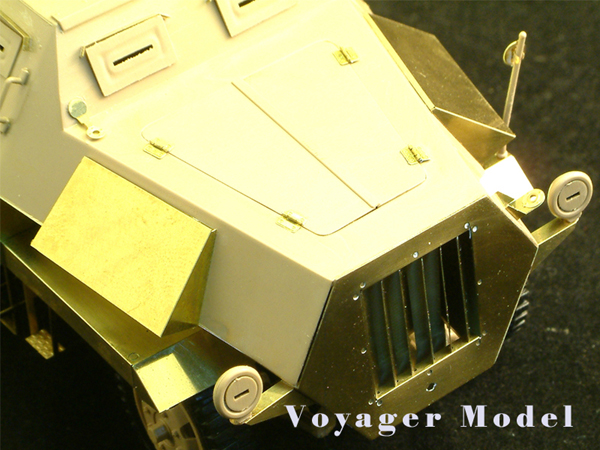


Go to Luckymodel to see set in packaging, although they are showing it out of stock at the minute.
http://www.luckymodel.com/scale.aspx?item_no=PE%2035066 Alan
Arizona, United States
Joined: October 20, 2015
KitMaker: 304 posts
Armorama: 293 posts
Posted: Saturday, March 26, 2016 - 03:30 PM UTC
Thanks Alan for the suggestion the Verlinden set comes with some photo etch with some simple bends and my plan was to use it to develop my photo etch skills before I tackle something larger.
Again thanks for looking
Robert
Arizona, United States
Joined: October 20, 2015
KitMaker: 304 posts
Armorama: 293 posts
Posted: Saturday, March 26, 2016 - 03:32 PM UTC
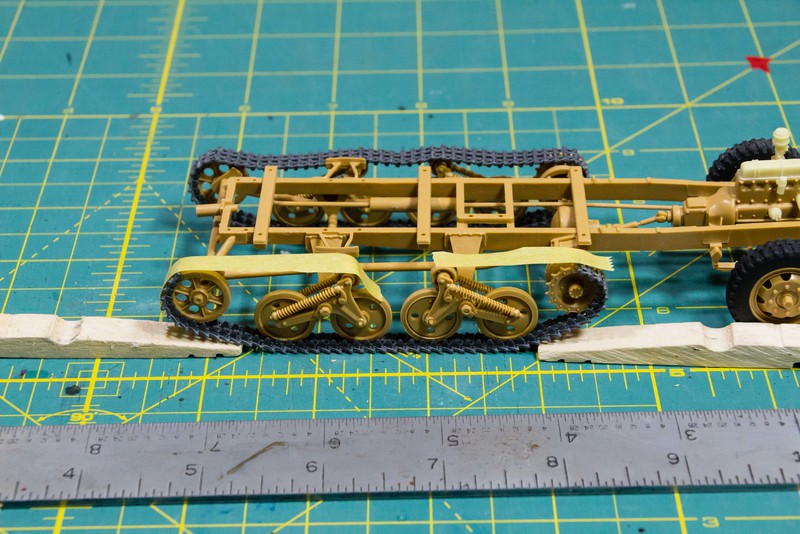
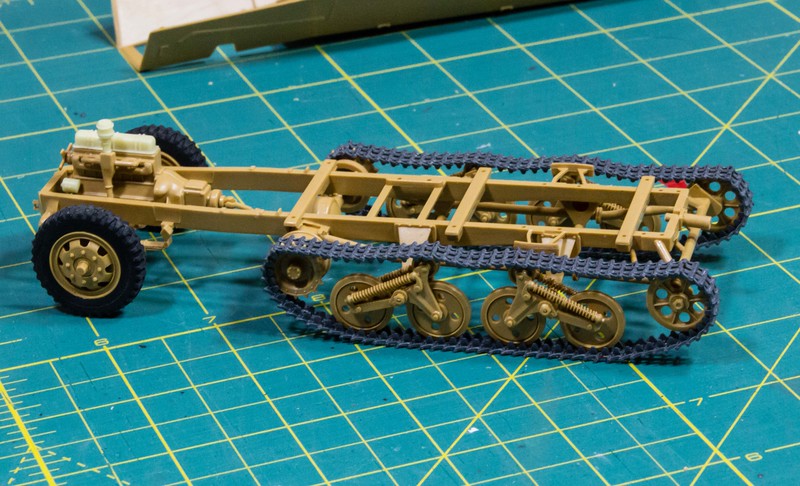
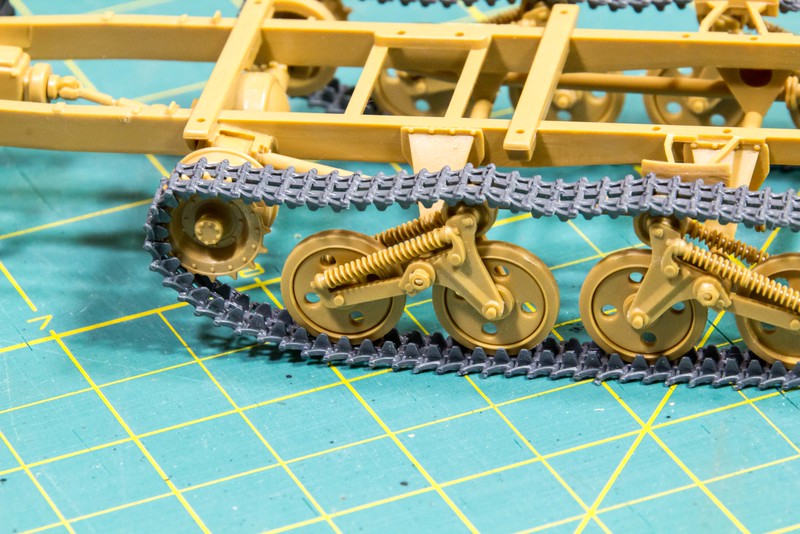
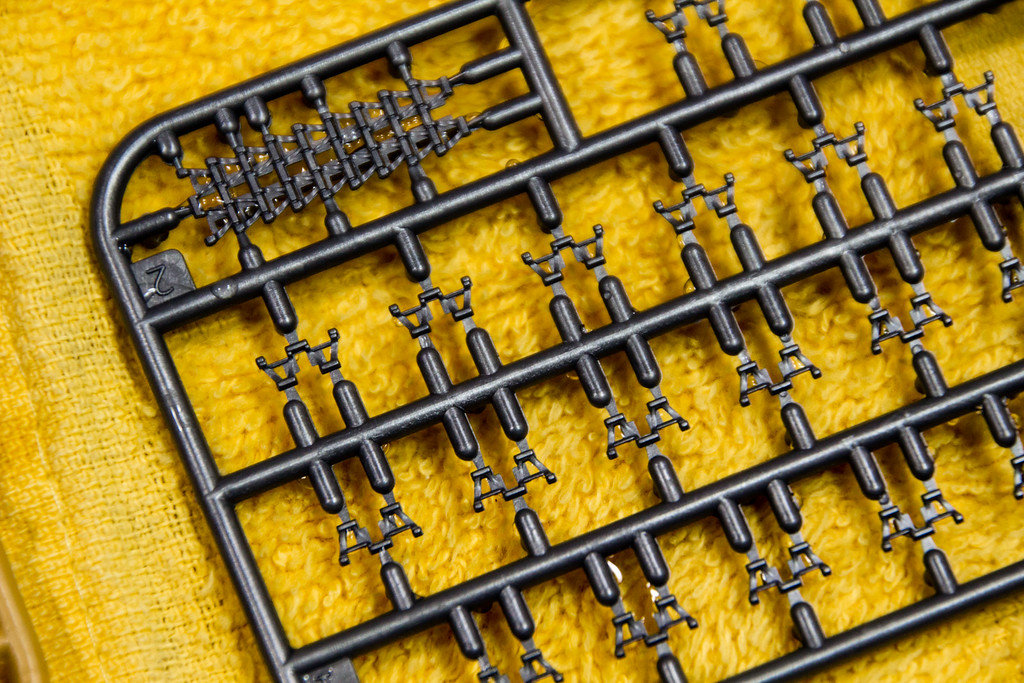
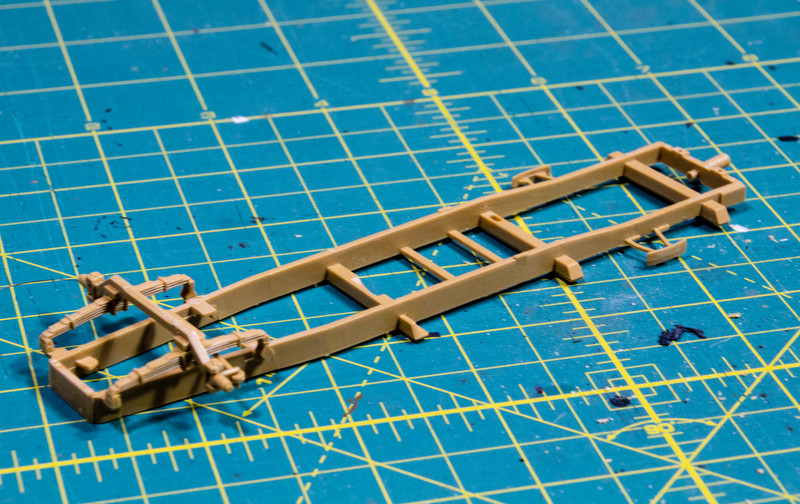
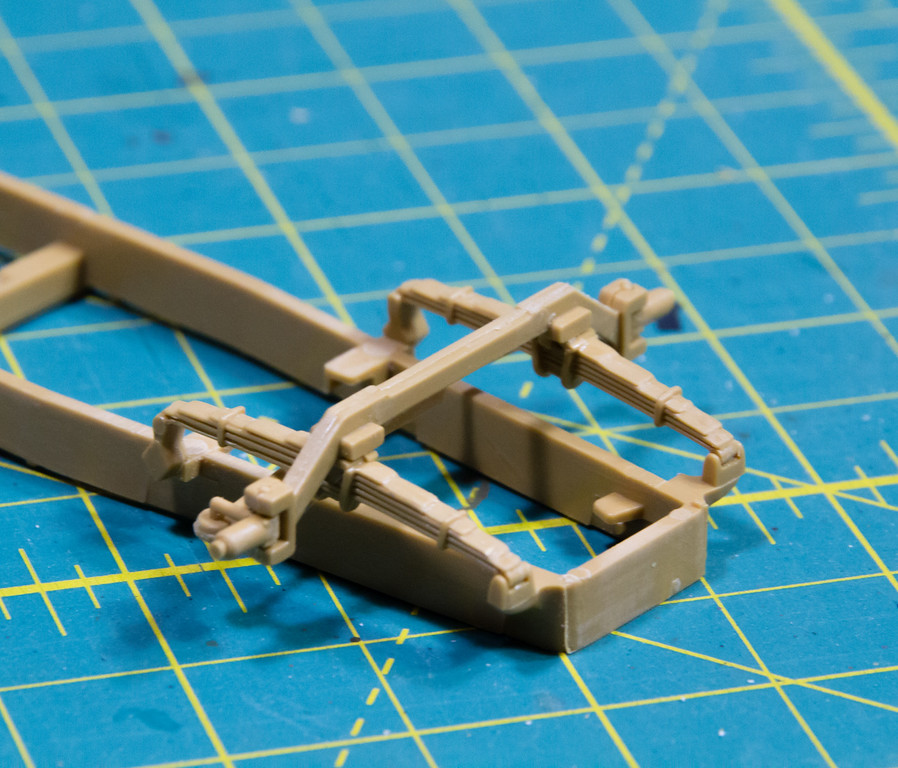
Steps 3 thru 5 are now completed. These steps cover the construction of the frame to support the running gear and construction and installation of the running gear.


I have found only one problem so far with this kit alignment of the wheels is off. The front wheels are off by the height of the rear bracket above the back set of wheels. The front set needs to be shimmed by that amount. The picture below shows what I am talking about.

Lesson #2: Always dry fit the suspension arms and wheels together to ensure that everything is level and touching the ground.
Lesson #3: I will never use rubber tires again. Just could not get the seam removed but unfortunately at this time I cannot afford and justify getting a set of aftermarket ones. I am hoping that some weathering will help hide that seam.
If anyone has any suggestions on how to improve the build log just let me know and I will see what I can do.
The next step is to build the individual track links. This will be my first time; I have heard good and bad about them so we will see how this works out.
Robert
United Kingdom
Joined: February 25, 2007
KitMaker: 3,033 posts
Armorama: 2,953 posts
Posted: Saturday, March 26, 2016 - 04:11 PM UTC
Hi Robert
No problem, just thought you might want to get more into the PE stuff, but I can understand if you've not had much experience with the stuff, it can be very taxing with some small fiddly parts.
Regarding the wheels being out of alignment. Don't forget when you add the tracks the back end will rise up, so the front wheels should align with the ground when the tracks are on, not with the bogie wheels.
Also if you haven't noticed the front drive sprocket sits in the centre of the track when fitted, not on the edge as it would seem obvious to do.
Also I don't know if Tamiya changed the formula of the material that the front tyres are made of but Italeri ones used to have a chemical reaction that ate the plastic. Most people put some form of barrier between the two, such as silver foil stuck to the plastic hub.
Alan
Arizona, United States
Joined: October 20, 2015
KitMaker: 304 posts
Armorama: 293 posts
Posted: Saturday, March 26, 2016 - 04:30 PM UTC
Quoted Text
Hi Robert
No problem, just thought you might want to get more into the PE stuff, but I can understand if you've not had much experience with the stuff, it can be very taxing with some small fiddly parts.
Regarding the wheels being out of alignment. Don't forget when you add the tracks the back end will rise up, so the front wheels should align with the ground when the tracks are on, not with the bogie wheels.
Also if you haven't noticed the front drive sprocket sits in the centre of the track when fitted, not on the edge as it would seem obvious to do.
Also I don't know if Tamiya changed the formula of the material that the front tyres are made of but Italeri ones used to have a chemical reaction that ate the plastic. Most people put some form of barrier between the two, such as silver foil stuck to the plastic hub.
Alan
Thanks Alan, I will get some foil on those hubs just to be safe. I was actually talking about the misalignment between the to sets of road wheels, Need to learn and be more specific.
Thanks again for all your help
Robert
Oklahoma, United States
Joined: September 30, 2015
KitMaker: 2,493 posts
Armorama: 2,344 posts
Posted: Saturday, March 26, 2016 - 07:48 PM UTC
Looking good sir.
As for the front wheels, just try sanding them some more. Chances are, on the real vehicle, the tires would/could be fairly worn.
"Only the dead have seen the end of war." - Plato
Arizona, United States
Joined: October 20, 2015
KitMaker: 304 posts
Armorama: 293 posts
Posted: Sunday, March 27, 2016 - 02:20 PM UTC
Thanks Dustin I will keep hammering away at them front wheels.
Robert
Arizona, United States
Joined: October 20, 2015
KitMaker: 304 posts
Armorama: 293 posts
Posted: Monday, March 28, 2016 - 02:31 AM UTC
Auckland, New Zealand
Joined: February 03, 2014
KitMaker: 1,042 posts
Armorama: 871 posts
Posted: Monday, March 28, 2016 - 04:34 AM UTC
Robert. Nice progress and it's coming along nicely - loving the nice clear photos too.
I note that the suspension springs have a rather nasty mould seam running along the length of the part. May be worth replacing them with scratch built parts as removing the seams will be a PITA.
Just cut out the spring section and replace with a piece of styrene rod to the same length. Then around that rod, wind a piece of lead solder wire of suitable diameter for the spring. You actually wind two lengths simultaneously - removing one length at the end which will keep the coils at equi- distance.
Gary
Arizona, United States
Joined: October 20, 2015
KitMaker: 304 posts
Armorama: 293 posts
Posted: Monday, March 28, 2016 - 03:40 PM UTC
Quoted Text
I note that the suspension springs have a rather nasty mould seam running along the length of the part. May be worth replacing them with scratch built parts as removing the seams will be a PITA.
Gary
Thanks Gary, after reading your response I went back to the springs and looked again I could not see them with my eye or my magnifying glasses also could not feel them with my fingers but the picture sure dose show one.
Thanks for the suggestion on cutting out the part but I don't quite feel ready for that type of surgery yet.
Thanks again for taking the time to look and comment.
Robert
Arizona, United States
Joined: October 20, 2015
KitMaker: 304 posts
Armorama: 293 posts
Posted: Thursday, March 31, 2016 - 03:38 PM UTC
Napoli, Italy
Joined: April 17, 2014
KitMaker: 652 posts
Armorama: 600 posts
Posted: Thursday, March 31, 2016 - 05:14 PM UTC
Hi Robert,
Good job so far. Very clean build with the tracks. I'm following...
Cheers
Oklahoma, United States
Joined: September 30, 2015
KitMaker: 2,493 posts
Armorama: 2,344 posts
Posted: Thursday, March 31, 2016 - 05:25 PM UTC
The tracks look very nice Rob.
"Only the dead have seen the end of war." - Plato
Arizona, United States
Joined: October 20, 2015
KitMaker: 304 posts
Armorama: 293 posts
Posted: Friday, April 01, 2016 - 03:12 PM UTC
Thanks for stopping to take a look Dustin and Giovanni.
Robert
Arizona, United States
Joined: October 20, 2015
KitMaker: 304 posts
Armorama: 293 posts
Posted: Sunday, April 03, 2016 - 04:54 PM UTC
Oklahoma, United States
Joined: September 30, 2015
KitMaker: 2,493 posts
Armorama: 2,344 posts
Posted: Monday, April 04, 2016 - 12:55 AM UTC
Looking real nice Rob. Can't wait to see some paint on this.
"Only the dead have seen the end of war." - Plato