

Armor/AFV
For discussions on tanks, artillery, jeeps, etc.
For discussions on tanks, artillery, jeeps, etc.
Hosted by Darren Baker, Mario Matijasic
Mk23 MTVR & 16.6 ton LHS

165thspc

#521

Joined: April 13, 2011
KitMaker: 9,465 posts
Armorama: 8,695 posts
Posted: Saturday, January 21, 2017 - 11:29 AM UTC
I made this alteration to both the 16.5 ton 8x8 and the smaller 4x4 making later cab construction much easier.

165thspc
#521
Joined: April 13, 2011
KitMaker: 9,465 posts
Armorama: 8,695 posts
Posted: Sunday, January 22, 2017 - 01:11 AM UTC
Spent last night working on shortening the loadbox. Inside dimension of the box should be 109.6 inches long.


165thspc
#521
Joined: April 13, 2011
KitMaker: 9,465 posts
Armorama: 8,695 posts
Posted: Sunday, January 22, 2017 - 01:35 AM UTC
Chopping the loadbox floor. Vehicle front is to the right.
Top view:

Bottom view:

Portion removed approximately 1 - 1/4 inches wide.
Top view:

Bottom view:

Portion removed approximately 1 - 1/4 inches wide.
165thspc
#521
Joined: April 13, 2011
KitMaker: 9,465 posts
Armorama: 8,695 posts
Posted: Sunday, January 22, 2017 - 02:19 AM UTC
Plan for chopping the sideboards of the loadbox:

Note that the center division of the three uprights on each sideboard panel is slightly wider than the other two.

Note that the center division of the three uprights on each sideboard panel is slightly wider than the other two.
165thspc
#521
Joined: April 13, 2011
KitMaker: 9,465 posts
Armorama: 8,695 posts
Posted: Monday, January 23, 2017 - 02:08 AM UTC
By any chance would someone have straight-on, photos or dimensional drawings for the Container Handling Unit (CHU)? Clearly overall dimensions of this lifting structure (less attachment hooks) must be 8 x 8 feet.
 (Original CHU design shown in line drawing.)

(Enhanced design (E-CHU) shown in photograph.)
 (Original CHU design shown in line drawing.)
(Enhanced design (E-CHU) shown in photograph.)
165thspc
#521
Joined: April 13, 2011
KitMaker: 9,465 posts
Armorama: 8,695 posts
Posted: Saturday, January 28, 2017 - 09:32 AM UTC
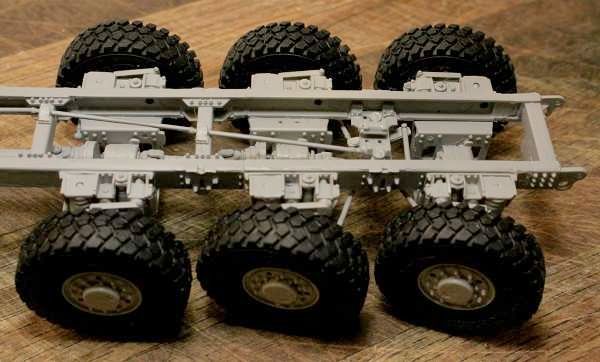
Working now on the bobber short bed undercarriage:

Re-spacing some of the support gussets and slightly relocating the smaller front mud flaps towards the rear of the box.

Re-spacing some of the support gussets and slightly relocating the smaller front mud flaps towards the rear of the box.
165thspc
#521
Joined: April 13, 2011
KitMaker: 9,465 posts
Armorama: 8,695 posts
Posted: Saturday, January 28, 2017 - 09:33 AM UTC
A couple of progress photos on the short bed:


165thspc
#521
Joined: April 13, 2011
KitMaker: 9,465 posts
Armorama: 8,695 posts
Posted: Sunday, January 29, 2017 - 02:46 AM UTC

Bottom view of the 4x4.

DocEvan
Joined: August 09, 2014
KitMaker: 180 posts
Armorama: 180 posts
Posted: Monday, January 30, 2017 - 07:36 AM UTC
We LIKE!
165thspc
#521
Joined: April 13, 2011
KitMaker: 9,465 posts
Armorama: 8,695 posts
Posted: Wednesday, February 01, 2017 - 08:45 AM UTC
Many thanks Evan - - Mike
165thspc
#521
Joined: April 13, 2011
KitMaker: 9,465 posts
Armorama: 8,695 posts
Posted: Friday, February 03, 2017 - 04:23 AM UTC
Another small detail that I just "HAD" to add to both the 4x4 and the 8x8:
The two mounting brackets under the hydraulic oil reservoir (just behind the cab) are supposed to be perforated. I think Trumpeter really should have added these two items to the PE sheet.
I used a twist drill to give myself a starting hole and then finished by enlarging the starting hole with a #11 E-Xacto blade.


165thspc
#521
Joined: April 13, 2011
KitMaker: 9,465 posts
Armorama: 8,695 posts
Posted: Friday, February 03, 2017 - 04:24 AM UTC
For the finished tank I also needed to add the missing filler cap. A piece of sprue and a little bit of plastic rod did the job.

There will be input and outflow hoses added to the reservoir as well - more on this later.
Footnote: That small detail on each end of the reservoir is the sight glass for checking the fluid level.
___________________________________________________________________________________
For greater clearity I am going to split off the construction of the 4x4 bobber truck to a separate thread.
Here is the link to the new thread:
https://armorama.kitmaker.net/forums/255243
165thspc
#521
Joined: April 13, 2011
KitMaker: 9,465 posts
Armorama: 8,695 posts
Posted: Monday, February 06, 2017 - 04:33 AM UTC
Time to get started on that rear steering gear for the big MTVR:
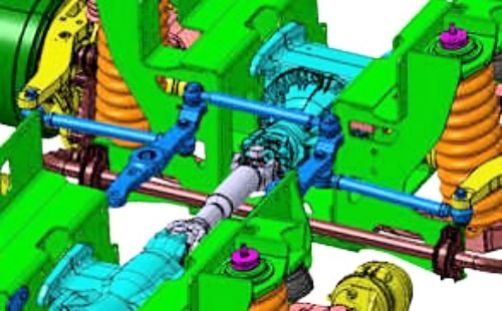
Scratch built pitman arms and cross link:


Scratch built pitman arms and cross link:

165thspc
#521
Joined: April 13, 2011
KitMaker: 9,465 posts
Armorama: 8,695 posts
Posted: Monday, February 06, 2017 - 06:18 AM UTC
Top view of steering gear with pitman arms and linkage installed:

View from below:

Still need to finish four more brake cylinders.

View from below:

Still need to finish four more brake cylinders.
165thspc
#521
Joined: April 13, 2011
KitMaker: 9,465 posts
Armorama: 8,695 posts
Posted: Monday, February 06, 2017 - 06:21 AM UTC
Final addition for the time being: first section of steering column shaft with universal joints and bearing (pillow) blocks.


165thspc
#521
Joined: April 13, 2011
KitMaker: 9,465 posts
Armorama: 8,695 posts
Posted: Wednesday, February 08, 2017 - 05:35 AM UTC

165thspc
#521
Joined: April 13, 2011
KitMaker: 9,465 posts
Armorama: 8,695 posts
Posted: Thursday, February 09, 2017 - 02:26 AM UTC
A few more progress shots:


Taylornic
Joined: January 10, 2005
KitMaker: 337 posts
Armorama: 332 posts

Posted: Friday, February 10, 2017 - 01:23 AM UTC
Those rear drives are a work of art. Very nice job!
165thspc
#521
Joined: April 13, 2011
KitMaker: 9,465 posts
Armorama: 8,695 posts
Posted: Friday, February 10, 2017 - 01:54 AM UTC
Thanks Taylor. I think we can thank Oshkosh for the easy way these modular units go together, building block style. And it works equally well in both 1/35th and 1 to 1 scales.
165thspc
#521
Joined: April 13, 2011
KitMaker: 9,465 posts
Armorama: 8,695 posts
Posted: Tuesday, February 14, 2017 - 08:28 AM UTC
More progress on the rear steering shaft. In front of the transfer case the shaft will angle down, duck below the transmission and then run forward to the main steering boxes.


HeavyArty

Joined: May 16, 2002
KitMaker: 17,694 posts
Armorama: 13,742 posts
Posted: Tuesday, February 14, 2017 - 08:34 AM UTC
Nice job on the rear steering shaft.
165thspc
#521
Joined: April 13, 2011
KitMaker: 9,465 posts
Armorama: 8,695 posts
Posted: Tuesday, February 14, 2017 - 09:57 AM UTC
Thanks Gino.
The only reference I have shows the rear steering shaft angling towards the passenger side of the cab. Therefore I have to assume it connects to the slave steering box up front.
The only reference I have shows the rear steering shaft angling towards the passenger side of the cab. Therefore I have to assume it connects to the slave steering box up front.
165thspc
#521
Joined: April 13, 2011
KitMaker: 9,465 posts
Armorama: 8,695 posts
Posted: Tuesday, February 14, 2017 - 11:33 PM UTC
What the mailman delivered . . .
Today I received my second copy of the "new" Italeri HEMTT with the LHS flatrack gear.

Today I received my second copy of the "new" Italeri HEMTT with the LHS flatrack gear.

HeavyArty
Joined: May 16, 2002
KitMaker: 17,694 posts
Armorama: 13,742 posts
Posted: Tuesday, February 14, 2017 - 11:40 PM UTC
Nice. Now what are you going to do with that extra HEMTT? I have a spare cargo bed if you want it. Just let me know.
165thspc
#521
Joined: April 13, 2011
KitMaker: 9,465 posts
Armorama: 8,695 posts
Posted: Tuesday, February 14, 2017 - 11:41 PM UTC
Gino here is my plan for using the leftover HEMTT vehicle - a totally freelanced dump truck with a mid-ships mounted crane:
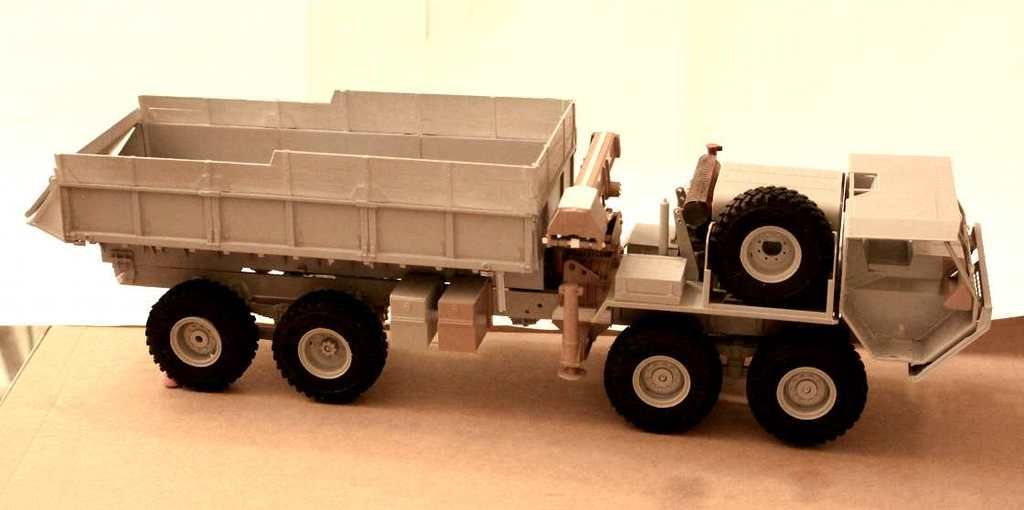
__________________________________________________________
Now back to the LHS equipment:
This mechanism built by MULTILIFT of Britain is going to be a necessary addition for building my Mk ?? 16.5 ton Navy LHS.

 Look at all that beautiful bolt head detail!
Very glad to report that the frame rail spacing on the HEMTT and the Mk23 IS THE SAME! (I think Oshkosh might have had a plan in mind here.) So the LHS MULTILIFT equipment drops right onto the Navy truck!
 |

WEB HOSTING BY


Copyright ©2021 Armorama and Kitmaker Network, a subsidiary of Silver Star Enterprises
All Rights Reserved. Please read our Conditions of Use and Privacy Policy.
All Rights Reserved. Please read our Conditions of Use and Privacy Policy.