Crusader to Gazala Campaign
Queensland, Australia
Joined: August 06, 2005
KitMaker: 3,353 posts
Armorama: 3,121 posts
Posted: Sunday, December 03, 2017 - 02:53 AM UTC
Looks like it is colour already Mark

If you refer back a couple of pages re the SdKfz 222 being built by Rory, I mentioned about the hole in flap on the Notek light being on the right not left:

Looks like you have a lefty too.
If you have some spare wire around, adding cables from the back of the lights into the hull may add a bit more interest for you. bottom left on the Notek and bottom centre on the round one
Is the reflective disk on the mount on the rear left fender... a bit hard to see in the pic, is all.
Looking good as is though. I can't wait to see it painted.
On the Bench:
Dust, styrene scraps, paint splotches and tears.

#424
Queensland, Australia
Joined: April 23, 2015
KitMaker: 4,648 posts
Armorama: 2,248 posts
Posted: Sunday, December 03, 2017 - 04:10 AM UTC
Mark,
Your Panzer iv looks good. Looking forward to seeing it painted.
Gaz
"Artillery adds dignity, to what would otherwise be an ugly brawl."
Frederick The Great

#453
Texas, United States
Joined: August 28, 2016
KitMaker: 1,925 posts
Armorama: 601 posts
Posted: Sunday, December 03, 2017 - 07:50 AM UTC
Peter,
Thanks for the info on the light. I will correct it before I paint. I will check my reference about the cable for the light and install it. Never thought it may be on the outside and not come up though the fender.
I just notice tonight that Dragon instructions is showing support brackets for the fenders about 3/4 of way back from the front. There is nothing in the instructions to install them or any brackets parts in the kit. So now I have to dig through my extra parts from other kits to see if there any thing I could use. Also the kit didn't come with toll cables. The Panzer IV Ausf. D didn't come with them from the factory? Another thing I need to find out.
Thought I was ready to paint, but looks like a delay.
Mark

#491
Missouri, United States
Joined: April 06, 2016
KitMaker: 602 posts
Armorama: 191 posts
Posted: Sunday, December 03, 2017 - 08:10 AM UTC
Paint job on the vehicle is about done I think. I went back and toned down the chipping so I think it looks a lot better. Its still not quite right but I have been tinkering with it all weekend and I think at some point you have to draw a line.


Next to paint the stowage. Then weathering/washes etc. Then vehicle commander and lastly vignette.
Edit: I will have to go back and fix some small areas. I see a mold line on the jack as well as some stray paint. And my little hole appears to have been covered by paint.
Currently working on: Multiple Campaigns :P
Oklahoma, United States
Joined: February 11, 2013
KitMaker: 294 posts
Armorama: 196 posts
Posted: Sunday, December 03, 2017 - 08:41 AM UTC
I looks really good. Can't wait to see the final result.

On the bench:
The Night Shift Campaign: GWH P-61 "The Last Shoot Down". 1/48
Spanish Civil War Campaign: Dragon Pz I Ausf B 1/35
Revell B-17 1/48 with lots of add ons.
Complete rehab and repaint of Dragon Pz III J. 1/35
California, United States
Joined: March 03, 2016
KitMaker: 142 posts
Armorama: 137 posts
Posted: Sunday, December 03, 2017 - 09:14 AM UTC
Quoted Text
Paint job on the vehicle is about done I think. I went back and toned down the chipping so I think it looks a lot better. Its still not quite right but I have been tinkering with it all weekend and I think at some point you have to draw a line.
Next to paint the stowage. Then weathering/washes etc. Then vehicle commander and lastly vignette.
Edit: I will have to go back and fix some small areas. I see a mold line on the jack as well as some stray paint. And my little hole appears to have been covered by paint.
Your 222 is starting to look Afrikan Rory!! I like it!!
JohnA
California, United States
Joined: March 03, 2016
KitMaker: 142 posts
Armorama: 137 posts
Posted: Sunday, December 03, 2017 - 09:24 AM UTC
Quoted Text
Well my Panzer IV Ausf. D Tropical is about finished. Assembling the tracks now. Once I have them dry fitted I will start the painting process.
Here are a few shots I taken this afternoon.
Next post should be in color.
Can't wait to see it's first coats of paint.
JohnA
Colorado, United States
Joined: February 24, 2014
KitMaker: 3,033 posts
Armorama: 2,492 posts
Posted: Sunday, December 03, 2017 - 09:55 AM UTC
Quoted Text
... but I have been tinkering with it all weekend and I think at some point you have to draw a line.
Let the line be drawn in the sand. ... That looks great!🍺
—mike

#424
Queensland, Australia
Joined: April 23, 2015
KitMaker: 4,648 posts
Armorama: 2,248 posts
Posted: Sunday, December 03, 2017 - 10:55 AM UTC
Rory,
That's looking great! Chipping is a very subjective thing, the most important thing being that it looks natural. And I think you've succeeded there.
Good job!
Gaz
"Artillery adds dignity, to what would otherwise be an ugly brawl."
Frederick The Great
Queensland, Australia
Joined: August 06, 2005
KitMaker: 3,353 posts
Armorama: 3,121 posts
Posted: Sunday, December 03, 2017 - 12:07 PM UTC
Hi Mark
Yes in comes in through the back where the grommet is in this casing:

On the Bench:
Dust, styrene scraps, paint splotches and tears.
Queensland, Australia
Joined: August 06, 2005
KitMaker: 3,353 posts
Armorama: 3,121 posts
Posted: Sunday, December 03, 2017 - 12:09 PM UTC
Very nice Rory. Looking great.
On the Bench:
Dust, styrene scraps, paint splotches and tears.

#454
Georgia, United States
Joined: July 10, 2016
KitMaker: 1,273 posts
Armorama: 1,138 posts
Posted: Sunday, December 03, 2017 - 11:11 PM UTC
Your chipping looks super, Rory, Very Nice Work!

"I can make armored cars, safe and unassailable...and behind these our infantry will be able to follow quite unharmed and without any opposition."
-Leonardo da Vinci, 1487

#123
New Mexico, United States
Joined: November 17, 2008
KitMaker: 1,202 posts
Armorama: 635 posts
Posted: Monday, December 04, 2017 - 07:14 AM UTC
Quoted Text
Your chipping looks super, Rory, Very Nice Work! 
"Ditto"
Can't wait to see more-looking good!
Take care,
Don "Lakota"

Working on Campaigns:
1/72 Hasegawa Ki-84 Frank
1/144 Dragon Armor

#491
Missouri, United States
Joined: April 06, 2016
KitMaker: 602 posts
Armorama: 191 posts
Posted: Tuesday, December 05, 2017 - 08:06 PM UTC
I am going to step away from this for a few days. I just realized that the Big Cats Campaign finishes at the end of the month and I need to get my JagdPanther finished up.
Currently working on: Multiple Campaigns :P
United States
Joined: August 28, 2015
KitMaker: 319 posts
Armorama: 308 posts
Posted: Tuesday, December 05, 2017 - 09:10 PM UTC
Big Cats ends May 31st


#491
Missouri, United States
Joined: April 06, 2016
KitMaker: 602 posts
Armorama: 191 posts
Posted: Tuesday, December 05, 2017 - 09:18 PM UTC
Quoted Text
Big Cats ends May 31st 
You are correct. Not sure how I got that mixed up. Must have been looking at the Dry Docked Campaign which does end 12/31.
That's a load off my mine but I still think I will push on through and get it done since The British Brigade has already started and Dragon 2018 starts soon as well. Granted I have loads of time to finish these but I am also eyeing the new Trumpeter campaign as well....
Currently working on: Multiple Campaigns :P
United States
Joined: August 28, 2015
KitMaker: 319 posts
Armorama: 308 posts
Posted: Tuesday, December 05, 2017 - 10:33 PM UTC
I totally get it. I got carried away and enlisted in five campaigns ending in 2018!
California, United States
Joined: October 08, 2013
KitMaker: 111 posts
Armorama: 67 posts
Posted: Friday, December 08, 2017 - 06:09 AM UTC
Update on build ... Quad in progress.... I've put on a first coat for some sections. doing a little scratchbuilding on the cab. Here's the progress shots. IN doing some research found out the Canadian Quad did not have a Caunter scheme, but was panted Light Stone. A little boring.... but the weathering will spruce it up.
Any and all comments welcome... only way to improve.


More work this weekend.....will prime and paint cab.
Regards,
Joe Osborne
On the bench:
1/35 Tamiya Tiger I early Production
1/35 Tamiya Mid Production Tiger I

#424
Queensland, Australia
Joined: April 23, 2015
KitMaker: 4,648 posts
Armorama: 2,248 posts
Posted: Friday, December 08, 2017 - 09:00 AM UTC
Joe,
The Quad is coming along nicely. I'm a little surprised about the amount of PE. I haven't built a Tamiya AFV in like 30 years... so I'm a bit behind the times.
Gaz
"Artillery adds dignity, to what would otherwise be an ugly brawl."
Frederick The Great

#453
Texas, United States
Joined: August 28, 2016
KitMaker: 1,925 posts
Armorama: 601 posts
Posted: Friday, December 08, 2017 - 09:34 AM UTC
Very nice looking work. Starting to really take shape.
California, United States
Joined: October 08, 2013
KitMaker: 111 posts
Armorama: 67 posts
Posted: Friday, December 08, 2017 - 02:01 PM UTC
Quoted Text
Joe,
The Quad is coming along nicely. I'm a little surprised about the amount of PE. I haven't built a Tamiya AFV in like 30 years... so I'm a bit behind the times.
Gaz
The pe comes from an old out of production Eduard offering for the Tamiya kit. Found it on ebay in the UK.
Regards,
Joe Osborne
On the bench:
1/35 Tamiya Tiger I early Production
1/35 Tamiya Mid Production Tiger I

#152
Texas, United States
Joined: December 07, 2002
KitMaker: 487 posts
Armorama: 441 posts
Posted: Monday, December 11, 2017 - 10:31 PM UTC
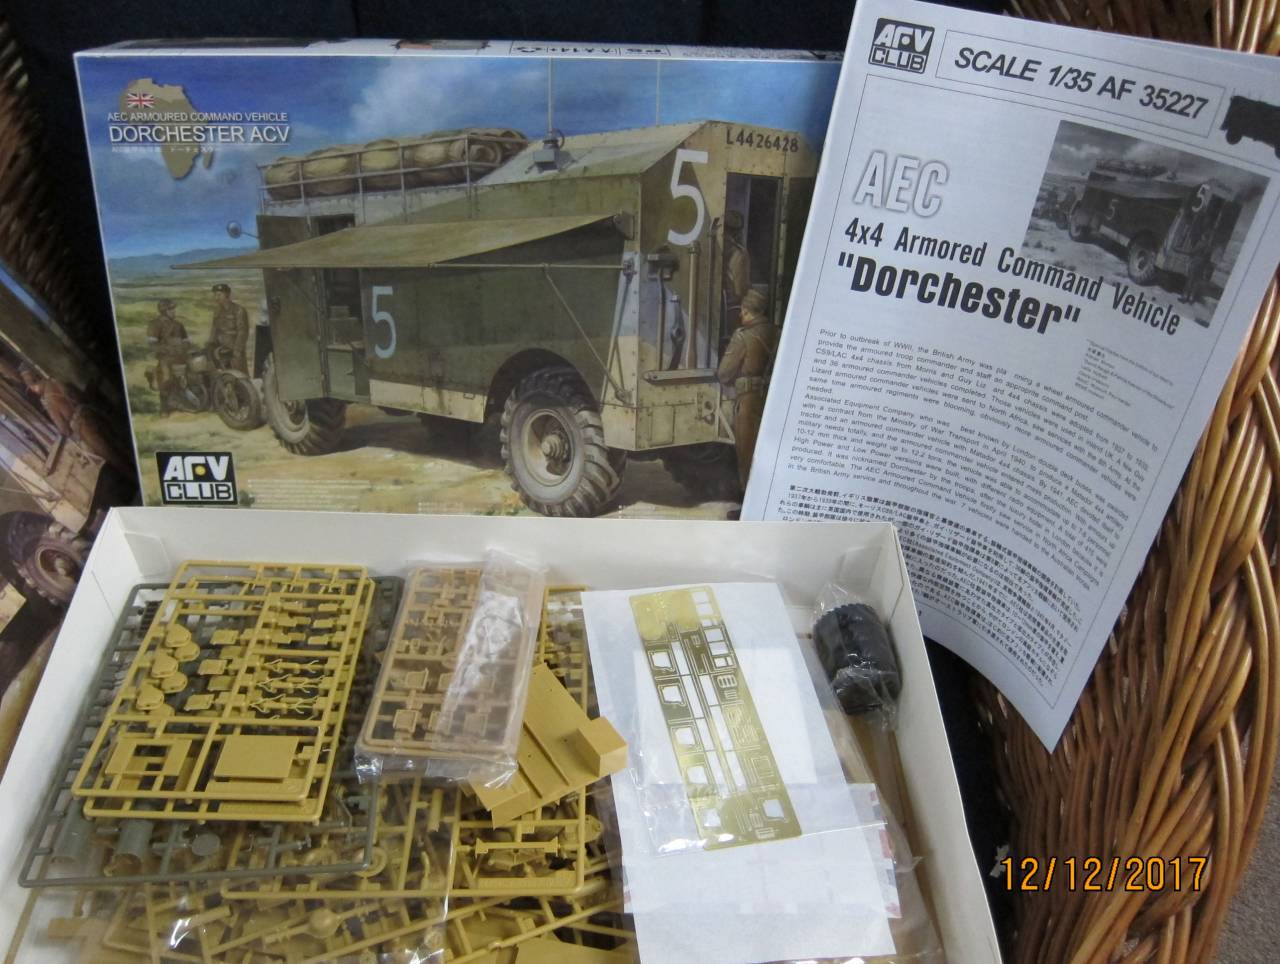
Here is my start up photo

Tom
Long time modeller. Starting when I was a teenager, then I found out about girls and college and work and kids. But now that I have one girl, no school, no work and the kids are grown, I'm back to full time modelling. My prime area of interest is armor, b

#424
Queensland, Australia
Joined: April 23, 2015
KitMaker: 4,648 posts
Armorama: 2,248 posts
Posted: Monday, December 11, 2017 - 10:55 PM UTC
Tom,
Welcome aboard! AS I have absolutely no knowledge of the Dorchester, I'm very interested to see how it looks in 3d.
Gaz
"Artillery adds dignity, to what would otherwise be an ugly brawl."
Frederick The Great
Iowa, United States
Joined: November 06, 2007
KitMaker: 585 posts
Armorama: 557 posts
Posted: Tuesday, December 12, 2017 - 07:49 AM UTC
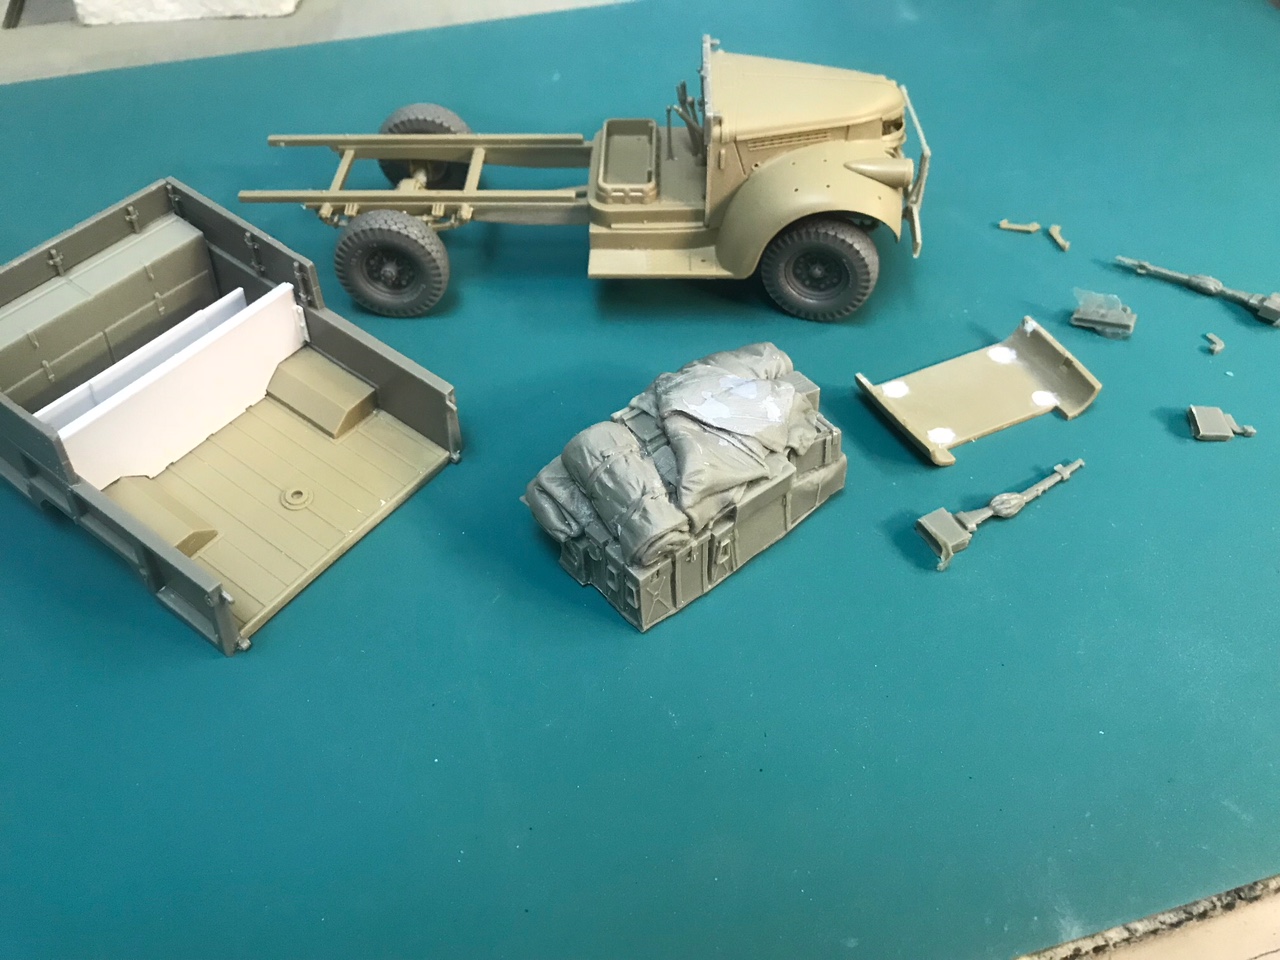
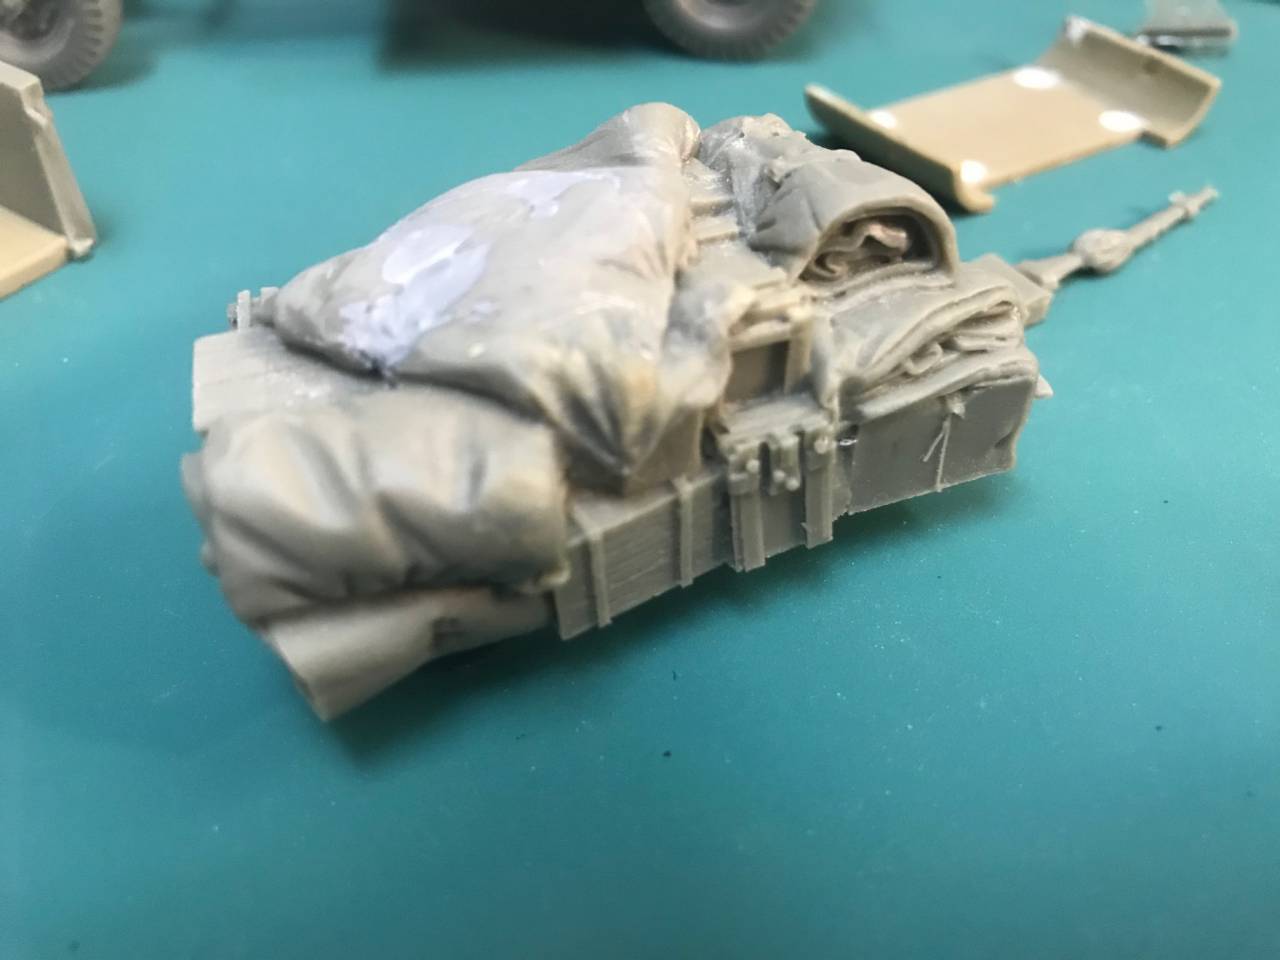
Made a start on the chevy while I wait for friul sprockets for the Bison. I had forgotten how bad some of the old Tamiya stuff was but gradually getting it sorted. The Resicast parts are a real mixed bag, some are really nice and fit well, others (such as the cargo 'box') are dreadful and require a lot of surgery/filler. As you can see from the photos I had to scratch build a replacement for the inner wall of the cargo area, the Resicast part was WAY too small to even reach the sides. I also removed the molded on BD jacket from the top of the stowage, I can't imagine it would stay there long in real life if the vehicle was being driven at any speed. I will add something else to the pile (probably a folded cammo net) at a later stage.


My short term memory is getting really bad....and so is my short term memory.

#424
Queensland, Australia
Joined: April 23, 2015
KitMaker: 4,648 posts
Armorama: 2,248 posts
Posted: Tuesday, December 12, 2017 - 12:42 PM UTC
Steve,
That's a nice start. I like the look of those resin parts but after watching a lot of build threads, one thing I find in common often is that the resin parts are a little too small.
Makes me wonder if they shrink over time or something.
Keep up the good work,
Gaz
"Artillery adds dignity, to what would otherwise be an ugly brawl."
Frederick The Great


