Crusader to Gazala Campaign

#491
Missouri, United States
Joined: April 06, 2016
KitMaker: 602 posts
Armorama: 191 posts
Posted: Friday, November 24, 2017 - 09:37 AM UTC
Currently working on: Multiple Campaigns :P
#424
Queensland, Australia
Joined: April 23, 2015
KitMaker: 4,648 posts
Armorama: 2,248 posts
Posted: Friday, November 24, 2017 - 10:55 AM UTC
"Artillery adds dignity, to what would otherwise be an ugly brawl."
Frederick The Great
RobinNilsson
 TOS Moderator
Stockholm, Sweden
Joined: November 29, 2006
KitMaker: 6,693 posts
Armorama: 5,562 posts
Posted: Friday, November 24, 2017 - 02:15 PM UTC
Before you start painting:
1. Check that the right hand side "engine room" hatch is positioned correctly. In the photo it seems as if there is a gap between the hinge ad the vehicle side.
2. The rear lights are shining slightly upwards. The "lense" side where the light comes out shall be vertical. Shining a beacon up towards the sky is usually not a good idea

There seems to be some molding flash on the edges of the hinges for those hatches but it could be the photos tricking my eyes.
/ Robin
In memory of Al Superczynski:
"Build what YOU want, the way YOU want to....
and the critics will flame you every time"
Queensland, Australia
Joined: August 06, 2005
KitMaker: 3,353 posts
Armorama: 3,121 posts
Posted: Friday, November 24, 2017 - 02:32 PM UTC
Hi Rory, nice work.
In addition to Robin's advice, there might be some flash on the armoured exhaust pipe covers.
I should also mention the flap on the rear Notek is back to front as the hole for the red light to shine through in daytime should be on the right side

and it is actually attached via a rectangular a metal bracket higher on the fender, as is the smaller round light when it was actually fitted. A mixed bag of pics of vehicles to give you the idea


On the Bench:
Dust, styrene scraps, paint splotches and tears.
Queensland, Australia
Joined: August 06, 2005
KitMaker: 3,353 posts
Armorama: 3,121 posts
Posted: Friday, November 24, 2017 - 02:55 PM UTC
Something a little different - Captured SdKfz 222 used by No2 Armoured Car Company RAF in the western desert... not exactly sure of the time line, but Libya sometime 1941-1942

On the Bench:
Dust, styrene scraps, paint splotches and tears.
#491
Missouri, United States
Joined: April 06, 2016
KitMaker: 602 posts
Armorama: 191 posts
Posted: Friday, November 24, 2017 - 09:17 PM UTC
Corrections have been made

Currently working on: Multiple Campaigns :P
Colorado, United States
Joined: February 24, 2014
KitMaker: 3,033 posts
Armorama: 2,492 posts
Posted: Saturday, November 25, 2017 - 02:02 AM UTC
@ Peter, Is that a spare suspention coil strapped to the upper hull in image No. 6? Could be an interesting stowage add-on.
mike
Queensland, Australia
Joined: August 06, 2005
KitMaker: 3,353 posts
Armorama: 3,121 posts
Posted: Saturday, November 25, 2017 - 03:57 AM UTC
Quoted Text
@ Peter, Is that a spare suspention coil strapped to the upper hull in image No. 6? Could be an interesting stowage add-on.
mike
Have a look closely at the long rod stowed near the rear wheel. My guess they are all parts of a disassembled Pogo Stick. They should have patented the idea back then...

On the Bench:
Dust, styrene scraps, paint splotches and tears.
England - South East, United Kingdom
Joined: March 05, 2016
KitMaker: 34 posts
Armorama: 28 posts
Posted: Saturday, November 25, 2017 - 05:18 PM UTC
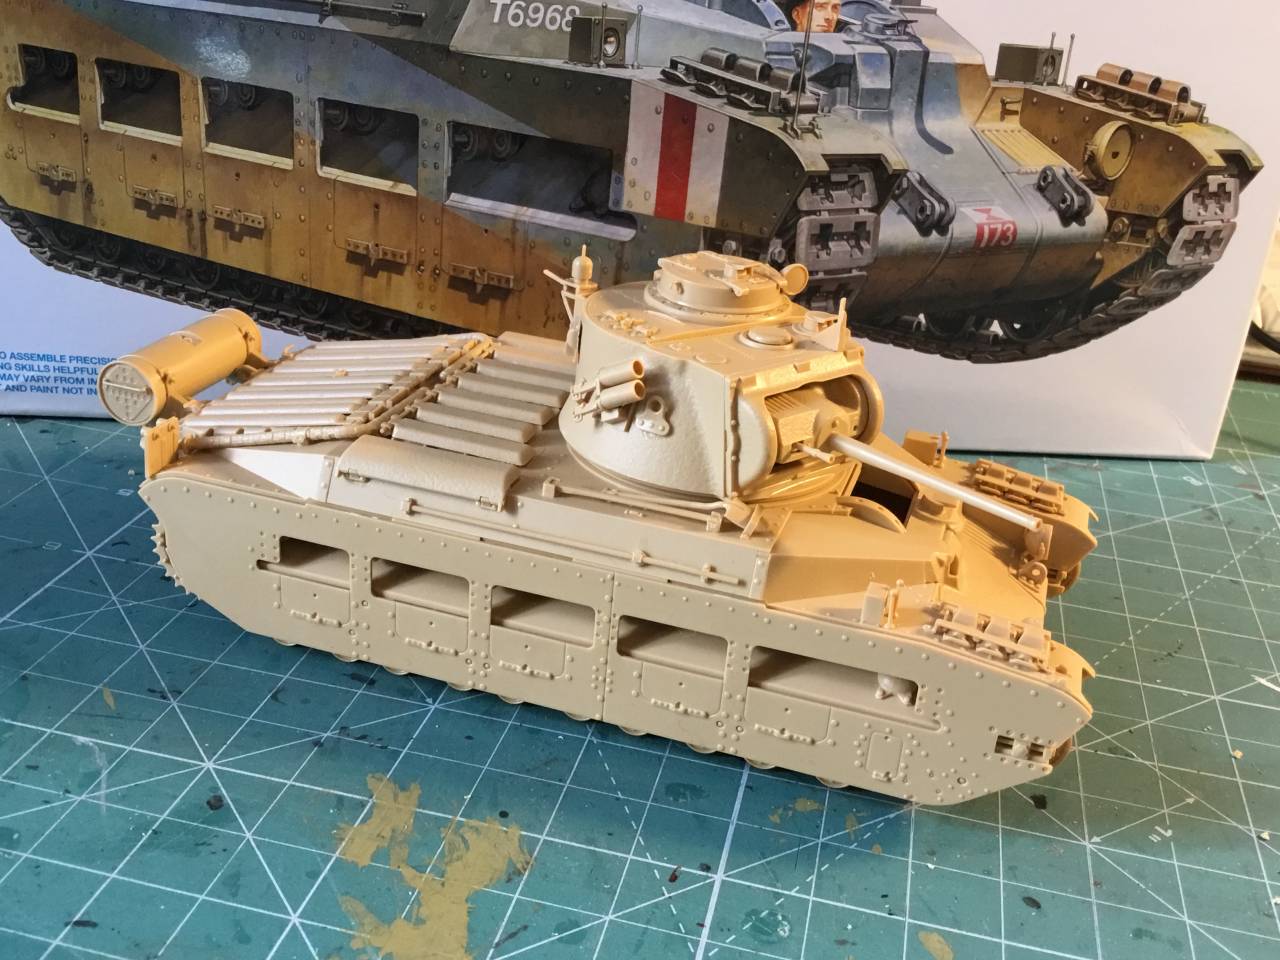
Thanks to confusion with Mrs geoboffin's iCloud account I no longer have the customary starting photo from last Saturday, but thanks to Tamiya's shake'n'bake qualities here is the build of my Matilda before painting starts. Given how little track will be visible I decided to use the rubber band tracks for ease.
#424
Queensland, Australia
Joined: April 23, 2015
KitMaker: 4,648 posts
Armorama: 2,248 posts
Posted: Sunday, November 26, 2017 - 06:57 AM UTC
Richard,
We'll live without the photo. I'm glad to see you've got the old Matildar together.
Looking forward to seeing he painted.
Gaz
"Artillery adds dignity, to what would otherwise be an ugly brawl."
Frederick The Great
Queensland, Australia
Joined: August 06, 2005
KitMaker: 3,353 posts
Armorama: 3,121 posts
Posted: Sunday, November 26, 2017 - 02:50 PM UTC
Wow fast build. Looks great too Richard
On the Bench:
Dust, styrene scraps, paint splotches and tears.
#424
Queensland, Australia
Joined: April 23, 2015
KitMaker: 4,648 posts
Armorama: 2,248 posts
Posted: Monday, November 27, 2017 - 01:13 PM UTC
Hi Guys,
I have a question about the hair spray technique. I just bought some at the store for this build and I really don't know how much to apply over the basecoat.
Do I Dust it?
Mist it?
Make it visibly wet?
Douse it?
Make it look like a jelly donut?
I don't have a clue.
Waddya say?
Thanks!
Gaz
"Artillery adds dignity, to what would otherwise be an ugly brawl."
Frederick The Great
England - West Midlands, United Kingdom
Joined: May 23, 2010
KitMaker: 642 posts
Armorama: 593 posts
Posted: Monday, November 27, 2017 - 03:17 PM UTC
Quoted Text
Hi Guys,
I have a question about the hair spray technique. I just bought some at the store for this build and I really don't know how much to apply over the basecoat.
Do I Dust it?
Mist it?
Make it visibly wet?
Douse it?
Make it look like a jelly donut?
I don't have a clue.
Waddya say?
Thanks!
Gaz
Hello Gaz,
I have used the technique several times and I have found that two coats with the airbrush will give you good results. You need to decant the hairspray into a small jar and use that in your airbrush, the amount you spray depends on how much chipping you want to do, I usually spray enough to make the surface look damp, when it is dry I then spray the top coat. You need to do this as soon as it is dry or it doesn't work too well, also you need to begin chipping after the paint is dry so the technique works well. Using what tools you find work, I use old paintbrushes cut down and cocktail sticks mainly, do small areas at a time and work your way around the model and the job should be 'a good 'un'.
Here's one I did earlier
...


Don't forget to varnish the model when you have finished the chipping so it seals the surface.
Hope this helps.
All the best,
Paul
California, United States
Joined: October 08, 2013
KitMaker: 111 posts
Armorama: 67 posts
Posted: Monday, November 27, 2017 - 05:47 PM UTC
[quote]
Quoted Text
Hi Guys,
I have a question about the hair spray technique. I just bought some at the store for this build and I really don't know how much to apply over the basecoat.
Do I Dust it?
Mist it?
Make it visibly wet?
Douse it?
Make it look like a jelly donut?
I don't have a clue.
Waddya say?
Thanks!
Gaz
@Gaz,
If you've never done this before I would strongly recommend this video. It's of the master weatherer, Michael Rinaldi,doing a demo of the hair spray technique this May for modelers in Toronto. Ther are many variations of this method as people have added their own twists(including myself from a method used in Rinaldi's SM 02 book..), but for the first time out I'd recommend this approach.
https://www.youtube.com/watch?v=mCHVn47E6LARegards,
Joe Osborne
On the bench:
1/35 Tamiya Tiger I early Production
1/35 Tamiya Mid Production Tiger I
United States
Joined: August 28, 2015
KitMaker: 319 posts
Armorama: 308 posts
Posted: Monday, November 27, 2017 - 08:29 PM UTC
Gaz, I am attaching a link you will want to check out. I subscribe to this guy on YouTube and really like his videos. They are long but very informative. The link is to a drug he does hairspray chipping on and he really covers everything. I have also read that Tamiya paints provide the best chipping effect.
https://m.youtube.com/watch?v=D5uzJULC62w&feature=em-subs_digest
#491
Missouri, United States
Joined: April 06, 2016
KitMaker: 602 posts
Armorama: 191 posts
Posted: Tuesday, November 28, 2017 - 12:32 AM UTC
Quoted Text
Hi Guys,
I have a question about the hair spray technique. I just bought some at the store for this build and I really don't know how much to apply over the basecoat.
Do I Dust it?
Mist it?
Make it visibly wet?
Douse it?
Make it look like a jelly donut?
I don't have a clue.
Waddya say?
Thanks!
Gaz
My advice would be to practice practice practice using an old model or even something from the spares box. Its very easy to overdo the effect.
My experience also shows you need to let the hairspray dry properly and then mist on several light coats of the top color, letting them dry between coats or your paint just cracks.
This was my attempt on a cheap Tamiya PzII.

I got it mostly right but there are several areas that are over done. I ended up stripping and redoing it...several times....but don't have a picture of the end result.
Currently working on: Multiple Campaigns :P
Queensland, Australia
Joined: August 06, 2005
KitMaker: 3,353 posts
Armorama: 3,121 posts
Posted: Tuesday, November 28, 2017 - 12:41 AM UTC
and when you get to the stage where you think it just needs a little more, IT DOESN'T. Better to leave it subtle than risk overdoing it.
I suggest you talk to Dan (The Guru) on Saturday. He is quite adept at the technique
On the Bench:
Dust, styrene scraps, paint splotches and tears.
Colorado, United States
Joined: February 24, 2014
KitMaker: 3,033 posts
Armorama: 2,492 posts
Posted: Tuesday, November 28, 2017 - 01:12 AM UTC
Joe, and Bryan, Thanks for sharing the videos!
One thing I'd like to add that I swear by (other than swearing), especially during the chipping process: I've noticed that the distance from my eyeglasses to model seems to decrease like a drunk nursing a drink. Now is the time to take a break, and that's when I simply walk away. I return later to inspect my work with a fresher outlook. Another thing is, try not to make chipping look patterned like a Christmas sweater. Lastly, I keep notes on everything I do ... and that is why I'm here at my computer desk, and not at my workbench where I should be building something. Lol!
Happy modeling!🍺
mike
#424
Queensland, Australia
Joined: April 23, 2015
KitMaker: 4,648 posts
Armorama: 2,248 posts
Posted: Tuesday, November 28, 2017 - 04:08 AM UTC
Guys,
Thank you very much for the advice! The pictures and video links you shared have really helped to increase my understanding of the process.
I've got a few older panzers that can be used as test dummies. In particular, I have the Wittman Stug that Never came off as I wanted that can be tested for a winter scheme.
Best Wishes,
Gaz
"Artillery adds dignity, to what would otherwise be an ugly brawl."
Frederick The Great
#454
Georgia, United States
Joined: July 10, 2016
KitMaker: 1,273 posts
Armorama: 1,138 posts
Posted: Tuesday, November 28, 2017 - 05:19 AM UTC
Quoted Text
Joe, and Bryan, Thanks for sharing the videos!
One thing I'd like to add that I swear by (other than swearing), especially during the chipping process: I've noticed that the distance from my eyeglasses to model seems to decrease like a drunk nursing a drink. Now is the time to take a break, and that's when I simply walk away. I return later to inspect my work with a fresher outlook. Another thing is, try not to make chipping look patterned like a Christmas sweater. Lastly, I keep notes on everything I do ... and that is why I'm here at my computer desk, and not at my workbench where I should be building something. Lol!
Happy modeling!🍺
mike
Wise words, well received! It's the little things folks seem to trip over...

"I can make armored cars, safe and unassailable...and behind these our infantry will be able to follow quite unharmed and without any opposition."
-Leonardo da Vinci, 1487
#491
Missouri, United States
Joined: April 06, 2016
KitMaker: 602 posts
Armorama: 191 posts
Posted: Tuesday, November 28, 2017 - 09:02 AM UTC
Basecoat down and first round of weathering aka chipping complete.
Will go back over some areas and do some sponge chipping over the PE since rubbing at them just caused the shiny PE to show.


Currently working on: Multiple Campaigns :P
#424
Queensland, Australia
Joined: April 23, 2015
KitMaker: 4,648 posts
Armorama: 2,248 posts
Posted: Tuesday, November 28, 2017 - 10:21 AM UTC
Rory,
That looks bada55! The chipping is awesome, too. I'm glad you left some overspray on the rubber.
When I went to Desert Storm, all the gear coming off the ship had overspray on the wheels.
Gaz
"Artillery adds dignity, to what would otherwise be an ugly brawl."
Frederick The Great
Colorado, United States
Joined: February 24, 2014
KitMaker: 3,033 posts
Armorama: 2,492 posts
Posted: Tuesday, November 28, 2017 - 10:36 AM UTC
Rory,
Looks like you've got the hairspray technique down.
However, please allow me one small critique: Note that you've chipped away nearly every outside corner on the vehicle's hull and its storeage boxes. These are areas where I try to use a bit of restraint. It's an easy fix, just go back-and-forth over a few of those edges with your base color in order to breakup some (not all) of the more continuous lines. That said ... the fenders, wheels, and tires look really good.
Disclaimer: I am no expert, just a humble observer.
Cheers!🍺
mike
Queensland, Australia
Joined: August 06, 2005
KitMaker: 3,353 posts
Armorama: 3,121 posts
Posted: Tuesday, November 28, 2017 - 01:05 PM UTC
Looking very nice Rory. Some other things you might want to consider:
Some heavier chipping at the top of the rear of the turret edge where the crew would place their Bada55's (touche Gaz) a lot of the time - check out the pics I posted. The continued polish by posterior would likely chip as much as anything.
Also the crew more often than not dismounted by swinging over the turret and walking down the rear and fenders, so their boots would scuff the grill and edges there. Why squeeze down beside the gun and worm around the gun mount, then duck walk to the side door when you can do it easier by swinging over the turret edge and walking off?
Same for the wheel arches where the sand/loose gravel would be kicked up by the tyres. Nothing like a sand blasting session to remove paint.
On the Bench:
Dust, styrene scraps, paint splotches and tears.
California, United States
Joined: October 08, 2013
KitMaker: 111 posts
Armorama: 67 posts
Posted: Tuesday, November 28, 2017 - 06:18 PM UTC
Rory,
Looking great... my comments.
1. I believe theres no such thing as too much or too little chipping(or weathering). Its how real is it executed, and does it match what you intended. I think you did an excellent job excuting the hairspray chipping technique. You have some very nice small chips which is one of the challenges with this chipping method.
2. I like what Peter said and is something I strive for. Research and think about how the crew handled the equipment. That is really a great guide to successful weathering. How they entered and exited a vehicle, where/how was maintenance done? All good questions that inform a proper weathering job.
Great job sovfar. Looking forward to dust and dirt
Regards,
Joe Osborne
On the bench:
1/35 Tamiya Tiger I early Production
1/35 Tamiya Mid Production Tiger I