Queensland, Australia
Joined: August 06, 2005
KitMaker: 3,353 posts
Armorama: 3,121 posts
Posted: Wednesday, January 24, 2018 - 12:11 AM UTC
Quoted Text
Maybe the heads are somewhere doing something useful, maybe on a road to nowhere: https://www.youtube.com/watch?v=AWtCittJyr0
The missing heads doesn't have to mean that a psycho killer has been in action.
/ Robin
I guess that is 'Life during Wartime' then Robin. Being headless sure isn't 'Cross-eyed and Painless' either.

On the Bench:
Dust, styrene scraps, paint splotches and tears.
Alabama, United States
Joined: September 22, 2008
KitMaker: 476 posts
Armorama: 447 posts
Posted: Wednesday, January 24, 2018 - 03:16 AM UTC
That does seem to be a bit of seam on the inside of the thumb, much more clearly visible in the photograph than in the light I was viewing it in.
On a positive note, the heads are on the figures, barely, since the mating surfaces aren't great.
By the next photo update, both issues should be addressed.
PS - Does anyone know what that third radio unit they seem to store behind the passenger seat is for. I can't find any reference photos where more than two are on the platform.
Queensland, Australia
Joined: August 06, 2005
KitMaker: 3,353 posts
Armorama: 3,121 posts
Posted: Monday, January 29, 2018 - 02:49 PM UTC
Sorry Johar, that one is a mystery to me.
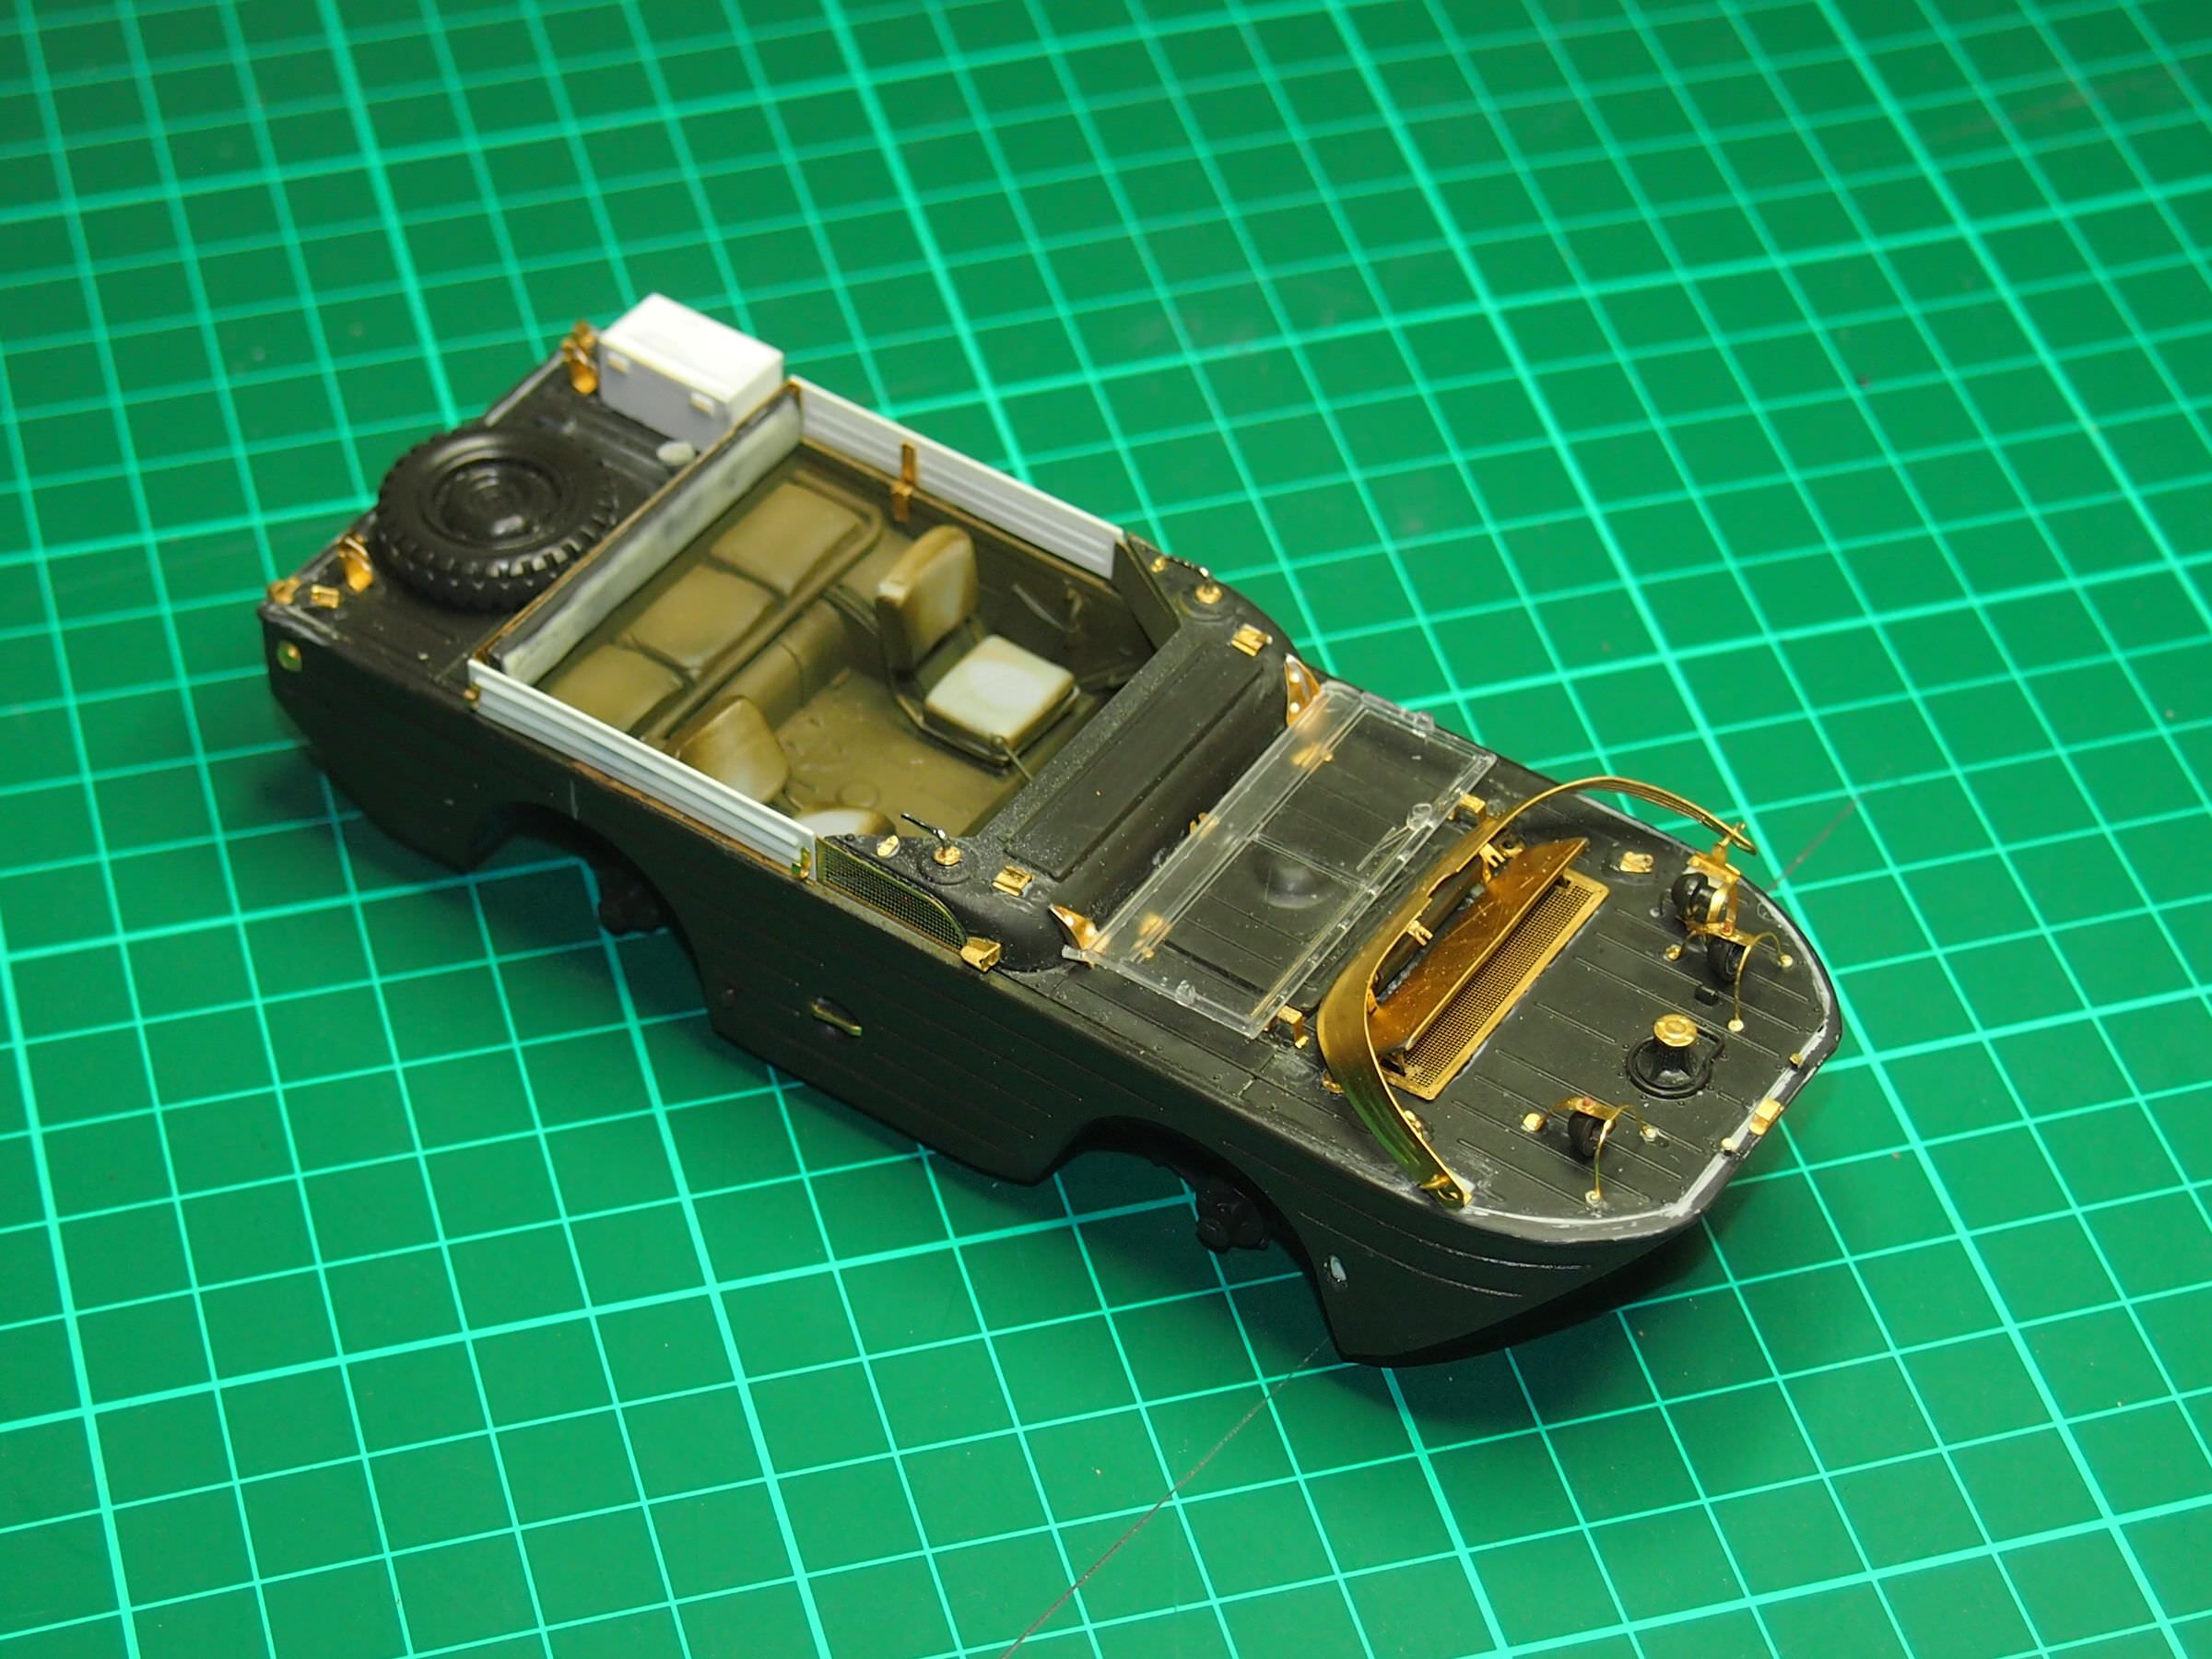
Time to show where I am at. Getting close to finishing the construction. Have to cast up some tail lights and cargo to put inside. Have started the metal box for the rear. I am doing a particular vehicle that needs it and a lot of other stuff.
Some of this is loose fit. The Windscreen will have a canvas cover so I will just use the kit with modified support legs to resemble the real thing


The Voyager etch has had to have some work done to it to make it fit in places, but does add some finesse.
On the Bench:
Dust, styrene scraps, paint splotches and tears.
Alabama, United States
Joined: September 22, 2008
KitMaker: 476 posts
Armorama: 447 posts
Posted: Monday, January 29, 2018 - 06:14 PM UTC
Yeah, the PE really spices it up. Lookin' good.

#477
Pest, Hungary
Joined: March 21, 2007
KitMaker: 133 posts
Armorama: 131 posts
Posted: Monday, January 29, 2018 - 06:39 PM UTC
Nice work, Peter. That PE looks nice with all other modifications. I hope you'll post the reference, too

cheers,
Zsolt
On the bench:
- Tristar Panzer IV ausf. B. 1:35 - France 1940 Campaign
- Dragon Panzerjäger I ausf. B 1:35
- Revell Leopard 2A4 1:35
My blog: http://muanyagforgacs.blogspot.com/
Colorado, United States
Joined: February 24, 2014
KitMaker: 3,033 posts
Armorama: 2,492 posts
Posted: Monday, January 29, 2018 - 10:21 PM UTC
Looking really good, Peter! 😎
—mike
North Carolina, United States
Joined: September 16, 2004
KitMaker: 1,281 posts
Armorama: 1,222 posts
Posted: Monday, January 29, 2018 - 10:58 PM UTC
The PE really takes this old kit to another level. Nice work.
Zuid-Holland, Netherlands
Joined: April 19, 2013
KitMaker: 179 posts
Armorama: 117 posts
Posted: Friday, February 16, 2018 - 01:06 AM UTC
Alabama, United States
Joined: September 22, 2008
KitMaker: 476 posts
Armorama: 447 posts
Posted: Friday, February 16, 2018 - 02:29 AM UTC
Queensland, Australia
Joined: August 06, 2005
KitMaker: 3,353 posts
Armorama: 3,121 posts
Posted: Friday, February 16, 2018 - 04:10 AM UTC
And well done it is Goof. Suitably dirty and all. Thanks for joining in.
On the Bench:
Dust, styrene scraps, paint splotches and tears.
Queensland, Australia
Joined: August 06, 2005
KitMaker: 3,353 posts
Armorama: 3,121 posts
Posted: Friday, February 16, 2018 - 04:25 AM UTC
Have cast up the components I needed, rear light and some stowage and finished the rear box as well.
Had to make a net to sit on top as well:

The rear with cast tail lights and finished box.

And the extras. The Bazooka is from an old Tamiya US Army weapon set. I just drilled out the ends, used some etch fret for the front sight and added the cable on the other side. It still needs part of the mechanism on the rear end. I used the kit frame for the rear, too lazy to attempt one with 6 wire spokes to get all in line and even......
You can also see the scratch built gear levers, wire pin for the shafts and Magic Sculpt boots - just the Tamiya knobs. There is also the scratch built fire extinguisher and to the left of the steering wheel a scratch built Bazooka Rocket carry bag also made from Magic Sculpt.

On the final run now, just need to finish the Bazooka and put a cover around the windscreen, then ready for paint.
On the Bench:
Dust, styrene scraps, paint splotches and tears.
Alabama, United States
Joined: September 22, 2008
KitMaker: 476 posts
Armorama: 447 posts
Posted: Friday, February 16, 2018 - 07:35 AM UTC
Queensland, Australia
Joined: August 06, 2005
KitMaker: 3,353 posts
Armorama: 3,121 posts
Posted: Saturday, February 17, 2018 - 12:23 AM UTC
On the Bench:
Dust, styrene scraps, paint splotches and tears.
Zuid-Holland, Netherlands
Joined: April 19, 2013
KitMaker: 179 posts
Armorama: 117 posts
Posted: Saturday, February 17, 2018 - 12:53 AM UTC
Great work on the GPA. I built mine out of the box, but yours sure puts it to shame

Nice looking Kubel Johhar!
Colorado, United States
Joined: February 24, 2014
KitMaker: 3,033 posts
Armorama: 2,492 posts
Posted: Saturday, February 17, 2018 - 02:59 AM UTC
Hi-ya kids!
@ Goof – Very nice finish!
@ Peter – The GPA is looking better and better!
@ Johhar – The Kübelwagen und crew are looking good!
Calling my Bronco GPW done for the campaign! Here's my version with very minimal scratch-building (fuel can rack, w/strap, and a fire extinguisher) and some aftermarket. The ‘Sagged Wheel’ set is from DEF Models, the Musette bag w/helmet is from Value Gear, and the modified driver is from MiniArt with Hornet head and hands.


Photo inspiration.


I didn't bother with the pin marks under the hood since they won't be seen once everything is permanently buttoned-up — those were the worst of a very few. This kit was a true joy to build.


And a shot of the GPW with top up as it will appear in my forthcoming diorama.

Note: There is no weathering at this time, that will be implemented during the final diorama stage. ... Hope you like it so far.
Cheers!🍺
—mike
Alabama, United States
Joined: September 22, 2008
KitMaker: 476 posts
Armorama: 447 posts
Posted: Saturday, February 17, 2018 - 03:20 AM UTC
Great work Mike. Could you give us a pic from the back and maybe from the bottom also?
Alabama, United States
Joined: September 22, 2008
KitMaker: 476 posts
Armorama: 447 posts
Posted: Saturday, February 17, 2018 - 05:35 AM UTC
Very smooth, editing into the original post.
Colorado, United States
Joined: February 24, 2014
KitMaker: 3,033 posts
Armorama: 2,492 posts
Posted: Saturday, February 17, 2018 - 06:00 AM UTC
Quoted Text
Very smooth, editing into the original post.
Since you asked.

Not so smooth ... uploading images into the campaign gallery today!!! 🤮
—mike
Alabama, United States
Joined: September 22, 2008
KitMaker: 476 posts
Armorama: 447 posts
Posted: Saturday, February 17, 2018 - 06:02 AM UTC
If you do figure out how to get pics into the gallery, let me know, so I can do the same.
Colorado, United States
Joined: February 24, 2014
KitMaker: 3,033 posts
Armorama: 2,492 posts
Posted: Saturday, February 17, 2018 - 06:11 AM UTC
Here's a link to the
'Jeeps 2017' Campaign Gallery. Once there, make sure you are logged in to the Gallery's page. Then click the 'Upload Photos' button and make you're selection. HTH.
—mike
Queensland, Australia
Joined: August 06, 2005
KitMaker: 3,353 posts
Armorama: 3,121 posts
Posted: Saturday, February 17, 2018 - 02:07 PM UTC
Great job on the GPW Mike. With the roof up, it reminds me of the opening scenes of Kelly's Heroes.
On the Bench:
Dust, styrene scraps, paint splotches and tears.
Zuid-Holland, Netherlands
Joined: April 19, 2013
KitMaker: 179 posts
Armorama: 117 posts
Posted: Saturday, February 17, 2018 - 06:24 PM UTC
Great looking GPW Mike

When looking earlier, i wondered if the roof would still fit on. The driver looked like he might be too tall. But it seems to fit alright

California, United States
Joined: April 26, 2016
KitMaker: 362 posts
Armorama: 285 posts
Posted: Saturday, February 17, 2018 - 09:04 PM UTC
Mike, well done. What is your idea for the diorama?
"Gonna start blastin"
...Stumpy
Rio Bravo 1959
Wojewodztwo Slaskie, Poland
Joined: October 21, 2003
KitMaker: 529 posts
Armorama: 500 posts
Posted: Sunday, February 18, 2018 - 02:01 AM UTC
Zuid-Holland, Netherlands
Joined: April 19, 2013
KitMaker: 179 posts
Armorama: 117 posts
Posted: Sunday, February 18, 2018 - 02:30 AM UTC
Nice work Pawel! I have the kit lying around too. Maybe it's time to move it to the front of the stash


