

Nice start guys.
I would love to join, but I'm too committed on other builds. If I can I will join later, but for now I will just enjoy watching you all.
Have fun and happy building.
Campaigns
Where Armorama group builds can be discussed, organized, and updates posted.
Where Armorama group builds can be discussed, organized, and updates posted.
Hosted by Darren Baker, Richard S.
WWI Armor Campaign
petbat

Joined: August 06, 2005
KitMaker: 3,353 posts
Armorama: 3,121 posts
Posted: Tuesday, November 28, 2017 - 01:18 PM UTC


Klaus-Adler

Joined: June 08, 2015
KitMaker: 1,505 posts
Armorama: 840 posts
Posted: Sunday, December 03, 2017 - 05:45 AM UTC
Quoted Text
Nice start guys.
I would love to join, but I'm too committed on other builds. If I can I will join later, but for now I will just enjoy watching you all.
Have fun and happy building.
i feel your pain!

27-1025

Joined: September 16, 2004
KitMaker: 1,281 posts
Armorama: 1,222 posts
Posted: Saturday, December 16, 2017 - 04:06 AM UTC
My campaign contribution.


LinusB
Joined: March 21, 2016
KitMaker: 247 posts
Armorama: 126 posts

Posted: Sunday, December 17, 2017 - 04:22 PM UTC
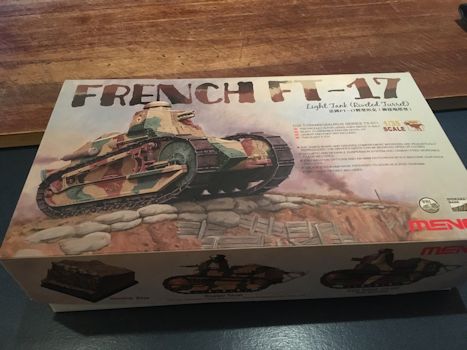
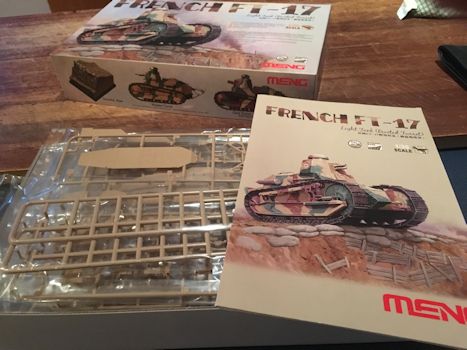
Hi all am going in with Meng's French FT-17

tinbanger

Joined: February 04, 2008
KitMaker: 2,507 posts
Armorama: 88 posts

Posted: Wednesday, December 20, 2017 - 05:35 AM UTC
Here is my build for this campaign:-


27-1025
Joined: September 16, 2004
KitMaker: 1,281 posts
Armorama: 1,222 posts
Posted: Saturday, December 23, 2017 - 03:44 AM UTC
A small update. Nice kit though you have to be very careful with prepping parts to ensure a good fit. I messed up a couple areas that will now require a bit of filler 


Klaus-Adler
Joined: June 08, 2015
KitMaker: 1,505 posts
Armorama: 840 posts
Posted: Saturday, December 23, 2017 - 09:07 PM UTC
well here is the start of my entry, the tamiya 1/35 british male tank; i apologise for the poor quality of the pictures.


strongarden
Joined: May 14, 2012
KitMaker: 730 posts
Armorama: 624 posts
Posted: Saturday, December 23, 2017 - 10:37 PM UTC
Beautiful dio Stephen, looks perfect!
Currently don't have any Great War armor, and have been shut down presently by the Finance Minister!
But I'll be following along, and good luck to all the impending builders!
Cheers
Dave
Currently don't have any Great War armor, and have been shut down presently by the Finance Minister!
But I'll be following along, and good luck to all the impending builders!
Cheers
Dave
Klaus-Adler
Joined: June 08, 2015
KitMaker: 1,505 posts
Armorama: 840 posts
Posted: Monday, December 25, 2017 - 05:43 PM UTC
brief update, i have managed to get all of the wheels and side sections on the tank...sorry for the bad picture;


PasiAhopelto

Joined: October 01, 2016
KitMaker: 514 posts
Armorama: 171 posts
Posted: Monday, December 25, 2017 - 10:58 PM UTC
Lower hull is pretty much done:

I'll add more mud and dust once I have upper ready. All hatches will be closed, which simplifies build a lot.
I'll add more mud and dust once I have upper ready. All hatches will be closed, which simplifies build a lot.
Klaus-Adler
Joined: June 08, 2015
KitMaker: 1,505 posts
Armorama: 840 posts
Posted: Wednesday, December 27, 2017 - 12:22 AM UTC
and the construction phase is now complete. the tracks were a joy to assemble... if only every individual track assembly was this easy!

tinbanger
Joined: February 04, 2008
KitMaker: 2,507 posts
Armorama: 88 posts
Posted: Saturday, December 30, 2017 - 01:07 AM UTC
Sub assembles together and the glued together and ready for primer:-


Seeing as the stearing rig was removed early in the Mk1 use I have not use it.
Seeing as the stearing rig was removed early in the Mk1 use I have not use it.
PasiAhopelto
Joined: October 01, 2016
KitMaker: 514 posts
Armorama: 171 posts
Posted: Sunday, January 07, 2018 - 12:10 AM UTC
Superstructure built and waiting for few layers of paint:

The MG barrels are quite flimsy, but look quite OK. Just have to be careful.
The MG barrels are quite flimsy, but look quite OK. Just have to be careful.
Klaus-Adler
Joined: June 08, 2015
KitMaker: 1,505 posts
Armorama: 840 posts
Posted: Sunday, January 07, 2018 - 08:47 PM UTC
brief update and i apologise for the bad pictures they were done with my old camera phone. I have now painted the tank in it's main colour but there are a few touch ups needing done and in the back ground you can see that the tracks have been painted along with the chain that attaches to the un-ditching log.

Removed by original poster on 01/24/18 - 17:24:17 (GMT).

PanzerGeek
Joined: February 10, 2008
KitMaker: 221 posts
Armorama: 217 posts

Posted: Tuesday, January 23, 2018 - 10:30 PM UTC
Ok a little update on the build.
I put the left and right hull sections together. The fit is very good, but I clamped together the assemblies until the glue dried so there would be no gaps.


I put the left and right hull sections together. The fit is very good, but I clamped together the assemblies until the glue dried so there would be no gaps.
PanzerGeek
Joined: February 10, 2008
KitMaker: 221 posts
Armorama: 217 posts
Posted: Tuesday, January 23, 2018 - 10:33 PM UTC


I also clamped the two rhomboid hull sections to the main hull. Here the fit too is excellent. It is really starting to look like something now.

Cheers
Todd
dtniedert
Joined: December 11, 2014
KitMaker: 152 posts
Armorama: 139 posts
Posted: Tuesday, January 23, 2018 - 10:34 PM UTC
Quoted Text
Superstructure built and waiting for few layers of paint:
The MG barrels are quite flimsy, but look quite OK. Just have to be careful.
Sorry I do not want to be "that guy" but the MGs are mounted upside down.
PasiAhopelto
Joined: October 01, 2016
KitMaker: 514 posts
Armorama: 171 posts
Posted: Wednesday, January 24, 2018 - 12:27 AM UTC
Oops, they really are upside down. Have to figure out best way to fix the issue. Thanks for pointing that out.
rmanneck
Joined: January 25, 2018
KitMaker: 3 posts
Armorama: 3 posts
Posted: Thursday, January 25, 2018 - 08:22 PM UTC
Hey there,
Brand new to the website, and coming back from a 10 year hiatus from plastic modeling.
I recently watched BBC's "Our World War", and got me thinking of building a WWI tank. I decided to pickup Meng's 1/35 MK A Whippet. I hope I can put my rusty modeling skills to good effect.
.jpg)
Cheers!
Brand new to the website, and coming back from a 10 year hiatus from plastic modeling.
I recently watched BBC's "Our World War", and got me thinking of building a WWI tank. I decided to pickup Meng's 1/35 MK A Whippet. I hope I can put my rusty modeling skills to good effect.
Cheers!
Barbarossa

Joined: August 25, 2005
KitMaker: 216 posts
Armorama: 215 posts
Posted: Friday, January 26, 2018 - 09:13 PM UTC
Hi everyone...,
Really enjoying seeing everyone's contributions to this campaign, some very good builds! Here's my offering - Takoms Hermaphrodite MK4 tank. Originally I was after Tamiya's well known MK4, but trying to get it at a reasonable price over Christmas, just came up against the regular websites being out of stock... So instead managed to get hold of this one from Takom at just over £30, which was good.
As it suggests it's a cross between the male & female version, so one side (the left) has the build of a male with a mounted six-pound gun and one Lewis MG, with the opposite side having the female version with just 2 MG's. The kit has enough MG's to build an all female version (which is what mine will be), but has only 1 six-pounder, not the 2, so an additional purchase would have to be made if a male MK4 was required.....
Mine however is being built to incorporate it into a larger Passchendaele diorama, so the male/female thing didn't really matter so much. The rest of the dio is pretty much complete now as you can see, apart from adding 5 more figures & creating the road, so now I can crack on with the tank.
 Armorama 1 (1) by simon gillard, on Flickr
 Armorama 1 (2) by simon gillard, on Flickr
 IMG_2773 by simon gillard, on Flickr
 IMG_2779 by simon gillard, on Flickr
 Part 3 Thumbnail by simon gillard, on Flickr
Figures are from Masterbox - MB35146 & MB35158. Hope to get some progress pics up sometime as the build begins....
Cheers,
Simon.
Really enjoying seeing everyone's contributions to this campaign, some very good builds! Here's my offering - Takoms Hermaphrodite MK4 tank. Originally I was after Tamiya's well known MK4, but trying to get it at a reasonable price over Christmas, just came up against the regular websites being out of stock...
So instead managed to get hold of this one from Takom at just over £30, which was good.As it suggests it's a cross between the male & female version, so one side (the left) has the build of a male with a mounted six-pound gun and one Lewis MG, with the opposite side having the female version with just 2 MG's. The kit has enough MG's to build an all female version (which is what mine will be), but has only 1 six-pounder, not the 2, so an additional purchase would have to be made if a male MK4 was required.....
Mine however is being built to incorporate it into a larger Passchendaele diorama, so the male/female thing didn't really matter so much. The rest of the dio is pretty much complete now as you can see, apart from adding 5 more figures & creating the road, so now I can crack on with the tank.
Armorama 1 (1) by simon gillard, on FlickrArmorama 1 (2) by simon gillard, on FlickrIMG_2773 by simon gillard, on FlickrIMG_2779 by simon gillard, on FlickrPart 3 Thumbnail by simon gillard, on FlickrFigures are from Masterbox - MB35146 & MB35158. Hope to get some progress pics up sometime as the build begins....
Cheers,
Simon.
rmanneck
Joined: January 25, 2018
KitMaker: 3 posts
Armorama: 3 posts
Posted: Saturday, January 27, 2018 - 01:24 AM UTC
Here are some in progress pictures.
The kit build very well and easy. Very impressed with the fit, some parts simply click together. The only gap I had was on the fuel tank, which I filled with watered down filler and cleaned up the area with a wet brush. I deviated from the instructions slightly and attached the inner side sponsons to the the tank body instead of building them up.


The kit build very well and easy. Very impressed with the fit, some parts simply click together. The only gap I had was on the fuel tank, which I filled with watered down filler and cleaned up the area with a wet brush. I deviated from the instructions slightly and attached the inner side sponsons to the the tank body instead of building them up.
PanzerGeek
Joined: February 10, 2008
KitMaker: 221 posts
Armorama: 217 posts
Posted: Wednesday, February 07, 2018 - 11:37 PM UTC
Great looking Dio Simon.
A little update on my Mk V.
I was not impressed with the three part 6pdr gun shield. I think it could have been done in one peace. I used Squadron Green Putty to fill the seams and sanded them flat. The top and bottom edges of the shields must also be sanded level too. This is the only real filling I needed to do on this kit.


The sponsons went together quite well with good fit all-round.

Cheers
Todd
A little update on my Mk V.
I was not impressed with the three part 6pdr gun shield. I think it could have been done in one peace. I used Squadron Green Putty to fill the seams and sanded them flat. The top and bottom edges of the shields must also be sanded level too. This is the only real filling I needed to do on this kit.
The sponsons went together quite well with good fit all-round.
Cheers
Todd
PanzerGeek
Joined: February 10, 2008
KitMaker: 221 posts
Armorama: 217 posts
Posted: Thursday, February 08, 2018 - 11:58 PM UTC
Okay I have the sponsons on the hull and I washed the kit in some hot water and dish soap. Next stop is the paint booth.


Cheers
Todd
Cheers
Todd
Klaus-Adler
Joined: June 08, 2015
KitMaker: 1,505 posts
Armorama: 840 posts
Posted: Saturday, February 10, 2018 - 06:33 PM UTC
as you can now see, i have painted the kit and have now begun to add the wear and tear on the vehicle. you can see that i have added the the rust to the exhaust that runs along the roof of the vehicle.


 |

WEB HOSTING BY


Copyright ©2021 Armorama and Kitmaker Network, a subsidiary of Silver Star Enterprises
All Rights Reserved. Please read our Conditions of Use and Privacy Policy.
All Rights Reserved. Please read our Conditions of Use and Privacy Policy.