Mark,
Your Panzer IV is looking awesome. Very clean build and the paint work is spot on. Another fine build.
Mark
Hosted by Richard S.
The Workhorses Campaign
Posted: Monday, April 23, 2018 - 06:02 PM UTC
Posted: Monday, April 23, 2018 - 09:11 PM UTC
Quoted Text
Mark,
Your Panzer IV is looking awesome. Very clean build and the paint work is spot on. Another fine build.
Mark
Thanks Mark. Should have it finished tonight.
Posted: Tuesday, April 24, 2018 - 10:30 AM UTC
My build is complete.
My basic premise is that this is a September 1944 production build. It is the last vehicle to receive the factory applied zimmerit coating; and first to receive the wire mesh schurzen. It has been delivered to the military for kitting out. It is now waiting to be loaded on a train for the Eastern Front. It doesn't have any markings or camo applied as that would be done by the unit after it was received.
So, a hypothetical scenario. But, that's what's great about our hobby; you can do whatever you like.
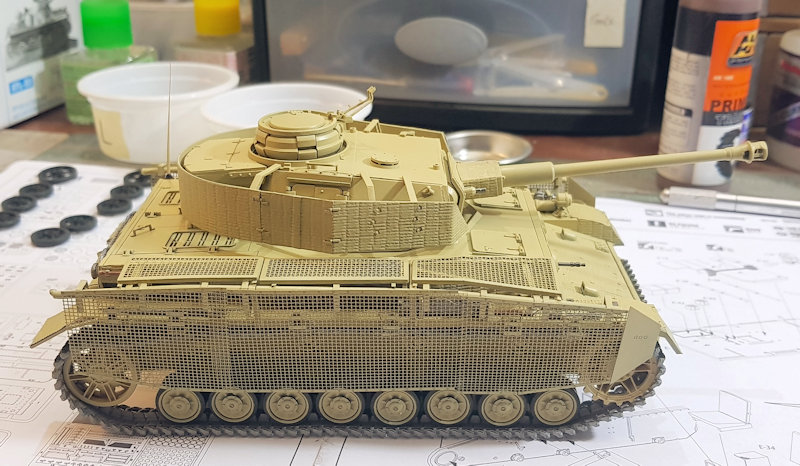
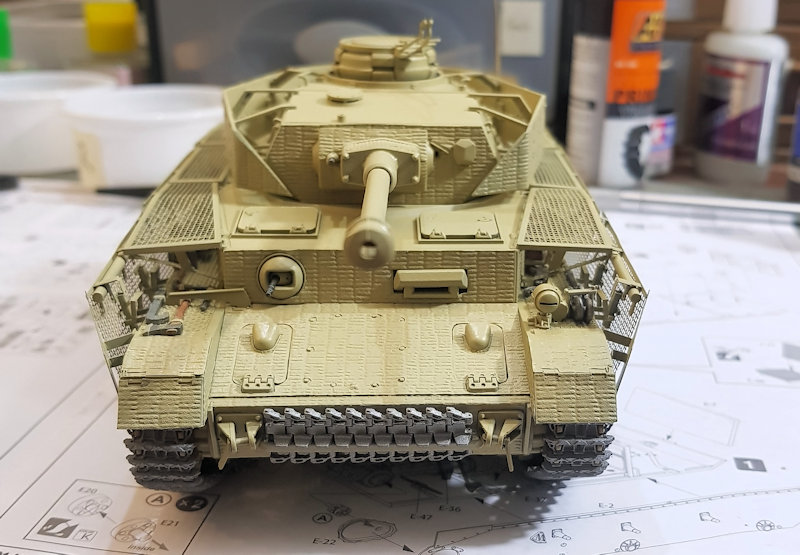
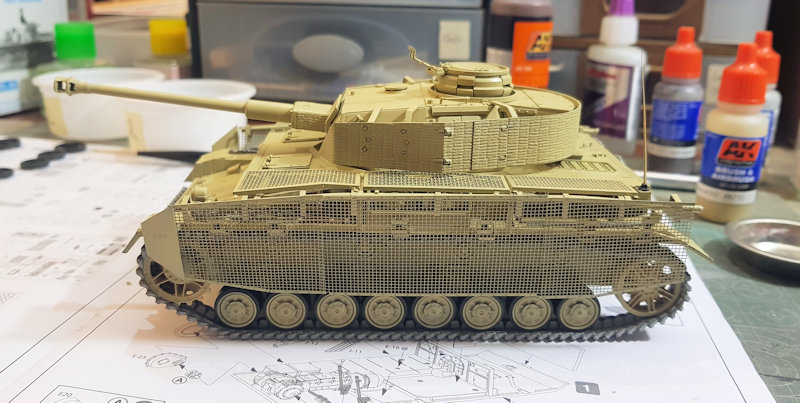
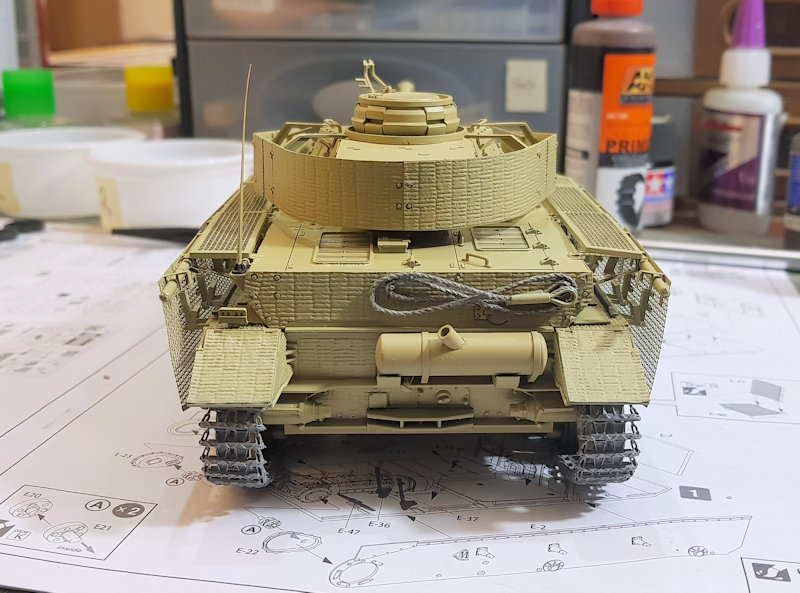
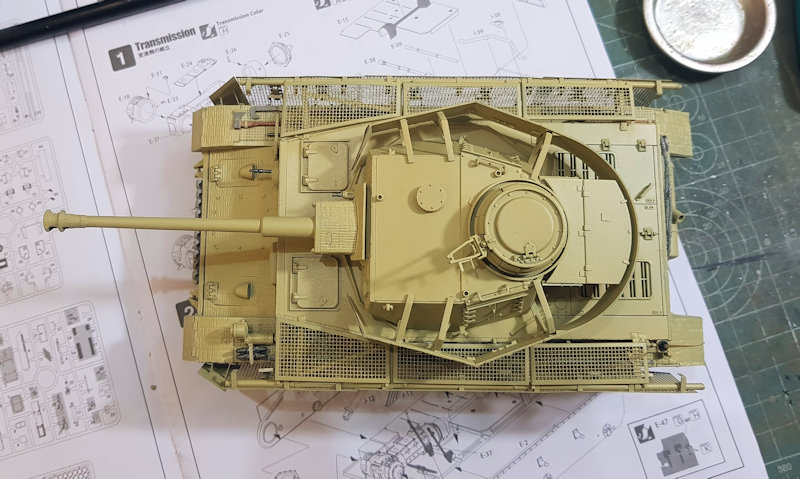
The Eduard schurzen set was not easy to work with, but the results were worth the effort.
Pics posted in campaign gallery as well.
My basic premise is that this is a September 1944 production build. It is the last vehicle to receive the factory applied zimmerit coating; and first to receive the wire mesh schurzen. It has been delivered to the military for kitting out. It is now waiting to be loaded on a train for the Eastern Front. It doesn't have any markings or camo applied as that would be done by the unit after it was received.
So, a hypothetical scenario. But, that's what's great about our hobby; you can do whatever you like.


The Eduard schurzen set was not easy to work with, but the results were worth the effort.
Pics posted in campaign gallery as well.

Northern_Lad

Joined: September 17, 2012
KitMaker: 462 posts
Armorama: 417 posts

Posted: Tuesday, April 24, 2018 - 11:25 PM UTC
@ Mark - awesome build! Love the mesh skirts....
I have more progress to report on the Italeri panzer iv f2. I’ve added weld beads to the hull and turret using stretched sprue and tamiya ultra thin cement - it works well I think.
Can anyone tell me if the final drive housing armour should have the conical bolt heads?And if yes, how many on the f2?… See picture below…

I completely rebuilt the back plate as the Italeri part was covered with inaccessible sink marks.

Turret needs more work around the mantlet. Also need to add weld beads on the top.


I used the RB model barrel for the f2. The front glacis is a Dragon extra, and there is a Tamiya part there too with the ball mount MG and drivers vision port - the Italeri ball mount MG was way oversized.

Next up: Friulmodel tracks….
Cheers
Matthew
I have more progress to report on the Italeri panzer iv f2. I’ve added weld beads to the hull and turret using stretched sprue and tamiya ultra thin cement - it works well I think.
Can anyone tell me if the final drive housing armour should have the conical bolt heads?And if yes, how many on the f2?… See picture below…

I completely rebuilt the back plate as the Italeri part was covered with inaccessible sink marks.

Turret needs more work around the mantlet. Also need to add weld beads on the top.


I used the RB model barrel for the f2. The front glacis is a Dragon extra, and there is a Tamiya part there too with the ball mount MG and drivers vision port - the Italeri ball mount MG was way oversized.

Next up: Friulmodel tracks….
Cheers
Matthew
Conrad86

Joined: January 01, 2018
KitMaker: 25 posts
Armorama: 25 posts
Posted: Wednesday, April 25, 2018 - 12:22 AM UTC
Very impressed with those weld beads Matthew, really nice. Excellent work on the rear panel too, very tidy indeed.
Mark - wonderful build, those Thoma skirts have come out beautifully.
Mark - wonderful build, those Thoma skirts have come out beautifully.

Northern_Lad

Joined: September 17, 2012
KitMaker: 462 posts
Armorama: 417 posts

Posted: Wednesday, April 25, 2018 - 04:41 AM UTC
Posted: Wednesday, April 25, 2018 - 09:46 AM UTC
Thanks for the positive comments guys.
Matthew, all your work is paying off on your F2 build. It's looking great.
Matthew, all your work is paying off on your F2 build. It's looking great.
petbat

Joined: August 06, 2005
KitMaker: 3,353 posts
Armorama: 3,121 posts

Posted: Wednesday, April 25, 2018 - 12:07 PM UTC
Fantastic finish Mark, looks great. Hope you enjoyed being part of the build.
Mathew the Frankenpanzer is really coming along nicely. Love the extra detail. It is great to have the extra parts available.
I built a Kugelblitz on a hull made entirely from from Dragon Spare parts and styrene stock. Used their old Kugelblitz ball turret, but rebuilt it and the ring mount, and emptied the spares box for the rest.
Posted: Thursday, April 26, 2018 - 09:57 AM UTC
I always enjoy the campaign builds. The best part is seeing everyone's builds.
m4sherman

Joined: January 18, 2006
KitMaker: 1,866 posts
Armorama: 1,808 posts

Posted: Friday, April 27, 2018 - 06:06 AM UTC
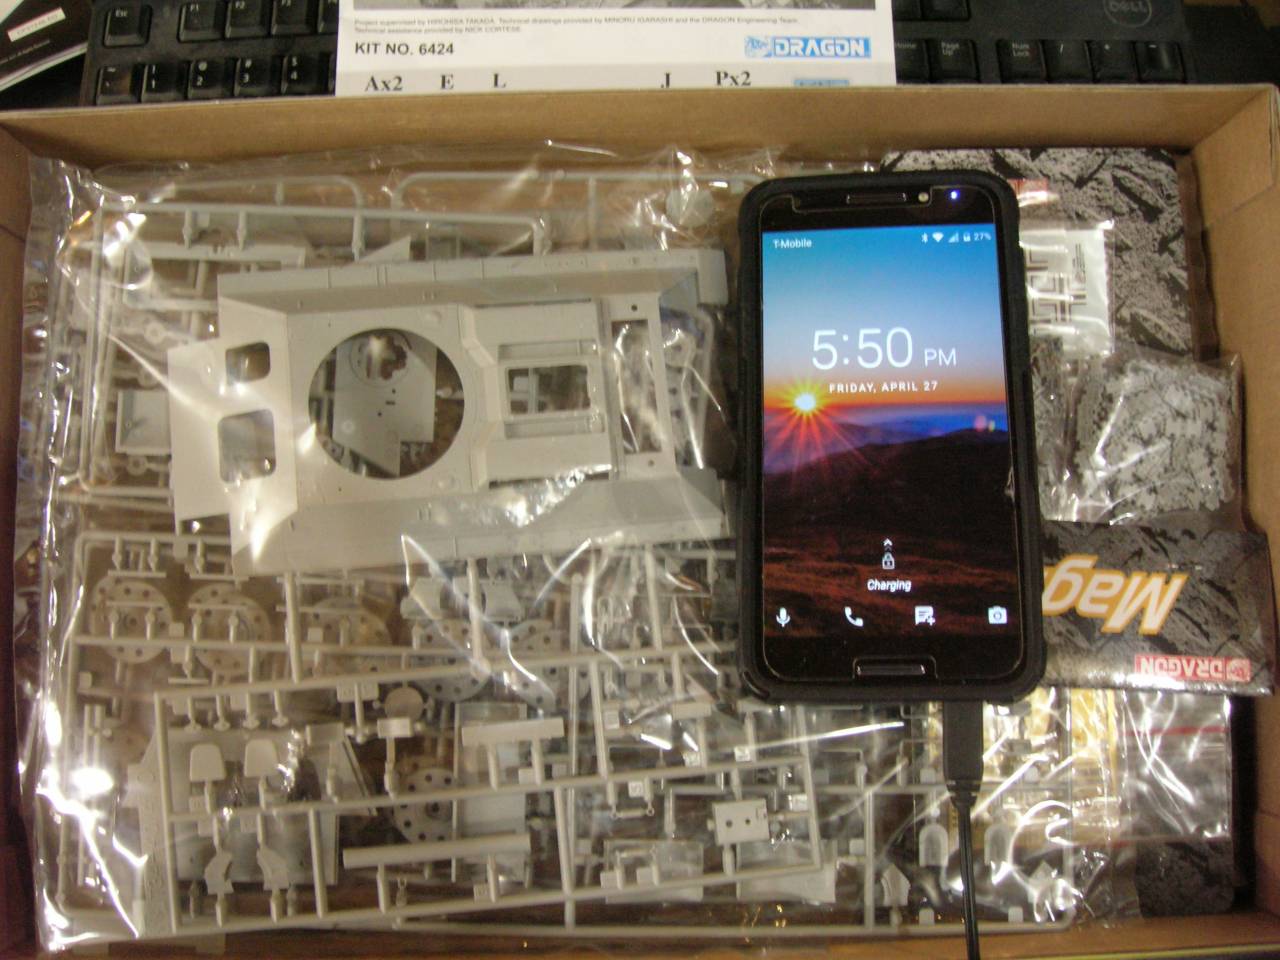
I've decided to join this campaign. I have pretty much failed at all the ones I joined last year due to some family problems and real bad karma. But I jut got a couple Dragon T-34's, and will do my best to come through on this one! I plan on kit bashing a little between the various kits I have to show a war weary T-34/76 in Berlin.

Bluestab

Joined: December 03, 2009
KitMaker: 2,160 posts
Armorama: 1,906 posts

Posted: Friday, April 27, 2018 - 07:03 AM UTC
Wow, some nice builds going on. That F2 really looks nice. It's almost going to be a shame to cover all that detail work with paint.
It's been a while but here's a quick update on my Academy M4a3(76mm)W "Battle of the Bulge" kit.
The last update I had sprayed a base coat of Olive Drab. The kit has the winter camo scheme of a vehicle from 709thTB, Colmar, France January 1945. I did some looking and found this photo. I like the look so I decided to go with it. The problem is the Sherman in the picture is an earlier version with the round loader's hatch, whereas the kit has the later oval hatch. So, we're going to be "inspired" by the picture and take some artistic license with it.

I used Tamiya white and hand-painted the designs on. I figured the crews used rags or brushes to apply them so I went with a rough appearance. The edges are a bit hard but they should soften out with weathering and washes.


I decided to add mud, using Sculptamold. I dabbed it on the lower hull. I should have done this before I added the suspension, but I had not planned on going bonkers on the mud at the time.
I went heavy with the mud on the suspension bogies. I put a glob of it on the road-wheels and turned them. The motion of the wheels smeared the mud on the wheels and left enough on the wheel support arms...It looks pretty good.

The mud painted, using Tamiya Earth. I had to touch-up some of the mudded spots, hence the white.I used a light earth wash to try to soften and blend the white on the hull. A couple more washes and it should be good.
The kit comes with Rubbermaid tracks. These are the duckbill variety. These are a huge improvement over the older duckbill tracks in Tamiya's M4a3 kit. They are thicker and have a distinct curve like the real thing. The downside are the track-lengths' connection point. They are the melt-the-pins-type. I used super glue and melted them to try to make them look seamless. Unfortunately, there's still a slight gap-point.
The tracks are also pretty tight. You can see where the front suspension are pushed up by the tracks.
Tracks were painted red-brown...steel...earth.

And that's where she stands at the moment.
It's been a while but here's a quick update on my Academy M4a3(76mm)W "Battle of the Bulge" kit.
The last update I had sprayed a base coat of Olive Drab. The kit has the winter camo scheme of a vehicle from 709thTB, Colmar, France January 1945. I did some looking and found this photo. I like the look so I decided to go with it. The problem is the Sherman in the picture is an earlier version with the round loader's hatch, whereas the kit has the later oval hatch. So, we're going to be "inspired" by the picture and take some artistic license with it.

I used Tamiya white and hand-painted the designs on. I figured the crews used rags or brushes to apply them so I went with a rough appearance. The edges are a bit hard but they should soften out with weathering and washes.


I decided to add mud, using Sculptamold. I dabbed it on the lower hull. I should have done this before I added the suspension, but I had not planned on going bonkers on the mud at the time.
I went heavy with the mud on the suspension bogies. I put a glob of it on the road-wheels and turned them. The motion of the wheels smeared the mud on the wheels and left enough on the wheel support arms...It looks pretty good.

The mud painted, using Tamiya Earth. I had to touch-up some of the mudded spots, hence the white.I used a light earth wash to try to soften and blend the white on the hull. A couple more washes and it should be good.
The kit comes with Rubbermaid tracks. These are the duckbill variety. These are a huge improvement over the older duckbill tracks in Tamiya's M4a3 kit. They are thicker and have a distinct curve like the real thing. The downside are the track-lengths' connection point. They are the melt-the-pins-type. I used super glue and melted them to try to make them look seamless. Unfortunately, there's still a slight gap-point.
The tracks are also pretty tight. You can see where the front suspension are pushed up by the tracks.
Tracks were painted red-brown...steel...earth.

And that's where she stands at the moment.
panzerman1

Joined: September 30, 2010
KitMaker: 430 posts
Armorama: 291 posts

Posted: Saturday, April 28, 2018 - 11:03 AM UTC
Great work being done here in this campaign.
Love the Toma mesh skirts on the Panzer IV.
I'm working on the F1 version of the Italeri Panzer IV. Nice to see someone doing the F2 version as well. Nice upgrades on that build as well.
Love the snow camouflage on the Sherman. Cool reference photo for it.
Keep up the great work Fellow Modelers!
Bill

m4sherman

Joined: January 18, 2006
KitMaker: 1,866 posts
Armorama: 1,808 posts

Posted: Sunday, April 29, 2018 - 11:24 AM UTC
Work on my T-34, now an OT-34 after browsing the T-34 Mythic weapon book for ideas, and I just got in the Dragon OT-34 model over the weekend.

I had to add reinforcing to the lower hull, it was warped. I add thin strips to the road wheel arms to better hold the arms in place.

The OT-34 I am using as a reference is a 1944 production tank with the sharp nose. Wheels are the Miniart 43-44 pressed wheels, with a wheel off an old Dragon kit. I wanted to leave off the front fenders so I am reworking the front plate. And, I am using the turret with the cupola.
Now that I have the T-34 bug again I made up a few parts to 3D print, fenders and some turret and hull fittings. I'll test them on the model once I get them in.
There is some great inspiration in this campaign.

I had to add reinforcing to the lower hull, it was warped. I add thin strips to the road wheel arms to better hold the arms in place.

The OT-34 I am using as a reference is a 1944 production tank with the sharp nose. Wheels are the Miniart 43-44 pressed wheels, with a wheel off an old Dragon kit. I wanted to leave off the front fenders so I am reworking the front plate. And, I am using the turret with the cupola.
Now that I have the T-34 bug again I made up a few parts to 3D print, fenders and some turret and hull fittings. I'll test them on the model once I get them in.
There is some great inspiration in this campaign.

m4sherman

Joined: January 18, 2006
KitMaker: 1,866 posts
Armorama: 1,808 posts

Posted: Monday, April 30, 2018 - 09:35 AM UTC
Soojet

Joined: March 22, 2018
KitMaker: 22 posts
Armorama: 20 posts

Posted: Thursday, May 03, 2018 - 06:15 AM UTC
My Panzer IV asuf. D with the base coat and post shading. The shading looks a little splattered, I'm hoping to blend it better with some filtering. The Frulmodel tracks are also given a base coat.


Posted: Thursday, May 03, 2018 - 06:40 AM UTC
Matt,
Sweet looking Panzer IV. Those tracks will be a nice addition to add on.
Mark
Sweet looking Panzer IV. Those tracks will be a nice addition to add on.
Mark
27-1025

Joined: September 16, 2004
KitMaker: 1,281 posts
Armorama: 1,222 posts

Posted: Sunday, May 06, 2018 - 07:55 PM UTC
panzerman1

Joined: September 30, 2010
KitMaker: 430 posts
Armorama: 291 posts

Posted: Tuesday, May 08, 2018 - 01:04 PM UTC
Panzer IV F2, Italeri, 1/35 scale.....Update #1
It's been long overdue for a build update. Sorry.

The lower hull came flat packed. The hull bottom, sides, rear, and front had to be assembled.

Work begins on the suspension components. Return roller mounts, road wheels, and rocker arms all needed clean up before assembly.

I did some minor corrections to the rear bulkhead. The tow pintel was drilled out, and I inserted a wire tow pin. The return idler wheel mounts were given missing gusset plates.
I will post more backlog photos soon. Good luck to everyone on their projects. Bill
It's been long overdue for a build update. Sorry.

The lower hull came flat packed. The hull bottom, sides, rear, and front had to be assembled.

Work begins on the suspension components. Return roller mounts, road wheels, and rocker arms all needed clean up before assembly.

I did some minor corrections to the rear bulkhead. The tow pintel was drilled out, and I inserted a wire tow pin. The return idler wheel mounts were given missing gusset plates.
I will post more backlog photos soon. Good luck to everyone on their projects. Bill
panzerman1

Joined: September 30, 2010
KitMaker: 430 posts
Armorama: 291 posts

Posted: Tuesday, May 08, 2018 - 01:14 PM UTC
Matt, nice base coat paint and shading on your Panzer IV Ausf.D.
Chris, Your Sherman is looking good. I like the stowage on the rear deck.
Some really inspiring builds going on here. Bill
Chris, Your Sherman is looking good. I like the stowage on the rear deck.
Some really inspiring builds going on here. Bill

PasiAhopelto

Joined: October 01, 2016
KitMaker: 514 posts
Armorama: 171 posts

Posted: Tuesday, May 08, 2018 - 09:55 PM UTC
Ready for paint:

I did try to make full fenders, but had fit issues so went with current light setup instead.

I did try to make full fenders, but had fit issues so went with current light setup instead.
27-1025

Joined: September 16, 2004
KitMaker: 1,281 posts
Armorama: 1,222 posts

Posted: Tuesday, May 08, 2018 - 11:52 PM UTC
Quoted Text
Matt, nice base coat paint and shading on your Panzer IV Ausf.D.
Chris, Your Sherman is looking good. I like the stowage on the rear deck.
Some really inspiring builds going on here. Bill
Thanks! Posted these pics on another site and got schooled on British Shermans
 Making some needed mods now.
m4sherman

Joined: January 18, 2006
KitMaker: 1,866 posts
Armorama: 1,808 posts

Posted: Thursday, May 10, 2018 - 04:48 AM UTC
Quoted Text
Quoted TextMatt, nice base coat paint and shading on your Panzer IV Ausf.D.
Chris, Your Sherman is looking good. I like the stowage on the rear deck.
Some really inspiring builds going on here. Bill
Thanks! Posted these pics on another site and got schooled on British ShermansMaking some needed mods now.
If your making some changes you might want to add a grab handle on the commanders hatch. The holes sort of stand out in your pictures. The model looks great, it will be interesting to see what you have to change.
Martinvidas

Joined: February 13, 2011
KitMaker: 322 posts
Armorama: 300 posts

Posted: Saturday, May 12, 2018 - 01:40 AM UTC
Is the FAMO is a workhorse?
petbat

Joined: August 06, 2005
KitMaker: 3,353 posts
Armorama: 3,121 posts

Posted: Saturday, May 12, 2018 - 01:53 AM UTC
Some great builds going on here guys. Nice to see so many actively getting in.
Hi Martin. There is a bit of discussion around what fits the build in the earlier threads. Long story short, though, the build is for T-34, Panzer IV and Sherman Tanks.
Those were built in very large numbers, were available to their user armies pretty much from start to finish of their participation in the war, etc.
Quoted Text
Is the FAMO is a workhorse?
Hi Martin. There is a bit of discussion around what fits the build in the earlier threads. Long story short, though, the build is for T-34, Panzer IV and Sherman Tanks.
Those were built in very large numbers, were available to their user armies pretty much from start to finish of their participation in the war, etc.

m4sherman

Joined: January 18, 2006
KitMaker: 1,866 posts
Armorama: 1,808 posts

Posted: Saturday, May 12, 2018 - 06:51 AM UTC
A little progress, but I'm waiting for some 3D printed parts for testing. A test 3D fender is on, but I had to redo the master so it will get replaced.


Late production 76mm T-34's had the same lift tabs as the T-34/85's. I had to add a strip inside the turret under the loaders hatch to hold it in place because Dragon did not mold a lip to hold the hatch on this version.
And, I think I got Imgur figured out.


Late production 76mm T-34's had the same lift tabs as the T-34/85's. I had to add a strip inside the turret under the loaders hatch to hold it in place because Dragon did not mold a lip to hold the hatch on this version.
And, I think I got Imgur figured out.
 |


