

Randall,
Nice progress. Most interested with how those fenders are going to look compare to the kit versions.
Mark
Hosted by Richard S.
The Workhorses Campaign

d6mst0

#453

Joined: August 28, 2016
KitMaker: 1,925 posts
Armorama: 601 posts

Posted: Saturday, May 12, 2018 - 07:52 AM UTC

Kanguroo

Joined: May 07, 2006
KitMaker: 416 posts
Armorama: 312 posts
Posted: Saturday, May 12, 2018 - 06:47 PM UTC
Hi,
A slow progress with my Dragon kit, because of many spare tracks link.


I intend to make a simple base. Figures from Dragon.


Regards,
K.
A slow progress with my Dragon kit, because of many spare tracks link.
I intend to make a simple base. Figures from Dragon.
Regards,
K.
MichaelSatin
Joined: January 19, 2008
KitMaker: 3,909 posts
Armorama: 510 posts
Posted: Saturday, May 12, 2018 - 08:33 PM UTC
Quoted Text
Some great builds going on here guys. Nice to see so many actively getting in.Quoted TextIs the FAMO is a workhorse?
Hi Martin. There is a bit of discussion around what fits the build in the earlier threads. Long story short, though, the build is for T-34, Panzer IV and Sherman Tanks.
Those were built in very large numbers, were available to their user armies pretty much from start to finish of their participation in the war, etc.
Thank you Peter, very good explanation!
I'm still weighing options but leaning towards an Asuka/Taska British Sherman. I've got the Mk.III initial suspension from Alamein and the Firefly IC both unstarted (I have several more that are more built than the rules allow. Who wrote those things? Oh yeah...) Anyone have any preferences?
Michael


kunjuro

Joined: October 27, 2013
KitMaker: 520 posts
Armorama: 488 posts
Posted: Saturday, May 12, 2018 - 10:45 PM UTC
Been a while since I put an update. You guys have such awesome kits. Good job!
As for my kit, I think I'm 99% done. The only thing bothering me is the turret MG - looks a bit bland. Might go over with with pigments. Anyway, here's probably the final update to my M4A2(76) Red Army


As for my kit, I think I'm 99% done. The only thing bothering me is the turret MG - looks a bit bland. Might go over with with pigments. Anyway, here's probably the final update to my M4A2(76) Red Army
d6mst0
#453
Joined: August 28, 2016
KitMaker: 1,925 posts
Armorama: 601 posts
Posted: Saturday, May 12, 2018 - 11:45 PM UTC
Mr. K
Your Sherman is looking sweet. Nice camo work.
Mark
Your Sherman is looking sweet. Nice camo work.
Mark
d6mst0
#453
Joined: August 28, 2016
KitMaker: 1,925 posts
Armorama: 601 posts
Posted: Saturday, May 12, 2018 - 11:46 PM UTC
Nigel,
Nice work with weathering on your Sherman.
Mark
Nice work with weathering on your Sherman.
Mark
m4sherman
Joined: January 18, 2006
KitMaker: 1,866 posts
Armorama: 1,808 posts

Posted: Sunday, May 13, 2018 - 09:30 AM UTC
Quoted Text
Randall,
Nice progress. Most interested with how those fenders are going to look compare to the kit versions.
Mark
I decided to finish this one with-out fenders, to match the reference pictures I am using. The fenders will be used on other projects I have in the works.
The model is on hold until I get the test run of the fuel can holders, but I managed to get everything else done, more or less. I always tend to forget something.

Nice job on the M4's.
Kanguroo
Joined: May 07, 2006
KitMaker: 416 posts
Armorama: 312 posts
Posted: Sunday, May 13, 2018 - 07:08 PM UTC
Thanks Mark.
Truly nice job on all of workhorses.

Truly nice job on all of workhorses.

Northern_Lad

Joined: September 17, 2012
KitMaker: 462 posts
Armorama: 417 posts
Posted: Monday, May 14, 2018 - 02:46 AM UTC
Hello!
More progress on the Italeri panzer iv F2 frankenpanzer...
Bogies on, extra parts courtesy of Dragon

Jerry can rack attached

Weld beads on turret top courtesy of stretched sprue

More PE

And on the other side...

Jack block restraining strap attached. full marks for effort (maybe), but execution could have been better

And grab handles...

Next up
More PE, and friul tracks. woohoo!
Cheers
Matthew
More progress on the Italeri panzer iv F2 frankenpanzer...
Bogies on, extra parts courtesy of Dragon
Jerry can rack attached
Weld beads on turret top courtesy of stretched sprue
More PE
And on the other side...
Jack block restraining strap attached. full marks for effort (maybe), but execution could have been better
And grab handles...
Next up
More PE, and friul tracks. woohoo!
Cheers
Matthew

panzerman1
Joined: September 30, 2010
KitMaker: 430 posts
Armorama: 291 posts
Posted: Monday, May 14, 2018 - 03:58 AM UTC
Update 2, Italeri Panzer IV, Ausf. F2, 1/35 scale.

The suspension parts and lower hull have been painted. Subcomponent work begins on the upper hull parts.

No problems attaching the suspension parts to the lower hull. Rocker arms are posable, so I opted for a flat stance. I'm on the fence as to whether I'll add figures for the driver and radio operator positions. ?????

Old school method of joining the vinyl tracks together. Exercise caution: not a lot pin surface to melt.

Success! The tracks are on the tank. For a kit that's pushing 40 years of age, the result is not half bad. Oh, I had to get rid of some pesky sink marks under the fenders too.
Das ist Alles!....for now. Good luck everyone on their projects. Bill
The suspension parts and lower hull have been painted. Subcomponent work begins on the upper hull parts.
No problems attaching the suspension parts to the lower hull. Rocker arms are posable, so I opted for a flat stance. I'm on the fence as to whether I'll add figures for the driver and radio operator positions. ?????
Old school method of joining the vinyl tracks together. Exercise caution: not a lot pin surface to melt.
Success! The tracks are on the tank. For a kit that's pushing 40 years of age, the result is not half bad. Oh, I had to get rid of some pesky sink marks under the fenders too.
Das ist Alles!....for now. Good luck everyone on their projects. Bill
Scipio2010
#401
Joined: December 08, 2013
KitMaker: 323 posts
Armorama: 221 posts
Posted: Monday, May 14, 2018 - 05:06 AM UTC
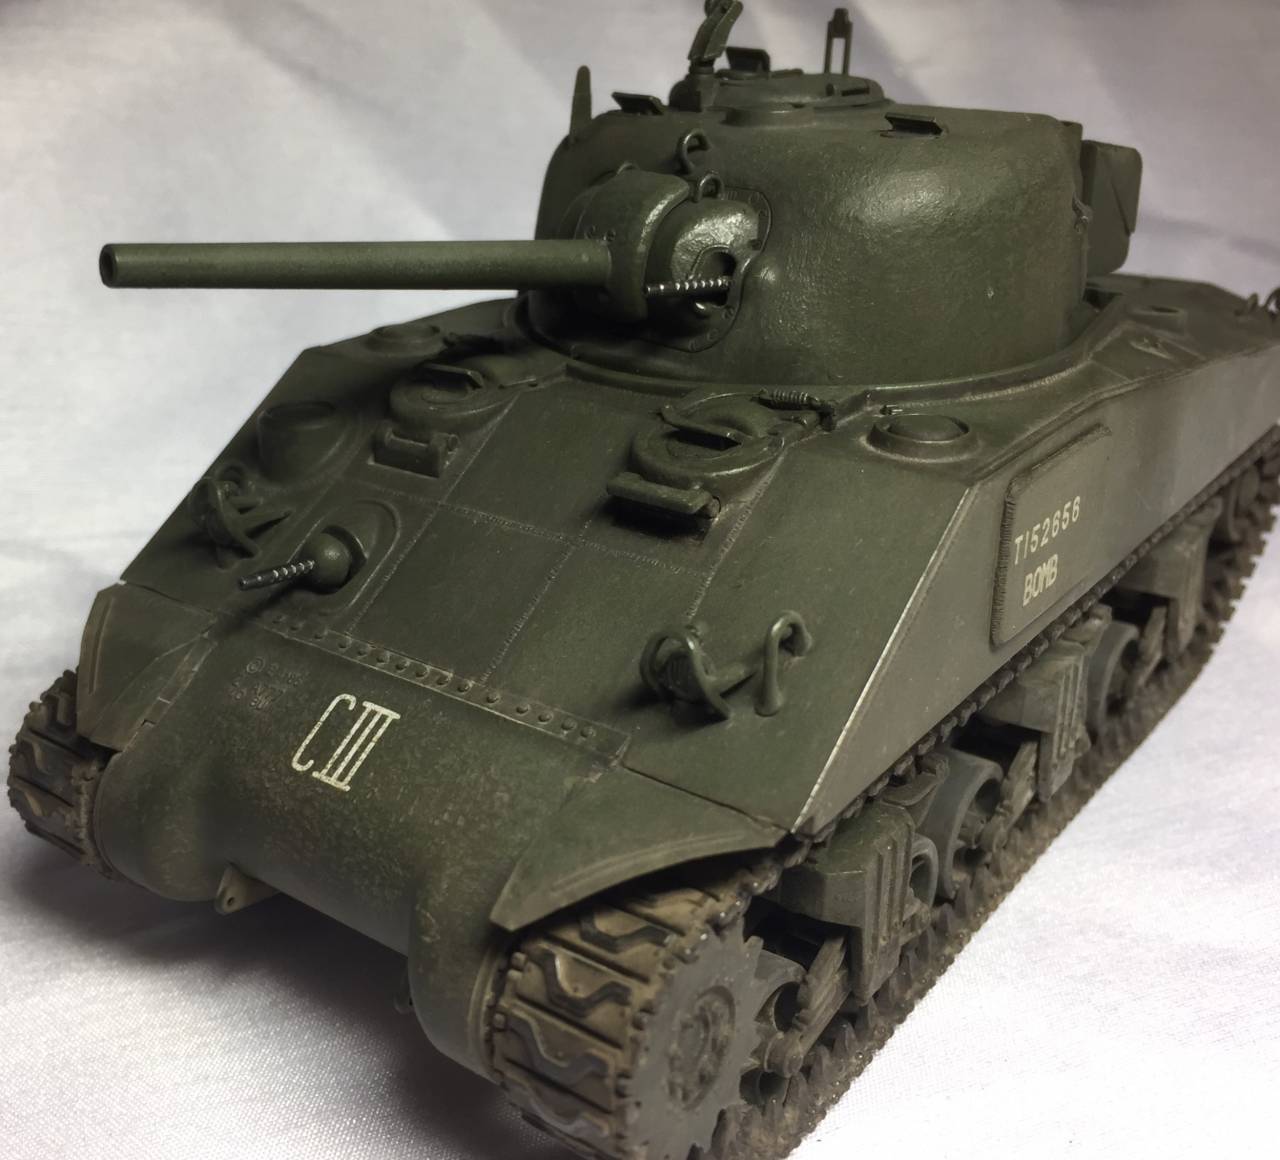
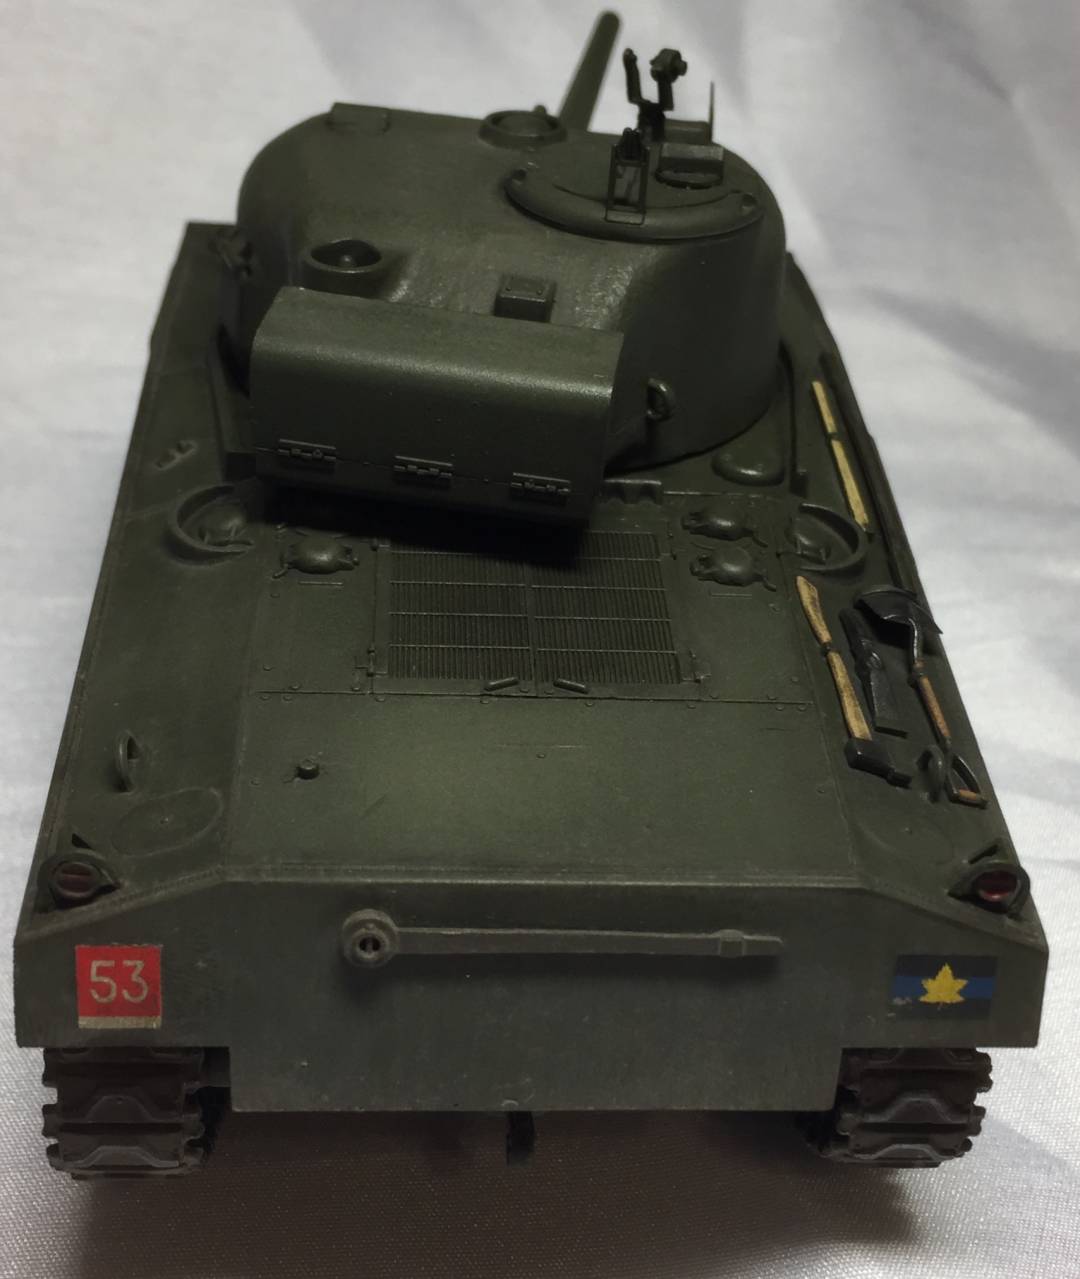
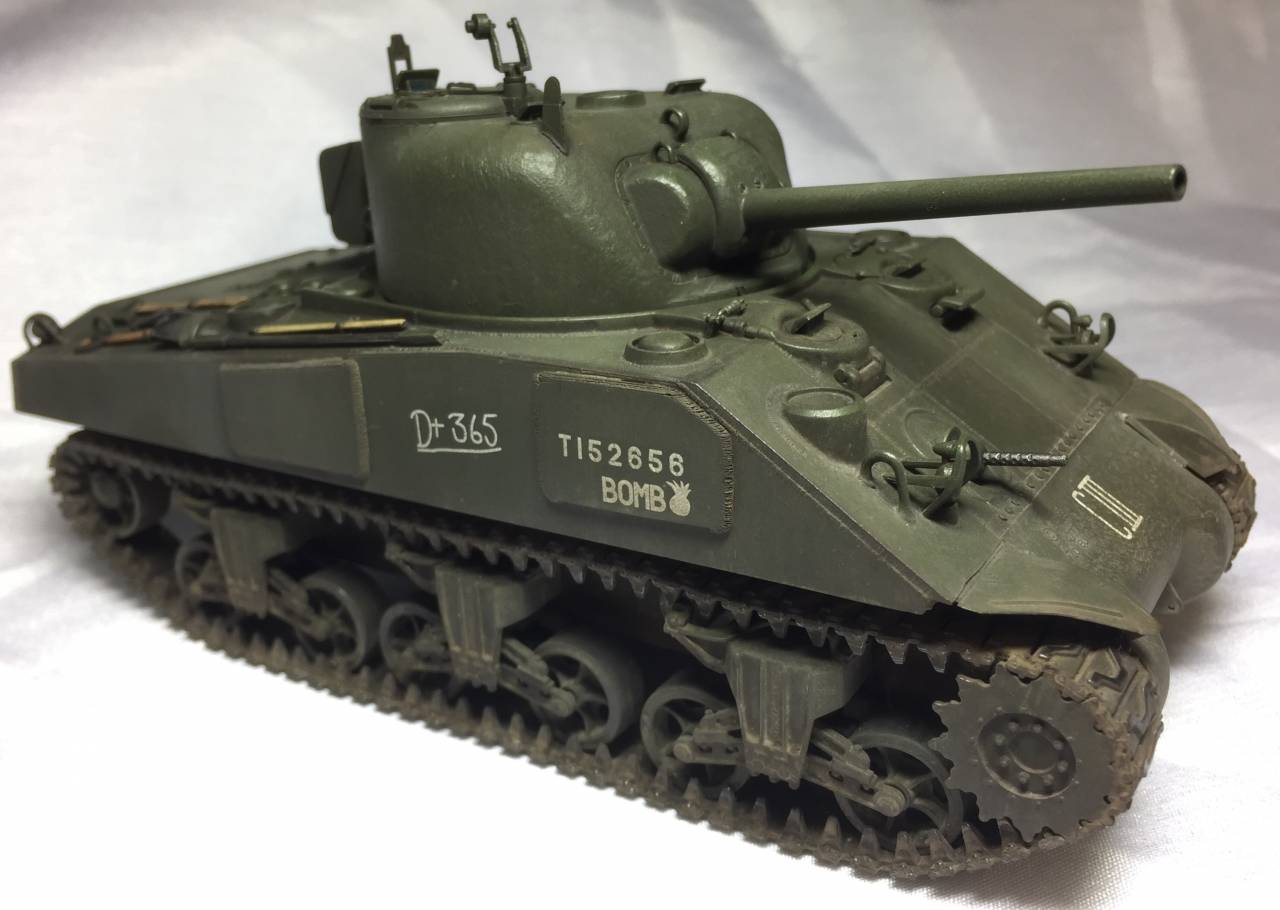
I finished up my MK III Sherman from B Squadron, The Sherbrooke Fusilier Regiment. This Canadian Sherman nicknamed 'Bomb' was a veteran of D-Day, and the entire European campaign. The decals represent the tank as photographed in June of 1945 to commemorate D+365 anniversary.
Comments welcome.
Comments welcome.

Charlie-66
#186
Joined: May 24, 2006
KitMaker: 771 posts
Armorama: 750 posts
Posted: Monday, May 14, 2018 - 05:25 AM UTC
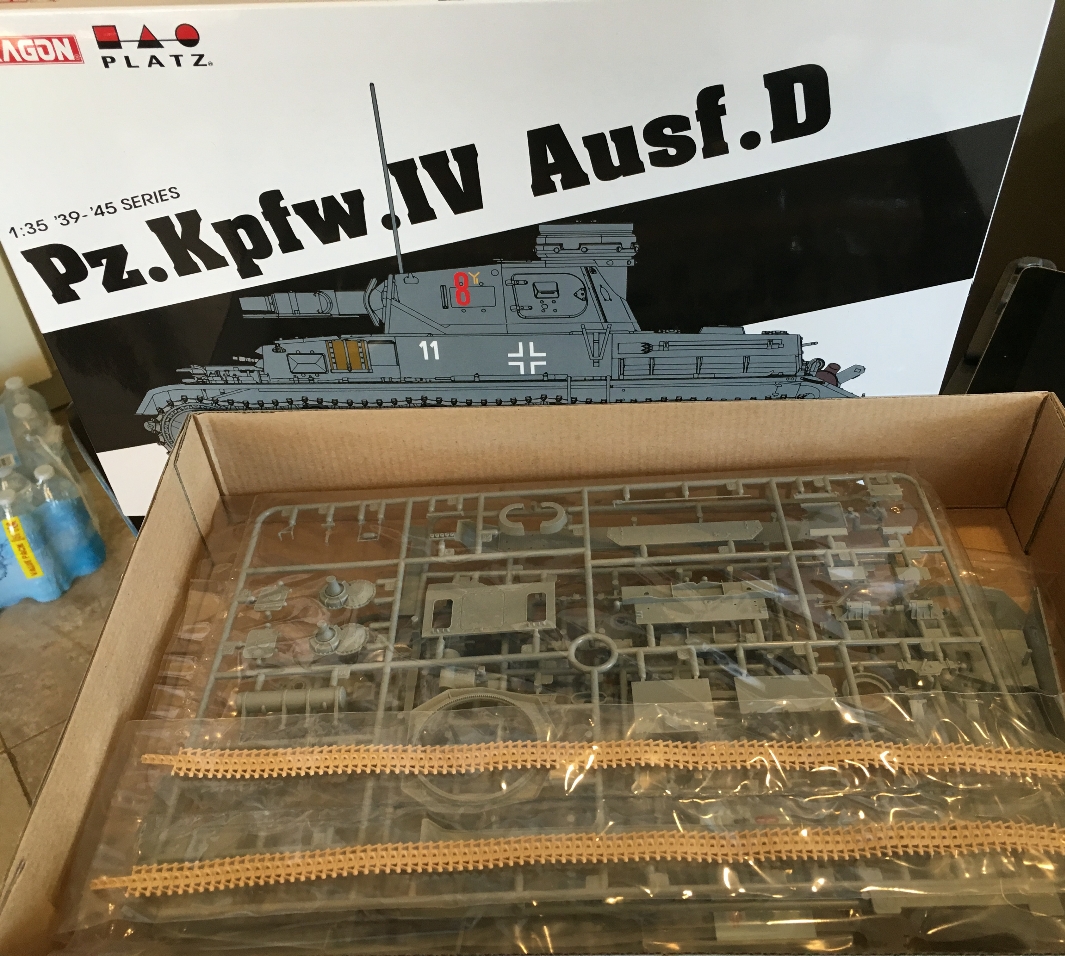
I was going to do a Sherman for this campaign but this kit arrived and changed my mind. It has a very low parts count, around 175, and reminds me a lot of the old Tamiya Pz IV Ausf. D in terms of simplicity. I read some on-line reviews that were generally very positive so I figured I'd give it a try. Edit: was reading back through the campaign thread and see that Matt has already done a bang up job on this kit. I hope mine comes out as well. there have been some really nice builds going on here! Cheers!

Chaman911
Joined: August 28, 2015
KitMaker: 319 posts
Armorama: 308 posts
Posted: Monday, May 14, 2018 - 05:30 PM UTC
Very nice work going on here. Every single build has impressed me. Strong work everyone. I am trying to get my build for Crusader to Gazala done then I will be starting on Tamiyas M4A3E8.

Soojet
Joined: March 22, 2018
KitMaker: 22 posts
Armorama: 20 posts
Posted: Tuesday, May 15, 2018 - 12:48 AM UTC
Quoted Text
I was going to do a Sherman for this campaign but this kit arrived and changed my mind. It has a very low parts count, around 175, and reminds me a lot of the old Tamiya Pz IV Ausf. D in terms of simplicity. I read some on-line reviews that were generally very positive so I figured I'd give it a try. Edit: was reading back through the campaign thread and see that Matt has already done a bang up job on this kit. I hope mine comes out as well. there have been some really nice builds going on here! Cheers!
Thanks Guy. That kit is super easy to put together, you would think it is made by Tamiya. I used very little putty on it, in fact I only used it to fix my own error! I can't wait to see how you build yours!
Charlie-66
#186
Joined: May 24, 2006
KitMaker: 771 posts
Armorama: 750 posts
Posted: Tuesday, May 15, 2018 - 05:37 AM UTC
Quoted Text
Quoted TextI was going to do a Sherman for this campaign but this kit arrived and changed my mind. It has a very low parts count, around 175, and reminds me a lot of the old Tamiya Pz IV Ausf. D in terms of simplicity. I read some on-line reviews that were generally very positive so I figured I'd give it a try. Edit: was reading back through the campaign thread and see that Matt has already done a bang up job on this kit. I hope mine comes out as well. there have been some really nice builds going on here! Cheers!
Thanks Guy. That kit is super easy to put together, you would think it is made by Tamiya. I used very little putty on it, in fact I only used it to fix my own error! I can't wait to see how you build yours!
Thanks Matt, I keep flashing back to the old Tamiya Ausf. D but the detail on this is so much better.

27-1025
Joined: September 16, 2004
KitMaker: 1,281 posts
Armorama: 1,222 posts
Posted: Tuesday, May 15, 2018 - 06:44 AM UTC
Quoted Text
I finished up my MK III Sherman from B Squadron, The Sherbrooke Fusilier Regiment. This Canadian Sherman nicknamed 'Bomb' was a veteran of D-Day, and the entire European campaign. The decals represent the tank as photographed in June of 1945 to commemorate D+365 anniversary.
Comments welcome.
Very nice work. Great seeing all these Shermans being built but I'm a bit biased on the subject

petbat

Joined: August 06, 2005
KitMaker: 3,353 posts
Armorama: 3,121 posts
Posted: Tuesday, May 15, 2018 - 08:40 AM UTC
Sheesh, so much to catch up in such a short time!!!
Mr K. That Sherman looks great. Like the layout of the dio you are planning too.
Michael, my preference is you build both
A Firefly is yet to appear here though....
Nigel. Your Shermie looks great too. I know what you mean, the .50 is such a chunk of iron it does take up attention and being dark like the tank doesn't help. Maybe a subtly lighter colour for the barrel and a black pin wash in the perforated jacket and under protrusions as a form of shadow might break it up a bit. I am not a fan of modulation as such, but on the fifty I usually make the feed cover a tad lighter than the body too - being on top and catching more light so to speak.
Coming along nicely Randall. I Hope the fuel can holders work out for you.
Matthew. The extra detail really pays off on the FP. Nice weld bead work. I think you put the jack block strap on upside down though. The buckle was lower down so it could be reached by the crewman standing on the ground

William, old school it may be, but it works. Nice to see the old Italeri kit getting taken out for a spin by you guys.
Shawn, yours sure looks a treat. A real green machine. I notice in the super sized images that your red colour in the tail lights has run on the bottom rim on the right.
Just in case you might want to know this, the 4 red sections in the Sherman Tail lights are a common modelling practice, but are not actually correct. Only the upper 'oval' on the left tail light was a red service light. The other 3 were not red. There was a rectangular blackout light within the oval underneath the red one. The sections on the right light were rectangular inside the oval shape and the lens looks black/grey when unlit
http://www.theshermantank.com/tag/sherman-lights/

.. and Lastly - nice box Guy
Hope I didn't offend you guys by mentioning the stuff above. Meant as positive feedback and discussion purposes only.
Mr K. That Sherman looks great. Like the layout of the dio you are planning too.
Michael, my preference is you build both
A Firefly is yet to appear here though....
Nigel. Your Shermie looks great too. I know what you mean, the .50 is such a chunk of iron it does take up attention and being dark like the tank doesn't help. Maybe a subtly lighter colour for the barrel and a black pin wash in the perforated jacket and under protrusions as a form of shadow might break it up a bit. I am not a fan of modulation as such, but on the fifty I usually make the feed cover a tad lighter than the body too - being on top and catching more light so to speak.
Coming along nicely Randall. I Hope the fuel can holders work out for you.
Matthew. The extra detail really pays off on the FP. Nice weld bead work. I think you put the jack block strap on upside down though. The buckle was lower down so it could be reached by the crewman standing on the ground
William, old school it may be, but it works. Nice to see the old Italeri kit getting taken out for a spin by you guys.
Shawn, yours sure looks a treat. A real green machine. I notice in the super sized images that your red colour in the tail lights has run on the bottom rim on the right.
Just in case you might want to know this, the 4 red sections in the Sherman Tail lights are a common modelling practice, but are not actually correct. Only the upper 'oval' on the left tail light was a red service light. The other 3 were not red. There was a rectangular blackout light within the oval underneath the red one. The sections on the right light were rectangular inside the oval shape and the lens looks black/grey when unlit
http://www.theshermantank.com/tag/sherman-lights/
.. and Lastly - nice box Guy
Hope I didn't offend you guys by mentioning the stuff above. Meant as positive feedback and discussion purposes only.

m4sherman
Joined: January 18, 2006
KitMaker: 1,866 posts
Armorama: 1,808 posts
Posted: Tuesday, May 15, 2018 - 08:50 AM UTC
Quoted Text
Sheesh, so much to catch up in such a short time!!!
Mr K. That Sherman looks great. Like the layout of the dio you are planning too.
Michael, my preference is you build both
A Firefly is yet to appear here though....
Nigel. Your Shermie looks great too. I know what you mean, the .50 is such a chunk of iron it does take up attention and being dark like the tank doesn't help. Maybe a subtly lighter colour for the barrel and a black pin wash in the perforated jacket and under protrusions as a form of shadow might break it up a bit. I am not a fan of modulation as such, but on the fifty I usually make the feed cover a tad lighter than the body too - being on top and catching more light so to speak.
Coming along nicely Randall. I Hope the fuel can holders work out for you.
Matthew. The extra detail really pays off on the FP. Nice weld bead work. I think you put the jack block strap on upside down though. The buckle was lower down so it could be reached by the crewman standing on the ground
William, old school it may be, but it works. Nice to see the old Italeri kit getting taken out for a spin by you guys.
Shawn, yours sure looks a treat. A real green machine. I notice in the super sized images that your red colour in the tail lights has run on the bottom rim on the right.
Just in case you might want to know this, the 4 red sections in the Sherman Tail lights are a common modelling practice, but are not actually correct. Only the upper 'oval' on the left tail light was a red service light. The other 3 were not red. There was a rectangular blackout light within the oval underneath the red one. The sections on the right light were rectangular inside the oval shape and the lens looks black/grey when unlit
http://www.theshermantank.com/tag/sherman-lights/
.. and Lastly - nice box Guy
Hope I didn't offend you guys by mentioning the stuff above. Meant as positive feedback and discussion purposes only.
Those tail lights were used on everything from Jeeps to tanks. They were a standardized fitting. The red oval is a tail light, when in a rear area.
petbat
Joined: August 06, 2005
KitMaker: 3,353 posts
Armorama: 3,121 posts
Posted: Tuesday, May 15, 2018 - 12:11 PM UTC
Quoted Text
I found a nifty feature on the forums called HIDE USER.
I was going to try it on myself and go stealth, but it only works on other users.
So Randall, have 2 logons and creep yourself out, without you knowing about it
Yep, standard fittings on trailers, tanks, Jeeps, GPA's, Half-tracks.... you name it basically
Scipio2010
#401
Joined: December 08, 2013
KitMaker: 323 posts
Armorama: 221 posts
Posted: Tuesday, May 15, 2018 - 07:16 PM UTC
[quote]
Shawn, yours sure looks a treat. A real green machine. I notice in the super sized images that your red colour in the tail lights has run on the bottom rim on the right.
Just in case you might want to know this, the 4 red sections in the Sherman Tail lights are a common modelling practice, but are not actually correct. Only the upper 'oval' on the left tail light was a red service light. The other 3 were not red. There was a rectangular blackout light within the oval underneath the red one. The sections on the right light were rectangular inside the oval shape and the lens looks black/grey when unlit
http://www.theshermantank.com/tag/sherman-lights/
quote]
Peter,
Thanks for pointing that out! I don't often model US/Commonwealth AFV's so that was very useful for my future Sherman builds.
McRunty
#491
Joined: April 06, 2016
KitMaker: 602 posts
Armorama: 191 posts

Posted: Tuesday, May 15, 2018 - 07:42 PM UTC
Quoted Text
I finished up my MK III Sherman from B Squadron, The Sherbrooke Fusilier Regiment. This Canadian Sherman nicknamed 'Bomb' was a veteran of D-Day, and the entire European campaign. The decals represent the tank as photographed in June of 1945 to commemorate D+365 anniversary.
Comments welcome.
Looks great! I really like how you got your tracks looking.
My only critique is you should remove the 50 caliber mount on the turret. The image I found of the tank did not show the mounting.

Scipio2010
#401
Joined: December 08, 2013
KitMaker: 323 posts
Armorama: 221 posts
Posted: Tuesday, May 15, 2018 - 08:32 PM UTC
Rory,
Thanks for the feedback. You are correct, and I also used the wrong drive sprocket and couldn't replicate the bracket on the front glacis. There are a few other details I missed but its close enough for me. This was the first Sherman I've built and I learned a few lessons that I've applied to my two ongoing M4A2 builds.
Thanks for the feedback. You are correct, and I also used the wrong drive sprocket and couldn't replicate the bracket on the front glacis. There are a few other details I missed but its close enough for me. This was the first Sherman I've built and I learned a few lessons that I've applied to my two ongoing M4A2 builds.
m4sherman
Joined: January 18, 2006
KitMaker: 1,866 posts
Armorama: 1,808 posts
Posted: Wednesday, May 16, 2018 - 06:13 AM UTC
Quoted Text
Quoted TextI found a nifty feature on the forums called HIDE USER.
I was going to try it on myself and go stealth, but it only works on other users.
So Randall, have 2 logons and creep yourself out, without you knowing about it
Yep, standard fittings on trailers, tanks, Jeeps, GPA's, Half-tracks.... you name it basically
Good thing I wasn't drinking when I read that!
Years ago I was looking for tail lights at a military vehicle show. One guy had a set for 20 dollars labeled tail lights, another had the exact same set for 50, labeled for Jeeps. I heard a guy tell a friend to go for the "Jeep" lights before someone else got there! I got the 20 dollar set, and still have them on my Jeep.
petbat
Joined: August 06, 2005
KitMaker: 3,353 posts
Armorama: 3,121 posts
Posted: Wednesday, May 16, 2018 - 07:41 AM UTC
Quoted Text
Years ago I was looking for tail lights at a military vehicle show. One guy had a set for 20 dollars labeled tail lights, another had the exact same set for 50, labeled for Jeeps. I heard a guy tell a friend to go for the "Jeep" lights before someone else got there! I got the 20 dollar set, and still have them on my Jeep.
I once went with my mother so she could buy dad a present. He had picked up a second hand pool table but needed some decent cues.
During the discussion with a store attendant, after some options had been explored and price range set, Mum asked how much for a left-hand Billiard cue (Dad is a lefty obviously), and the assistant said he would have to check...
 .... when he came back he had a cue with a dusty old price tag with an 'L' on it. He said they had had it for a long time, so she could have it for 1/2 the ticket price....
 I just smiled and nodded, and when we left, I had to explain to Mum that there is no such thing as a left handed cue - for obvious reasons, and the L on the tag was that the cue was a longer than usual cue - designed to fit in a bridge for long shots..... I still don't know if the guy was hoping to off load old stock, or as oblivious as my mother was....
Never the less, Dad loved the cue and the story, and although the table is long gone, he still has the cue.
m4sherman
Joined: January 18, 2006
KitMaker: 1,866 posts
Armorama: 1,808 posts
Posted: Wednesday, May 16, 2018 - 08:22 AM UTC
Shawn, your Sherman looks good. I agree, nice job with the tracks.
 |

WEB HOSTING BY


Copyright ©2021 Armorama and Kitmaker Network, a subsidiary of Silver Star Enterprises
All Rights Reserved. Please read our Conditions of Use and Privacy Policy.
All Rights Reserved. Please read our Conditions of Use and Privacy Policy.