Two Wings and a Prayer underway!
Joined: February 18, 2005
KitMaker: 4,303 posts
Armorama: 1,051 posts
Posted: Tuesday, May 31, 2005 - 06:21 AM UTC
Quoted Text
Funny how much better things fit when you actually pay attention to the instructions
LOL! That's why they inculde those in the box, Mika! :-) :-)
Looking forward to the pictures!
Andy, BRIGHT ORANGE!! I have to get my hands on that kit!
We Dutch love everything as long as it's orange!
:-) :-)

Paul
Vaasa, Finland
Joined: August 07, 2002
KitMaker: 424 posts
Armorama: 0 posts
Posted: Tuesday, May 31, 2005 - 09:01 AM UTC
Quoted Text
its moulded in bright orange.
I think it's the Matchbox "Mold it in color so you don't have to paint it" mentality. It's funny because I have an ARII Willow, and it's also molded in bright orange. At least we don't have to deal with a chrome plated B-29 kit...
Mika
"I must, now, practice the noble craft of warfare"
- Rottenfuhrer Kopke
Moselle, France
Joined: May 15, 2005
KitMaker: 5,653 posts
Armorama: 503 posts
Posted: Tuesday, May 31, 2005 - 09:21 AM UTC
Hi all!
I have a Mauve P-40 wich is... how can I say... FLUO green! It would be great to start a topic about weird plastic colored kits! You would post your oranges and I would post my E.T.

Jean-Luc

Better think one hour and build five minutes...
Than think five minutes and build an hour!
Uusimaa, Finland
Joined: March 30, 2004
KitMaker: 2,845 posts
Armorama: 808 posts
Posted: Wednesday, June 01, 2005 - 11:20 PM UTC
I got myself an ICM I-5 (early) biplane kit and saw this campaign, so I enlisted today with the intention of getting this kit actually built. :-)
Yesterday I opened the box and washed the parts , as they had some mold grease still in them. This kit looks good! But then I broke one of the machine guns, and one of the wing braces was broken in the box. But the mg can be scratch-built (a simple box with a barrel), and the brace repaired. I have to be extra-carefull working with the tiny parts because the styrene is very hard and brittle.
I'll post some in-progress pics, when I get something done.
Vaasa, Finland
Joined: August 07, 2002
KitMaker: 424 posts
Armorama: 0 posts
Posted: Thursday, June 02, 2005 - 07:00 AM UTC
Hi Eetu, and welcome to the campaign. It seems that the grease on ICM kits a common woe - I have an I-400, where the parts look like they've been glued to the bag with this yellowish brown goop. I scrubbed the parts with a toothbrush & dish soap before things felt better, but still not completely good.
On the progress front, the cockpit was been glued into place along with the front coaming and the tailplane. That completes the basic assembly of the fuselage. Next step will be to prepare parts for painting, and then to start fiddling with the top wing (that's where the prayer part of campaign comes in).
Sorry for the lack of photos, I'm sorta lazy about that.
Mika
"I must, now, practice the noble craft of warfare"
- Rottenfuhrer Kopke
Karnataka, India / भारत
Joined: June 01, 2002
KitMaker: 381 posts
Armorama: 0 posts
Posted: Thursday, June 02, 2005 - 08:06 AM UTC
Hiya folks,
OK, count me in

. I've bought myself a Fairey Swordfish in 1/72 scale from Revell. WIll be making one from the sdn that sunk the Bismarck.
Letz hv fun guys....

Plans are nothing. Planning is everything.
- General 'Ike' Eisenhower
Vaasa, Finland
Joined: August 07, 2002
KitMaker: 424 posts
Armorama: 0 posts
Posted: Thursday, June 02, 2005 - 10:39 AM UTC
Welcome aboard, bytepilot! This campaign seemed a sleeper when started, but it's really picking up steam now! We have currently 18 masochists signed up, which is up by 11 from when the campaign started.
Let's keep the momentum going!
Mika
"I must, now, practice the noble craft of warfare"
- Rottenfuhrer Kopke
Uusimaa, Finland
Joined: March 30, 2004
KitMaker: 2,845 posts
Armorama: 808 posts
Posted: Thursday, June 02, 2005 - 07:33 PM UTC
You said it, masochists! :-) I got started on my kit yesterday, and I'm beginning to doubt my kit of choice.

The styrene is incredibly brittle and I've already broken two of the machine gun barrels and the seat. The seat was truly idiotic. It's a flat piece of plastic with the seat halves on each end. You're then supposed to bend the sides inward. Guess who broke the part?

I also noticed that one of the landing gear legs has gone missing and one of the wing supports was broken in the kit. I'll see if I can scratch-build those missing parts, although the gear leg looks like a tough one.
If it looks completely hopeless, I'll have to look for another subject when I visit my LHS next time. There should be enough time, didn't this campaign end in November? I remembered have dragon's fokker D.VIII in my stash, but that's actually a monoplane so it doesn't fit to the campaign. (How about "one wing but still praying"! :-) )
Vaasa, Finland
Joined: August 07, 2002
KitMaker: 424 posts
Armorama: 0 posts
Posted: Sunday, June 05, 2005 - 12:46 PM UTC
Progress has been made - the entire kit has been primed. I've decided that the kit needs to be fully decalled prior to any of the painting, so the next step is to hit it with a gloss coat where the decals need to go, put the lozenge, and then another gloss coat to make sure decals stay put prior to masking.
Mika
"I must, now, practice the noble craft of warfare"
- Rottenfuhrer Kopke
Moselle, France
Joined: May 15, 2005
KitMaker: 5,653 posts
Armorama: 503 posts
Posted: Sunday, June 05, 2005 - 06:45 PM UTC
Hello Mika and everybody!
I just finished my last project and I'm in the starting blocks for the campaign now! I will post some in-progress pics and comments about my I-153 in a few days!
Meanwhile, good luck to everyone and happy building!
Jean-Luc
Better think one hour and build five minutes...
Than think five minutes and build an hour!
Uusimaa, Finland
Joined: March 30, 2004
KitMaker: 2,845 posts
Armorama: 808 posts
Posted: Monday, June 06, 2005 - 05:33 AM UTC
Today I got myself Eduard's Sopwith Camel. I'll build this beaty first and then see if have the time of the will to struggle with the ICM kit. I'm sure it can be built into a good-looking model, but the brittle plastic requires extra care and some scratch-building. I'm planning to start building my camel when I get my T-34/85 built. I can then paint the tank and build the plane at the same time.
Moselle, France
Joined: May 15, 2005
KitMaker: 5,653 posts
Armorama: 503 posts
Posted: Monday, June 06, 2005 - 09:41 AM UTC
Hi Eatu!
It's to bad luck for the I-5! But the Camel seems to be a good replacement!

I started my I-153 today and I think, after dryfiting the main parts, that it will be a nice little kit to build! Not too many parts, acceptable details and no engine to deal with! The front cowling is represented in closed position!
I'll post some pics as soon as I have finished the cockpit!
jean-Luc
Better think one hour and build five minutes...
Than think five minutes and build an hour!
Joined: February 18, 2005
KitMaker: 4,303 posts
Armorama: 1,051 posts
Posted: Tuesday, June 07, 2005 - 01:55 AM UTC
Hey!
This 'masochist' is started yesterday evening with the 1:32 Nieuport 17. This is the result this far:


PAUL
Vaasa, Finland
Joined: August 07, 2002
KitMaker: 424 posts
Armorama: 0 posts
Posted: Tuesday, June 07, 2005 - 02:02 AM UTC
Paul, That's a good looking start! I've applied the gloss coat, tonight I'll start with the decals on the fuselage. I also promise to post some photos. Really.
Mika
"I must, now, practice the noble craft of warfare"
- Rottenfuhrer Kopke
Moselle, France
Joined: May 15, 2005
KitMaker: 5,653 posts
Armorama: 503 posts
Posted: Tuesday, June 07, 2005 - 10:07 AM UTC
Hi all!
The "Chaika" is on the way!

I've made the cockpit so far and then glued the two fuselage parts and the underwing. I didn't follow exactly the instructions for the cockpit as the control stick would have been behind the instrument panel! I don't know if I missed something, but the cockpit floor was too forward and I had to add some plastic card under the seat. Other than that it was okay!

The general fit is very good. I test fitted the upper wing as soon as the two fuselage halves were together to see if I could paint it separatly... it seems to be possible and this will make the camouflage painting easier... as well as the rigging!
Next step will be to prepare the sub-assemblies for painting!
Nice building everyone!
Jean-Luc
Better think one hour and build five minutes...
Than think five minutes and build an hour!
Vaasa, Finland
Joined: August 07, 2002
KitMaker: 424 posts
Armorama: 0 posts
Posted: Friday, June 10, 2005 - 12:14 AM UTC
Jean, the Chaika is coming along very nicely! As for myself, well, we'll see. After the lack of success with Micro-Sol and Roden decals and opinions on what would work better, I sat down with wing lozenges and a fresh bottle of Solvaset. These are tough little decal buggers. Solvaset was just so much water to them ... until ... I was reaching for the left wing lozenge, and knocked over the bottle of solvaset. All over my work desk, the Fokker, and myself. Lots of swear words sprang out immediately, and I started to mop up the mess, and in the haste I knocked over the bottle of Micro-Sol. All over the first mess, a Sh-2, the Fokker, and myself. So, I'm drenched in this stuff, I've got a puddle of solvents on my bench, and worst of all the lozenge decal was fully free of the backing paper. There was nothing to do but hope that the solvents wouldn't eat into my leg & desk as I maneuvered the lozenge decal on the wing. Hey, priorities. I'll heal, but a damaged lozenge is forever!
Anyway, I think it might have come out ok, though I think the bottom of the Fokker might need some touching up. I consider myself lucky that I hadn't put the bottom lozenge on yet.
Final insult: I still can't get those darn decals to snuggle down right.
Mika
"I must, now, practice the noble craft of warfare"
- Rottenfuhrer Kopke
Moselle, France
Joined: May 15, 2005
KitMaker: 5,653 posts
Armorama: 503 posts
Posted: Friday, June 10, 2005 - 04:33 AM UTC
Hello Mika!
Seems to be a hard dogfight with your Fokker! But I'm sure you will gain the overhand!
For my "Chaika", I just cut of the upper wing in three pieces! I actually saw a picture on the net wich showed there was no panel line along the upper wing fairings where the wing meets the fuselage... so I had to add some putty! To be able to paint the model later I choose to cut away the upper wings!
I'll post a picture later so you will see that more clearly!
Jean-Luc
Better think one hour and build five minutes...
Than think five minutes and build an hour!
Vaasa, Finland
Joined: August 07, 2002
KitMaker: 424 posts
Armorama: 0 posts
Posted: Friday, June 10, 2005 - 01:54 PM UTC
Here's the long promised progress photo. All in all, things are still looking good. Everything in the photo that is gray will be painted in WW1 purple.
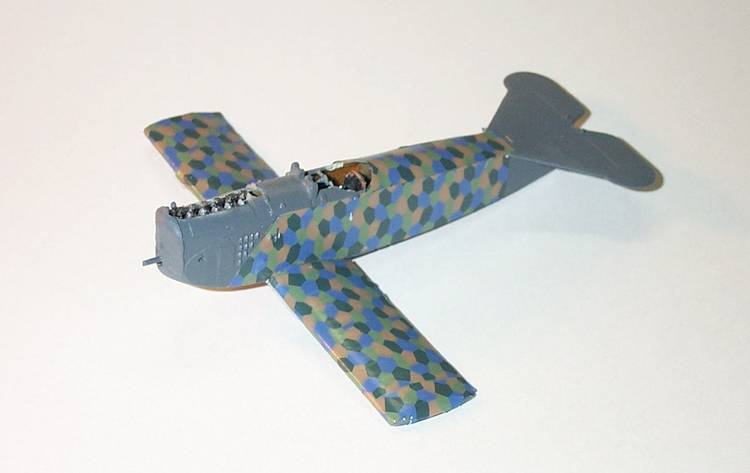
Mika
"I must, now, practice the noble craft of warfare"
- Rottenfuhrer Kopke
California, United States
Joined: July 04, 2004
KitMaker: 62 posts
Armorama: 49 posts
Posted: Friday, June 10, 2005 - 06:44 PM UTC
I am attempting my first biplane, (and 3rd plane ever ) a Polikarpov PO-2 in 1/72 scale. Hopefully I will pick up some pointers as the progression moves on.
Joined: February 18, 2005
KitMaker: 4,303 posts
Armorama: 1,051 posts
Posted: Friday, June 10, 2005 - 07:09 PM UTC
Welcome Drew!
We are looking forward to your model!
Mika, you did a great job on that decals!!
So that's the magic trick you use to put the decals on this way; first nock over 2 bottles of solvents, when everything is drowned in it, place the decals :-) :-)
But serious: it's looking great! Good luck with the painting!
Paul
Moselle, France
Joined: May 15, 2005
KitMaker: 5,653 posts
Armorama: 503 posts
Posted: Friday, June 10, 2005 - 08:46 PM UTC
Hi all!
Welcome drew!
The lozange decals are looking good despite the problems you had Mika! And I've heard there are actually guys who paint this sort of things by hand!!!! Incredible! But the decals are a good alternative and realisitic too! I think you all know that the lozange weren't painted but printed!
Good luck everyone!
Jean-Luc
P.S. for Drew: to insert a picture in your posts, simply click on the picture you want in your gallery. Then copy the pic's Url ("Copy an paste to display in forum") then go to your post text and paste the Url! Be sure to leave a space between the text and the url!
Better think one hour and build five minutes...
Than think five minutes and build an hour!
Joined: February 18, 2005
KitMaker: 4,303 posts
Armorama: 1,051 posts
Posted: Friday, June 10, 2005 - 11:28 PM UTC
[qoute]And I've heard there are actually guys who paint this sort of things by hand!!!! Incredible! [/quote]
And we thought we were masochists! :-)
California, United States
Joined: July 04, 2004
KitMaker: 62 posts
Armorama: 49 posts
Posted: Saturday, June 11, 2005 - 12:01 PM UTC
Here are some pics of my 1/72 Polikarpov PO-2 pre -painting stage, hopefully they will show up , othewise i guess you can just click on my photos. Hopefully , soon, I will get the hang of it posting pics and all!

80408
Vaasa, Finland
Joined: August 07, 2002
KitMaker: 424 posts
Armorama: 0 posts
Posted: Saturday, June 11, 2005 - 02:01 PM UTC
That Po-2 is looking really good! I like the work you've done with the control cables! One small point on the control surfaces - the ones on the wing will point in the opposite directions, so you won't get left and right dropped. One drops, the other raises.
Mika

"I must, now, practice the noble craft of warfare"
- Rottenfuhrer Kopke
California, United States
Joined: July 04, 2004
KitMaker: 62 posts
Armorama: 49 posts
Posted: Saturday, June 11, 2005 - 06:31 PM UTC
thanks for the tip Mika , I will take that advice and switch it up also thanks for the pic post I still haven't figured that out
Drew


