Campaigns
Where Armorama group builds can be discussed, organized, and updates posted.
Two Wings and a Prayer underway!
JPTRR
Staff MemberManaging Editor
RAILROAD MODELING
#051
Visit this Community
Tennessee, United States
Joined: December 21, 2002
KitMaker: 7,772 posts
Armorama: 2,447 posts
Posted: Thursday, June 23, 2005 - 05:35 AM UTC
Jean-Luc,

Great Tchaïka! Of course, I'd expect such work from the Moselle/Mosel valley

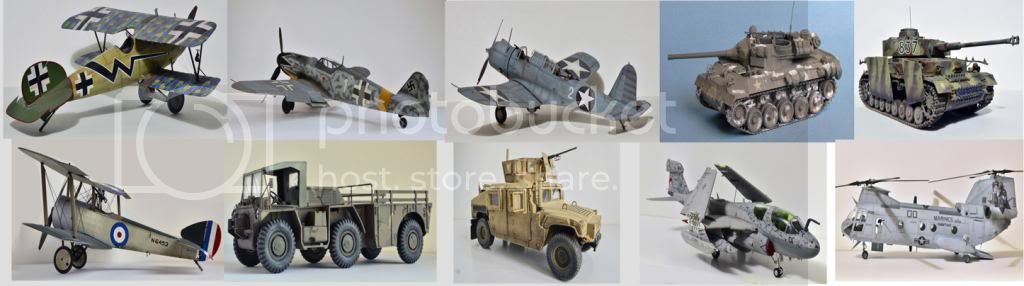
Fine control on the camoflague.
TedMamere
Visit this Community
Moselle, France
Joined: May 15, 2005
KitMaker: 5,653 posts
Armorama: 503 posts
Posted: Thursday, June 23, 2005 - 07:56 AM UTC
Hello fred!

In fact I cheated with the camouflage! I didn't painted it freehand but used paper masks I cut myself... but as we say in French "la fin justifie les moyens!" ("The end justifies the means!")

Good luck with your WW1 german air force!

Jean-luc
007
Joined: February 18, 2005
KitMaker: 4,303 posts
Armorama: 1,051 posts
Posted: Thursday, July 07, 2005 - 09:25 PM UTC
No spectacular progress at the moment. Putted the hull together and placed the wings of my Academy 1:32 Nieuport.

Paul

TedMamere
Visit this Community
Moselle, France
Joined: May 15, 2005
KitMaker: 5,653 posts
Armorama: 503 posts
Posted: Wednesday, August 03, 2005 - 08:38 PM UTC
Hi all!

Any progress on the two wings front?

Jean-Luc

PS I admit I posted this only to dig the thread out of the deep Campaign Central Command's cave!
betheyn
Staff MemberSenior Editor
AEROSCALE
#019
Visit this Community
England - South East, United Kingdom
Joined: October 14, 2004
KitMaker: 4,560 posts
Armorama: 510 posts
Posted: Thursday, August 04, 2005 - 02:49 AM UTC
This is a Nichimo Tachikawa KI-9 Spruce which was used by the Japanese army as a training plane.
It started out orange and finished orange so i'm dedicating it to all the Dutch people out there as their OFFICIAL plane lol

Emeritus
Visit this Community
Uusimaa, Finland
Joined: March 30, 2004
KitMaker: 2,845 posts
Armorama: 808 posts
Posted: Friday, August 05, 2005 - 10:51 AM UTC
Nice subtle weathering you have there! A good looking plane. Is the rigging metal wire?

I've made so much progress as washing the sprues and buying some paint for the project.... I'll get building as soon as I get my Narcissus shuttle finished.
modelguy2
Visit this Community
Ohio, United States
Joined: March 09, 2002
KitMaker: 818 posts
Armorama: 269 posts
Posted: Friday, August 12, 2005 - 07:58 AM UTC
Some great looking planes so far. I like the orange willow-something you don't see every day and the silver russian plane's an excellent job as well. Looking forward to the DVII. Here's my Roden Bristol F.2B:


TedMamere
Visit this Community
Moselle, France
Joined: May 15, 2005
KitMaker: 5,653 posts
Armorama: 503 posts
Posted: Friday, August 12, 2005 - 09:19 AM UTC
Hey Mike!

Great job! That's what I call rigging! :-) It looks awsome! Do you have in-progress shots? I would love to see how the hell you made this!

Jean-Luc
modelguy2
Visit this Community
Ohio, United States
Joined: March 09, 2002
KitMaker: 818 posts
Armorama: 269 posts
Posted: Friday, August 12, 2005 - 09:36 AM UTC
Thanks Jean-Luc.

It's just OOB. The lower wing was a pain and I remember cussing and wishing the entire time why doesn't Eduard have one of these! of course as I was decalling the Eduard kit was released.Mike T
betheyn
Staff MemberSenior Editor
AEROSCALE
#019
Visit this Community
England - South East, United Kingdom
Joined: October 14, 2004
KitMaker: 4,560 posts
Armorama: 510 posts
Posted: Friday, August 12, 2005 - 10:35 AM UTC

Quoted Text

Nice subtle weathering you have there! A good looking plane. Is the rigging metal wire?


Thanks. Yes, the rigging is metal and it came with the kit. I had to cut it to the right length, so i'm quite surprised i didn't b er it up :-) :-).
Mike that is one nice Roden Bristol F.2B you have built there.
almonkey
Visit this Community
England - East Midlands, United Kingdom
Joined: March 23, 2003
KitMaker: 2,124 posts
Armorama: 192 posts
Posted: Saturday, August 13, 2005 - 02:35 AM UTC
hi all! i come late to the party, i have quite a stash of biplanes and a fondness for building them. what i have to choose from are-
heller roland C-II
airfix tiger moth
academy sopwith camel
and possibly a matchbox gloster gladiator
all kits in 1/72
Emeritus
Visit this Community
Uusimaa, Finland
Joined: March 30, 2004
KitMaker: 2,845 posts
Armorama: 808 posts
Posted: Saturday, August 13, 2005 - 03:36 AM UTC
I've started my sopwith camel. I'll post pics when I get the cockpit and engine built and painted. I've started with the cockpit and the engine is ready for painting.
TedMamere
Visit this Community
Moselle, France
Joined: May 15, 2005
KitMaker: 5,653 posts
Armorama: 503 posts
Posted: Saturday, August 13, 2005 - 04:10 AM UTC

Quoted Text

hi all! i come late to the party, i have quite a stash of biplanes and a fondness for building them. what i have to choose from are-
heller roland C-II
airfix tiger moth
academy sopwith camel
and possibly a matchbox gloster gladiator
all kits in 1/72


Hi Baron!

I thought you were in Spain! :-)

Welcome to the campaign! It's always hard to make a choice! Build them all! #:-) (++)

Jean-Luc
almonkey
Visit this Community
England - East Midlands, United Kingdom
Joined: March 23, 2003
KitMaker: 2,124 posts
Armorama: 192 posts
Posted: Saturday, August 13, 2005 - 04:21 AM UTC
hi ivan! i thought YOU were in spain! theres every chance i might build them all, but today i bought a heinkel he 70 that id like to do in spanish civil war colours (and i have a roden he 111 pedro) for some strange reason im getting a taste for kits from that conflict.

the baron
Emeritus
Visit this Community
Uusimaa, Finland
Joined: March 30, 2004
KitMaker: 2,845 posts
Armorama: 808 posts
Posted: Thursday, August 18, 2005 - 07:14 AM UTC
Now I have some in-progress pics to show:
Image hosted by Photobucket.com
I had to replace nearly half of the pushrods on the engine, because the delicate parts broke when removed from the sprue. I used copper wire for the replacement parts. All I did was drill small holes for them in the engine and attach the wires with superglue.

The fuselage halves are nearly ready. I'm still thinking about weathering the linen and metal colored parts, but I don't think they will be that visible. The wooden parts have recieved a wash and drybrushing, because they will be the most visible part of the cockpit. The tank behind the seat still lacks weathering. And more about the seat. Next time I'll probably use PE seats. Eduard provides plastic seats plus decals which simulate the wicker material on the seats. The decals were good and went on well but the decal on the inside was very tricky to get right. I need at least four hads to be able to it without trouble. :-) One to hold the seat, one to hold and bend the decal sheet, one to slide the decal from the sheet and one to guide the decal in place on the seat!
But after some struggling, I got the inside decal attached. The PE seatbelts will then nicely hide any imperfections.

Next I'll be closing up the fuselage and starting to work with the wings.
TedMamere
Visit this Community
Moselle, France
Joined: May 15, 2005
KitMaker: 5,653 posts
Armorama: 503 posts
Posted: Thursday, August 18, 2005 - 08:56 AM UTC
Hi Eetu!

Your interior work is great! If you manage to get the outside as good... you'll have a fantastic model!

I'll stay tuned for further in-progress pictures!

Jean-Luc
Emeritus
Visit this Community
Uusimaa, Finland
Joined: March 30, 2004
KitMaker: 2,845 posts
Armorama: 808 posts
Posted: Thursday, August 18, 2005 - 10:44 PM UTC
Some more progress. I attached the seat and seatbelts yesterday.
Image hosted by Photobucket.com
That was quite a struggle. I should have glued the lower belts before gluing the seat on the frame. The component is almost ready, I still have to do some touch ups.

I have been working with the instrument panel too. The dial decals are in place and soon I'll be closing up the fuselage.
JPTRR
Staff MemberManaging Editor
RAILROAD MODELING
#051
Visit this Community
Tennessee, United States
Joined: December 21, 2002
KitMaker: 7,772 posts
Armorama: 2,447 posts
Posted: Tuesday, August 23, 2005 - 06:48 AM UTC
Here we go!

This is AHM's late 60s-early 70s "1/87" 1/100 Boeing F4B-B, U.S.S. Ranger, 3rd Section leader, Fighting Sqd. Two, Flying CPOs.


FWIW, I have been so impressed that I have bought most of these, and the couple I have worked on are real gems! The detail for the size is great, the control surfaces are positionable, that engine is well detailed, the fit was better than some of today's kits, and the 35-year-old decals are superior to my current Hasegawa and Monogram kits

AHM even supplied 3 gunsights and three antennes, no doubt because they are so fine.

Looking forward to my next one, I think I'll do the F3F or P-6E.
TedMamere
Visit this Community
Moselle, France
Joined: May 15, 2005
KitMaker: 5,653 posts
Armorama: 503 posts
Posted: Tuesday, August 23, 2005 - 07:39 AM UTC
Hi Fred!

Looks great! So... how can I say... Hmmm... CLEAN!

Wasn't it too difficult for the weathering specialist you are not to add some paint chipping, exhaust stains, dirt etc... :-)

Anyway, the Golden Age planes are looking better when build that way. After all, they didn't saw combat!

Jean-Luc
JPTRR
Staff MemberManaging Editor
RAILROAD MODELING
#051
Visit this Community
Tennessee, United States
Joined: December 21, 2002
KitMaker: 7,772 posts
Armorama: 2,447 posts
Posted: Tuesday, August 23, 2005 - 12:07 PM UTC

Quoted Text

So... how can I say... Hmmm... CLEAN!

Wasn't it too difficult for the weathering specialist you are not to add some paint chipping, exhaust stains, dirt etc... :-)


Is there an emoticon for "I'm embarrassed"? #:-)

Yeah, it feels...so...unnatural, a clean aerocraft 
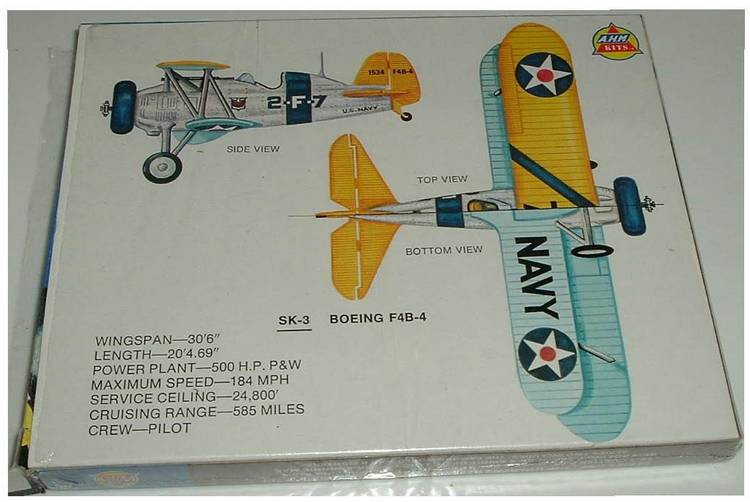
But there is a method to my madness. I have scrutinized my Monogram USN colors & markings book, CARRIER AIR WAR IN ORIGINAL WWII COLOR, and a couple of WINGS or AIR POWER magazines with color pre-war NavAir. The planes are clean! Even in-flight and post-flight shots show an amazing lack of even exhaust There is a SNJ with a little chipping around an anti-skid pad, and some light gray F4Fs with a little grime around their cowl lines, but I am suprised at how clean they are, even aboard ships.

BTW, there is an in-flight shot c.1940 of a trio of F4B-4s of a training unit; color & markings almost like pre-war (curiously, there is no red center in the top wing national insignia, yet no national insignia on the fuselage. Again, these planes make mine look filthy!

I have a copy of the Technicolor movie Divebomber. I'll pull it out and see if the birds in it are always as clean.


Can any of you out there confirm this--were these birds really that well kept? I know they were well cared for, but this clean?
TreeCat
Visit this Community
Tennessee, United States
Joined: March 17, 2004
KitMaker: 187 posts
Armorama: 0 posts
Posted: Tuesday, August 23, 2005 - 12:26 PM UTC
construction complete Hobbycraft 1/32 Scale Spad fighter.

Have not begun to paint it
Emeritus
Visit this Community
Uusimaa, Finland
Joined: March 30, 2004
KitMaker: 2,845 posts
Armorama: 808 posts
Posted: Sunday, September 04, 2005 - 09:22 PM UTC
Here's a pic of my Camel before I start attaching the struts to the wings.
Image hosted by Photobucket.com
I think I'll glue the outer wing struts to the lower wing and the inner ones to the upper wing. I'll then paint and decal the upper wing separately and attach it right before rigging.
TedMamere
Visit this Community
Moselle, France
Joined: May 15, 2005
KitMaker: 5,653 posts
Armorama: 503 posts
Posted: Monday, September 05, 2005 - 03:13 AM UTC
Hi Eetu!

Glad you made some progress on your Camel. Looks good so far!

Did you already choose your paintscheme? I just found one in Aéro Journal n°44 (French magazine) wich is very colourfull at least! It's aCamel Flown by Captain L.P. Coombes in an instruction squadron in november 1918... Colors are red, white, black, dark green, medium blue, dark blue and beige (linen?) And that in geometrical patterns that would have made Mondrian look like an amateur! Very psychedelic!

Jean-Luc
Emeritus
Visit this Community
Uusimaa, Finland
Joined: March 30, 2004
KitMaker: 2,845 posts
Armorama: 808 posts
Posted: Monday, September 05, 2005 - 04:34 AM UTC
I'm planning to go for a classic scheme of Beige (linen) under surfaces, dark green uppers and a red cowling / front fuselage. I'm open to suggestion, however. Do you have any pics of that psychedelic paint job? Was it like lozenge on German planes?
TedMamere
Visit this Community
Moselle, France
Joined: May 15, 2005
KitMaker: 5,653 posts
Armorama: 503 posts
Posted: Monday, September 05, 2005 - 05:08 AM UTC
Hi Eetu!

I knew I would make you curious! :-)

I don't know if it is a good idea... but since you asked for, Voilà!


I hope you have enough masking tape left...

Jean-Luc