Яusso-Soviэt Forum: Cold War Soviet Armor
For discussions related to cold war era Russo-Soviet armor.
My new T-55 has arrived!
GunTruck
Visit this Community
California, United States
Joined: December 01, 2001
KitMaker: 5,885 posts
Armorama: 3,799 posts
Posted: Friday, February 21, 2003 - 08:34 AM UTC
Hey Sniper (Steve) - made any progress on your T-55? I didn't get a chance to do any painting last week - got waylaid by the Wife and a whole day of shopping at IKEA and doing other honey-do's...

Planning on hitting the workbench in the morning though!

Gunnie
sniper
Visit this Community
New York, United States
Joined: May 07, 2002
KitMaker: 1,065 posts
Armorama: 508 posts
Posted: Friday, February 21, 2003 - 02:51 PM UTC

Quoted Text

Hey Sniper (Steve) - made any progress on your T-55? I didn't get a chance to do any painting last week - got waylaid by the Wife and a whole day of shopping at IKEA and doing other honey-do's...

Planning on hitting the workbench in the morning though!

Gunnie


Got the base coat, wash, and a dry brush done. Did some heavy pastels, looked great, hit it with clear flat and all the pastel work dissapeared! Ugh!

One thing, this is GREEN with very little to break it all up. Check out Missing Links and go to What's New. There is a beautiful T-55 up. Just a fantastic finish on that one.

I think I have to do some serious paint chipping.

I've had it put up for a couple days (been a little under the weather) so I hope to do some work tomorrow and Sunday too.

Let me know how it goes this weekend with you. I hope to get the digital camera and get a few pics up in a week or so.

Steve
kkeefe
Visit this Community
Massachusetts, United States
Joined: May 12, 2002
KitMaker: 1,416 posts
Armorama: 0 posts
Posted: Friday, February 21, 2003 - 04:14 PM UTC

Quoted Text

On a side note, having never built any other Russian kits I'm a little surprised at the size of the tank compared to my other modern tank kits. The turret on my Leo 2A5 alone is almost as long as the whole T-55 (not including the cannon). Are other Russian tanks in the same size range? I know size isn't an indicator of how effective the tank is but I just thought it was interesting.

later,
Mike


Soviet armor was not known for it's crew comforts. Quite hard on the body if cooped up in any of it for any length of time.
sniper
Visit this Community
New York, United States
Joined: May 07, 2002
KitMaker: 1,065 posts
Armorama: 508 posts
Posted: Saturday, February 22, 2003 - 11:21 AM UTC

Just about to get out the airbrush and do some dust.

Gunnie, you busy shopping or did you get some paint on that sucker?

Steve
GunTruck
Visit this Community
California, United States
Joined: December 01, 2001
KitMaker: 5,885 posts
Armorama: 3,799 posts
Posted: Saturday, February 22, 2003 - 03:13 PM UTC

Quoted Text


Just about to get out the airbrush and do some dust.

Gunnie, you busy shopping or did you get some paint on that sucker?

Steve


Can't believe I'm up on the Forum tonight! It's been a long time since I made a Saturday night visit

I was up editing a portion of an article submission - and messing around with my T-55 Steve. I began painting about an hour ago - pics up tomorrow around midday. I had to break down and toss that uninspiring vinyl mesh Tamiya give you in the kit. I have some fine brass mesh in place of it now - like the looks much better. I took some pics of the naked model before painting - but I don't know why - it's so clean to begin with anyway...

I'm aiming to have the basic color coat and intial weathering/fading done before the end of tomorrow. I'll drop pics here in this thread...

Gunnie
GunTruck
Visit this Community
California, United States
Joined: December 01, 2001
KitMaker: 5,885 posts
Armorama: 3,799 posts
Posted: Sunday, February 23, 2003 - 08:53 AM UTC
Okay Sniper - here's a couple of pics before the paint goes on. I'm now just going to add fuel lines and power cables for the searchlights and headlights before painting this afternoon...


I've decided to induce the track sag after painting. I'm constructing a jig that I can insert underneath the sponsons to clamp the tracks in place while I use tiny drops of 5-minute epoxy on the tops of the road wheels closest to the hull. Only other thing I felt I had to do was replace the Tamiya supplied mesh with finer brass mesh. I really don't see a huge need for photoetching - the basic kit is pretty nice.


For those of you who haven't gotten into this kit yet - I think you'll like it a lot. I never realized how wicked the T-55 could look until building my first one. The low-slung turret and big barrel make the tank look sinister.

Gunnie
sniper
Visit this Community
New York, United States
Joined: May 07, 2002
KitMaker: 1,065 posts
Armorama: 508 posts
Posted: Sunday, February 23, 2003 - 01:30 PM UTC

Quoted Text

Okay Sniper - here's a couple of pics before the paint goes on. I'm now just going to add fuel lines and power cables for the searchlights and headlights before painting this afternoon...

Gunnie


Lookin' good man. Like the brass screen, should have thought of that too.

Could you do me a favor? Would love a detail photo or two of the fuel lines when you get those put on.

Yeah, other than new engine screens and some straps, I don't see too much need for a whole PE set!! Separate fenders would be nice too. I also modified the brackets that hold the unditching log. I'm leaving the unditiching beam off, but if I was going to use one I would try to find a substitute out in the backyard.

What will be nice are some coversions, because there are some great T-55 variants out there.

The varient you chose looks good. I think I like the turret better that way than the 'a' model I did. With the DShK on top, it will look mean. Think I might do that on my next one.

Can't wait to see more photos!

Steve
GunTruck
Visit this Community
California, United States
Joined: December 01, 2001
KitMaker: 5,885 posts
Armorama: 3,799 posts
Posted: Sunday, February 23, 2003 - 02:26 PM UTC

Quoted Text


Quoted Text

Okay Sniper - here's a couple of pics before the paint goes on. I'm now just going to add fuel lines and power cables for the searchlights and headlights before painting this afternoon...

Gunnie


Lookin' good man. Like the brass screen, should have thought of that too.

Could you do me a favor? Would love a detail photo or two of the fuel lines when you get those put on.

Yeah, other than new engine screens and some straps, I don't see too much need for a whole PE set!! Separate fenders would be nice too. I also modified the brackets that hold the unditching log. I'm leaving the unditiching beam off, but if I was going to use one I would try to find a substitute out in the backyard.

What will be nice are some coversions, because there are some great T-55 variants out there.

The varient you chose looks good. I think I like the turret better that way than the 'a' model I did. With the DShK on top, it will look mean. Think I might do that on my next one.

Can't wait to see more photos!

Steve


You've got it - I'll take photos of the fuel line setup before painting it and post them here in this thread. Man, it took days to piece enough information together to take a crack at it! Since Tamiya's detail on the "Pillow Tanks" is simplistic, I'm gonna stick with it and make simple solder fuel lines.

I also loved that AA Gun - that is the best small weapon I've ever seen Tamiya do. Should be a separate kit. Late this afternoon, I decided to make my model a T-55A Model 1970, so I just went back and added Part #D40 (the Radiation Shield bulge) to my Driver's Hatch. I thought the detail would look better since I'm mounting the DShK Machine Gun and the rest of the details already present on the model. I decided to actually use the Commander Figure too - a first for me - but put him in the other cupola for variety. Gotta "beef-up" the butt area to make the sit of the figure look more natural in this location. He can wait until the end, though...

Gunnie
GunTruck
Visit this Community
California, United States
Joined: December 01, 2001
KitMaker: 5,885 posts
Armorama: 3,799 posts
Posted: Saturday, March 01, 2003 - 06:12 AM UTC
Steve - here's a quick series of pics including the simple fuel line detail I added to my T-55 Pillow Tanks. I used .010" and .031" thickness of solder to better mimic the two different thicknesses of lines I saw in photos and the T-55 Technical Manual. I think the detail is simple, but matches the simple line detail in other places on the model - and looks appropriate.

Gunnie


Kelley
Visit this Community
Georgia, United States
Joined: November 21, 2002
KitMaker: 1,966 posts
Armorama: 1,635 posts
Posted: Saturday, March 01, 2003 - 11:10 AM UTC
Thanks Gunny, these will also be useful to me, do this and I'm ready to paint. By the way I have already seen several T-55's with various paint jobs, below is a link to one built and painted by Charlie Pritchett that Mig posted on one of the ML forums. It is painted as an Iraqi T-55 and really looks good. I thought it might be of interest to some.

Cheers,
Mike

http://www.network54.com/Hide/Forum/message?forumid=110741&messageid=1046471098
sniper
Visit this Community
New York, United States
Joined: May 07, 2002
KitMaker: 1,065 posts
Armorama: 508 posts
Posted: Monday, March 03, 2003 - 04:23 AM UTC

Thanks Gunnie!

Looks much better with your fuel line addition. I have to order another one and give it the treatment. I will use your photos as a guide. That's a big help.

Man, I like this kit.

Mike, that's a nice looking T55 on that ML link. Wonder where the decal came from? Would like to get that set, if it's available aftermarket.

Steve

Kelley
Visit this Community
Georgia, United States
Joined: November 21, 2002
KitMaker: 1,966 posts
Armorama: 1,635 posts
Posted: Monday, March 03, 2003 - 05:27 AM UTC
Steve,
Charlie stated in another post that he had painted the markings using a gulf war photo as reference.

Mike
sniper
Visit this Community
New York, United States
Joined: May 07, 2002
KitMaker: 1,065 posts
Armorama: 508 posts
Posted: Monday, March 03, 2003 - 06:10 AM UTC

Quoted Text

Steve,
Charlie stated in another post that he had painted the markings using a gulf war photo as reference.

Mike


I see now. Wow. That is one great looking model!

Steve
sniper
Visit this Community
New York, United States
Joined: May 07, 2002
KitMaker: 1,065 posts
Armorama: 508 posts
Posted: Friday, March 07, 2003 - 08:34 AM UTC

Gunnie,

Any progress on the T-55?

I started dry brushing last night after a few sessions of airbrush weathering. Looking good, but I did order a set of Model Kasten tracks.

I'd like to get a couple of in-progress photos up.

Steve
GunTruck
Visit this Community
California, United States
Joined: December 01, 2001
KitMaker: 5,885 posts
Armorama: 3,799 posts
Posted: Friday, March 07, 2003 - 08:54 AM UTC

Quoted Text


Gunnie,

Any progress on the T-55?

I started dry brushing last night after a few sessions of airbrush weathering. Looking good, but I did order a set of Model Kasten tracks.

I'd like to get a couple of in-progress photos up.

Steve


Yep - I painted the whole model on Sunday afternoon. I've got the subassemblies glossed for decal (what little there is) for tomorrow. I was planning to update 'ya tomorrow. I already weathered the Tamiya tracks, so I'm gonna use them...

I decided to go with a mix of Tamiya Acrylic XF-58 Olive Green (3 parts) and XF-21 Sky (1 part) for my model. The lacquer and dull coats will darken it up nicely. The only thing I've been debating over this week was how to weather the model. The examples I've seen completed are really heavily weathered. Way over the top in some cases. I'm modeling a Soviet machine, kinda don't think they were that beat up. Since I haven't decided what time period and theatre I want to model in - I haven't a solid thought on how I want to present the model.

I'm also debating on whether or not to fit a laser rangefinder to the Turret too. Depends on what I eventually decide to model. I'm just having too much fun with it so far...

Gunnie
Jacques
Visit this Community
Minnesota, United States
Joined: March 04, 2003
KitMaker: 4,630 posts
Armorama: 4,498 posts
Posted: Friday, March 07, 2003 - 09:21 AM UTC
Nice work guys...I am finishing up my T-72BM (you know, the T-90 conversion from Kirin) with extra details before I tackle the beasie...in the box it still looks like a gem though.

I am going to build the Tamiya kit side-by-side to the trumpeter kit. Just to prove I can do it #:-)

Also, before all those who bemoan the trumpeter kit come out, I have one of those old Lindberg kits I did YEARS ago. all I can say is UGH! Makes the Tamiya and Trumpeter kits look like twins.
sniper
Visit this Community
New York, United States
Joined: May 07, 2002
KitMaker: 1,065 posts
Armorama: 508 posts
Posted: Friday, March 07, 2003 - 09:24 AM UTC

Quoted Text

I've got the subassemblies glossed for decal (what little there is) for tomorrow.


Think I'm going to try and hand-paint the markings on mine. Yes, it scares me too...

Steve
GunTruck
Visit this Community
California, United States
Joined: December 01, 2001
KitMaker: 5,885 posts
Armorama: 3,799 posts
Posted: Friday, March 07, 2003 - 09:40 AM UTC

Quoted Text

Nice work guys...I am finishing up my T-72BM (you know, the T-90 conversion from Kirin) with extra details before I tackle the beasie...in the box it still looks like a gem though.


Ooooh - is this the "Lion of Babylon" that I've heard naughty things about?!? Man - if I had one in my collection, I'd build it right along side with you - share the pain #:-)

I'd like to see one built-up nicely though!

Sniper Steve - yep, I was comtemplating painting my T-55 Turret Markings too, but more like cutting my own stencils and airbrushing. I still might decide to do it - I'm unpredictable sometimes Funny, I almost want to do anything other than use Tamiya decals! It makes me laugh sometimes...

Gunnie
Jacques
Visit this Community
Minnesota, United States
Joined: March 04, 2003
KitMaker: 4,630 posts
Armorama: 4,498 posts
Posted: Friday, March 07, 2003 - 02:32 PM UTC
no, the "lion of Babylo" was a M-84, the yugoslavian tank wasn't it?

The Kirin kit is supposed to be a T-90, (and was later used by Terre Models and AEF to make a more "accurate" version) but they are ALL really T-72BM's. The T-72BM was sorta the test bed for the T-90 (when the next upgrade from the T-72BM was made, instead of keeping the "bad" name of the T-72, they made it the T-90. For some reason, the T-72 got a bad rap in DS. ) Overall it is a ok kit, not worth the money I paid,but not a throw away. It goes on the DML T-72M2 kit, so there are other problems as well. I will post once I have re-finished it. Every couple of years or so I have topull it out and use all my new techniques onit and usually make it look better.
GunTruck
Visit this Community
California, United States
Joined: December 01, 2001
KitMaker: 5,885 posts
Armorama: 3,799 posts
Posted: Saturday, March 08, 2003 - 03:32 PM UTC
Sniper Steve - here's my weekly progress update on my Tamiya T-55 model:

I've not applied the turret markings yet - so no pic of the glossed turret - ya know what that looks like anyway #:-)

While the turret is sitting there drying, I began weathering the rest of the model. All the weathering in the initial stages will be accomplished with water and pastels - only...


The basic model painted and faded with the airbrush. This color is the a mixture of 3 parts XF-58 Olive Green to 1 part XF-21 Sky as a base tone. The filter coat is the base tone with a tiny bit more XF-21 Sky, thinned about 80%. As the light level decreases around the model - the filter becomes more apparent - an advantage in horrendous lighting conditions like last months IPMS SVSM contest here in my neck of the woods...


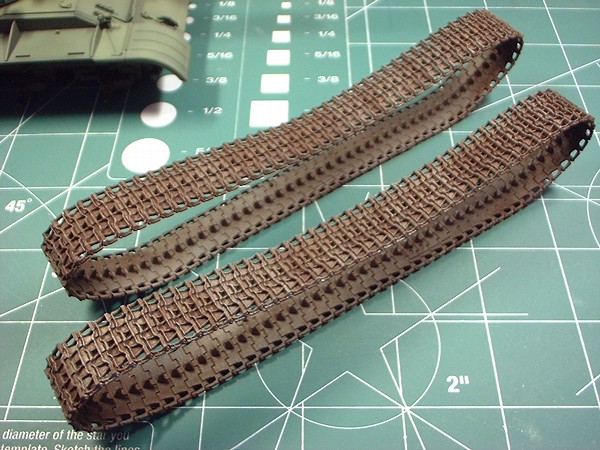
The tracks. I left them attached on the tank to dry for about a week so that they could be "trained" to hold their shape. When I got my kit, they were warped slightly. However, the tension of fitting them in place on the model was enough to get them back into shape again. The track runs were painted Flat Black, then oversprayed with my Steel Track Mixture (90% XF-56 Metallic Grey to 10% Flat Black). I began the weathering with pastel chalk suspended in water. I'll finish weathering them before I put them onto the tank model.


I finished the exhaust tunnel with black and light grey pastels - applied dry instead of wet. Did the same to the inside upper truck part too.


The backsides of the road wheels in initial weathering stages too. They'll match the underside of the hull weathering later on.


The spare track links were painted and initially weathered like the track runs, and I tossed in a couple of Grandt Line bolts to "secure" them in place to the fender. The lighting is a bit bright, so the basic weathering of the hull areas is a bit subdued in these photos. I wanted to weather the sponson areas before attaching the Fuel Tanks and Stowage Boxes to ensure depth is there in the completed model.

Gunnie
Tiger101
Visit this Community
Pennsylvania, United States
Joined: March 02, 2002
KitMaker: 902 posts
Armorama: 628 posts
Posted: Saturday, March 08, 2003 - 03:48 PM UTC
Great job so far the tracks look awesome. what did you use to weather them. I also think your fuel lines look fantastic.
GunTruck
Visit this Community
California, United States
Joined: December 01, 2001
KitMaker: 5,885 posts
Armorama: 3,799 posts
Posted: Saturday, March 08, 2003 - 03:54 PM UTC

Quoted Text

Great job so far the tracks look awesome. what did you use to weather them. I also think your fuel lines look fantastic.


Thank you! I painted the track runs with Tamiya Acrylic XF-1 Flat Black. I then oversprayed them with a steel track mixture I make up = 90% XF-56 Metallic Grey and 10% Flat Black - the mix thinned up to 75%. When dry, I then mixed up pastel chalk with plain water, and "washed" the tracks.

Sometimes, I'll go back and seal the tracks with Dull Cote and then wash them with a really thin Raw Umber oil mixture and then hit the highlights with a mixture of Silver and Raw Umber oils. Silver straight out of the tube is too brilliant, in my opinion, so I cut it with the Raw Umber a bit...

Gunnie
Kelley
Visit this Community
Georgia, United States
Joined: November 21, 2002
KitMaker: 1,966 posts
Armorama: 1,635 posts
Posted: Saturday, March 08, 2003 - 04:29 PM UTC
Looking good Gunnie. What are you using to get the reddish-brown tone?

Mike
GunTruck
Visit this Community
California, United States
Joined: December 01, 2001
KitMaker: 5,885 posts
Armorama: 3,799 posts
Posted: Saturday, March 08, 2003 - 05:26 PM UTC

Quoted Text

Looking good Gunnie. What are you using to get the reddish-brown tone?

Mike


Just a combination of brown and orange-brown pastel chalk scrapings...

Gunnie
Jacques
Visit this Community
Minnesota, United States
Joined: March 04, 2003
KitMaker: 4,630 posts
Armorama: 4,498 posts
Posted: Saturday, March 08, 2003 - 05:34 PM UTC
really looks good, I will have to try the pastels in water suspension to see how it comes out...I mainly use dry pastels and then overcoat with clear flat. Any technique hints?