Campaigns
Where Armorama group builds can be discussed, organized, and updates posted.
Where Armorama group builds can be discussed, organized, and updates posted.
Hosted by Darren Baker, Richard S.
Shermans!

PantherF

Joined: June 10, 2005
KitMaker: 6,188 posts
Armorama: 5,960 posts

Posted: Friday, July 25, 2008 - 12:52 PM UTC
gamodelmaker

Joined: May 07, 2008
KitMaker: 186 posts
Armorama: 129 posts

Posted: Friday, July 25, 2008 - 03:15 PM UTC
thanks for the kind words as for the forage the stuff is mind crafts. you can get it from michales or micro mark.it was a fun build and i do want to get academys new m7 priest to go along with it. and this is my frist compete gb on this site. now i just have to figure out how to post on kitmaker site and add the ribbon as for adding the foilage it to the model just use white glue
JeepLC

Joined: June 20, 2007
KitMaker: 510 posts
Armorama: 469 posts

Posted: Friday, July 25, 2008 - 07:04 PM UTC
I want that RC sherman!!! That thing looks awesome. Hours of fun I'd say.
-Mike
-Mike
beefy66

Joined: October 22, 2007
KitMaker: 971 posts
Armorama: 280 posts

Posted: Saturday, July 26, 2008 - 12:33 AM UTC
Hours of fun definetly with that R/C Crab plus the wife would not complain about not getting the grass cut 


PantherF

Joined: June 10, 2005
KitMaker: 6,188 posts
Armorama: 5,960 posts

Posted: Saturday, July 26, 2008 - 01:51 AM UTC


PantherF

Joined: June 10, 2005
KitMaker: 6,188 posts
Armorama: 5,960 posts

Posted: Sunday, July 27, 2008 - 08:45 AM UTC
Here's a couple new progress pics. Still have the tools left and then mess it all up with weathering, or just leave it the way it is. 


I am running out of time though.


I am running out of time though.

BobCard

Joined: August 09, 2006
KitMaker: 1,008 posts
Armorama: 847 posts

Posted: Sunday, July 27, 2008 - 11:52 AM UTC
All done. Still want to put it in a diorama, and am working on that part,
I also added these to the campaign gallery.


Now I think I'll switch over to a Tank Dozer in Peleliu
Good Luck to those remaining and we really have some great builds,
Thanks for the Campaign
Bob

I also added these to the campaign gallery.
Now I think I'll switch over to a Tank Dozer in Peleliu
Good Luck to those remaining and we really have some great builds,
Thanks for the Campaign
Bob

Posted: Sunday, July 27, 2008 - 08:42 PM UTC
Very unique Sherman, Keith. It looks stunning! I am looking forward to see it in full battle colours.
Excellent Sherman, Bob. You must have a whole company of PTO Shermans soon
Looking forward to see more
Excellent Sherman, Bob. You must have a whole company of PTO Shermans soon

Looking forward to see more

beefy66

Joined: October 22, 2007
KitMaker: 971 posts
Armorama: 280 posts

Posted: Monday, July 28, 2008 - 11:56 PM UTC
Jeff you have got to mess it up a little never seen any pics of a clean sherman in the feild.
Bob brilliant work love the faded O/D and the figures just add that extra touch of class
Well we,ve had two days of sunshine here but just managed to get sum paint on when it it got cooler I don,t know about any of you guys but my air brush does not like the warmer wheather unless it,s just me being lazy .Here are sum pics with the basic O/D shades and a light dusting more detail painting and washes to follow.


Bob brilliant work love the faded O/D and the figures just add that extra touch of class

Well we,ve had two days of sunshine here but just managed to get sum paint on when it it got cooler I don,t know about any of you guys but my air brush does not like the warmer wheather unless it,s just me being lazy
 .Here are sum pics with the basic O/D shades and a light dusting more detail painting and washes to follow.


PantherF

Joined: June 10, 2005
KitMaker: 6,188 posts
Armorama: 5,960 posts

Posted: Tuesday, July 29, 2008 - 12:29 AM UTC
Outstanding Keith!! Your weathering is what I hope to accomplish on mine. Care to share how it was done? So, was it a difficult one to build? I always wanted that kit, but hesitated.
Yeah I know mine is a little clean. I did make the plunge buying some pigments for the first time. I have an old build I'll be practising on to see what I can do. That'll happen after I put the tools on that are drying as we speak.
Yeah I know mine is a little clean. I did make the plunge buying some pigments for the first time. I have an old build I'll be practising on to see what I can do. That'll happen after I put the tools on that are drying as we speak.
beefy66

Joined: October 22, 2007
KitMaker: 971 posts
Armorama: 280 posts

Posted: Tuesday, July 29, 2008 - 03:21 AM UTC
Jeff the pics you see are the kit in just paint, First used tamiya O/D straight from jar with windscreen wash as thinner,then used Nato Green with a drop of Buff to lighten the center of all pannels,then used kahki drab and buff to spray some streaks,then lastly use buff again thinned right down 80% sceenwash 20% paint on all the lower hull and running gear.The kit is a bit of a laubour of love some of the main parts where shaped like a banana the main support brase had to be scratched because the kit part had shrunk  .It took a while to build but what you get with the ledgends convestion makes it worth while I think.Still have a couple of oil washes some detail painting and pigments to make it all dirty
  thats the bit i like doing
 .It took a while to build but what you get with the ledgends convestion makes it worth while I think.Still have a couple of oil washes some detail painting and pigments to make it all dirty
  thats the bit i like doing
skyhawk

Joined: June 03, 2003
KitMaker: 1,095 posts
Armorama: 743 posts

Posted: Tuesday, July 29, 2008 - 03:38 AM UTC
Keith,
outstanding Crab!! that is on my to do list someday.... It would a awesome if Dragon chose to do some "funnies" with the sherman line..a Crab, WizBang, DD, Calopie, and even a Dozer woud be fantastic (and would make perfect 3-1 kits)
cant wait to see this one done
Andy
outstanding Crab!! that is on my to do list someday.... It would a awesome if Dragon chose to do some "funnies" with the sherman line..a Crab, WizBang, DD, Calopie, and even a Dozer woud be fantastic (and would make perfect 3-1 kits)
cant wait to see this one done
Andy
Quoted Text
Jeff you have got to mess it up a little never seen any pics of a clean sherman in the feild.
Bob brilliant work love the faded O/D and the figures just add that extra touch of class
Well we,ve had two days of sunshine here but just managed to get sum paint on when it it got cooler I don,t know about any of you guys but my air brush does not like the warmer wheather unless it,s just me being lazy.Here are sum pics with the basic O/D shades and a light dusting more detail painting and washes to follow.
skyhawk

Joined: June 03, 2003
KitMaker: 1,095 posts
Armorama: 743 posts

Posted: Tuesday, July 29, 2008 - 03:47 AM UTC
Work continues on the Dragon M4A3E8… Ive done the filters, wash, and drybrushing on the tank itself as preliminary steps toward final weathering, and installed the tracks (which still need some work). While I was painting the base, I hit the lower areas of the Sherman with the same color for the start of dust effects.


WIP blog started here:
https://armorama.kitmaker.net/modules.php?op=modload&name=SquawkBox&file=index&req=forums/122857&page=1
I need to turn some attention to the natural ground areas behind the Sherman, then attach the Sherman to the base, some stowage, crew figures, and final details and weathering.
Comments welcome!
Andy
skyhawk

Joined: June 03, 2003
KitMaker: 1,095 posts
Armorama: 743 posts

Posted: Tuesday, July 29, 2008 - 03:51 AM UTC
Bob,
Great PTO sherman! Putting that in a small dio/base would really show it off. I have the same kit and after starting one sherman, im itching to start another..and this might be the one.
Great work on the figures too!
Semper Fi!!
Andy
Great PTO sherman! Putting that in a small dio/base would really show it off. I have the same kit and after starting one sherman, im itching to start another..and this might be the one.
Great work on the figures too!
Semper Fi!!
Andy
beefy66

Joined: October 22, 2007
KitMaker: 971 posts
Armorama: 280 posts

Posted: Tuesday, July 29, 2008 - 08:20 AM UTC
Nice one Andy looking good like the crushed drum is it P/E or did you make from lead foil 


Posted: Tuesday, July 29, 2008 - 07:47 PM UTC
Excellent job, Keith. A great Sherman entry for the campaign.
Very nice diorama base, Andy. It looks busy, but not overcrowded. It frames the Sherman very well.
Thanks for sharing your great builds
Very nice diorama base, Andy. It looks busy, but not overcrowded. It frames the Sherman very well.
Thanks for sharing your great builds


Bigrip74

Joined: February 22, 2008
KitMaker: 5,026 posts
Armorama: 1,604 posts

Posted: Tuesday, July 29, 2008 - 08:01 PM UTC
@ Keith the Crab is looking good with the paint job.
@ Andy that is a nice dio and the Sherman looks really good.
I started back to work on my M4A1 and will have pics following.
ROBERT
@ Andy that is a nice dio and the Sherman looks really good.
I started back to work on my M4A1 and will have pics following.
ROBERT

skyhawk

Joined: June 03, 2003
KitMaker: 1,095 posts
Armorama: 743 posts

Posted: Wednesday, July 30, 2008 - 05:34 AM UTC
Quoted Text
Nice one Andy looking good like the crushed drum is it P/E or did you make from lead foil

Thanks Keith.
The drum is made from aluminum foil, folded into 3rds to get some thickness, and then rolled around a plastic drum (in this case, old Taymia). Im sure you could use some thicker metal, like lead foil to do the same thing, I just dont have that much lead foil on hand and the aluminum foil is free (at least untill i have to replace the kitchen stock!)
skyhawk

Joined: June 03, 2003
KitMaker: 1,095 posts
Armorama: 743 posts

Posted: Wednesday, July 30, 2008 - 05:40 AM UTC
Quoted Text
Very nice diorama base, Andy. It looks busy, but not overcrowded. It frames the Sherman very well.
Robert and Jesper, thanks for the comments!
this is my first time doing a slighty smaller base than im used to. I tend to go toward the more "classic" rules of dioramas where you have ample room around the subject to have ballanced positive and negitive space. Ive noticed that over the last several years, the bases have gotten smaller and smaller, to the point that stuff hangs off the edge.
so, I thought i would challenge myself to try something new and build a "tighter" base. it will be fun to maintain the composure and balance as I add more clutter and debris without making it too overcrowded.
Im having so much fun on the "urban" side of this base that ive serioiusly neglected the natural ground behind the tank...i really need to put some work in back there!
Andy

modelguy2

Joined: March 09, 2002
KitMaker: 818 posts
Armorama: 269 posts

Posted: Thursday, July 31, 2008 - 06:14 PM UTC
Day 1 progress on Dragon's 1/35 M4A1


skyhawk

Joined: June 03, 2003
KitMaker: 1,095 posts
Armorama: 743 posts

Posted: Friday, August 01, 2008 - 02:24 AM UTC
Mike,
what did you use on the lower hull? Also, im currious why you filled in the turret casting numbers...is the turret in the kit inaccurate with type of recesed casting numbers?
looks like a great start!
Andy
what did you use on the lower hull? Also, im currious why you filled in the turret casting numbers...is the turret in the kit inaccurate with type of recesed casting numbers?
looks like a great start!
Andy

modelguy2

Joined: March 09, 2002
KitMaker: 818 posts
Armorama: 269 posts

Posted: Friday, August 01, 2008 - 04:25 AM UTC
Hi Andy,
I use model master raw umber for the bottom sides of my armor. Then about halfway up I overspray raw sienna. Then I blot on raw sienna with a ratty old brush followed by a lighter application of sand. I'll get a better photo today, it was getting dark when I took those-I don't like to use flash. The turret casting numbers were removed because I recently aquiredOsprey's Modeling the US Army M4 (76) Sherman Medium Tank by Steve Zaloga. The numbers as molded are for an M4A3 (76) turret while the numbers for this M4A1 will be forward of the hatches. I would never had known this little fact myself had I not got a good deal on the book in a buy/sell forum.
I use model master raw umber for the bottom sides of my armor. Then about halfway up I overspray raw sienna. Then I blot on raw sienna with a ratty old brush followed by a lighter application of sand. I'll get a better photo today, it was getting dark when I took those-I don't like to use flash. The turret casting numbers were removed because I recently aquiredOsprey's Modeling the US Army M4 (76) Sherman Medium Tank by Steve Zaloga. The numbers as molded are for an M4A3 (76) turret while the numbers for this M4A1 will be forward of the hatches. I would never had known this little fact myself had I not got a good deal on the book in a buy/sell forum.

modelguy2

Joined: March 09, 2002
KitMaker: 818 posts
Armorama: 269 posts

Posted: Friday, August 01, 2008 - 05:17 AM UTC
Here's a better photo

I also realised I'd never posted photos here of my finished Firefly. I had posted a few in the campaign album but while I was going to leave it as seen there because the rocket attachments were too low and too short/close to the turret, last night I scratched new mounts and removed the spent shell port. I could ad the wires to the launchers but I'm debating wether I want to or not as they're a liability when dusting


I also realised I'd never posted photos here of my finished Firefly. I had posted a few in the campaign album but while I was going to leave it as seen there because the rocket attachments were too low and too short/close to the turret, last night I scratched new mounts and removed the spent shell port. I could ad the wires to the launchers but I'm debating wether I want to or not as they're a liability when dusting


MrMox

Joined: July 18, 2003
KitMaker: 3,377 posts
Armorama: 1,088 posts

Posted: Friday, August 01, 2008 - 08:25 AM UTC
Wow !!, so many beautiful Shermans here, so while waiting for some photoetch for another project (a Gato) I just had to join this campain as it gives me a excuse for building my Tasca Vc Firefly - a stunning kit that virtually builds itself and looks great at that! - only problem is to remember to shoot some pics while building, so fast is it...
Heres som progress shots from a few weeks back - as can be seen on the pics - very little putty is needed and everything so far fits perfectly!
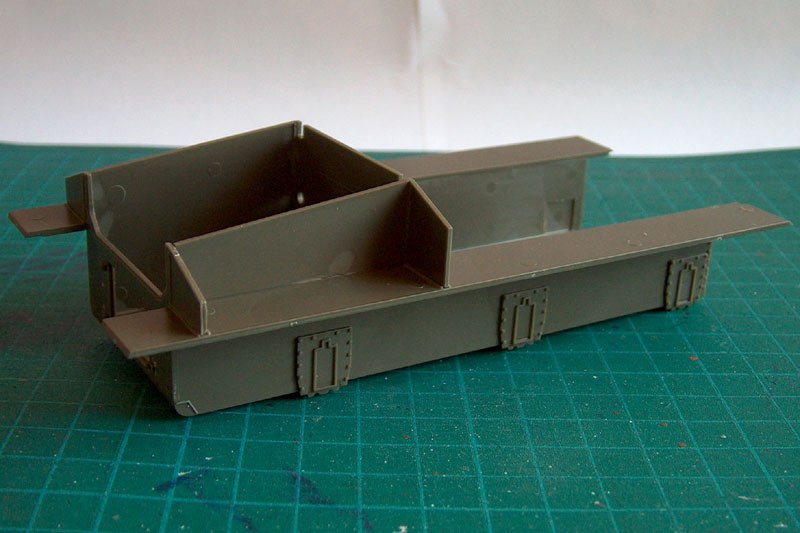
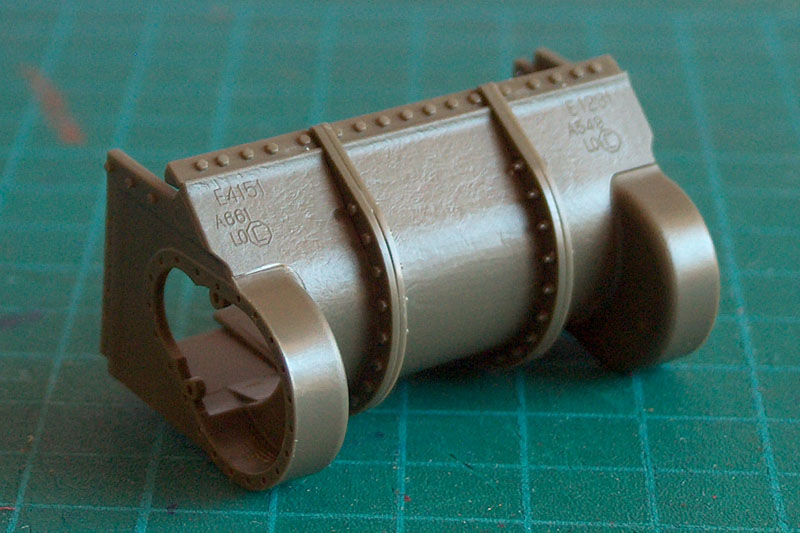
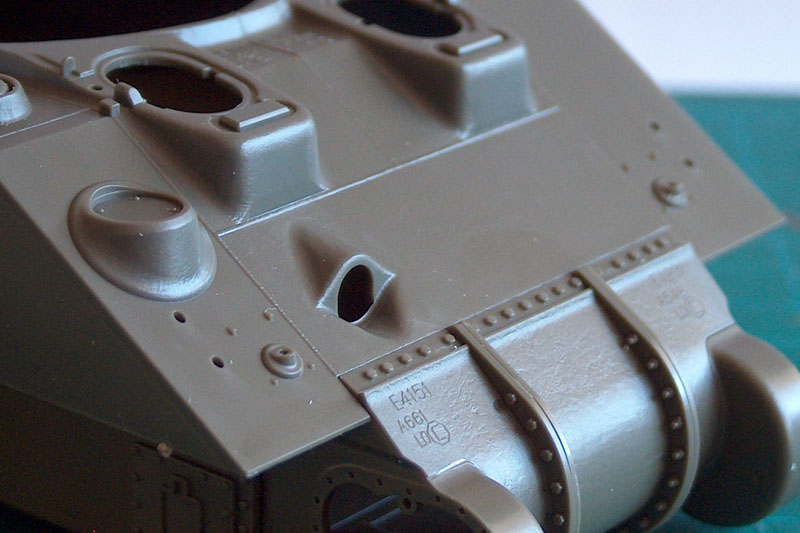
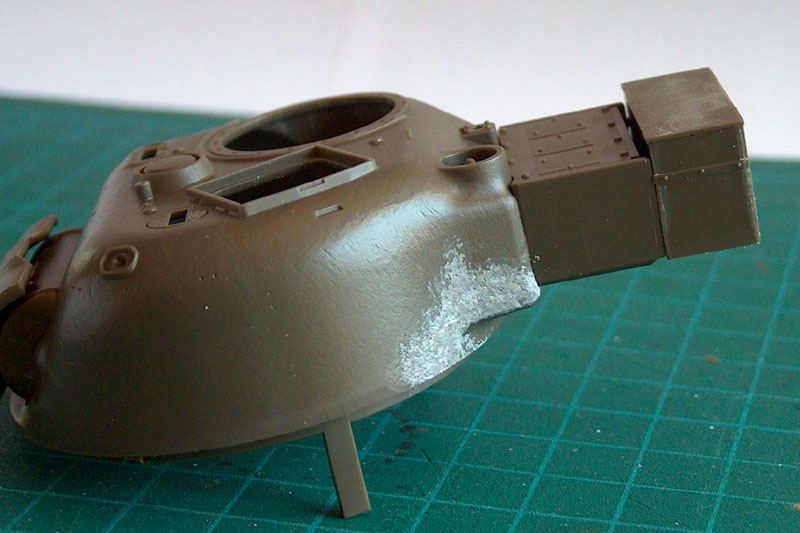
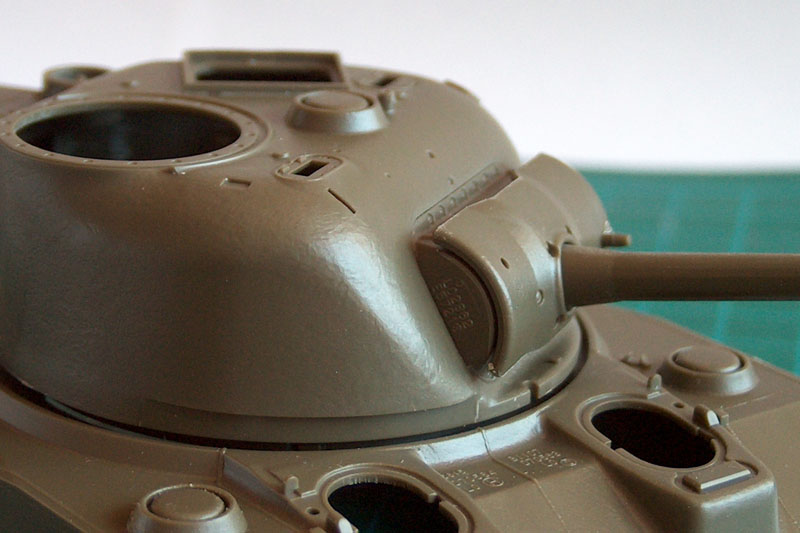
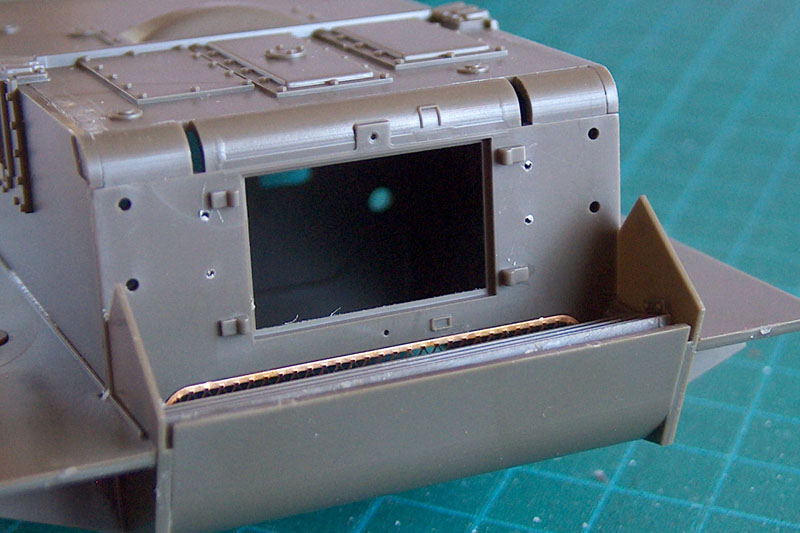
Heres som progress shots from a few weeks back - as can be seen on the pics - very little putty is needed and everything so far fits perfectly!


Bigrip74

Joined: February 22, 2008
KitMaker: 5,026 posts
Armorama: 1,604 posts

Posted: Friday, August 01, 2008 - 11:39 AM UTC
Mike nice progress and photos on your build. Is that an Italian theatre marking?
ROBERT
ROBERT

 |


