Hi Everyone
Alan, your work keeps on inspiring me. I love the conversions.
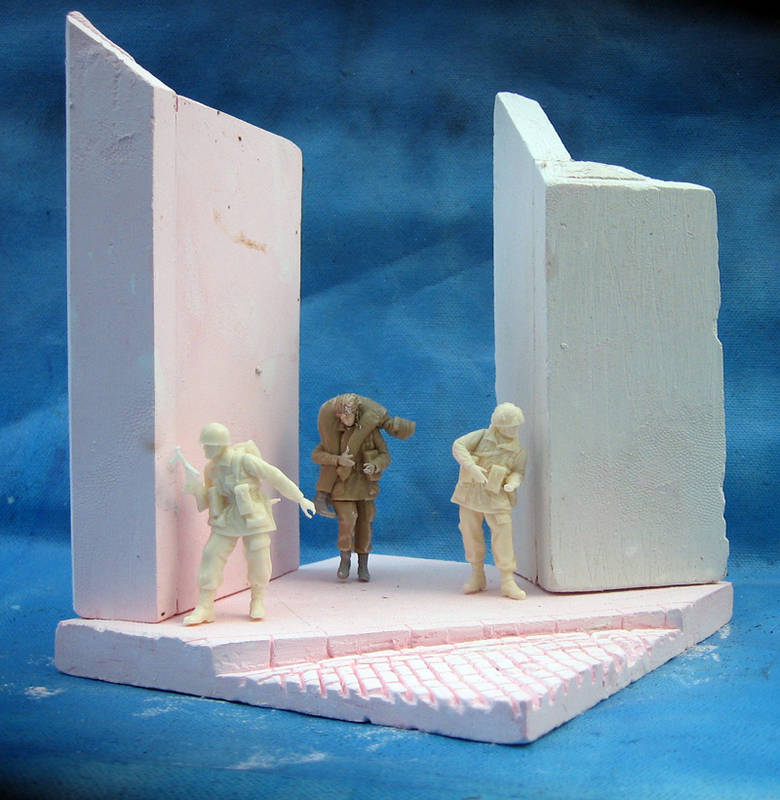
You mentioned the General. I forgot to mention that I never got an Officer figure and sort of decided to work with the 12 soldiers that I already have, plus the motorcycle/sidecar and then the anti-tank piece. Since that is a lot of work, I am focusing on the 4 figures in the scene below for the moment. Also, since the scene is busy, I will do a separate diorama for the anti-tank gun (
Basically instead of doing the hard work sketching out my plan, I started the scene, and then went to the store to see what I could get and so I have reworked my idea based on what I have, and also how the pieces fit together.
Here is the outline of the new scene. The location is the same, however this is about a couple hours before in terms of the timeline. The general has yet to arrive.
The motorcycle side car would be operating as a recon unit for the Panzergrenadiers on the other side of the bridge. (see the maps in A Bridge Too Far, I can scan if needed). The recon unit has taken a hit- not a bad one but the sidecar is damaged and the MachineGunner is hurt in the head. The SS Wassen unit (although I am less sure of their role historically in the area= any info would help) is tending to the wounds and consulting the map. As such there are only 4 figures in the scene, but as it looks now, a bit of conversion will be required as well. In particular, i am curious about the baggage. I need to make it looks like the one sidebag on the ground has been opened up. Most of the gear will be laying about, as opposed to equipped. Also suggestions on how to make the sidecar look damaged would help? What shall we say the damage is from? Are there records of engagement between Allied units and German motor-recon units. From my research, the motor recon units seemed pretty widespead.
thats it for now.
also the quality of my pics is really poor. I am sorry about that. I am getting a digital cam in the mail from my mum on wednesday!
Billy
(EDIT) after looking at these I can tell what I need to complete the scene is a radio unit of the SS Wassen trooper who is standing. Instead of looking at the map like a dummy, he would be radioing in to higher command. You could say that the motor recon unit's radio was knocked out and they have just returned to the scene. Could they have taken fire from Allied units on the other side of the river? The SS medic would be performing initial first aid before sending him back to the German MASH unit. Make sense?
Campaigns
Where Armorama group builds can be discussed, organized, and updates posted.
Hosted by Darren Baker, Richard S.
Operation Market Garden
guille
Oregon, United States
Joined: May 31, 2009
KitMaker: 98 posts
Armorama: 94 posts
Joined: May 31, 2009
KitMaker: 98 posts
Armorama: 94 posts
Posted: Sunday, June 14, 2009 - 01:15 PM UTC
Posted: Monday, June 15, 2009 - 03:55 AM UTC
Hi Billy,
good luck with the build.
Al
good luck with the build.
Al
Posted: Tuesday, June 16, 2009 - 06:55 AM UTC
Hi Guys,
Something for interest!
Just a little bit of info on the lack of fighter support, during the campaign. There were 2 special teams of signallers flown in to direct air to ground support by USAAF fighters and fighter bombers. These teams were landed in Waco gliders and consisted of five Americans (one airborne officer and 4 signallers) from the 40th Moblile Communications Squadron, plus 2 British Jeeps Drivers. The jeeps were equipped with an SCR-193 high Frequency and SCR-542 VFH sets. No 1 Team was under the command of Lt J Johnson and No 2 Team Lt L Geddes.
The wirless sets had been wrongly tuned in the haste of preparation so were useless, so that part was an American cock up. If you've watched a Bridge to Far then that doesn't quite come over very clearly.
Al
Posted: Thursday, June 18, 2009 - 05:16 AM UTC
Hi Guys,
There were 3 cameraman from AFPU who landed with the troops Sgts Walker, Smith and Lewis This is my effort at one of them holding one of their 35mm Bell and Howell Eyemo movie cameras. This was made from a german water bottle, Bren gun, .50cal MG, bridge disc the top of a vehicle jack and some styrene
All survived the operation and made it safely back to the UK.
The other is the Reiscast para whose hand and rifle I had to cut off and replace. There must have been a flaw in the resin as you could bend the rifle in an S shape and when I tried to drill out the hand the resin was flaky, so I just replaced it and gave him a Tamiya rifle.
Al
exer
Dublin, Ireland
Joined: November 27, 2004
KitMaker: 6,048 posts
Armorama: 4,619 posts
Joined: November 27, 2004
KitMaker: 6,048 posts
Armorama: 4,619 posts
Posted: Sunday, June 21, 2009 - 12:10 AM UTC
Really active Campaign this -well done everyone.
The Masterbox conversions look really good Al.
I finally started my entry, it's a small vignette with a couple of Wee Friends Paras plus the Verlinden Para carrying his mate.
I started a BLOG over in the Diorama forum.
The Masterbox conversions look really good Al.
I finally started my entry, it's a small vignette with a couple of Wee Friends Paras plus the Verlinden Para carrying his mate.
I started a BLOG over in the Diorama forum.
Posted: Sunday, June 21, 2009 - 06:11 AM UTC
Hi Pat,
Thanks. A good looking scene to build on there. I was up at Duxford today and met Ian, pickled up some of his paras they do look goot. The Verlinden set is also good and size wise them seem to fit well together.
At least you had the sense to choose something that is managable lol, lol, mine seems to want to grow.
I foresee a summer of paratroopers ahead, maybe several summers lol, lol.
Al
GidGar
Alaska, United States
Joined: August 22, 2005
KitMaker: 47 posts
Armorama: 26 posts
Joined: August 22, 2005
KitMaker: 47 posts
Armorama: 26 posts
Posted: Sunday, June 21, 2009 - 10:11 AM UTC
Amazing work by all posters, thank you for the motivational kick to get me involved.
I visited Arnhem in September 2000 and have been thinking of diorama ideas ever since. I've been collecting airborne figures since then as well but now have the motivation to do something with them!
I've started a small vignette of Lance Sergeant John Baskeyfield's defense of Acacialaan in Oosterbeek with his section of 2, 6lb AT guns. He was awarded the VC posthumously for his actions on 20 September, 1944.
Using the ancient Tamiya 6lb AT gun, a modified Tamyia crew member, DML Para figures and some odds and ends from an old Aurora/Esci British Para figure set. Figures being modified, Tamiya gun being detailed (I did say it was ancient!) and converted to an aiborne version.
Pictures to come as I figure out how best to post and work this site!
Thanks again for the great campaign and great ideas!
calvin_ng
United States
Joined: June 23, 2008
KitMaker: 1,024 posts
Armorama: 753 posts
Joined: June 23, 2008
KitMaker: 1,024 posts
Armorama: 753 posts
Posted: Sunday, June 21, 2009 - 10:47 AM UTC
HOLY !@#$%^&*()_+, alan your dio looks really big, where on earth are you going to put it? im a big fan of your figure painting skills alan, could you please tell us your paints(pretty please) . shane i like the start of your dio, it , looks great. alot of good dio builders here.
Posted: Sunday, June 21, 2009 - 11:30 AM UTC
Hi Gideon,
Welcome to the campaign. One thing we do need is a new 6pdr AT gun in plastic Look forward to your build.
Hi Calvin,
Thanks, I'm been trying to improve them, not always successfully lol, lol. For the para smocks I used Tamiya XF 49 Khaki as a base coat and XF 64 Red Brown, XF 58 Olive Green and XF 60 dark Yellow for the camo pattern. after the base coat had dried I painted on the camo, left it to dry a little and then gave it a coat of Mig P402 Brown for Desert Yellow to help the colours blend in, well I hope so. For the webbing I used XF57 Tamiya Buff and over that a wash of MIG P245 Brown for Dark Green. For shadow I used my gunk pot which is mainly made up from Vallejo 941 Burnt Unber although there is other unspecified stuff in there too!
For the Trousers Tamiya XF 52 as a base coat with Vallejo English Uniform for the top coat.
Tin pots a mix of XF 61 and FX 62 for some and others XF 58 Olive green with some buff for camo and mig pigments to tone them down and some pencil for exposed rims.
Berets are XF 1 Flat Balck and XF 7 Flat red mixed until I got what i thought was close to the maroon beret.
Brasses - Revelll brass on these ones.
Rifles, Vallejo Yellow Ochre as a base with Tamixy XF 64 for coloue and X10 gun metal for the metal parts. Finished with P220 a MIG Dark Wash which I hope gives the wood depth and also works well over the metal parts.
Faces, I've been trying out the LIfe colour set and it has made painting the faces easier. Lips ears and cheeks a little bit of XF7 Flat Red and XF15 Flat Flesh mixed to something resenbling lip and cheak colour. The Life colour paints are very good, flow very easily and you only need a tine amount well watered down after the base coat.
That's about it I think.
You could use buff as a base for the smocks, I'm going to try a few that way for contrast to see how they come out. I tend to paint with very watery paints again to help them blend into one another.
Experiments continue
Hope that helps.
Al
Edit: On the dio, I'm going to put it with the 2 other monsters I creating lol, lol.
Longlance
Galway, Ireland
Joined: June 02, 2009
KitMaker: 89 posts
Armorama: 87 posts
Joined: June 02, 2009
KitMaker: 89 posts
Armorama: 87 posts
Posted: Sunday, June 21, 2009 - 11:31 AM UTC
Hi Pat, great scene, really like the poses of the figures, look foward to seeing this one progress
shane
shane
Posted: Tuesday, June 23, 2009 - 06:20 AM UTC
Hi Guys,
these are the last of the MB figures I've just started work on.
Al
these are the last of the MB figures I've just started work on.
Al
captnenglish
California, United States
Joined: May 20, 2008
KitMaker: 1,184 posts
Armorama: 770 posts
Joined: May 20, 2008
KitMaker: 1,184 posts
Armorama: 770 posts
Posted: Tuesday, June 23, 2009 - 06:37 AM UTC
Quoted Text
Hi Guys,
these are the last of the MB figures I've just started work on.
Al
I have these on the WB as well, I had hoped to combine them wth some Resicast figures, but they don't scale out rght IMHO
Posted: Tuesday, June 23, 2009 - 07:07 AM UTC
Hi Matthew,
The guy on the right is a MB Figure, the chap on the left a Resicast one, works for me. Unless you are going to have them sitting on top of each other then a slight difference in hight shouldn't be a problem. People come in all shapes and sizes, what's improtant is that the equipment is a similar scale.
Al
erichvon
England - East Midlands, United Kingdom
Joined: January 17, 2006
KitMaker: 1,694 posts
Armorama: 1,584 posts
Joined: January 17, 2006
KitMaker: 1,694 posts
Armorama: 1,584 posts
Posted: Tuesday, June 23, 2009 - 03:39 PM UTC
Al, I fully agree. I've just compared one of my MB figs with a Resicast one and the Resicast is about 3 inches shorter (scale) visually. The size difference is good as not everyone was 5 foot 9. Some people are short some people are stupidly tall over 6 foot(I'm 5ft 9...lol). So long as weapons and equipment are the same size it reflects the variation in size of the average soldier.
Posted: Thursday, June 25, 2009 - 07:22 AM UTC
Hi Karl,
How's you build coming along? I was delighted to see the Tristar Wellbikes might finally be available. They will be an interesting kit.
What about the rest of you folks, any updates on the builds?
Cheers
Al
How's you build coming along? I was delighted to see the Tristar Wellbikes might finally be available. They will be an interesting kit.
What about the rest of you folks, any updates on the builds?
Cheers
Al
erichvon
England - East Midlands, United Kingdom
Joined: January 17, 2006
KitMaker: 1,694 posts
Armorama: 1,584 posts
Joined: January 17, 2006
KitMaker: 1,694 posts
Armorama: 1,584 posts
Posted: Thursday, June 25, 2009 - 05:31 PM UTC
Hi Al, not done a lot this week (bereavement in the family) but I've been working on some Jerries surrendering for the buggared halftrack. Had a bit of a rethink and decided to go "post contact" in the street. Knocked out 250/1 from a PIAT overlooked from a damaged building. The RAP is coming on. Mixture of Paras and SS in there. I've done 1/2 the building (bloody hate the build on these miniart kits) but it's getting there> Need to do some juggling about to work out the street scene but it's getting there
captnenglish
California, United States
Joined: May 20, 2008
KitMaker: 1,184 posts
Armorama: 770 posts
Joined: May 20, 2008
KitMaker: 1,184 posts
Armorama: 770 posts
Posted: Thursday, June 25, 2009 - 06:05 PM UTC
Quoted Text
Hi Matthew,
The guy on the right is a MB Figure, the chap on the left a Resicast one, works for me. Unless you are going to have them sitting on top of each other then a slight difference in hight shouldn't be a problem. People come in all shapes and sizes, what's improtant is that the equipment is a similar scale.
Al
Well, I might just have to revisit my plan
Posted: Thursday, June 25, 2009 - 08:04 PM UTC
Hi Karl,
Sounds good, I like the mixed RAP idea. Never built any of the MiniArt buildings although I have some on order if they ever arrive. The after contact idea sounds good.
Hi Matthew,
On the MB figures the main thing I did was switch out their equipment which I believe is overscale. I used kit from the Tamiya Infantry Patrol set which is much better. I will do another comparison shot for you as I now have a mix of Tamiya, MB, Resicast and home grown figures.
Al
Edit. Here you go Matthew, judge for yourself.
Left to right
RC, MB, RC, MB, RC
Left to Right
RC MB, MB, RC, TM, RC
A lot will depend on how you place the figures and whether your ground work is flat or uneven.
My 3 conversions in the background are all different sizes, the radio op being just over 6ft or so
I have my troops split in Paras and Air Landing Brigade chaps who will be in different areas of the build so I don't see a problem. Also some figures mix, work better together than opthers.
Al
yeahwiggie
Dalarnas, Sweden
Joined: March 24, 2006
KitMaker: 2,093 posts
Armorama: 1,359 posts
Joined: March 24, 2006
KitMaker: 2,093 posts
Armorama: 1,359 posts
Posted: Friday, June 26, 2009 - 01:40 AM UTC
Even put next to each other, they just look great. I really like the diversaty in length. Makes them look like a real crowd.
What about everybody else?
Still building? Or enjoying the summer allready??
What about everybody else?
Still building? Or enjoying the summer allready??
tracklink2
Pennsylvania, United States
Joined: March 07, 2007
KitMaker: 131 posts
Armorama: 120 posts
Joined: March 07, 2007
KitMaker: 131 posts
Armorama: 120 posts
Posted: Friday, June 26, 2009 - 02:09 AM UTC
I like the mix of heights alan. It just adds another bit of realism because not everybody was the average height.
Ron
I'm still building, I got the AA gun I want to have abandoned in my dio ready for painting, I'm going to start on the trailer today, and the Firefly is primed. I try to work my building in with summer, work getting busy again, and learning to roller skate so I can play roller hockey at college. I do think I will have it done by the end date though.
keep buildin'
Posted: Friday, June 26, 2009 - 08:44 PM UTC
Hi Cody and Ron,
Thanks for the feedback.
Cody, project sounds grand, look forward ti some updates.
Ron you dio turned ot really great, it was a very cool project.
With such a wide ranging operation the dio possibilities are endless, this is a seriously fun project. When I was down at Duxford last sunday I dropped into the Airborne Museum. It is interesting but a bit disappoint too. They have been allocated very little space and what hardware there is is sort of hung up on the walls out side and this doesn't make for good pictures.
Inside the light was too poor and everything behine glass so uniform pictures etc weren't possible.
I did get some goos shots of the Welbike, outside in the Military Vehicle Display, so if any one needs them (I'm think Tristar here) just let me know and I'll post them up.
There were lots of vendors there plus the MAFVA Model SHow so I did part with some cash for a few more of the Resicast Troops and Airborne Containers, plus another airborne jeep conversion!
Cheers
Al
Posted: Saturday, June 27, 2009 - 03:07 AM UTC
Hi Guys,
A little more work on the 3 MB figures.
Al
A little more work on the 3 MB figures.
Al
Removed by original poster on 06/30/09 - 07:50:46 (GMT).
GidGar
Alaska, United States
Joined: August 22, 2005
KitMaker: 47 posts
Armorama: 26 posts
Joined: August 22, 2005
KitMaker: 47 posts
Armorama: 26 posts
Posted: Monday, June 29, 2009 - 09:00 PM UTC
Alan, your figures look great, thanks for the great photos.
here are a couple of my in progress shots.
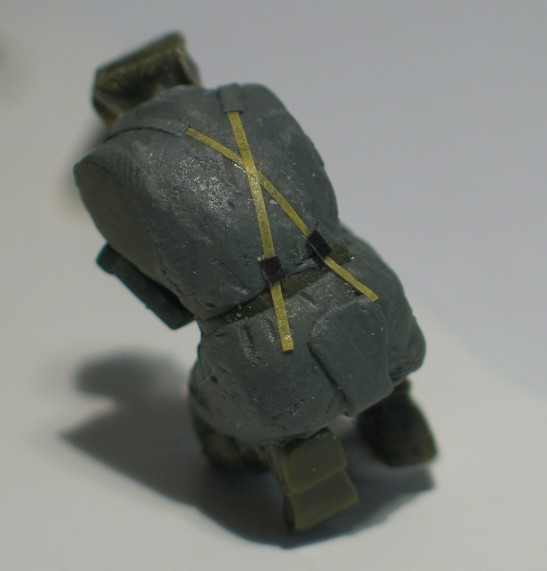
Tamiya figure modified to be airborne with epoxy putty Denison smock.
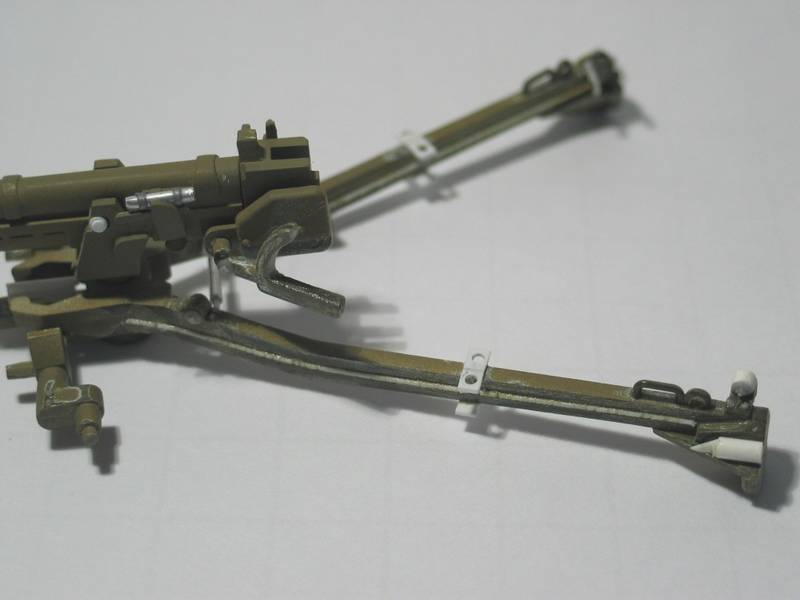
Tamiya 6 pdr modified with nuts/bolts, weld lines, lead foil, scrap plastic. Modifing trailing arms to represent the airborn carriage. Ways to go still.....
here are a couple of my in progress shots.
Tamiya figure modified to be airborne with epoxy putty Denison smock.
Tamiya 6 pdr modified with nuts/bolts, weld lines, lead foil, scrap plastic. Modifing trailing arms to represent the airborn carriage. Ways to go still.....
Posted: Monday, June 29, 2009 - 10:51 PM UTC
Hi Gideon,
Nice work on the figure and the 6pdr, excellent start. A new plastic 6pdr is so long overdue.
Look forward to seeing this one develop. What's you setting as this is an action one by the look of things?
Al
Nice work on the figure and the 6pdr, excellent start. A new plastic 6pdr is so long overdue.
Look forward to seeing this one develop. What's you setting as this is an action one by the look of things?
Al