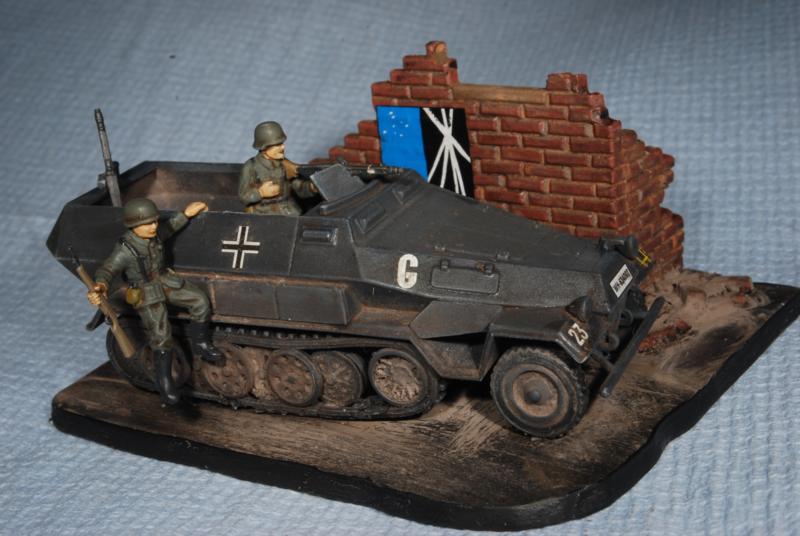
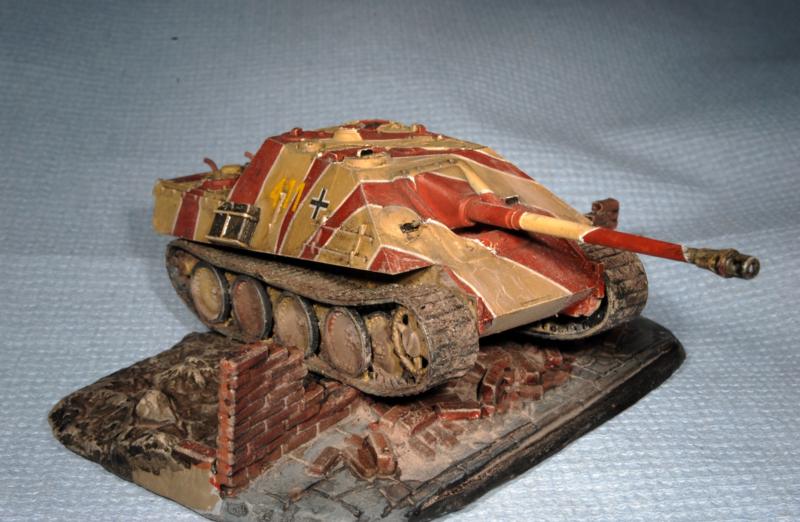
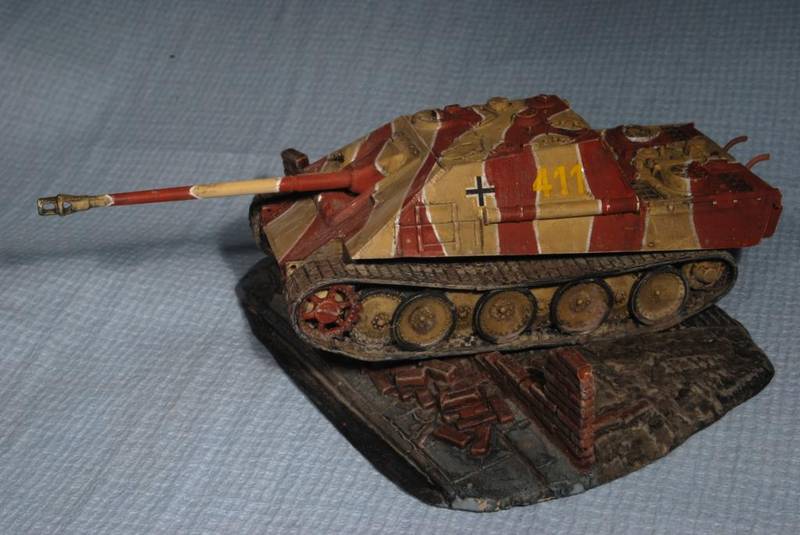
Thanks for your help and positive comments on my humble models Matthew
I've uploaded some photos of my Char B1 and FT-17 to the campaign gallery now with your able asistance, thanks for the link!
I've also declared complete my 251 and Jagdpanther. (Mainly as a have a short attention span and a very large pile of models screaming "Build me!")
Campaigns
Where Armorama group builds can be discussed, organized, and updates posted.
Hosted by Darren Baker, Richard S.
Matchbox Nostalgia Campaign
Technocrat
England - South West, United Kingdom
Joined: November 03, 2009
KitMaker: 6 posts
Armorama: 5 posts
Joined: November 03, 2009
KitMaker: 6 posts
Armorama: 5 posts
Posted: Sunday, May 30, 2010 - 11:20 AM UTC
sabredog
Western Australia, Australia
Joined: July 22, 2007
KitMaker: 607 posts
Armorama: 599 posts
Joined: July 22, 2007
KitMaker: 607 posts
Armorama: 599 posts
Posted: Sunday, May 30, 2010 - 02:47 PM UTC
Quoted Text
@sabredog - Yes, you are definitely a scurvy dog as those are the decals I wanted to use. Weren't we supposed to negotiate who did which version! Fine, I'll remember this for the next campaign.
Cheers,
Jan
Yikes! Sorry Jan. With the impending club trip looming and the manic preparations, I went into auto mode...
Cheers and sorry again
Mike
tread_geek
Ontario, Canada
Joined: March 23, 2008
KitMaker: 2,847 posts
Armorama: 2,667 posts
Joined: March 23, 2008
KitMaker: 2,847 posts
Armorama: 2,667 posts
Posted: Wednesday, June 02, 2010 - 05:13 AM UTC
Well people, its been rather quiet here. Does that mean that everyone has put their noses to the grindstone to get their builds finished? There are now 65 pictures in the official campaign gallery and I can't help desiring to see that number grow. As of today we have two weeks left in this campaign. The quality of the results has been astounding and far beyond what many of us might have expected. Full steam ahead.
Cheers,
Jan
Cheers,
Jan
firstcircle
England - South East, United Kingdom
Joined: November 19, 2008
KitMaker: 2,249 posts
Armorama: 2,007 posts
Joined: November 19, 2008
KitMaker: 2,249 posts
Armorama: 2,007 posts
Posted: Wednesday, June 02, 2010 - 07:10 AM UTC
Quoted Text
...noses to the grindstone...Full steam ahead.
Posted: Wednesday, June 02, 2010 - 10:22 AM UTC
Nice one. How long it take you to build those?
You use the toothpaste method of masking the cammo on the Morris?
tread_geek
Ontario, Canada
Joined: March 23, 2008
KitMaker: 2,847 posts
Armorama: 2,667 posts
Joined: March 23, 2008
KitMaker: 2,847 posts
Armorama: 2,667 posts
Posted: Friday, June 04, 2010 - 04:53 PM UTC
Matthew, what is going on? As someone mentioned, is it a toothpaste issue? To everyone else, the clock is ticking! If anyone has a problem, please ask for assistance. This is all our campaign.
Cheers,
Jan
Cheers,
Jan
firstcircle
England - South East, United Kingdom
Joined: November 19, 2008
KitMaker: 2,249 posts
Armorama: 2,007 posts
Joined: November 19, 2008
KitMaker: 2,249 posts
Armorama: 2,007 posts
Posted: Saturday, June 05, 2010 - 01:56 AM UTC
Stephen, it's probably taken about 15-20 hours to get it to the stage in the photos below; I started it on 22 May. Not a great choice for a quick extra right at the end!Quite fiddly to build with all those small parts to clean up. Drivers have been ditched as too horrible - I don't think they were done by the usual MB figure sculptor.
Toothpaste, yes - yet again. I wanted to do the "Mickey Mouse ears" camo. While it might have been easier to paint it by hand, airbrusing makes a nicer finish.
Decals were fiddly too - standard for this type of vehicle I suppose, but Jeep and C8 between them have about 18 of them. Unsurprisingly, the serial numbers didn't fit in any of the three spaces they're supposed to. Tried to take them off again, but couldn't!! One on the Morris ended up on the side, probably totally inauthentic.
Andronicus
England - South East, United Kingdom
Joined: March 13, 2007
KitMaker: 391 posts
Armorama: 321 posts
Joined: March 13, 2007
KitMaker: 391 posts
Armorama: 321 posts
Posted: Saturday, June 05, 2010 - 02:40 AM UTC
Still at it Jan...I'll get there somehow!!!!
A
A
Posted: Sunday, June 06, 2010 - 09:56 AM UTC
matthew - its a method of cammo masking I've never come across before or would have ever thought of. You're getting such good results I'm very tempted to have a go myself. I have the revell boxing and the decals are better quality.
Well I better get cracking with the Comet if I'm gonna meet this deadline.
greywolf
Quebec, Canada
Joined: February 17, 2002
KitMaker: 20 posts
Armorama: 20 posts
Joined: February 17, 2002
KitMaker: 20 posts
Armorama: 20 posts
Posted: Sunday, June 06, 2010 - 02:43 PM UTC
Here are a few pics of what i've done so far
Hosted on Fotki
Hosted on Fotki
Hosted on Fotki
Hosted on Fotki
Hosted on Fotki
Hosted on Fotki
Hosted on Fotki
Hosted on Fotki
Posted: Monday, June 07, 2010 - 02:54 AM UTC
Been away for a while (no I haven't been in jail!) and now I'm back and find that you people have been very busy having fun and building. A lot of effort has been put into these kits . . . really enjoy looking at everyone's builds. Outstanding stuff.
Hopefully I'll have some in progress pics up this week (95 percent complete now almost ready for paint). Jan, and everyone thanks for the Campaign extension this came at a good time for me and many of us involved in this great Campaign.
-Eddy
Hopefully I'll have some in progress pics up this week (95 percent complete now almost ready for paint). Jan, and everyone thanks for the Campaign extension this came at a good time for me and many of us involved in this great Campaign.
-Eddy
tread_geek
Ontario, Canada
Joined: March 23, 2008
KitMaker: 2,847 posts
Armorama: 2,667 posts
Joined: March 23, 2008
KitMaker: 2,847 posts
Armorama: 2,667 posts
Posted: Monday, June 07, 2010 - 05:35 AM UTC
@firstcircle - Looking positively marvellous, Matthew. I am particularly impressed with your brickwork on the diorama base. One question about your masking technique. Have you tried the toothpaste method with acrylic paints?
@Andronicus - You've still got a little more than an entire week so you shouldn't be too stressed. Do as much as you can and submit one picture in the gallery.
@greywolf - Looking good Marc. Your base with the wood and snow is inspirational. The snow sticking to the bottoms of the fence logs is particularly well done.
@Braille - Eddy, I am glad to hear that you're almost done building. As I state in earlier posts, the extension was almost a necessity. Many have run into far more difficulties with these so called "simple" kits than most of us anticipated.
I've updated the award chart to reflect Technocrat has added pictures to the gallery and archived a ribbon. Torchy, could you please add one picture to the official campaign gallery.
Cheers,
Jan
Maxiplus
Wien, Austria
Joined: November 03, 2005
KitMaker: 47 posts
Armorama: 44 posts
Joined: November 03, 2005
KitMaker: 47 posts
Armorama: 44 posts
Posted: Monday, June 07, 2010 - 08:42 AM UTC
Hi! Here are some update pictures of my current builds:
Stuart - painted, awaiting weathering.
Panther - currently at the washing stage. I´ve decided to do an unusual stripe camo pattern.
In order to follow my own "batch of three" rule, I also decided to build another Jagdpanzer IV. I just completed the washing on this one.
I´m pretty confident I can finish all of those before the campaign ends, rising my number of valid campaign entries to five!
I also would like to express my admiration for all the other participants models. Impressive work!
greywolf
Quebec, Canada
Joined: February 17, 2002
KitMaker: 20 posts
Armorama: 20 posts
Joined: February 17, 2002
KitMaker: 20 posts
Armorama: 20 posts
Posted: Monday, June 07, 2010 - 02:29 PM UTC
Posted: Tuesday, June 08, 2010 - 02:13 AM UTC
Wow! Great work, Maximillian.
Looking forward to see more
tread_geek
Ontario, Canada
Joined: March 23, 2008
KitMaker: 2,847 posts
Armorama: 2,667 posts
Joined: March 23, 2008
KitMaker: 2,847 posts
Armorama: 2,667 posts
Posted: Tuesday, June 08, 2010 - 06:41 AM UTC
@Maxiplus - At the rate you are turning out these builds you may end up with the entire collection, Maximilian.
@greywolf - Very nice progress on your T-34, Marc. That green you used definitely has that Russian look to it.
Cheers,
Jan
@greywolf - Very nice progress on your T-34, Marc. That green you used definitely has that Russian look to it.
Cheers,
Jan
Andronicus
England - South East, United Kingdom
Joined: March 13, 2007
KitMaker: 391 posts
Armorama: 321 posts
Joined: March 13, 2007
KitMaker: 391 posts
Armorama: 321 posts
Posted: Tuesday, June 08, 2010 - 09:28 AM UTC
Hi all,
I seem to be my own worst enemy at the moment - and I do apologise if I seem to be making heavy weather of this kind of entry-level kit! However if anyone can help me out on these questions I would be grateful!
Yours - slightly embarrassed!
Andronicus
I seem to be my own worst enemy at the moment - and I do apologise if I seem to be making heavy weather of this kind of entry-level kit! However if anyone can help me out on these questions I would be grateful!
Yours - slightly embarrassed!
Andronicus
firstcircle
England - South East, United Kingdom
Joined: November 19, 2008
KitMaker: 2,249 posts
Armorama: 2,007 posts
Joined: November 19, 2008
KitMaker: 2,249 posts
Armorama: 2,007 posts
Posted: Wednesday, June 09, 2010 - 01:32 AM UTC
Andronicus, what's all this about improving the brass grab handle??? I thought these were meant to be out of the box builds!! I wouldn't be embarrassed about it - fixing things that go wrong is all part of it, and though these may be "entry level" kits, the reality is that getting a good result from old or small is just as hard if not harder than getting it from a more expensive, bigger or more recent kit. All that modern slide moulding means you no longer have to drill out your own barrels for example.
I wouldn't try drilling out the wire stump either - agree you should either dig it out, fill the hole and go again from there, or just file it / cut it down with side cutters until flush and then try re-attaching over the same point. Maybe you should just use the kit plastic part!
Washing, I wouldn't use a swab or a cotton bud, but a big very soft paint brush and gently wipe it over with water with a bit of washing up liquid in it, then do it again with clean water. Dry it off in the airing cupboard overnight (I put mine in an old ice cream tub and put it in there near the hot water tank each night to dry off paint and glue as well as water.)
The Johnson's stuff is called Klear in the UK and you can sometimes find it in Robert Dyass, but not that easy to get hold of from what I can tell. I have never done the decal in the wet pool of Klear before, I only coat the model with the Klear, then apply the decals to it when dry (which is about 20 mins) and then apply another coat over to seal them in and remove some of the step effect around them. Obviously you could use varnish for this too, but Klear is miraculously easy to apply compared to varnish (just take care not to stir up bubbles) and quicker drying (so don't keep going back over what you just did as it dries in minutes.)
Maxiplus, really wonderful painting - would you care to reveal your masking technique? Not toothpaste... I see also you have introduced a competitive edge to this, with your contribution of 5!! Grrr...! I'll have you know I'm not done yet, and what's more I have recruited my 9 year old daughter to the cause...
firstcircle
England - South East, United Kingdom
Joined: November 19, 2008
KitMaker: 2,249 posts
Armorama: 2,007 posts
Joined: November 19, 2008
KitMaker: 2,249 posts
Armorama: 2,007 posts
Posted: Wednesday, June 09, 2010 - 01:35 AM UTC
Quoted Text
The Johnson's stuff is called Klear in the UK and you can sometimes find it in Robert Dyass
OR Wilkinson apparently. Every town seems to have one of those at the moment.
Posted: Wednesday, June 09, 2010 - 06:34 AM UTC
I did hear something about Klear being reformulated and the new version is useless for modelling. Anyone got any confirmation on that?
I've never used it as an adhesive for decals but I do use it for a clear gloss varnish. I do a lot of aircraft and the stuffs more than proved its worth.
Anyway got a couple of progress pics.
The Comet is now painted, just the detail stuff to paint it. The cammo is very unusual but does suit it. I have to admit to being a little skeptical as to revells instructions on this.
I've also put the first couple of coats to the base. I made up a new cross for the barbed wire barrier with balsa blending it into the bas with filler. I added cotton to enhance the molded on barbed wire.
tread_geek
Ontario, Canada
Joined: March 23, 2008
KitMaker: 2,847 posts
Armorama: 2,667 posts
Joined: March 23, 2008
KitMaker: 2,847 posts
Armorama: 2,667 posts
Posted: Wednesday, June 09, 2010 - 07:56 AM UTC
@Andronicus - I am sorry to hear about your problems with your build. I see from checking the other thread you linked to that you've gotten some good answers to your questions. I must say that I support the digging out the wire and then puttying the resultant cavity. Had to do that with my BTR-80 build.
@ phantom_phanatic309 - The comet looks good although I've never seen a cammo scheme with those colours. The base also looks very nice and I really like what you've done with the balsa additions and the wire.
So many people are soooo close to finishing that I think it's going to be a photo finish.
Cheers,
Jan
Posted: Wednesday, June 09, 2010 - 11:37 AM UTC
It is VERY unusual and try as hard as I might I cant find a photo of one in this scheme, which has me thinking it might be field applied. Maybe Revell knows something we don't?
The dark colour is actually Humbrol green 116 but looks a little brown in the pics. The sand is supposed to be revell 88 Ochre but I didnt have a tin so had to cross reference into Humbrol and used HM 93. I'm keeping with the spirit of the build and going with what the instructions say even though its probably innacurate.
Thanks for the comment about the base
tread_geek
Ontario, Canada
Joined: March 23, 2008
KitMaker: 2,847 posts
Armorama: 2,667 posts
Joined: March 23, 2008
KitMaker: 2,847 posts
Armorama: 2,667 posts
Posted: Wednesday, June 09, 2010 - 12:04 PM UTC
Quoted Text
It is VERY unusual and try as hard as I might I cant find a photo of one in this scheme, which has me thinking it might be field applied. Maybe Revell knows something we don't?
The dark colour is actually Humbrol green 116 but looks a little brown in the pics. The sand is supposed to be revell 88 Ochre but I didnt have a tin so had to cross reference into Humbrol and used HM 93. I'm keeping with the spirit of the build and going with what the instructions say even though its probably innacurate.
Thanks for the comment about the base
Stephen, digital photos do not always capture the proper colours. As I have been learning there are a number of options to take into account. Field applied paints were far more prevalent than many might assume. It is not a rule or requirement that accuracy in colours or specifications be researched or maintained. The whole goal is to have fun and perhaps enjoy a "blast from the past." We have seen some almost astounding builds in this campaign and I am sure that yours will be up there with them.
To everyone, I hope that all can be enjoying this campaign. Don't feel that anything you post is short of a masterpiece and an advance in your personal skills.
I have finally modified and attached the second track of the M40. Weathering of the treads has started and gloss coat and decals will follow in a day or two. I sadly have no pictures of the progress as I am recharging the camera's batteries at the moment.
Cheers,
Jan
NWBrit
England - North West, United Kingdom
Joined: October 30, 2003
KitMaker: 46 posts
Armorama: 41 posts
Joined: October 30, 2003
KitMaker: 46 posts
Armorama: 41 posts
Posted: Thursday, June 10, 2010 - 08:12 PM UTC
Hello everyone,
A bit of a stop start campaign for me, but I seem to be on the final, slightly rushed, leg now. I have been making good progress this week, but had no time to post photos, so these are from last weekend where I finally got the Dingo interior finished and the major assembly completed.
The basework is not shaping up too badly, though with a personal deadline of Saturday because of a few days away getting it the way I originally envisaged is unlikely.
The caravan with its base coat and cab interior mostly finished.
And finally the Dingo comes together. Once again the instructions were a little vague as to the exact fit of parts. Good reference pictures make things much clearer
Posted: Thursday, June 10, 2010 - 11:01 PM UTC
Stephen, great looking Comet. The camouflage looks very nice, although it is a little unusual as you have pointed out.
The base looks great. Very nice touch to add the wire and balsa wood.
Looking forward to see more
The base looks great. Very nice touch to add the wire and balsa wood.
Looking forward to see more