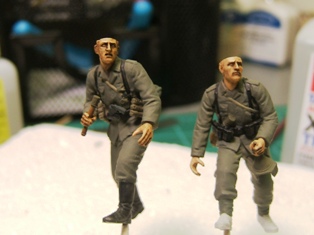
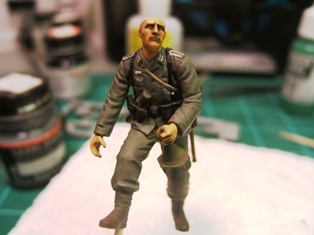
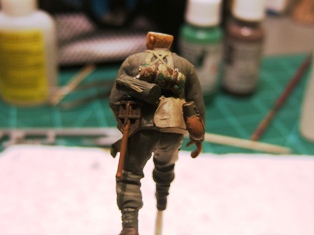
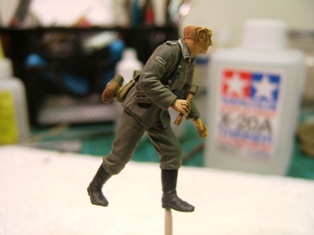
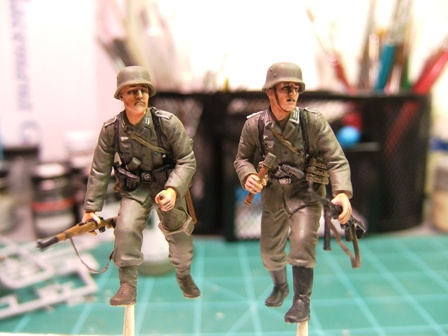
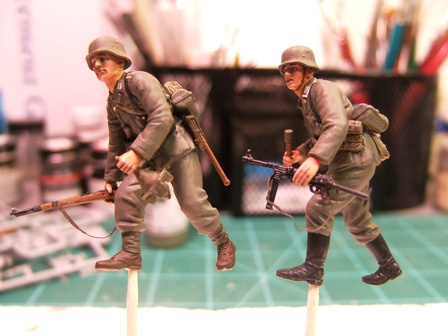
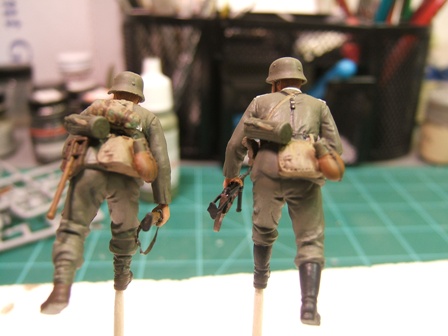
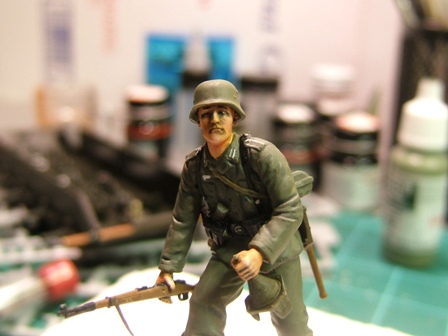
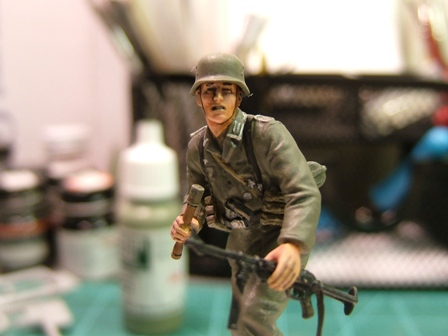
OK, here are my figures so far. Like some others here I've taken this campaign as an oppertunity to do figures, something I have not seriously done in the past. My few previous efforts are not worth counting. These tw o guys have taken an age to do with lots of bits done and re-done and I still see lots of mistakes and bits that could be improved for future figures, but at this stage these two are done! Yes, the wash is too dark, I souldn't have tried painting whites in the eyes, some seams around the shoulders could have been better filled....but they are still a quantum leap for me. I've learned a lot from all the posts here and just from actually finally doing.... more will definitly follow. So, thank you for this campaign. The goal of this campaign was "to lift the "dreaded threat" of of painting figures." and in my case it worked!!! I think.....
Now I have to do a little vignette(?) to put them on....
Quick question: Why does clear matt never come out matt?
Campaigns
Where Armorama group builds can be discussed, organized, and updates posted.
Hosted by Darren Baker, Richard S.
Paint those troops!!
35th-scale
Kildare, Ireland
Joined: November 21, 2007
KitMaker: 3,212 posts
Armorama: 2,807 posts
Joined: November 21, 2007
KitMaker: 3,212 posts
Armorama: 2,807 posts
Posted: Sunday, February 14, 2010 - 10:08 PM UTC
MSGsummit
Tennessee, United States
Joined: November 16, 2002
KitMaker: 751 posts
Armorama: 545 posts
Joined: November 16, 2002
KitMaker: 751 posts
Armorama: 545 posts
Posted: Tuesday, February 16, 2010 - 05:19 AM UTC
Finally began some work on my figures for this campaign. I'm sure everyone recognises the figures being from Dragon. The figures are painted with Vallejo paints. Anyway here it goes....
Here are the figures after they were built minus helmets and weapons.
The figures after priming
Here they are with the flesh areas base coated and the uniform base coated
Here I have started laying in the colors for suspenders, mag pouches and other gear. Also I have given the flesh areas a wash of W&N burnt umber oil paint.
Thats it for now.....more to follow soon
guille
Oregon, United States
Joined: May 31, 2009
KitMaker: 98 posts
Armorama: 94 posts
Joined: May 31, 2009
KitMaker: 98 posts
Armorama: 94 posts
Posted: Wednesday, February 17, 2010 - 08:30 PM UTC
Hi everyone,
Been busy with work so progress, and posting is also sporatic at best. I need to check my photos to see if I have any updates when I am on my other computer.
Ron. Roger that on the dio picts. I guess I did veer a bit from the figures with some of my pictures in retrospect. my progress with the dio is terribly slow anywise.
Pavel. I love the depth of your work. You put a lot of details into that and the overall effect is nice.
Hi Alan, I have been reading a lot of your reviews. Good to see you keeping busy as usual. I hope you get to take advantage of some good weather soon.
Jesse. great stuff. I love the straps on the rifles, as well as your work with the smocks. what did you use for the rifle straps?
Art. good progress also. Your colors are turning out well I think. I think I have a similar Dragon set. which set is that again?
Regarding white in the eyes at 1/35- I have to chime in with J.P. and Ron. I don't really think that at that scale you normally see white in someone's eyes either. I don't have a photo to test, but look at someone when they are an a couple few centimeters, or around an inch in height. That would be comparable to looking at a 1/35 scale figure. There is no way you normally see the whites of someone's eyes at that distance, in my humble opinion at least.
Think about skin though. Human skin is like 7 layers thick. You would think that painting skin would be like weathering a tank. You have to know the history, and then apply layer by layer.The base would be blood red, and then work up the tones from there depending on on how much sun a person has received. Just something I have been thinking about during my walks. I might have to experiment with this at some point.
I wish I could comment on everyone's work, as there is some good progress is going on. keep it up everyone.
edit: the thing is, that when we look at photos of pictures on the computer, they tend to get blown up a bit. So at the size we are looking at here, I think the white eyes are more natural looking and a bit more in scale. But the actual figures are a quite a bit smaller than we see them here, at least in most shots.
not trying to be controversial, I figure we are all here to learn from each other, right.
Billy
MSGsummit
Tennessee, United States
Joined: November 16, 2002
KitMaker: 751 posts
Armorama: 545 posts
Joined: November 16, 2002
KitMaker: 751 posts
Armorama: 545 posts
Posted: Thursday, February 18, 2010 - 01:57 AM UTC
Bill,
The figures are from Dragon's Panzerjager set. I slightly modified them. The guy with the magnetic mine was supposed to be carrying a teller mine. The othe rone was supposed to have a magnetic mine in his had but I substituted it for a potato masher grenade. Also I stuck a flare pistol in his belt versus the grenade he was supposed to have stuck there. The idea for the flare pistol was actually boorrowed from someone here on armorama. Can't for the life of me remember who though.
yolk24
Visayas, Philippines
Joined: November 07, 2007
KitMaker: 40 posts
Armorama: 30 posts
Joined: November 07, 2007
KitMaker: 40 posts
Armorama: 30 posts
Posted: Friday, February 19, 2010 - 12:12 AM UTC
Quoted Text
Hi everyone,
Jesse. great stuff. I love the straps on the rifles, as well as your work with the smocks. what did you use for the rifle straps?
Billy
hi billy,
thank you! for the starps i used aluminum foil.
jcourtot
Indiana, United States
Joined: June 06, 2008
KitMaker: 344 posts
Armorama: 251 posts
Joined: June 06, 2008
KitMaker: 344 posts
Armorama: 251 posts
Posted: Friday, February 19, 2010 - 02:53 PM UTC
Quoted Text
Looks great Jonathan love the smock colour.
Thanks man, its been a while since I had done a camo smock so I was a bit worried about how it would turn out....
Everyone else's projects are turning out great!!
Jessie- Great painting bro, love the camo job!
Sean- Dude not bad at all, just keep painting them...thats all you need to do.
Art- Looks great....I'm liking the face!
guille
Oregon, United States
Joined: May 31, 2009
KitMaker: 98 posts
Armorama: 94 posts
Joined: May 31, 2009
KitMaker: 98 posts
Armorama: 94 posts
Posted: Friday, February 19, 2010 - 08:41 PM UTC
Thanks, Art. Figures look good so far.
Jesse. I guess I was thinking aluminum foil was the way to go. Ever heard of Aranciata citrus soda? I think it is Italian, but anywise the tops of the cans come covered with a fairly thick aluminum foil and I have had some success working that into strap-like material. Don't know if they have that product in your area, but you obviously have a good technique going. thanks for sharing.
Billy
Removed by original poster on 02/20/10 - 19:00:25 (GMT).
KAYELL
England - North East, United Kingdom
Joined: February 16, 2008
KitMaker: 107 posts
Armorama: 81 posts
Joined: February 16, 2008
KitMaker: 107 posts
Armorama: 81 posts
Posted: Saturday, February 20, 2010 - 07:04 AM UTC
Hi guys
Enclosed are my efforts for the campaign, Masterbox Russian Tankmen, set with my SU122 that I have just completed
Cheers
Keith
iamheaminot
Invercargill, New Zealand
Joined: January 03, 2004
KitMaker: 265 posts
Armorama: 185 posts
Joined: January 03, 2004
KitMaker: 265 posts
Armorama: 185 posts
Posted: Saturday, February 20, 2010 - 07:35 AM UTC
[quote
Regarding white in the eyes at 1/35- I have to chime in with J.P. and Ron. I don't really think that at that scale you normally see white in someone's eyes either. I don't have a photo to test, but look at someone when they are an a couple few centimeters, or around an inch in height. That would be comparable to looking at a 1/35 scale figure. There is no way you normally see the whites of someone's eyes at that distance, in my humble opinion at least.
Billy[/quote]
I have just been looking at this thread, very interesting. I am not one to be involved in campaigns as I am such a slow finisher it ain't funny
Regards the whites of the eyes. Truth is you are quite correct. In 1/35th / 1/32nd scales you would not see the white of the eye. To throw the cat in amongst the pigeons why do we paint creases to the xenth degree, line in equipment, paint detail here and there? when much of the same could be said about those things. Yes there are shadows et all are there but not to the degree that some depict. My thougts are: I paint the whites of the eyes to create expression, I add details, shadows, highlights, outline etc to create depth to the object thereby creating life as per two dimensional artwork. Plus of course there is the brain stuff, we look in the mirror and what do we see, our brain tricks in depicting every little detail that we are familiar with and therefore if I make a miniature of me there must be the same detail therein. There seems to be something about the miniaturist and detail. We all know that a pair of trousers is sewn together so we have seams so sometimes those seems have to be shown to depict joins in the material otherwise the object looks like a blob. Enough from me, I am starting to ramble on
I think you all get my drift. I paint that or this because they are there, what is right or wrong who cares I paint for my "sense of sensibility" with apologies to Jane Austen
My example of a conversion to go with a French 1939 dio.
MSGsummit
Tennessee, United States
Joined: November 16, 2002
KitMaker: 751 posts
Armorama: 545 posts
Joined: November 16, 2002
KitMaker: 751 posts
Armorama: 545 posts
Posted: Sunday, February 21, 2010 - 04:19 AM UTC
Okay guys, made a little more progress on the lads. The detail on these figures are pretty soft and painting is a challenge for me with theses two. Also, I am trying to learn how to paint and shade with Vallejo acrylics and that too is proving to be a challenge! Anyway this first pic is after I added a raw umber wash using W&N oils.
The dude with the magnetic mine after some detail painting and shading
And the NCO
And a parting shot of both of them. The shading process has kinda been a booger for me .....I think it is the thinning ratios that are kicking me in the rear. Anyway......
Soon, I hope to have the faces completed with oils and the rest of the detail painting.
woody6968
England - North East, United Kingdom
Joined: March 02, 2006
KitMaker: 454 posts
Armorama: 380 posts
Joined: March 02, 2006
KitMaker: 454 posts
Armorama: 380 posts
Posted: Sunday, February 21, 2010 - 11:28 PM UTC
hi keith ,
very nice work ,, i like the relaxed poses more than action ,, your painting is excellent and i like your skin tones , very natural looking
MSGsummit
Tennessee, United States
Joined: November 16, 2002
KitMaker: 751 posts
Armorama: 545 posts
Joined: November 16, 2002
KitMaker: 751 posts
Armorama: 545 posts
Posted: Sunday, February 28, 2010 - 09:04 AM UTC
Okay......finally finished my two figures for this campaign. I painted the faces with W&N oils using the color mixes in the features by Mongo Mel (Criag Wittaker) here on the kit maker network. Thanks for the inspiration Craig! Anyway, my entery is posted in the gallery and heres a few pics of the finished figures. Enjoy!
yeahwiggie
Dalarnas, Sweden
Joined: March 24, 2006
KitMaker: 2,093 posts
Armorama: 1,359 posts
Joined: March 24, 2006
KitMaker: 2,093 posts
Armorama: 1,359 posts
Posted: Sunday, February 28, 2010 - 09:23 AM UTC
Thanks for your contribution, Art!
Well done!
Well done!
woody6968
England - North East, United Kingdom
Joined: March 02, 2006
KitMaker: 454 posts
Armorama: 380 posts
Joined: March 02, 2006
KitMaker: 454 posts
Armorama: 380 posts
Posted: Monday, March 01, 2010 - 09:55 AM UTC
hi art .
very clean and very well painted figures i like them ,, skin tone looks good and the kit on them is excellent , good work
MSGsummit
Tennessee, United States
Joined: November 16, 2002
KitMaker: 751 posts
Armorama: 545 posts
Joined: November 16, 2002
KitMaker: 751 posts
Armorama: 545 posts
Posted: Monday, March 01, 2010 - 03:14 PM UTC
Thanks Ron and Ian. This was a fun one!
Posted: Friday, March 05, 2010 - 05:28 AM UTC
Hi Art, Jessie,
Some grand looking German there, lots of great stuff going here folks.
I haven't done anything else to my Paras yet!!, but I have finished these two: 2 tankers from 144th Royal Armourd Corps, 33rd Armoured Division, they are the Ultracast figures sculpted by Pete Morton.
Al
Some grand looking German there, lots of great stuff going here folks.
I haven't done anything else to my Paras yet!!, but I have finished these two: 2 tankers from 144th Royal Armourd Corps, 33rd Armoured Division, they are the Ultracast figures sculpted by Pete Morton.
Al
Zaltar
British Columbia, Canada
Joined: May 03, 2008
KitMaker: 272 posts
Armorama: 264 posts
Joined: May 03, 2008
KitMaker: 272 posts
Armorama: 264 posts
Posted: Saturday, March 06, 2010 - 12:54 PM UTC
Here's the figure that I'll be entering in this campaign: the commander from Dragon's Sherman Firefly kit.
I'll also be entering the other included figure.
The rest of the build after the figures will be posted on the "True North Strong and Free" campaign.
zaltar
I'll also be entering the other included figure.
The rest of the build after the figures will be posted on the "True North Strong and Free" campaign.
zaltar
joryyys
Ain, France
Joined: April 16, 2009
KitMaker: 64 posts
Armorama: 57 posts
Joined: April 16, 2009
KitMaker: 64 posts
Armorama: 57 posts
Posted: Saturday, March 06, 2010 - 10:50 PM UTC
My entry will be these 2 guys for a bridge vignette:
The idea for this vignette came from "Saving Private Ryan". There is a scene where a soldier from 101st says that they've put so many Comp B explosives into the bridge they could destroy it two times. As most of you remember, they didn't work. So these 2 Germans (from MasterBox's "Watchtower") will be looking at some U.S. explosives on the bridge.
Now, I just need to find some cork...
I may also add this German sniper with a dummy:
Zaltar
British Columbia, Canada
Joined: May 03, 2008
KitMaker: 272 posts
Armorama: 264 posts
Joined: May 03, 2008
KitMaker: 272 posts
Armorama: 264 posts
Posted: Sunday, March 07, 2010 - 11:54 AM UTC
I mostly finished the skin tones today. Here is the progress picture:
zaltar
zaltar
Zaltar
British Columbia, Canada
Joined: May 03, 2008
KitMaker: 272 posts
Armorama: 264 posts
Joined: May 03, 2008
KitMaker: 272 posts
Armorama: 264 posts
Posted: Monday, March 08, 2010 - 10:47 AM UTC
Here's the final pics of my figure.
Base Coat of tan:
And the final product; tank commander of the British Columbia Regiment (as accurate as possible):
This was probably my third (?) attempt at doing a 1/35 scale figure, so of course it's not fantastic...
That's all for my first entry!
zaltar
Base Coat of tan:
And the final product; tank commander of the British Columbia Regiment (as accurate as possible):
This was probably my third (?) attempt at doing a 1/35 scale figure, so of course it's not fantastic...
That's all for my first entry!
zaltar
armfeldt
Västra Götaland, Sweden
Joined: December 17, 2009
KitMaker: 26 posts
Armorama: 11 posts
Joined: December 17, 2009
KitMaker: 26 posts
Armorama: 11 posts
Posted: Wednesday, March 10, 2010 - 03:10 AM UTC
Ok, my contribution to this excellent little campaign are finished.
Lots of first for me here,
Well that last one is not quite true...first 1/35th figures in 10 years and after reading some of the great painting guides here.
I painted the crew for my Tamiya StugIII G early version.
Now, let's see if I can manage to get some photos up....
First we have the commander:
Since these figures are my first "serious" attempt at figure painting I decided to test some different techniques/methods. The commander was painted with acrylics, mainly Tamiya and some Humbrol. He was given a wash of Raw Umber oil paint and some light weathering with oils and pastel chalk.
Next up is crewman holding a puppy.
He was painted with Humbrol enamels, apart from the skin tones, which were painted with Humbrol acrylics. He too was given a Raw Umber wash and some weathering with oils, pastels and acrylics. I'm rather pleased with this one. The commander didn't come out quite as good I think. Also I found that it was easier to work with the enamels as opposed to the Tamiya acrylics.
Can I have my ribbon now?
Cheers!
Lots of first for me here,
- first campaign
- first sharing of work on this (or any other site..)
- and first 1/35th figures.
Well that last one is not quite true...first 1/35th figures in 10 years and after reading some of the great painting guides here.
I painted the crew for my Tamiya StugIII G early version.
Now, let's see if I can manage to get some photos up....
First we have the commander:
Since these figures are my first "serious" attempt at figure painting I decided to test some different techniques/methods. The commander was painted with acrylics, mainly Tamiya and some Humbrol. He was given a wash of Raw Umber oil paint and some light weathering with oils and pastel chalk.
Next up is crewman holding a puppy.
He was painted with Humbrol enamels, apart from the skin tones, which were painted with Humbrol acrylics. He too was given a Raw Umber wash and some weathering with oils, pastels and acrylics. I'm rather pleased with this one. The commander didn't come out quite as good I think. Also I found that it was easier to work with the enamels as opposed to the Tamiya acrylics.
Can I have my ribbon now?
Cheers!
guille
Oregon, United States
Joined: May 31, 2009
KitMaker: 98 posts
Armorama: 94 posts
Joined: May 31, 2009
KitMaker: 98 posts
Armorama: 94 posts
Posted: Wednesday, March 10, 2010 - 08:42 PM UTC
Hi Rod,
I hear you. Personally most of the time I model to have fun and to relax. Most of my faces come out looking like blobs anywise, and occasionally I do get one looking nice only to ruin it again later. But right on, the point it is to learn, to have fun, and to try to progress. Truth be told, I think more experimentation may be needed in the areas of the eyes.
In the end, we really do have to go with what looks good.
guille
Oregon, United States
Joined: May 31, 2009
KitMaker: 98 posts
Armorama: 94 posts
Joined: May 31, 2009
KitMaker: 98 posts
Armorama: 94 posts
Posted: Wednesday, March 10, 2010 - 08:58 PM UTC
Just a little progress.
First of all, I backtracked. I think I ruined the progress I had made previously on my Russian POWS. The Tanker set is coming along but I don't have pictures at this moment.
I did do some work with my set of various MPs and have them now on semi-display (meaning I have a couple more rounds of paint). The one guy sitting in the middle has had his face painted in oils and I am happy with the result. The guy who looks like half of his face is a blob is really like that. I got some glue in the eye, and I suppose I need to find a new head as it looks bloody aweful. Or maybe an eye patch.
And the Cossack who is in no way associated with this campaign- just thought you might enjoy.
Looks like I might have a big line to deal with on that hat. Funny how photos bring out the details.
Thanks for your time.
Posted: Thursday, March 11, 2010 - 06:17 AM UTC
Hi all
A tad late starting,these four ICM 1/48 figures will be used as part of a mini dio over on Aeroscale for the Bf 109 campaign
More pics soon
Andy
A tad late starting,these four ICM 1/48 figures will be used as part of a mini dio over on Aeroscale for the Bf 109 campaign
More pics soon
Andy