Campaigns
Where Armorama group builds can be discussed, organized, and updates posted.
1/48 Scale
koschrei
Visit this Community
California, United States
Joined: September 21, 2004
KitMaker: 147 posts
Armorama: 134 posts
Posted: Monday, September 13, 2010 - 03:07 AM UTC

Quoted Text

Good choice, I have just finished building one of these and assembly is a real treat, I cant wait to see how you progress with this subject!


Thanks Allan - wonderful to hear you enjoyed this kit - looking over the parts Tim has done just a masterful job on this model, and I am really looking forward to seeing it come together myself!

Best,

Konrad
koschrei
Visit this Community
California, United States
Joined: September 21, 2004
KitMaker: 147 posts
Armorama: 134 posts
Posted: Monday, September 13, 2010 - 03:11 AM UTC
[quoteKonrad: Looks like a cool project. I've always wanted to do a flail some day. Using parts from the spares box is no problem at all. Can you post some pics of the flail assembly? Just for my personal interest...

Cheers everyone!
Stefan[/quote]

Definitely will be positng in progress images of this build, and I will add some images of the flail for sure.

Really enjoy these GB's Stefan, they are a wonderful motivation - thanks for putting this one together!

Best,

Konrad
domingohm
Visit this Community
Santa Cruz de Tenerife, Spain / España
Joined: November 23, 2005
KitMaker: 59 posts
Armorama: 58 posts
Posted: Monday, September 13, 2010 - 04:41 AM UTC
Hi konrad,

I don't have many problems with this tracks, only I gued the extremes and i fixed on the road wheels with a small glue point, 5 minutes and it's ok.

Thanks
simpson6376
Visit this Community
England - South East, United Kingdom
Joined: July 31, 2005
KitMaker: 6 posts
Armorama: 5 posts
Posted: Monday, September 13, 2010 - 05:24 AM UTC
Konrad
The Flail chains are a challenge, I had problems getting them to hang so I replaced them with real chain.
I worked so much better and the resin chains fill the chain locker!
koschrei
Visit this Community
California, United States
Joined: September 21, 2004
KitMaker: 147 posts
Armorama: 134 posts
Posted: Tuesday, September 14, 2010 - 03:52 AM UTC
Thanks guys - sounds easy enough - I will try that on my next AFV build Domingo, and I will watch out for those chains Allan.

Looking forward to both your builds!

Konrad
Fritz_57
Visit this Community
Michigan, United States
Joined: March 01, 2009
KitMaker: 9 posts
Armorama: 8 posts
Posted: Tuesday, September 14, 2010 - 06:10 AM UTC
Very little progress. I am replacing the Tamiya supplied string tow cable with guitar string. I don't like the twist to it but do like the way real metal looks more like metal than plastic does. One of the hand hold/ladder rungs went missing so I am replacing it with some bent copper wire.


I'm not fond of painting the front of the headlight as a white disc so I am going to try to make a clear lens for it. I like these wiggle eyes because they are radiused.


Xavier_Ruiz
Visit this Community
Barcelona, Spain / España
Joined: September 06, 2010
KitMaker: 4 posts
Armorama: 3 posts
Posted: Tuesday, September 14, 2010 - 11:03 PM UTC
I think we will see great and good work by fellow group

first photos of the model
is mounted to the chassis and added some external boxes.
almost completed this part, we continue inside

regards xavier


alvaro_rm
Visit this Community
Santa Cruz de Tenerife, Spain / España
Joined: August 28, 2010
KitMaker: 17 posts
Armorama: 16 posts
Posted: Wednesday, September 15, 2010 - 07:15 AM UTC
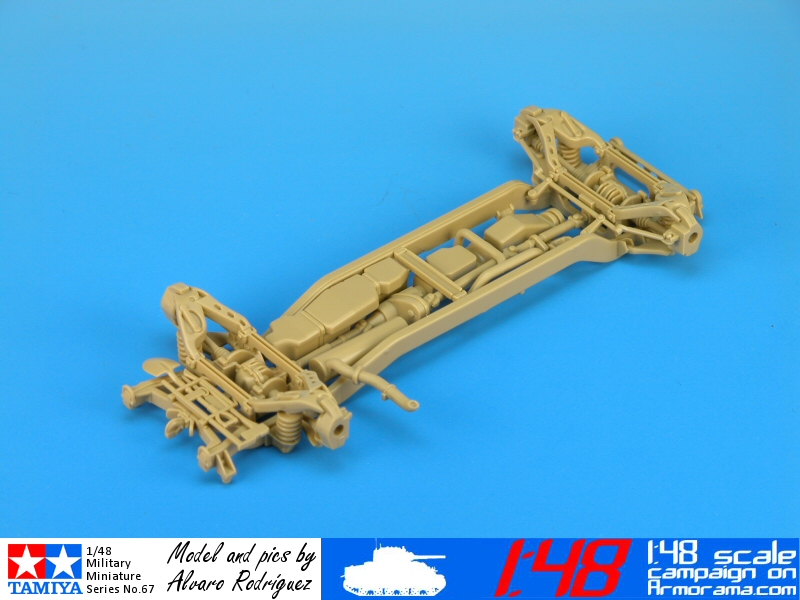
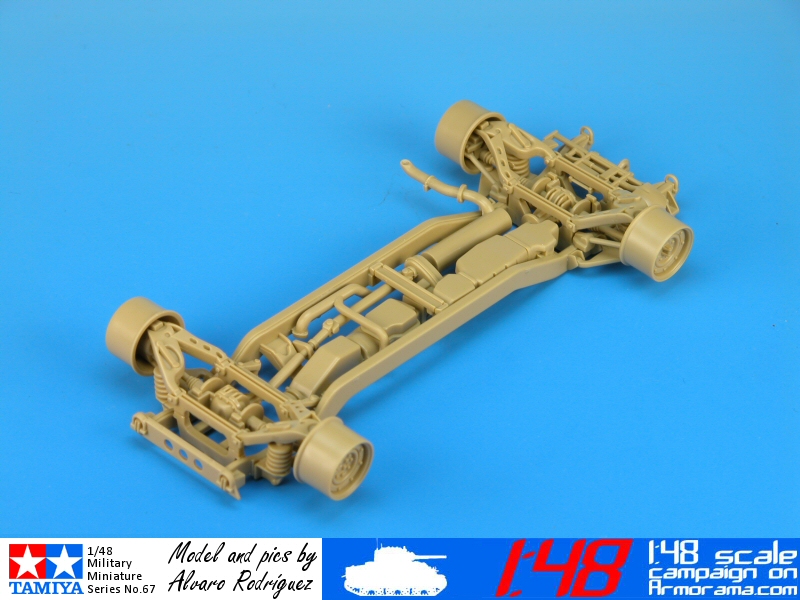
UPDATE #1: U.S. Modern 4x4 Utility Vehicle w/Grenade Launcher


Hi all!

Here you got the HMMWV progress so far.

For a modern armour fan and a 1/72nd scale modeller like me, this 1/48th kit is a pleasant surprise!

Seems to me a very clever engienered kit. Most of the injection pins resulted hidden during the assembly with those lovely crisp parts with almost no flash to worry about.

Here you got all the detail that will become invissible as soon as the wheels touched the ground!


Next update as soon as I finished the interior details!

I hope you like it!

Best regards!

PS This GB rocks!
alvaro_rm
Visit this Community
Santa Cruz de Tenerife, Spain / España
Joined: August 28, 2010
KitMaker: 17 posts
Armorama: 16 posts
Posted: Wednesday, September 15, 2010 - 07:59 AM UTC
Some comments to the group!

Looks like we are going to have a quite nice, interesting and assorted selection of models here! Keep them coming!

I was not too much familiar with the 1/48th scale offering but I have already realized that there is injection moulded available kits on the market for a life! (not to mention the more exotic but eyecatching resin ones as well!)

Should I have to add anything else? This scale rules!

@John Keogh German BIG cats are not my favourite but that Tiger looks impressive! It´s a nice touch that AFV moulded the zimmerit!!!

@Ed Small Good work with that KVmonster!

@Greg Good wheels are like new shoes! Those resin chained ones, plus the other resin accesories here and there, improve the M8 a LOT!. I already knew your Humvee on steroids project -from T48 and ML forums- and the Dtoys conversion -even when expensive- looks quite useful.

@Alan Simpson I love those (ugly but charm) British lorries! Great choice!

@Bud Highleyman Great to see a desert baloons Kübel!!!!

Xavier That conversion is one of the sexiest german 6x6 I´ve ever seen!

Domin You, like Xavier, will face the open top vehicles challenge!

StüG builders Those III´s will become an invincible army!

Sherman builders I hope you stop those StüGs!

Best regrads!
Dangeroo
#023
Visit this Community
Zurich, Switzerland
Joined: March 13, 2009
KitMaker: 2,058 posts
Armorama: 1,656 posts
Posted: Wednesday, September 15, 2010 - 08:21 AM UTC
Domingo: Nice start on the 251, looks like a clean build.

Konrad: No problem setting up the GB, it can only be as good as the particiation of everyone, so thanks back at you all!

Ed: The cable looks kind of strange, maybe replace it with twisted wires? I’m looking forward to you use of puppet eyes for tank “eyes”.

Xavier: Looks like the resin parts fit well to the rest. The shape looks familiar…

Alvaro: Good start on the Humvee. I especially like your photo layout! I think I’ll use it fort he feature at the end of the campaign if you don’t mind.

My build has progressed somewhat, here are some pix:


This one shows the sponson fillers I made and the putty used to cover some holes:


And of course there's the updated participants list:


I will be on vacation for 2 weeks starting Saturday, no internet. But I’m sure you boys can behave during my absence... Looking forward to all the progress in those two weeks!

Cheers!
Stefan
Railmen2000
Visit this Community
California, United States
Joined: February 17, 2007
KitMaker: 87 posts
Armorama: 65 posts
Posted: Wednesday, September 15, 2010 - 06:54 PM UTC
I am really glad so many more are joining in.

Here are some more shots of the AB43 I am doing.

First, the Jerry cans supplied are like the old Bandai ones - solid across the top. I was tempted to replace them entirely with Tamiya ones and scratchbuild the brackets holding them, but I only had Allied Jerry cans left in my spares box. So I modified the tops of the kit ones by cutting off the solid top and adding Tamiya handles.


Since the turret will be all buttoned up, I did not want to waste the detail of the gun breach here. Instead, I will replace the 20mm Breda gun with a 4.7cm barrel. (Actually, I plan on using a metal 50mm Pz III barrel from RB, which for me is close enough). Here are some shots with the hull nearly complete (just needs stowage and the bits that will break off when handling before painting) and the wheels and turret (sans gun) placed in position.


In the picture, you can see a result of not having enough hands to keep the numerous hull pieces together when using extra fine liquid cement - a big fat fingerprint.
Lucky for me I will be able to cover that up with proper stowage.
Might prime the hull and wheel hubs while I wait for my barrel to arrive.
Everyone else, keep on building.
Jim
vonHengest
Visit this Community
Texas, United States
Joined: June 29, 2010
KitMaker: 5,854 posts
Armorama: 4,817 posts
Posted: Wednesday, September 15, 2010 - 06:57 PM UTC
Looks like I'll be arriving back home shortly before you Stefan, hope you guys enjoy

Ed: I'm looking forward to seeing how your scratch comes out

Xavier: Can't wait to see the body shell dropped on the chassis!

Alvaro: This is looking to be an excellent kit, I may have to grab one for my collection. Looking forward to seeing how it builds up!

I agree with the previous comments, this group build is just awesome! I think that 1/48 armor is soon going to be my favorite
vonHengest
Visit this Community
Texas, United States
Joined: June 29, 2010
KitMaker: 5,854 posts
Armorama: 4,817 posts
Posted: Wednesday, September 15, 2010 - 07:01 PM UTC
Jim: Almost missed your post mate. Nice call on the Jerry cans, and glad to here the fingerprint will be easily covered up. Have you decided what camo scheme you want to apply to your build?
GaryKato
Visit this Community
California, United States
Joined: December 06, 2004
KitMaker: 3,694 posts
Armorama: 2,693 posts
Posted: Wednesday, September 15, 2010 - 07:50 PM UTC

Quoted Text


In the picture, you can see a result of not having enough hands to keep the numerous hull pieces together when using extra fine liquid cement - a big fat fingerprint.


Been there. Done that.
Easy_Co
Visit this Community
England - South East, United Kingdom
Joined: September 11, 2002
KitMaker: 1,933 posts
Armorama: 985 posts
Posted: Wednesday, September 15, 2010 - 09:10 PM UTC
Still doing it
Railmen2000
Visit this Community
California, United States
Joined: February 17, 2007
KitMaker: 87 posts
Armorama: 65 posts
Posted: Thursday, September 16, 2010 - 07:18 AM UTC
Jeremy, Gary & John: Thanks for the sympathies.
As for camo scheme, I will do the Dk Green and Red/brown hard patches over yellow as shown on the box and on the instructions. I have several sharp color pictures of a restored AB43 with this scheme for pattern reference. The kit also lets you model a 1950 Italian Police version in an overal dark red, but I want to stick with WWII here.
Jim
zontar
Visit this Community
Hawaii, United States
Joined: August 27, 2006
KitMaker: 1,646 posts
Armorama: 1,557 posts
Posted: Thursday, September 16, 2010 - 02:56 PM UTC
Aloha All,

There's some great work here as this campaign seems to be rolling along quite well.

Plugging along bit by bit. Was able to get the base coat on and starting to paint the details, beginning with the road wheels.


Thanks for looking and have a good one.
-zon
vonHengest
Visit this Community
Texas, United States
Joined: June 29, 2010
KitMaker: 5,854 posts
Armorama: 4,817 posts
Posted: Thursday, September 16, 2010 - 04:21 PM UTC
Jim: I'm glad to hear you are going with one of the nice looking tri tone camo schemes... now where's that darn thumbs up icon?

Zon: Your build is coming along nicely mate, it's about to go together soon?

I wish I brought some stuff up to Montana to work on up here, had no idea I would be staying as long as I am. I went into the "big town" and tried hunting down some model kits, but only found some high priced older Tamiya 1/35 kits in Hobby Lobby.
Dangeroo
#023
Visit this Community
Zurich, Switzerland
Joined: March 13, 2009
KitMaker: 2,058 posts
Armorama: 1,656 posts
Posted: Thursday, September 16, 2010 - 08:03 PM UTC
Jim: That AB43 is coming along nicely, the cans look great. Italeri was never known for ease of construction, IIRC...

Zon: Your build is coming along nicely, looks like you might be the first finisher.

Looks my build got unnoticed... Must be the bad pix. Keep 'em coming lads! This is my last post for a couple of weeks.

Cheers!
Stefan
vonHengest
Visit this Community
Texas, United States
Joined: June 29, 2010
KitMaker: 5,854 posts
Armorama: 4,817 posts
Posted: Thursday, September 16, 2010 - 08:16 PM UTC
Nah, I just figured you were already kicking off for your vacation. I was going to ask if the PE was kit supplied or AM. Now that you mention it, your pics could use a bit more in the way of lighting....
GregCloseCombat
Visit this Community
California, United States
Joined: June 30, 2008
KitMaker: 2,408 posts
Armorama: 2,394 posts
Posted: Sunday, September 19, 2010 - 09:59 AM UTC
Stefan - we were just distracted by your nice charting
nice progress everyone.


I found these Gasoline Master Fighter figures on e-bay and thankfully they are perfectly size matched to the total war miniatures. The 2 German tank hunters will be hiding in the woods (I may turn them to face the vehicle) and the US (er Germans in MP uniforms) have their jeep blocking the true route with a road sign chopped down. Hopefully when I condense the scene a little more the scene won't be too distracting and the point is clear. Any scene organization tips welcomed.


Lakota
#123
Visit this Community
New Mexico, United States
Joined: November 17, 2008
KitMaker: 1,202 posts
Armorama: 635 posts
Posted: Monday, September 20, 2010 - 08:39 AM UTC
Howdy Gentlemen,

I have been out of action for awhile as I've had some eye surgery. Unfortunately I do not think I will ever be able to build in brail scale again.

I was working on captured KV-II put into service by the Germans for the "Axis of Armor" campaign but was unable to finish it due to my eye surgery. I was wondering if y'all would let me enter this campaign as a 'fighting wounded' entrant with my partially completed KV-II German?

Thanks,
Don Smith 'Lakota'
Railmen2000
Visit this Community
California, United States
Joined: February 17, 2007
KitMaker: 87 posts
Armorama: 65 posts
Posted: Monday, September 20, 2010 - 12:09 PM UTC
Greg, how did I miss those on ebay! Gasoline does make some good 1/48 figures. I am sure your scene is inspired by how the movie Battle of the Bulge portrayed this (I don't remember if you stated that in earlier posts.) Are you planning on having bushes and shrubbery on both sides of the road? I liked the way the movie had a wood fence on one side. Just a thought.
Don - sorry to read about your eye surgery. Hopefully you will still be able to view all the posts here and give some good critiques and comments.
Meanwhile, while waiting for my barrel, I primed and base coated the hull and wheels:


I used a lighter shade of yellow for the base coat here. On all my prior German armor, I used Tamiya dark yellow. Once washes are applied and then weathered, they look too dark . We'll see how this shade does here. I'll probably start painting the camoflage scheme, first on the wheels, then on the hull.
Looking forward to seeing progress on others.
GregCloseCombat
Visit this Community
California, United States
Joined: June 30, 2008
KitMaker: 2,408 posts
Armorama: 2,394 posts
Posted: Monday, September 20, 2010 - 04:54 PM UTC
Hi Jim,
Ya I got lucky on those ebay guys at just the right moment I needed them. I was mostly just happy their sizes matched the MIG figures (the newer TWM figures are a bit too large in comparison to the older MIG ones). I need to catch up to you now in painting. Your AB is coming along splendidly. I like the fence idea - I'l have to watch that movie again. I had the idea after watching Hart's War with Bruce Willis.
grayghost666
#021
Joined: August 02, 2007
KitMaker: 2,458 posts
Armorama: 656 posts
Posted: Monday, September 20, 2010 - 05:24 PM UTC
Hello Don,
I am sorry about the eye surgery, My cousin had cataract surgery and now see's 20/25 now. I hope your eyes will get better.
About you entry, How far have you gotten? is about 25% done, I see no problem with you joining up and finishing the build.
Of course Der Leader will have to OK it, But I think he will allow it.
I hope you get better I know a great eye doctor if you need one,
Cheers,
Bruce