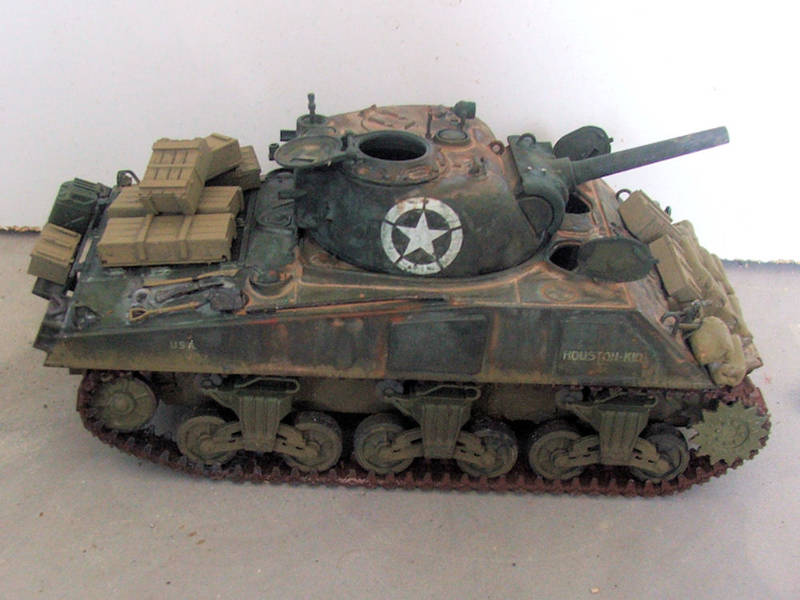
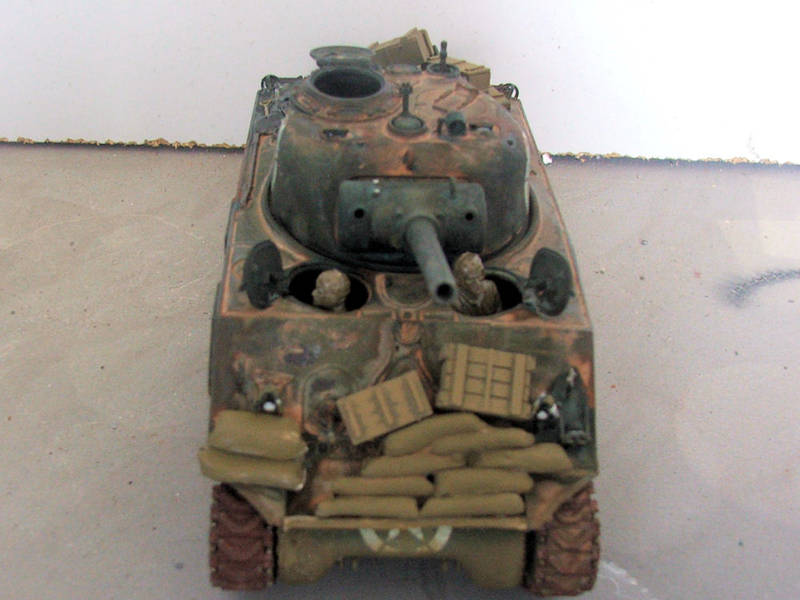
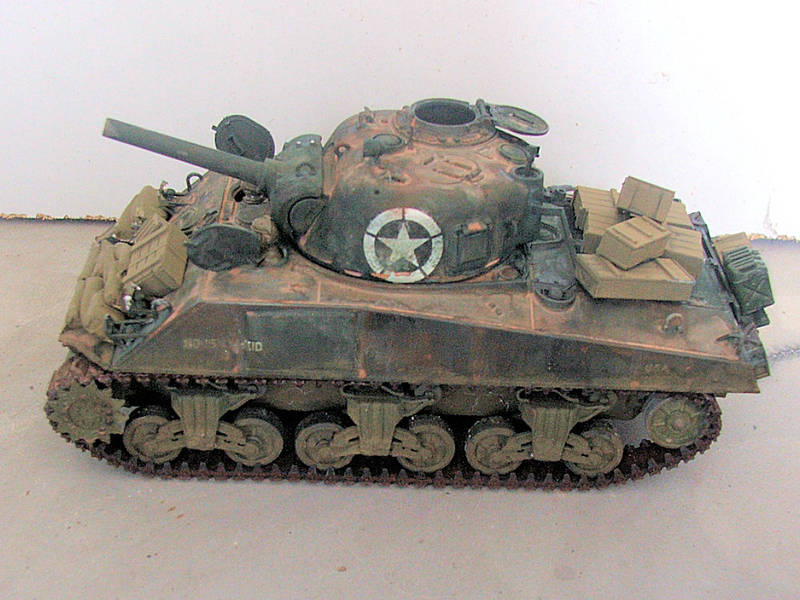
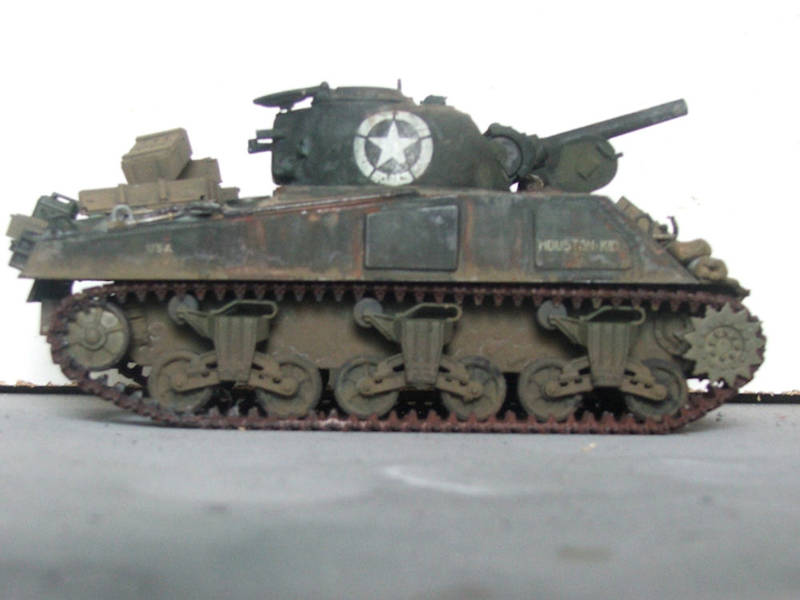
All looking good so far great work here some done already
Glad we have a year or so.
I am back on those pesky full of holes and different size disks again.
As you can see with all the red and super glue not an easy task here.
Wish Dragon would do one in plastic.
most likely right after I finish this one.
Yes I know clean the area and put some new cardboard down.
Enjoy the builds me not in a big hurry as fun not work.
Campaigns
Where Armorama group builds can be discussed, organized, and updates posted.
Hosted by Darren Baker, Richard S.
Sherman Campaign
sgtreef
Oklahoma, United States
Joined: March 01, 2002
KitMaker: 6,043 posts
Armorama: 4,347 posts
Joined: March 01, 2002
KitMaker: 6,043 posts
Armorama: 4,347 posts
Posted: Monday, August 23, 2010 - 12:06 AM UTC
Posted: Monday, August 23, 2010 - 01:00 AM UTC
Quoted Text
I thought it was 1'35 as well great work.Good gosh man I thought that was a 1/35th scale kit till I saw your hand in the picture...even more impressive!...Don't sweat the few things you're not satisfied with just use it as a learning expirence and you'll be more careful next time ...I still haven't seen anything wrong with the stacks ... Excellent job sir!
Posted: Monday, August 23, 2010 - 01:05 AM UTC
here are some more pics although I fear that I may of over weathered it am in the process of removing some dirt from the turret.
Posted: Monday, August 23, 2010 - 06:09 AM UTC
Michael - lovely little Shermie Whats the deal with the black band round the turret base? Never seen that before
thebear
Quebec, Canada
Joined: November 15, 2002
KitMaker: 3,960 posts
Armorama: 3,579 posts
Joined: November 15, 2002
KitMaker: 3,960 posts
Armorama: 3,579 posts
Posted: Monday, August 23, 2010 - 09:20 AM UTC
Neil ..I'm not sure but it might just be residue left over from the waterproofing but it does look very straight and almost too perfect to be that ...Your guess is as good as mine,...
Rick
Rick
mopnglo
United States
Joined: January 07, 2006
KitMaker: 452 posts
Armorama: 271 posts
Joined: January 07, 2006
KitMaker: 452 posts
Armorama: 271 posts
Posted: Monday, August 23, 2010 - 02:25 PM UTC
Thanks for the compliments, guys! This was my first foray into braille scale, so it's good to know I didn't completely botch it. I was a bit intimidated at times!
Neil, that's a great question about the band around the turret. I tried to answer it before I started the build and waterproofing was the only answer I could find. I agree with Rick that it seems like something else, but I'm most definitely not a Sherman expert!
I still hope to add something to the base, so I won't post any pictures to the campaign gallery until I'm 100% finished. I also hope to come back with another Sherman build to finish off the campaign. Until then, I'll continue to follow and learn from the great builds that are going on!
ppawlak1
Victoria, Australia
Joined: March 14, 2006
KitMaker: 1,973 posts
Armorama: 1,843 posts
Joined: March 14, 2006
KitMaker: 1,973 posts
Armorama: 1,843 posts
Posted: Monday, August 23, 2010 - 07:20 PM UTC
@ Jeff - Wow those pesky resin bits need a bit of work don't they. It'll all be worth it as the finished Mine roller looks fantastic !!
@ David - your shermie is coming along quickly (well done).
If you need to take more dust off try using a Q Tip.
I use dry ones and just keep brushing the area I want to clean up (lightly) until it's the way I want it
Keep posting guys !
I'll try to get the turret on my machine finished before the week is ''out'. I've bought some Aber PE to add the sandshield strips, and I think I'll also use PE for the tail light guards
Cheers
Paul
HONEYCUT
Victoria, Australia
Joined: May 07, 2003
KitMaker: 4,002 posts
Armorama: 2,947 posts
Joined: May 07, 2003
KitMaker: 4,002 posts
Armorama: 2,947 posts
Posted: Monday, August 23, 2010 - 08:37 PM UTC
Quoted Text
Neil ..I'm not sure but it might just be residue left over from the waterproofing
Rick
I'd be inclined to agree also...I believe it is the application of mastic sealant, and one would imagine the turret could not be traversed until safely on land to keep the integrity of the dealant intact?
Brad
HONEYCUT
Victoria, Australia
Joined: May 07, 2003
KitMaker: 4,002 posts
Armorama: 2,947 posts
Joined: May 07, 2003
KitMaker: 4,002 posts
Armorama: 2,947 posts
Posted: Tuesday, August 24, 2010 - 01:29 AM UTC
Here is the start of my M4A3 (76)W
Some Formations OVM (pioneer tools) What you get in the set...
These ones have no tie downs in place and I have added some brass rod shafts where needed.
I have added some liquid cement to the cast areas around the driver's positions.
Here is one of the biggest problems with the kits. The undersized final drive cover is shown next to it's proper sized counter part from a subsequent release (which one escapes me at present)
The transmission cover overhangs to accomodate the undersized final drive cover, and thus some cutting is needed to fit the full sized version.
After the trimming back...
Fits perfect!
Posted: Tuesday, August 24, 2010 - 03:54 AM UTC
@ David - your shermie is coming along quickly (well done).
If you need to take more dust off try using a Q Tip.
I use dry ones and just keep brushing the area I want to clean up (lightly) until it's the way I want it
Keep posting guys !
I'll try to get the turret on my machine finished before the week is ''out'. I've bought some Aber PE to add the sandshield strips, and I think I'll also use PE for the tail light guards
Cheers
Paul[/quote]
yeah cheers Paul. by Q tip do you mean a pool Q tip. lucky I had only applied it with water so have got most of the unwanted dust off. there are a lot of good builds going on by the looks of it should be a good campaign
ppawlak1
Victoria, Australia
Joined: March 14, 2006
KitMaker: 1,973 posts
Armorama: 1,843 posts
Joined: March 14, 2006
KitMaker: 1,973 posts
Armorama: 1,843 posts
Posted: Tuesday, August 24, 2010 - 08:11 AM UTC
Quoted Text
yeah cheers Paul. by Q tip do you mean a pool Q tip. lucky I had only applied it with water so have got most of the unwanted dust off. there are a lot of good builds going on by the looks of it should be a good campaign
"Cotton bud" Q tip's David, (the type used for makeup or cut's etc - small cottom bud on a paper / card 'stick') they're very useful
Posted: Tuesday, August 24, 2010 - 08:54 AM UTC
yeah thats what I used the tubes come in handy to thanks. I thought a Q tip was a strange thing to use.
Posted: Wednesday, August 25, 2010 - 04:47 AM UTC
Man, you guys keep speeding ahead...
O.k., deal me in, up the blinds:
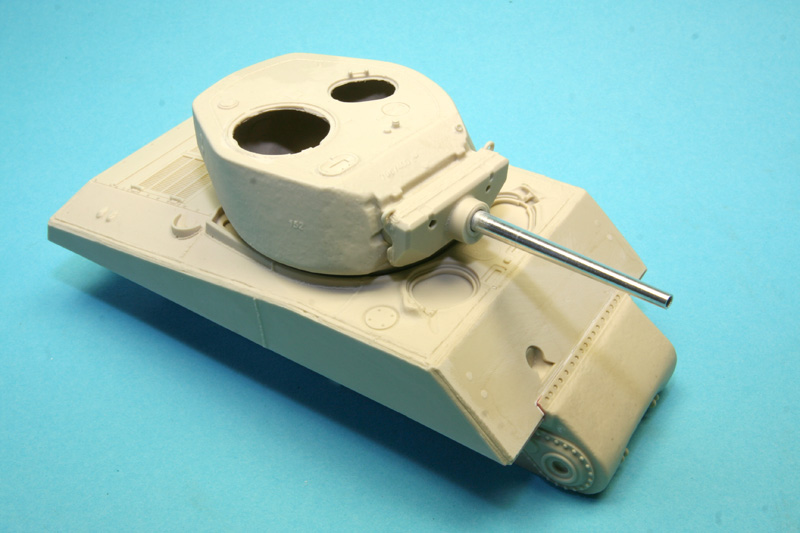
I accidentally started my jumbo due to scraping at it for 'having a look' after breakfast on Saturday.
Doesn't look like much but here's how i got there:
Had to graft in some strip here and there to achieve a nice clean form. But that's probably my fault as i maybe removed to much material. I'm a novice to anything bigger than resin bang seats...
But let me tell you this: the fit is purely delighting, take a looksee:
As you can see by the scalpelblade comparison: awesome! This is resin!! Have some of our beloved Injectors do that!
Well, I'm planning on doing a build review feature, so I got mor pics if desired.
Still, got to solve the marking problem. It's a 75mm, too. So no ''Hanks Tank Aquino'
O.k., deal me in, up the blinds:
I accidentally started my jumbo due to scraping at it for 'having a look' after breakfast on Saturday.
Doesn't look like much but here's how i got there:
Had to graft in some strip here and there to achieve a nice clean form. But that's probably my fault as i maybe removed to much material. I'm a novice to anything bigger than resin bang seats...
But let me tell you this: the fit is purely delighting, take a looksee:
As you can see by the scalpelblade comparison: awesome! This is resin!! Have some of our beloved Injectors do that!
Well, I'm planning on doing a build review feature, so I got mor pics if desired.
Still, got to solve the marking problem. It's a 75mm, too. So no ''Hanks Tank Aquino'
MVisser
Utrecht, Netherlands
Joined: December 14, 2006
KitMaker: 2,679 posts
Armorama: 313 posts
Joined: December 14, 2006
KitMaker: 2,679 posts
Armorama: 313 posts
Posted: Wednesday, August 25, 2010 - 05:47 PM UTC
Cool jumbo,
I understand you don't make the Hanks Tank, Aquino,
I've got the decals and was planning to make that one.
Martin
I understand you don't make the Hanks Tank, Aquino,
I've got the decals and was planning to make that one.
Martin
Posted: Thursday, August 26, 2010 - 02:13 AM UTC
Please, Martin, do go ahead. I'm going for a somewhat generic marking, as mine is a 75mm and the Bison sheet is hard to find.
So you still are going to entry your jumbo? Hopefully Tasca see this, so they will know people just love that beast!!
Looking forward to see your progress!
Greetings
So you still are going to entry your jumbo? Hopefully Tasca see this, so they will know people just love that beast!!
Looking forward to see your progress!
Greetings
thebear
Quebec, Canada
Joined: November 15, 2002
KitMaker: 3,960 posts
Armorama: 3,579 posts
Joined: November 15, 2002
KitMaker: 3,960 posts
Armorama: 3,579 posts
Posted: Thursday, August 26, 2010 - 10:25 AM UTC
I got my Jumbo sitting on the corner of my bench as well...
junglejim
Alberta, Canada
Joined: February 18, 2003
KitMaker: 1,728 posts
Armorama: 1,629 posts
Joined: February 18, 2003
KitMaker: 1,728 posts
Armorama: 1,629 posts
Posted: Thursday, August 26, 2010 - 12:22 PM UTC
Paul, if it's not too late, I'd like to join up. Couldn't see 'enlist' button anywhere on the main campaign page? I recently got the Dragon M4 DV I want to fix up the hull to a proper Baldwin one.
Jim
Jim
thebear
Quebec, Canada
Joined: November 15, 2002
KitMaker: 3,960 posts
Armorama: 3,579 posts
Joined: November 15, 2002
KitMaker: 3,960 posts
Armorama: 3,579 posts
Posted: Thursday, August 26, 2010 - 02:47 PM UTC
Hi Jim and welcome aboard ...I'll be following closely ... I was thinking about getting the kit but heard it was quite the mish-mash ...The corrections should be interesting ... I know a lot of rivets are in order..
vonHengest
Texas, United States
Joined: June 29, 2010
KitMaker: 5,854 posts
Armorama: 4,817 posts
Joined: June 29, 2010
KitMaker: 5,854 posts
Armorama: 4,817 posts
Posted: Thursday, August 26, 2010 - 04:26 PM UTC
Hey guys, glad to see there's a lot of activity here, and a lot of good looking builds going on. I'm still not certain what I want to build, and was wondering what you guys have for suggestions?
ppawlak1
Victoria, Australia
Joined: March 14, 2006
KitMaker: 1,973 posts
Armorama: 1,843 posts
Joined: March 14, 2006
KitMaker: 1,973 posts
Armorama: 1,843 posts
Posted: Thursday, August 26, 2010 - 08:46 PM UTC
Quoted Text
Paul, if it's not too late, I'd like to join up. Couldn't see 'enlist' button anywhere on the main campaign page? I recently got the Dragon M4 DV I want to fix up the hull to a proper Baldwin one.
Jim
Hey Jim !
You are most welcome, as are more enlistees.
I don't understand why you didn't see the button, perhaps try again :
Sherman Campaign
I'm seeing the button on the link above, so hopefully it's Ok now.
Cheers and REALLY looking forward to you build
Paul
ppawlak1
Victoria, Australia
Joined: March 14, 2006
KitMaker: 1,973 posts
Armorama: 1,843 posts
Joined: March 14, 2006
KitMaker: 1,973 posts
Armorama: 1,843 posts
Posted: Thursday, August 26, 2010 - 10:28 PM UTC
@ Leo - lovely Jumbo
Looking forward tp seeing more
Paul
Looking forward tp seeing more
Paul
Posted: Thursday, August 26, 2010 - 11:36 PM UTC
Paul,
I know my tractor build is still ongoing, and the Tasca Sherman III has barely made it out of the box, but the reason for the delay has been a review item - the new Dragon M7. So, I'll add that to the campaign list! (I had to do rather more building than I intended just to answer questions for the review, so it now has its own blog here: https://armorama.kitmaker.net/modules.php?op=modload&name=SquawkBox&file=index&req=forums/163080&page=1 )
So, I'm now up to three parallel builds! After all, we do have nearly a year to go...
Tom
PvtMutt
Missouri, United States
Joined: July 01, 2006
KitMaker: 614 posts
Armorama: 601 posts
Joined: July 01, 2006
KitMaker: 614 posts
Armorama: 601 posts
Posted: Friday, August 27, 2010 - 10:57 AM UTC
Howdy Folks
You know it seems like i've been a member here forever and just today found out that the "Campaign" area is for Group Builds.
Some of you may already know that i'm a SPG fiend and needing an American example for my collection jumped on the DML M7 Priest as soon as it was released. After I completed my honey-do list of task for the summer I popped opened the box,looked over the instructions and that 105 grabbed my attention right off the bat, no need to flip a coin as to where I wanted to start.
To insure that the recoil bed stayed true I installed the upper gun assembly and gator clipped both ends while the glue cured for a couple of days.
Here's a tip that can make life easier for you: I wouldn't advise installing parts A29, A30 or A37 until after you've installed the armor shields. With the shields on, you can install A29 and A30 from the bottom side.
After installing the shields the remainder of the small assorted parts were put in place. After these pictures were taken I went back and touched up a couple spots I missed but I think it's ready for primer now.
I'm not going to give you a blow by blow here because Tom is doing a build blog for this kit. I will tell you that there is no use looking for a lot of left over parts for the spares bin cause there ain't but a few.
I'll catch ya later cause this registered redneck has pork chops on the grill and I do have my priorities.
Tony the Mutt
junglejim
Alberta, Canada
Joined: February 18, 2003
KitMaker: 1,728 posts
Armorama: 1,629 posts
Joined: February 18, 2003
KitMaker: 1,728 posts
Armorama: 1,629 posts
Posted: Friday, August 27, 2010 - 11:35 AM UTC
Quoted Text
I don't understand why you didn't see the button, perhaps try again :
Sherman Campaign
I'm seeing the button on the link above, so hopefully it's Ok now.
Paul
Yep, that one works, when I went to the link provided on the first page it's not there:
Maybe you can edit that link so others don't run into the same problem?
Thanks,
Jim
HONEYCUT
Victoria, Australia
Joined: May 07, 2003
KitMaker: 4,002 posts
Armorama: 2,947 posts
Joined: May 07, 2003
KitMaker: 4,002 posts
Armorama: 2,947 posts
Posted: Friday, August 27, 2010 - 11:46 AM UTC
Quoted Text
Howdy Folks
You know it seems like i've been a member here forever and just today found out that the "Campaign" area is for Group Builds.
Some of you may already know that i'm a SPG fiend and needing an American example for my collection jumped on the DML M7 Priest as soon as it was released.
Tony the Mutt
Hey Toner
Good to see clarity prevails and you have found the campaign!
I very much look forward to your (and others!) build of the M7 HMC, as this is a a kit I know little about...
Brad