Campaigns
Where Armorama group builds can be discussed, organized, and updates posted.
Not-Fighting Vehicles
mat
Visit this Community
Limburg, Netherlands
Joined: November 18, 2003
KitMaker: 894 posts
Armorama: 643 posts
Posted: Tuesday, July 26, 2011 - 08:53 AM UTC
some update on the radar. The PE parts are very thin so I started to add some thickness to them by adding strips of Evergreen. The screen also misses some struts and cables which I will add on later


here is the front part which I made from 1 mm thick rod to replace thee PE parts


and now filled with some parts. When looking at pictures I saw that the circular parts that came with the kit (2 pcs together as shown on the picture) were a bit small so I made my own from Evergreen (here seen already mounted in the boom. The 2 electronics boxes in the kit were also way too small and had an incorrect rectangular shape, the have to be more like a trapezoid. I made my own (red and white boxes on the picture)

mat
Visit this Community
Limburg, Netherlands
Joined: November 18, 2003
KitMaker: 894 posts
Armorama: 643 posts
Posted: Friday, July 29, 2011 - 11:49 PM UTC
the project is coming to an end, the radar took me more time then expected


I decided to make the radar turn with an electric motor, why? just because I can
GaryKato
Visit this Community
California, United States
Joined: December 06, 2004
KitMaker: 3,694 posts
Armorama: 2,693 posts
Posted: Saturday, July 30, 2011 - 01:04 AM UTC

Quoted Text


I decided to make the radar turn with an electric motor, why? just because I can


That would be so awesome to see! I doubt I'd ever be able to put such a large bunch of PE together like you did.
barkingdigger
Staff MemberAssociate Editor
ARMORAMA
#013
Visit this Community
England - East Anglia, United Kingdom
Joined: June 20, 2008
KitMaker: 3,981 posts
Armorama: 3,403 posts
Posted: Saturday, July 30, 2011 - 01:10 AM UTC
Mat,

Your radar buggy is absolutely stunning! I thought I was doing good just getting some gloss paint onto my Citroen...

I can't wait to see your finished build!

Tom
17741907
Visit this Community
Istanbul, Turkey / Türkçe
Joined: December 05, 2007
KitMaker: 953 posts
Armorama: 705 posts
Posted: Saturday, July 30, 2011 - 12:34 PM UTC
Fine effort Mat....Great work there....
barkingdigger
Staff MemberAssociate Editor
ARMORAMA
#013
Visit this Community
England - East Anglia, United Kingdom
Joined: June 20, 2008
KitMaker: 3,981 posts
Armorama: 3,403 posts
Posted: Sunday, July 31, 2011 - 07:33 AM UTC
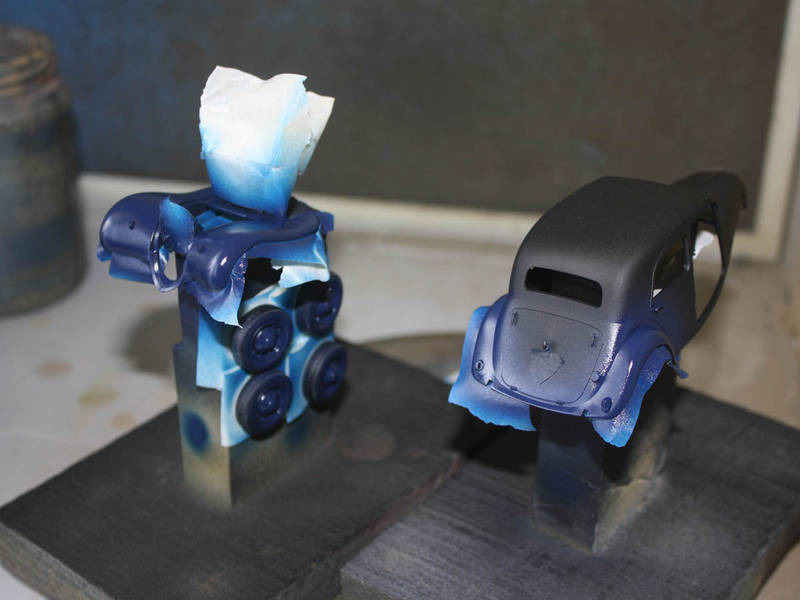
Just to prove I'm progressing, here is the Royal Blue paint on my Traction Avant. The main body will be Sky Blue, so it'll look sharp! The driver should make a good counter-point in his Feldgrau uniform...

"I remember every detail. You wore blue, the Germans wore grey..."


Tom
mat
Visit this Community
Limburg, Netherlands
Joined: November 18, 2003
KitMaker: 894 posts
Armorama: 643 posts
Posted: Monday, August 01, 2011 - 06:47 AM UTC
Hi guys,

thank you for the positive feedback, it keeps me motivated

this is the motor I will use for the radar. I got it for free from the guy that runs my LHS. It's an old Tamiya motor with a lot of reduction gears which brings the turning speed back to something more like the real vehicle, I read it turns once every 4-5 seconds.


I made a flexible connection from brass wire bent in a coil which I soldered to a stronger metal shaft.


I started painting, first grey since green won't cover well on yellow resin


some preshading


the base coat of 2/3 XF-58 olive green and 1/3 clear gloss, this mix has been thinned down with 50% thinner. It looks like crap but I always work in thin layers


second layer


now the lower areas get a coat of the same mixture with some XF-61 dark green


the higher areas get a coat of the base mix with XF-51 khaki drab added


highlighting with the base mix and XF-65 field grey


after this I added the final highlights with some extra light gray added, F-12 JN grey (no pic available). All this may not be visible on the pictures but all these layers give a subtle effect. I am not into chipping since it is not a WWII Afrika Korps vehicle

Matthijs
17741907
Visit this Community
Istanbul, Turkey / Türkçe
Joined: December 05, 2007
KitMaker: 953 posts
Armorama: 705 posts
Posted: Monday, August 01, 2011 - 11:29 AM UTC
Looking good so far Matthijs.....
Nito74
Visit this Community
Lisboa, Portugal
Joined: March 04, 2008
KitMaker: 5,386 posts
Armorama: 4,727 posts
Posted: Wednesday, August 03, 2011 - 06:28 PM UTC
I'm with a Panzer I training from Tristar.
Or a BergeTiger
mat
Visit this Community
Limburg, Netherlands
Joined: November 18, 2003
KitMaker: 894 posts
Armorama: 643 posts
Posted: Saturday, August 06, 2011 - 09:05 AM UTC
a Bergetiger...the Italeri kit? that one is a challenge

my radar buggy as I call it now is already on it's base. There is a hole in it to fit the motor. I will give it a few light washes, this is not a kit that should receive heavy weathering imho....

Nito74
Visit this Community
Lisboa, Portugal
Joined: March 04, 2008
KitMaker: 5,386 posts
Armorama: 4,727 posts
Posted: Sunday, August 07, 2011 - 03:44 PM UTC
No Matt, I can't find that old kit, that's too bad. I'll do the Dragon kit.
Or maybe the training Pz I from Tristar.
Still not sure.
I'm a little behind with my T-62 for another Campaign...
ltb073
Visit this Community
New York, United States
Joined: March 08, 2010
KitMaker: 3,662 posts
Armorama: 3,078 posts
Posted: Monday, August 08, 2011 - 02:19 AM UTC
Mat your Radar buggy is a beast, I have been following your build there and you have been doing a great job at it Its really looking pretty cool looking forward to seeing lots of pictures of it when its finished
mat
Visit this Community
Limburg, Netherlands
Joined: November 18, 2003
KitMaker: 894 posts
Armorama: 643 posts
Posted: Saturday, August 13, 2011 - 07:08 AM UTC
I have reached the toughest part of my build, the groundwork. If there is something in the world I have no talent for, it is making groundwork. That why I like to keep things simple (hints and tips will be highly appreciated )


the base is standing on legs because the motor is sticking out. I still have to shorten the pin that turns the radar

batteries and switch:


the frame, it has to be 100% square otherwise the glass won't fit correctly

mat
Visit this Community
Limburg, Netherlands
Joined: November 18, 2003
KitMaker: 894 posts
Armorama: 643 posts
Posted: Tuesday, August 16, 2011 - 06:19 AM UTC
just a small update, which in fact cost me ton of work and frustration

I covered the dio base with styrene, which is much easier to paint than the MDF. Luckily these styrene plates cost almost nothing at my LHS. Cutting the glass was not so easy. I tried with 2 mm thick glass first, but it cracked all the time, so I took some 4 mm glass which works much better. I got the stuff from a friend who owns a greenhouse The frame for the glass was made from cheap plastic profiles. Aluminium was too expenive and wood too ugly. cutting everything at the exact length and a 45 degree angle was test for my patience, just like glueing it all together and keeping things square........ all left to do is sanding and painting everything (except for the glass ofcourse )


time for a refreshing beer....
mat
Visit this Community
Limburg, Netherlands
Joined: November 18, 2003
KitMaker: 894 posts
Armorama: 643 posts
Posted: Wednesday, August 17, 2011 - 04:27 AM UTC
I have the radar working!!!!!!

maybe a bit fast but it looks great. Don't think I can upload a video, so here is the link, copy and paste in your browser:

http://zapp-brannigan.hyves.nl/album/22476373/Iedereen/VDlYOhUk/video/1386808757/0/yGK7/
lespauljames
Visit this Community
England - South West, United Kingdom
Joined: January 06, 2007
KitMaker: 3,661 posts
Armorama: 2,764 posts
Posted: Wednesday, August 17, 2011 - 07:12 AM UTC
nice one Mat, although that looks way too fast. looks like its gonna come off.
mat
Visit this Community
Limburg, Netherlands
Joined: November 18, 2003
KitMaker: 894 posts
Armorama: 643 posts
Posted: Wednesday, August 17, 2011 - 07:43 AM UTC
thanks

yes I know it's too fast, it should turn every 4-5 seconds. It looks more like a Tunguska radar on steroids I have to bring the revs down somehow..
lespauljames
Visit this Community
England - South West, United Kingdom
Joined: January 06, 2007
KitMaker: 3,661 posts
Armorama: 2,764 posts
Posted: Wednesday, August 17, 2011 - 08:17 AM UTC
or a tunguscacoptor ? haha. I admit though, im one for moving parts, taking apart old aircraft kits and putting in engines. they never did take off...
mat
Visit this Community
Limburg, Netherlands
Joined: November 18, 2003
KitMaker: 894 posts
Armorama: 643 posts
Posted: Wednesday, August 17, 2011 - 09:24 AM UTC
I must say that when I put it on it gives me a nice cool breeze. No need anymore to buy a fan . All joking aside, I have to add some resistors. Since the only thing I know about my electrical circuit is that power supply is 4,5 volts I cannot calculate how many "ohms" I need.

Once it's operational I can make it work together with my 2K11 Krug from Tankmania so I can deal with those nasty pigeons that wake me up in the morning...
mat
Visit this Community
Limburg, Netherlands
Joined: November 18, 2003
KitMaker: 894 posts
Armorama: 643 posts
Posted: Thursday, August 18, 2011 - 01:19 AM UTC
finally I am ready


so here are the pics, I kept the cover off since taking pics through glass is difficult:

PE flowers, thanks to Aber


thanks to all for following my build and for the feedback, it really helped me getting this one done

Matthijs
emroglan
Visit this Community
Istanbul, Turkey / Türkçe
Joined: December 16, 2004
KitMaker: 1,163 posts
Armorama: 842 posts
Posted: Thursday, August 18, 2011 - 03:05 AM UTC
Well done Matthijs, that came out great!
sfctur1
Visit this Community
California, United States
Joined: December 12, 2007
KitMaker: 643 posts
Armorama: 497 posts
Posted: Friday, August 19, 2011 - 05:42 PM UTC
Here are my photo's of my completed entry. Sorry no inprogress tried a new camera it didn't work. Back to old faithful. The model is a Revell HMMWV Cargo.
Painted it with Model Master Enamal paints.


I will post a couple of pictures in the campaign gallery.As always all comments welcome.
Tom
plstktnkr2
Visit this Community
Maryland, United States
Joined: October 10, 2002
KitMaker: 352 posts
Armorama: 309 posts
Posted: Tuesday, August 23, 2011 - 02:52 AM UTC
I am doing this kit : 1/35 Citroen 11cv.

The subject chosen will be a civilian capture, in use by a doctor at a German field hospital (dio in process)

spongya
Staff MemberAssociate Editor
MODELGEEK
Visit this Community
Budapest, Hungary
Joined: February 01, 2005
KitMaker: 2,365 posts
Armorama: 1,709 posts
Posted: Tuesday, August 23, 2011 - 03:23 AM UTC
Always wanted to build this kit (and many-many others). The Russians were making some real cool looking hardware, that's for sure. Incredible build... I don't think I could manage this kit.


Quoted Text

a Bergetiger...the Italeri kit? that one is a challenge

my radar buggy as I call it now is already on it's base. There is a hole in it to fit the motor. I will give it a few light washes, this is not a kit that should receive heavy weathering imho....


barkingdigger
Staff MemberAssociate Editor
ARMORAMA
#013
Visit this Community
England - East Anglia, United Kingdom
Joined: June 20, 2008
KitMaker: 3,981 posts
Armorama: 3,403 posts
Posted: Tuesday, August 23, 2011 - 04:47 AM UTC
Hi Rick,

Good choice of kit! Mine is now a nifty sky blue with dark blue fenders - what civvie scheme are you doing for yours? I was strongly tempted by yellow with brown fenders. Then again, basic black with lots of chrome looks good too.

(I really need to post some more pics...)

Tom