I get side-tracked for a day or so and this thread goes WILD!!! First off was to get all the changes to be reflected in our Master Chart. There were more than I might have anticipated. Since the original is back on page seven and this starts our eleventh page, I'll put copy here.
@sabredog Welcome back and good to hear from you again. We need a couple of begin pictures so that I can cross that off by your callsign.
@firstcircle Matthew, I am still trying to resurrect and complete the ESCI StuG III. The newer pieces that I received that were from a later kit do not fit well at all. It was easier to modify the old suspension than the newer one. The Airfix SU-76i article was extremely fascinating and enjoyable to read. Thanks for sharing it with us.
The resin SU-76i kit is an earlier version than the one in the article and I am doing it as a separate build. There were no instructions with these kits so some research is required. I needed a few items from the spares box (headlights and the like) and have them set aside for later. The SU suspension has been a bear to clean up and get it to sit properly against the hull. Only the left side suspension is complete and firmly attached. I let it just rest on the right side for the pictures. THe tracks snapped a couple of times before I got it attached and they had to be repaired. AC glue did not want to hold with this type of resin so I had to resort to epoxy.
Eternal Questions- Why didn't I just resort to a new kit(s)?
Looks like quite a few are making some good progress. I hope that we can keep this initial momentum going through the duration of the campaign.
Cheers,
Jan
Campaigns
Where Armorama group builds can be discussed, organized, and updates posted.
Hosted by Darren Baker, Richard S.
Braille Battlefield
tread_geek
Ontario, Canada
Joined: March 23, 2008
KitMaker: 2,847 posts
Armorama: 2,667 posts
Joined: March 23, 2008
KitMaker: 2,847 posts
Armorama: 2,667 posts
Posted: Tuesday, November 16, 2010 - 08:25 AM UTC
eremzet
Katowice, Poland
Joined: September 10, 2010
KitMaker: 89 posts
Armorama: 87 posts
Joined: September 10, 2010
KitMaker: 89 posts
Armorama: 87 posts
Posted: Tuesday, November 16, 2010 - 08:28 AM UTC
Next step. I think I over-sharpened photos a litle bit:)
FirstMass
Massachusetts, United States
Joined: August 15, 2004
KitMaker: 252 posts
Armorama: 146 posts
Joined: August 15, 2004
KitMaker: 252 posts
Armorama: 146 posts
Posted: Tuesday, November 16, 2010 - 02:37 PM UTC
Radek -- your Sahariana is pretty damn impressive. If I didn't know better I'd say it was 1/35 not 1/73. Wonderful job.
Brian
Brian
ChaosXVI
Metro Manila, Philippines
Joined: October 24, 2009
KitMaker: 128 posts
Armorama: 126 posts
Joined: October 24, 2009
KitMaker: 128 posts
Armorama: 126 posts
Posted: Wednesday, November 17, 2010 - 01:17 AM UTC
Here's my entry:
Trumpeter's M113 A2
I've built one about two years ago and it went together pretty easy. It even has details for the engine and some interior. However, I don't plan on using any of these interior parts. Instead, I'm slapping this on...
A resin copy of a Cadillac Gage turret scratch built by a fellow Filipino modeler we call Buck.
I am planning to build an M113 used by the Philippines' Presidential Security Group or PSG. As the name implies, they were responsible for protecting the Philippine president. Or the local version of the Secret Service. Here is one of only 2 photos I have of the actual vehicle courtesy of Timawa.net:
Good luck to everyone in this campaign!
Posted: Wednesday, November 17, 2010 - 01:38 AM UTC
Great build, Radek. Very impressive weathering and details.
Nice choice of colour scheme, Toby. I look forward to see the finished camouflage.
tread_geek
Ontario, Canada
Joined: March 23, 2008
KitMaker: 2,847 posts
Armorama: 2,667 posts
Joined: March 23, 2008
KitMaker: 2,847 posts
Armorama: 2,667 posts
Posted: Wednesday, November 17, 2010 - 05:30 AM UTC
@Radek Simply beautiful results you have achieved. You set the bar quite high for the rest of us.
Toby Positively fascinating build subject. I not only like modern subjects but unique variations of them are always great to see. That urban camo is going to be great to see and I imagine take some effort to achieve. After checking out some pictures of Philippine military vehicles I must say that they have some really different and nice camouflage.
Cheers,
Jan
Sudzonic
Scotland, United Kingdom
Joined: December 07, 2007
KitMaker: 2,096 posts
Armorama: 1,983 posts
Joined: December 07, 2007
KitMaker: 2,096 posts
Armorama: 1,983 posts
Posted: Wednesday, November 17, 2010 - 05:55 AM UTC
OK slight change of plans.. I am still waiting on order confirmation from tracks and troops for the TUSK upgrade i ordered, the set is designed for the revell Abrams kit so i will have to get my hands on one? so I am going to build the Abrams i have up as a standard one in NATO 3 tone camo with some stowage on it. I also have some more dragon humvees on the way so I will prob build some up for this campaign?
Hope this wokrs ok for you Jan?
tread_geek
Ontario, Canada
Joined: March 23, 2008
KitMaker: 2,847 posts
Armorama: 2,667 posts
Joined: March 23, 2008
KitMaker: 2,847 posts
Armorama: 2,667 posts
Posted: Wednesday, November 17, 2010 - 06:07 AM UTC
Scott I can't see there being any reason for a problem. As long as the campaign conditions are met within the time frame almost anything goes. With you doing a "standard" M1 in NATO colours and I believe that AJB is also doing one in that scheme then we only need a few more to complete a platoon. I hope that your order arrives quicker than my order for Preiser figures from the local shop did. A one week delivery turned into a 4 to 6 week back order. It was three and a half months before the kits actually arrived. The only plus side was that the shop gave me a respectable discount if I still wanted them.
Cheers,
Jan
Cheers,
Jan
sabredog
Western Australia, Australia
Joined: July 22, 2007
KitMaker: 607 posts
Armorama: 599 posts
Joined: July 22, 2007
KitMaker: 607 posts
Armorama: 599 posts
Posted: Wednesday, November 17, 2010 - 05:44 PM UTC
This is the progress thus far on the UM BA-6. It is going together rather well and has no real vices. Time will tell though.
sabredog
Western Australia, Australia
Joined: July 22, 2007
KitMaker: 607 posts
Armorama: 599 posts
Joined: July 22, 2007
KitMaker: 607 posts
Armorama: 599 posts
Posted: Wednesday, November 17, 2010 - 09:11 PM UTC
Here is the T34/76 model 1940 progress
Excellent kit from Dragon as always.
Maurice
Friesland, Netherlands
Joined: September 11, 2006
KitMaker: 254 posts
Armorama: 75 posts
Joined: September 11, 2006
KitMaker: 254 posts
Armorama: 75 posts
Posted: Thursday, November 18, 2010 - 02:40 AM UTC
The Sahariana looks awesome. Great work.
After a break of one and a half week I continued with the Achilles today, no update pics yet but I'll try to have some this weekend. The model turns out to be a lot tougher then I expected. Photo etched parts and scale 1:72 simply do not match well, parts are just too small and there is no easy way to attach them to the model but we're not giving up
The break was because I had to build something else in only limited time, for a duel at Benno's Figures Forum, so that had to go first. No armor in that little build but still scale 1/72:
Hope you like it, now I can focus on the Achilles again
weathering_one
Ontario, Canada
Joined: April 04, 2009
KitMaker: 458 posts
Armorama: 456 posts
Joined: April 04, 2009
KitMaker: 458 posts
Armorama: 456 posts
Posted: Thursday, November 18, 2010 - 08:39 AM UTC
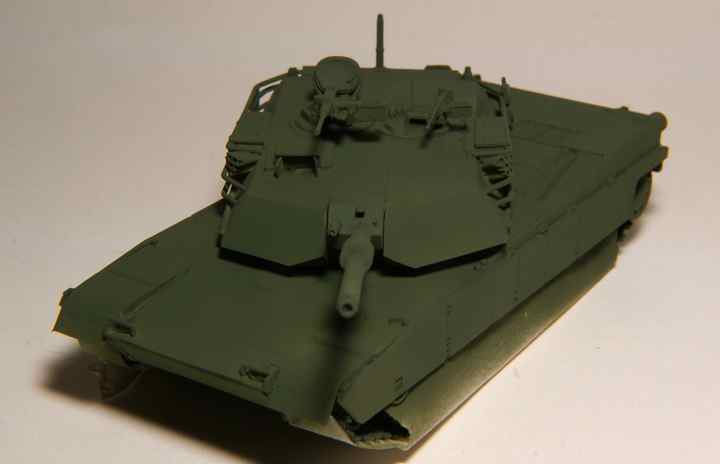
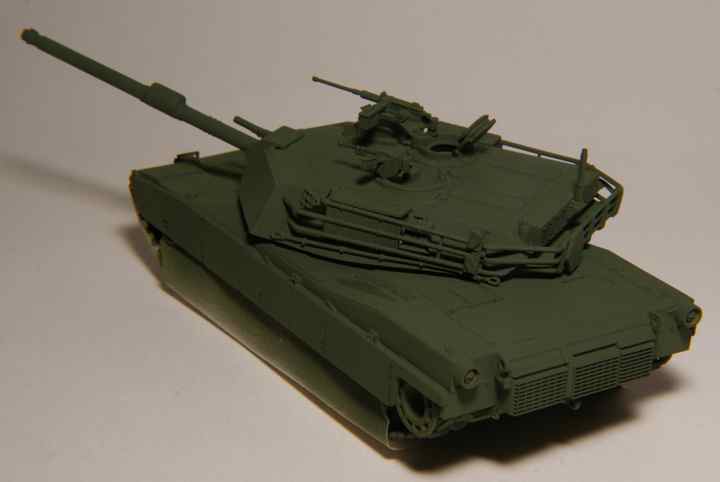
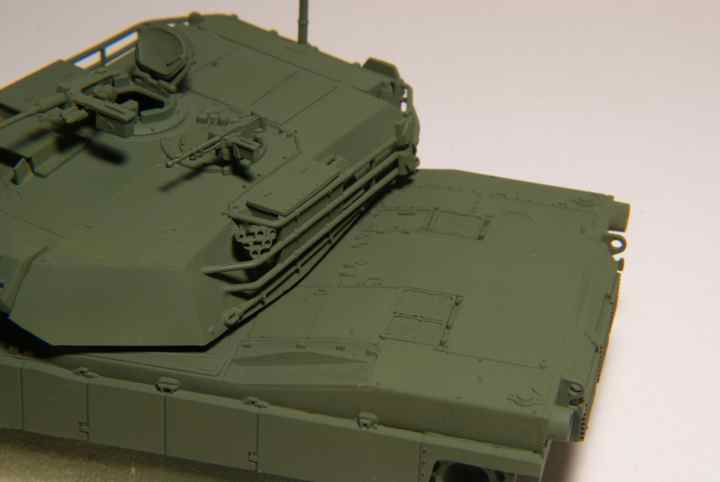
Again it's like too much good stuff to comment on each one but it looks like great things happening here. I've masked off the tracks on the Abrams with obviously, masking tape! I then applied a lightened shade of Nato green and after that an even lighter shade in certain areas. The preshading seems to have worked but it doesn't quite show as well in the pictures as in person. I think that I'll keep using that in any future build.
Now the problem will be finding a suitable masking method and applying the other colours. As the tank doesn't have too many obstructions I might try cutting up pieces of tape but I'll let the green dry overnight before I try that. In looking at the instructions paint guide it seems to be more than a bit strange in the colour choices (light olive, khaki drill, chocolate, oak??). In all the pictures that I've looked at there was nothing like that. I'll stick to the three Nato colours.
Regards,
AJ
firstcircle
England - South East, United Kingdom
Joined: November 19, 2008
KitMaker: 2,249 posts
Armorama: 2,007 posts
Joined: November 19, 2008
KitMaker: 2,249 posts
Armorama: 2,007 posts
Posted: Thursday, November 18, 2010 - 08:57 AM UTC
Radek, bravo, your Sahariana is excellent, and as for not being able to tell it from a 1/35 model, it is actually quite uncanny how it looks virtually identical to Italeri's 1/35 version, which I have built - except I think yours is better than mine.
Jan, glad you found the article interesting, there's plenty more where that came from . . .
Maurice, I really like the diorama; although it's of two figures, it's really that closed door in the big thick impenetrable wall that is the real subject.
I've been messing around with the Isuzu this week. Not sure that my pre-shading has had much effect now that I've added further coats, but I wanted to see if I could adjust the base coat that was very pale by applying glazes over it, and without having to use varnish or Klear in between to protect the previous coat.
On the pale base went an oil glaze of raw sienna on the bodywork, yellow ochre on the canvas roof:
Then, so not to disturb the oil paint, I did a glaze of an olive green shade on the body, in acrylic paint thinned with acrylic matt medium. Never done this before, and unlike with oils, there isn't too much time to adjust things as it dries quickly (I think a retarder is available) I'm not convinced I did this in the right order, but whatever:
Then because that acrylic coats the whole surface, I could do an oil wash over it without altering the colour again:
Oh yes, and those nice shiny tryes like they've been boot polished
tread_geek
Ontario, Canada
Joined: March 23, 2008
KitMaker: 2,847 posts
Armorama: 2,667 posts
Joined: March 23, 2008
KitMaker: 2,847 posts
Armorama: 2,667 posts
Posted: Thursday, November 18, 2010 - 09:11 AM UTC
@sabredog The chart at the top of this page has been updated to reflect your posting of the status pictures. I did the SU-85M a while ago and your T-34 hull looks noticeably different. Looks like an interesting kit.
@Maurice Very nice figures for the scale. I must admire that camo on the troops.
AJB When I blow up your images in a separate tab I can really make out the tonal variations in the greens. I believe that the pre-shading has also helped to define the panel lines.
firstcircle You truck is coming along and you must be quite happy that it might finally be finished. As with AJ's pictures, when enlarged they do show more shade variations than at the smaller size.
Cheers,
Jan
ChaosXVI
Metro Manila, Philippines
Joined: October 24, 2009
KitMaker: 128 posts
Armorama: 126 posts
Joined: October 24, 2009
KitMaker: 128 posts
Armorama: 126 posts
Posted: Thursday, November 18, 2010 - 09:43 AM UTC
Radek: Firstcircle's right, your Sahariana really does look like 1/35th. I keep ignoring this kit in my LHS. After seeing your work, I think I'll get myself one too. Bravo on your build!
Here are my updates:
I removed the details that need correction like the brackets on the hull roof. With a Dremel grinder, I carefully grinded off details where the turret ring mount will go on.
There were plans to build M113's with the Cadillac Gage turret but these never pushed through. The Armed Forces of the Philippines however, upgraded some of the M113's in inventory with spare 1m turrets by adding a plate on top of the M113 where a new turret ring will be attached. I made mine using some unreturned freeway toll cards.
Here's where I am thus far...
casualmodeler
Hame, Finland
Joined: February 04, 2009
KitMaker: 702 posts
Armorama: 665 posts
Joined: February 04, 2009
KitMaker: 702 posts
Armorama: 665 posts
Posted: Friday, November 19, 2010 - 07:40 AM UTC
Quoted Text
This is the progress thus far on the UM BA-6. It is going together rather well and has no real vices. Time will tell though.
Hi Michael. Is that Aber barrel on your BA-6? I may have to buy several of those to my BA-3 and T-26 turreted armored train..
sabredog
Western Australia, Australia
Joined: July 22, 2007
KitMaker: 607 posts
Armorama: 599 posts
Joined: July 22, 2007
KitMaker: 607 posts
Armorama: 599 posts
Posted: Saturday, November 20, 2010 - 12:08 AM UTC
Quoted Text
Quoted TextThis is the progress thus far on the UM BA-6. It is going together rather well and has no real vices. Time will tell though.
Hi Michael. Is that Aber barrel on your BA-6? I may have to buy several of those to my BA-3 and T-26 turreted armored train..
I think they are. The ziplocks do not have a company name on them at all.
Got a stack of these from a seller on Missing Lynx braille scale forum.
Well worth it though. They look great
casualmodeler
Hame, Finland
Joined: February 04, 2009
KitMaker: 702 posts
Armorama: 665 posts
Joined: February 04, 2009
KitMaker: 702 posts
Armorama: 665 posts
Posted: Saturday, November 20, 2010 - 02:33 AM UTC
Quoted Text
Quoted TextQuoted TextThis is the progress thus far on the UM BA-6. It is going together rather well and has no real vices. Time will tell though.
Hi Michael. Is that Aber barrel on your BA-6? I may have to buy several of those to my BA-3 and T-26 turreted armored train..
I think they are. The ziplocks do not have a company name on them at all.
Got a stack of these from a seller on Missing Lynx braille scale forum.
Well worth it though. They look great
Thanks Michael. In that case, I think those are RB Model barrels. They certainly look great and in braille scale, mostly very cheap. Got to keep them in mind..
spacewolfdad
England - West Midlands, United Kingdom
Joined: May 23, 2010
KitMaker: 642 posts
Armorama: 593 posts
Joined: May 23, 2010
KitMaker: 642 posts
Armorama: 593 posts
Posted: Saturday, November 20, 2010 - 02:58 AM UTC
Quoted Text
I think they are. The ziplocks do not have a company name on them at all.
Got a stack of these from a seller on Missing Lynx braille scale forum.
Well worth it though. They look great
Yes, they will be the RB barrels, I bought a load from probably the same seller. Excellent value, really good quality. I get mine from this company now and they are reliable and fast.
http://www.jbmodel.eu/
All the best,
Paul
eremzet
Katowice, Poland
Joined: September 10, 2010
KitMaker: 89 posts
Armorama: 87 posts
Joined: September 10, 2010
KitMaker: 89 posts
Armorama: 87 posts
Posted: Saturday, November 20, 2010 - 06:31 AM UTC
Guys, thank you very much for your comments on my Sahariana.
I hope the final result won't disappoint you.
@ Maurice - really great biult. Especially the uniforms camouflage. Good job!
@ Maathew - your Isuzu looks better and better. I like this colour and shadow/highlits effect you did so far.
@ AJB - Abrams is pretty cool with this dark undercoat - Sith Abrams
Sudzonic
Scotland, United Kingdom
Joined: December 07, 2007
KitMaker: 2,096 posts
Armorama: 1,983 posts
Joined: December 07, 2007
KitMaker: 2,096 posts
Armorama: 1,983 posts
Posted: Saturday, November 20, 2010 - 07:47 AM UTC
Well just got these two.. that will be 4 humvees more for the collection
tread_geek
Ontario, Canada
Joined: March 23, 2008
KitMaker: 2,847 posts
Armorama: 2,667 posts
Joined: March 23, 2008
KitMaker: 2,847 posts
Armorama: 2,667 posts
Posted: Saturday, November 20, 2010 - 09:09 AM UTC
@Toby Your M113 'Special' is coming along. Very resourceful of you to use discarded plastic to enhance the build.
@Scott Even MORE Hummers! My goodness you surely appear to be becoming a Hummer-a-holic. I have the bottom kit in my stash and it looks very nice. I am particularly intrigued by the Gun-Truck version.
Glad to see all the progress and interaction in this thread. With all the current campaigns we should all be proud that ours is seeing so much action. It's only three weeks in and our view count has already broken 11,000! Astounding and I believe that we are well on our way to exceed the action we saw in the Matchbox Campaign.
Cheers,
Jan
Maurice
Friesland, Netherlands
Joined: September 11, 2006
KitMaker: 254 posts
Armorama: 75 posts
Joined: September 11, 2006
KitMaker: 254 posts
Armorama: 75 posts
Posted: Saturday, November 20, 2010 - 09:35 AM UTC
@ Scott I've build the top box of those two sets (one of the two in the set at least, can be seen in my gallery), found them very hard to do, especially the roof which is completely made of transparent plastic and the doors that didn't fit properly.
@ Jan, Radek, Matthew thanks guys, it was fun to build. The wall is suppose to be a Afghan compound, made from a piece of styrofoam covered with plaster. The camouflage is suppose to be UCP or Arpat, which I think turned out nice, considering the scale. of course it's impossible to really do digital camo in 1:72. The figures are from this set: Caesar H058 Modern US Elite Force
sabredog
Western Australia, Australia
Joined: July 22, 2007
KitMaker: 607 posts
Armorama: 599 posts
Joined: July 22, 2007
KitMaker: 607 posts
Armorama: 599 posts
Posted: Saturday, November 20, 2010 - 01:19 PM UTC
Quoted Text
Quoted TextI think they are. The ziplocks do not have a company name on them at all.
Got a stack of these from a seller on Missing Lynx braille scale forum.
Well worth it though. They look great
Yes, they will be the RB barrels, I bought a load from probably the same seller. Excellent value, really good quality. I get mine from this company now and they are reliable and fast.
http://www.jbmodel.eu/
All the best,
Paul
Thanks Paul
I will check that site out today.
Firefly74
Queensland, Australia
Joined: April 15, 2010
KitMaker: 224 posts
Armorama: 205 posts
Joined: April 15, 2010
KitMaker: 224 posts
Armorama: 205 posts
Posted: Monday, November 22, 2010 - 10:10 PM UTC
Hi, great progress all.
Here's a couple of update photos from two of my builds.
I decided to go with Humbrol Khaki Drab for the Valentine, one of the two UK 'service colours' around in 1942 as i really wanted to do a "green" Val. The colour has turned out to be Very olive!
I've added some black to darken it and some dark earth to try and lower the brightness for the next coat. I really should have stripped the 2 sloppy layers of paint off that i did 10 years ago first as the detail is being lost on the turret already. The turret was really quite a bad fit,had to use plastic card around manlet and putty on rear join. The Italeri Valentine is a mark 1 and wouldn't pass for a mkII to the discerning eye so I'm using this kit to play around with making grab handles etc. Their on the rear engine doors and drivers hatches, my first attempt so pretty happy with them. It's also the first kit I've started with link and length track so looking forward to trying them out,they look a lot better than those rubbery old airfix tracks I'm used to!
The Airfix Vickers VIa was a nice quick easy build. It's a reboxing of the old JB modles kit. Seems a little big for 1:76 scale...
I put a quick bit of putty on the turret to make the oversized armour plate joins more accurate (you can still see the large "seams" on the hull) and drilled out the barrels,smoke launchers and exhaust. I'll be doing the rest straight OOB in B.E.F colours.
Cheers,
Tim