Campaigns
Where Armorama group builds can be discussed, organized, and updates posted.
Tiger Campaign
Kiwi_Modeller
Visit this Community
Queensland, Australia
Joined: August 13, 2010
KitMaker: 188 posts
Armorama: 121 posts
Posted: Saturday, January 22, 2011 - 04:26 AM UTC
hehe yeh tis big Sal i just hope i got enough time lol, and i still got the henshel turret one in the stash.

yeh Bill there made of what we call [auto-censored] metal, cast kinda stuff there ok tho cept ya got to use CA as come in two bits for the drive wheels and 3 for the idlers.
the tracks are hardish plastic with metal pins, i'll take pic tomorrow for ya , there not bad.
the kits pritty good even tho it has a lot inaccuracies and things not modeled at all but with around 1500 parts im only building it OOB i aint got the patience the likes of the guys at network 54 have there going all out.
having said that if you want a nice KT i think you can do it without all the extras if your not an accuracy freak.
the road wheels are in 4 bits per wheel plus a little soft cap that gets sandwiched inside so they move when u stick em on the torsion bars.

theres much debate about trumpy stuff but all in all i like it , I havent found to many fir issues with any of there kits, the historical accuracy might be not quite right but far as im concerned if it looks like what ever its sposed to thats all i care about you can do a lot with paint these days and all the neat stuff we never had 30 odd years ago.
cheers,
Graham
thebear
Visit this Community
Quebec, Canada
Joined: November 15, 2002
KitMaker: 3,960 posts
Armorama: 3,579 posts
Posted: Saturday, January 22, 2011 - 12:57 PM UTC
Hi Graham and welcome to the build ...Now that's what I call making an entrance... Great choice but I'll say like you time might be a factor...I saw that kit in Montreal last week ..I must say it looks tempting and as long as the interior is nice looking through the hatches I'd be able to live with that.. I haven't heard much about what's wrong with the exterior ,(can't be that bad can it??)
I'll be following this one for sure ...Have fun!!
Kiwi_Modeller
Visit this Community
Queensland, Australia
Joined: August 13, 2010
KitMaker: 188 posts
Armorama: 121 posts
Posted: Saturday, January 22, 2011 - 04:17 PM UTC
thanks Richard yeh the exterior looks fine to me there probably is some minor things that arent perfect if ya into dead on accuracy but im not that much of expert on tanks.
the interior is bulk detail even OOB , its gonna be crammed in with all them sheels and everything else.
took pic of tracks there huge.

theres also a few ejector pin marks ya have to fill but the others wont be seen at all so didnt worry bout them.

now just wait till putty dry's then can start adding floor bits and inner parts of suspension etc.
all the wheels are now done, will probably paint em before i install em, but its easy enough to take em off as it looks like ya dont have to glue em on (but will for final ass)

cheers,
Graham
Kiwi_Modeller
Visit this Community
Queensland, Australia
Joined: August 13, 2010
KitMaker: 188 posts
Armorama: 121 posts
Posted: Saturday, January 22, 2011 - 09:37 PM UTC
todays progress done.


have to let it harden up for a bit.
cheers,
Graham
cacciacarri
Visit this Community
Rimini, Italy
Joined: March 18, 2007
KitMaker: 91 posts
Armorama: 88 posts
Posted: Saturday, January 22, 2011 - 11:01 PM UTC
Hi Guys,
I star my project Tiger I late Dragon,Atak zimm.,Lion Roar PE and barrel.
I was waiting a Friul track kit but it is missing(mail post problem)
Here my progress:


cheers
Antonio
spacewolfdad
Visit this Community
England - West Midlands, United Kingdom
Joined: May 23, 2010
KitMaker: 642 posts
Armorama: 593 posts
Posted: Sunday, January 23, 2011 - 11:54 AM UTC
Hi Folks,

I have managed to get some done on my Dragon Elephant, taking part in several campaigns is a bit of a juggling act to say the least. Anyway, here's the story so far...

As I was using the Atak resin hull, I gave it a really good wash in soapy water. I did this as I wouldn't be able to do this later due to the photo-etch that I will be adding. I then cleaned up the running gear ready to attatch, I am only attatching the inside run as I intend to paint the tracks separately.


There is a fine set of link and length tracks with lots of individual links for around the sprockets. There are two types of link, one with a guide horn and one without, getting them all in the right order requires a deal of concentration.


I found that the amount of links quoted by Dragon for the individual links is not quite right and had to adjust the amounts accordingly. Here is a completed run of single links for the sprockets.


I then made up the tracks in situ, but not glueing them to the road wheels, so they could be removed for painting.


I then added the rear hatch to the superstructure, along with some resin zimmerit.


I also fixed the RB gun barrel to the mantlet and the mantlet surround to the superstructue. That is it for the moment, a little done, a lot more still to do.


All the best,

Paul
MAMOOTH
Visit this Community
Yucatan, Mexico
Joined: January 16, 2011
KitMaker: 45 posts
Armorama: 43 posts
Posted: Sunday, January 23, 2011 - 03:33 PM UTC
Hi guys this weekend i have advenced a little in my elefant, i get the wheels and part of the car. I have a doubt the wheels of this vehicle has rubber or only steel?.


vonHengest
Visit this Community
Texas, United States
Joined: June 29, 2010
KitMaker: 5,854 posts
Armorama: 4,817 posts
Posted: Sunday, January 23, 2011 - 08:36 PM UTC
Wow, great progress everyone!

Graham: Looks like I'll have to look for a place to hide my 1/16 T-34 soon Keep the regular updates coming, I'm really looking forward to watching this one come together.

Paul: Your Elefant is looking fantastic! Did you have to modify any parts to add the aluminum barrel?

Jose: Not sure what you are asking. All of the wheels should have been made from steel, are you asking if the Elefant had rubber vs. all steel wheels?
GewoonWouter
Visit this Community
Antwerpen, Belgium
Joined: March 31, 2010
KitMaker: 227 posts
Armorama: 123 posts
Posted: Sunday, January 23, 2011 - 08:58 PM UTC
I think that is his question indeed

Jose, the Elefant's wheels were indeed full steel wheels, so no rubber tyre around the rim buddy ;-)

great progress so far btw

cheers
Kiwi_Modeller
Visit this Community
Queensland, Australia
Joined: August 13, 2010
KitMaker: 188 posts
Armorama: 121 posts
Posted: Sunday, January 23, 2011 - 09:57 PM UTC
LOL Jeremy ya got thsat right mate think i'll have to hide mine too this damn things is a monster in the true sense of the word.
i got all the other 1/16th scale things but the KT makes em all look small and the parts and detail is mind blowing even if theres a few things not quiet accurate.
well got some more done , what ya see now is only about 10% of what goes inside this thing and i got to start painting as i go now.

all the torsion bars are in and oil tanks i think they are.

seat back for radio op and other bits in, they hide the other ejector pin marks.

turret rear wall just sitting in , have since painted it base color (ivory color) will do some detail painting before i glue it in.

pedals and levers in plus some other little bits, will probably paint all the inside red oxide tomorrow night.
cheers,
Graham
GewoonWouter
Visit this Community
Antwerpen, Belgium
Joined: March 31, 2010
KitMaker: 227 posts
Armorama: 123 posts
Posted: Monday, January 24, 2011 - 01:50 AM UTC
that's some really cool stuff inside that Tiger ausf B...I think the editor of AFV modeller is building the same kit if I'm not mistaken...

How big is that one btw?

cheers
GregCloseCombat
Visit this Community
California, United States
Joined: June 30, 2008
KitMaker: 2,408 posts
Armorama: 2,394 posts
Posted: Monday, January 24, 2011 - 03:22 AM UTC
That interior is so great - will you leave the upper hull removable or just hatch visible?
rebelsoldier
Visit this Community
Arizona, United States
Joined: June 30, 2004
KitMaker: 1,336 posts
Armorama: 757 posts
Posted: Monday, January 24, 2011 - 03:55 AM UTC
morning guys,

just a tip for those of us who have a prob with instructions being on the small side.

http://www.1999.co.jp/eng/10059174

when you open this site up scroll down and you will see instruction sheets. left click on the page and a separate window will open up. after maximizing the window you can increase size by clicking on percentage size in lower right of window.

i've used this site when they have my model in stock and the instruction sheets are included on that models page. you can find it by searching the site useing the list of make and model on left side of page.

just saying...

reb
Removed by original poster on 01/24/11 - 16:10:29 (GMT).
MAMOOTH
Visit this Community
Yucatan, Mexico
Joined: January 16, 2011
KitMaker: 45 posts
Armorama: 43 posts
Posted: Monday, January 24, 2011 - 04:15 AM UTC
Thanck you Jeremy and Wouters for your answer. What do you thinck about the boxes and tools campstiments in the tanks, must be painted whit the camo pattern or in colors like wood, l make thos question because the elefant had a box fixed in the upper part of the back, and i thinck if the tnak was painted in the front the box must be incluided in the camo pattern, what do yuo thinck?
Delbert
#073
Visit this Community
Pennsylvania, United States
Joined: October 05, 2002
KitMaker: 2,659 posts
Armorama: 1,512 posts
Posted: Monday, January 24, 2011 - 04:32 AM UTC
More progress on my 1/72 Dragon Tiger


mostly complete before painting... tracks are just staged not glued into place yet.

went together pretty well. lots of tiny parts though.


Delbert
GewoonWouter
Visit this Community
Antwerpen, Belgium
Joined: March 31, 2010
KitMaker: 227 posts
Armorama: 123 posts
Posted: Monday, January 24, 2011 - 07:51 AM UTC
Nice one Delbert

Jose: the toolbox on the back of the Elefant was fixed on the exhaustcover. Both had zimmerit applied onto them and they had also the camouflage on them. The wooden block for the jack next to I'd suggest you paint it in some wood colors indeed.

cheers
spacewolfdad
Visit this Community
England - West Midlands, United Kingdom
Joined: May 23, 2010
KitMaker: 642 posts
Armorama: 593 posts
Posted: Monday, January 24, 2011 - 10:45 AM UTC
von Hengest:
Quoted Text

Paul: Your Elefant is looking fantastic! Did you have to modify any parts to add the aluminum barrel?


Hi Jeremy,

The barrel is from RB and comes with a brass collar. This doesn't correspond with the mantlet in the kit, so I cut it off and then cut the plastic gun from the mantlet. The mantlet was then drilled and the barrel push fit, to allow for any adjustment later. Unfortunately the Atak kit I bought (off Ebay) was not complete and the rear hatch, front plate and tool box were missing. Fortunately I didn't pay the full price for it so the hurt isn't too bad. I will have to fabricate these things, the toolbox isn't too difficult as I have one in the PE set. I will have to make a back story that the zimmeritted one was lost and the replacement was not coated, well that will be my story anyway.

All the best,

Paul
Kiwi_Modeller
Visit this Community
Queensland, Australia
Joined: August 13, 2010
KitMaker: 188 posts
Armorama: 121 posts
Posted: Monday, January 24, 2011 - 08:40 PM UTC
@Wouter , yeh i think Daves is the Henshell turret.
the tanks is around 5-600 mm long not counting barrel.

@Greg, yeh havent really decided yet bud it comes with solid plastic and clear versions of hull top and turret, im thinking on using clear turret and make like cut out pieces not painted on the sides but no definite plan yet.
cheers,
Graham
Delbert
#073
Visit this Community
Pennsylvania, United States
Joined: October 05, 2002
KitMaker: 2,659 posts
Armorama: 1,512 posts
Posted: Tuesday, January 25, 2011 - 09:16 AM UTC
Hey guys..

Those are some great looking kits everyone is building. they make my little 1/72 tiger feel a little small... lol

Did some painting today. This is my first attempt at doing a pre-shade. I'm using my new Renegage Velocity airbrush to paint this and so far so good.

anyways here is a series of progress pics..

This pic is after the pre-shade of Burnt Umber.


the next one is after my basecoat of Africa Braun


and the final one of this post is after the high lighting which is the base coat lightened with white and sprayed on the upper surfaces..( I know its kinda hard to see in the photos)


and thats what I have done today.. hope to do more later..

curseoftheundead
Visit this Community
New York, United States
Joined: June 04, 2007
KitMaker: 40 posts
Armorama: 38 posts
Posted: Wednesday, January 26, 2011 - 08:06 AM UTC
Greetings all
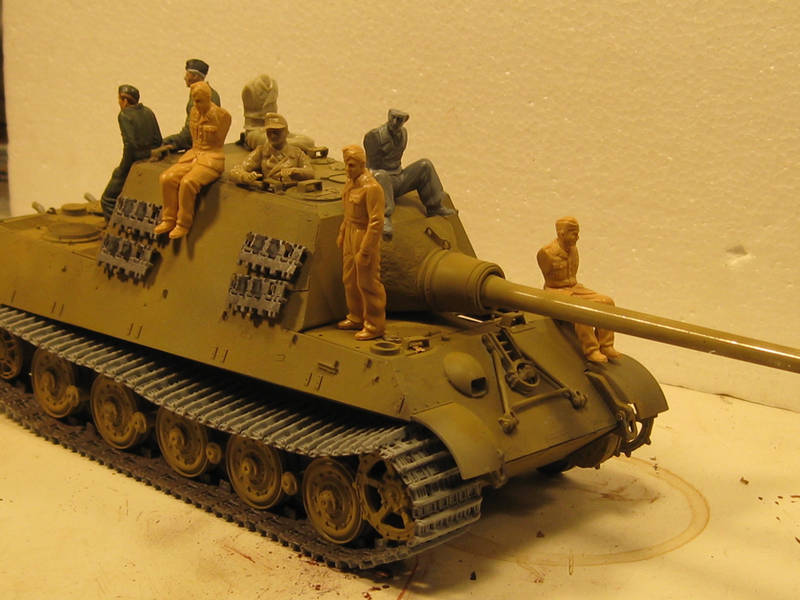
Here is where I am at with regards to my jagdtiger dio.. Most of the basic vehicle assembly is done and the undecoat is on. Next is the.laying out the basic design....There will also be a US jeep involved, with GI's wary watching the vehicle as it moves off to complete the surrender....


exer
Visit this Community
Dublin, Ireland
Joined: November 27, 2004
KitMaker: 6,048 posts
Armorama: 4,619 posts
Posted: Wednesday, January 26, 2011 - 09:21 AM UTC
Hard to keep up with all the builds here. Delbert your little Tiger is looking good.
Peter I like the Jagdtiger with all the surrendering troops. Hard to get the sitting guys to look natural sometimes when you add the arms, I'll be interested to see how they work.
spacewolfdad
Visit this Community
England - West Midlands, United Kingdom
Joined: May 23, 2010
KitMaker: 642 posts
Armorama: 593 posts
Posted: Wednesday, January 26, 2011 - 12:56 PM UTC
Delbert:

Quoted Text

Those are some great looking kits everyone is building. they make my little 1/72 tiger feel a little small... lol


Hi Delbert,

Your Tiger may be small, but it is perfectly formed. The paint job is looking really good, I look forward to seeing the progress on this one. Nice to see some of the Braille Scale affectionados amongst the participants in this campaign.

All the best,

Paul
vonHengest
Visit this Community
Texas, United States
Joined: June 29, 2010
KitMaker: 5,854 posts
Armorama: 4,817 posts
Posted: Wednesday, January 26, 2011 - 03:03 PM UTC

Quoted Text

von Hengest:
Quoted Text

Paul: Your Elefant is looking fantastic! Did you have to modify any parts to add the aluminum barrel?


Hi Jeremy,

The barrel is from RB and comes with a brass collar. This doesn't correspond with the mantlet in the kit, so I cut it off and then cut the plastic gun from the mantlet. The mantlet was then drilled and the barrel push fit, to allow for any adjustment later. Unfortunately the Atak kit I bought (off Ebay) was not complete and the rear hatch, front plate and tool box were missing. Fortunately I didn't pay the full price for it so the hurt isn't too bad. I will have to fabricate these things, the toolbox isn't too difficult as I have one in the PE set. I will have to make a back story that the zimmeritted one was lost and the replacement was not coated, well that will be my story anyway.

All the best,

Paul


Great, thanks for the rundown Paul I think I'm going to have to order another kit to use the barrel and Atak resin, otherwise I'm going to end up breaking everything...
Kiwi_Modeller
Visit this Community
Queensland, Australia
Joined: August 13, 2010
KitMaker: 188 posts
Armorama: 121 posts
Posted: Wednesday, January 26, 2011 - 09:44 PM UTC
paint under way before adding anything else.

drivers seat.

rear bulkhead.

torsion bars and lubrication lines.


front hull area.
still all the wheels and tracks to paint then start adding more bits
cheers,
Graham