#186
Texas, United States
Joined: May 24, 2006
KitMaker: 771 posts
Armorama: 750 posts
Posted: Tuesday, February 14, 2012 - 04:41 PM UTC
Quoted Text
Nice build Guy! What kit is that? I was looking for a sherman kit that would catch my eye and that is the one.
Thank you.
Phil 
Thanks Phil. Matt nailed it. It's a great kit with a ton of extra parts for the spare parts box. It builds a really nice Sherman right out of the box, and can be really great with a few minor tweeks. There are also some parts in the kit that are really useful, although not mentioned in the instructions. I'll try to post a list of those soon.
California, United States
Joined: June 30, 2008
KitMaker: 2,408 posts
Armorama: 2,394 posts
Posted: Tuesday, February 14, 2012 - 06:14 PM UTC
Sweet Sherman! Might have to try out that Vallejo putty.
Quebec, Canada
Joined: November 19, 2011
KitMaker: 1,389 posts
Armorama: 1,388 posts
Posted: Wednesday, February 15, 2012 - 02:11 AM UTC
Quoted Text
Quoted Text
Nice build Guy! What kit is that? I was looking for a sherman kit that would catch my eye and that is the one.
Thank you.
Phil 
Thanks Phil. Matt nailed it. It's a great kit with a ton of extra parts for the spare parts box. It builds a really nice Sherman right out of the box, and can be really great with a few minor tweeks. There are also some parts in the kit that are really useful, although not mentioned in the instructions. I'll try to post a list of those soon.
Thanks! Sorry about the confusion there... Did not know about DML

Still learning hehe.
Phil.
Modeling...
I rest my case.
England - North East, United Kingdom
Joined: October 22, 2007
KitMaker: 971 posts
Armorama: 280 posts
Posted: Wednesday, February 15, 2012 - 08:00 AM UTC
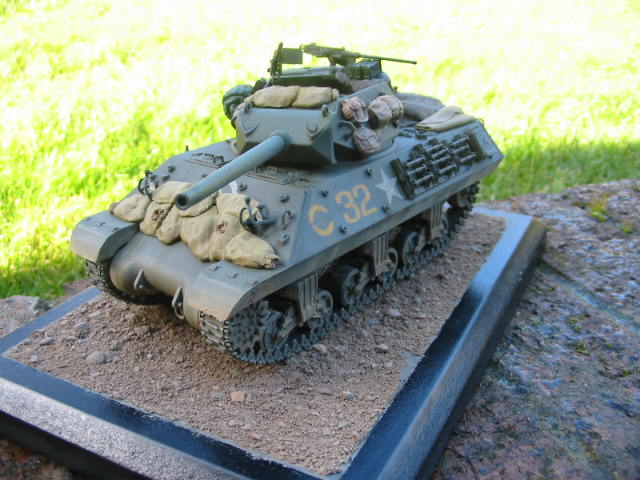
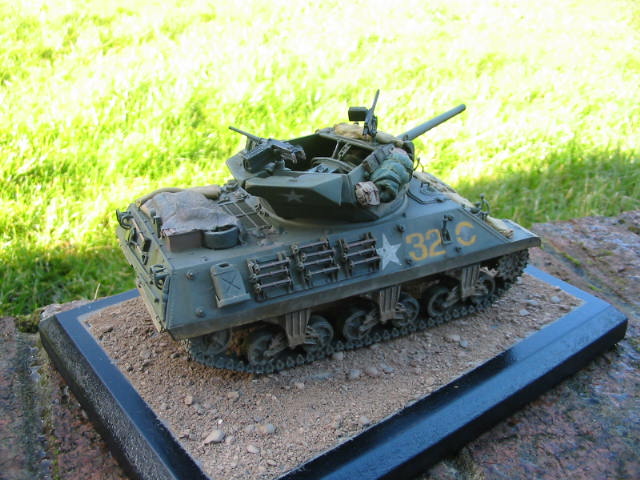
Gent,s this is what I,am calling done on my M10 have added more stowage and sandbags washes and a subtle hint of wear wanted to have a new,ish but dusty tank heading into the main battlefield in france in July 44 will add a figure later


Hope you like any comments wellcome to help me improve my skills
Cheers Keith
Arkansas, United States
Joined: June 29, 2009
KitMaker: 11,610 posts
Armorama: 7,843 posts
Posted: Wednesday, February 15, 2012 - 10:34 AM UTC
Keith: I will have to adjust the color settings on my computer. Your build looks very yellow. Other than that, I'll be interested to see if my M36 can compare with your amazing build.
Ideals are peaceful. History is violent.
Quebec, Canada
Joined: November 19, 2011
KitMaker: 1,389 posts
Armorama: 1,388 posts
Posted: Wednesday, February 15, 2012 - 01:22 PM UTC
Keith, very impressive build and the base is simple and incredibly effective I like it a lot. As a former cabinet maker I've would have sanded the base a little more before finishing to avoid the bumpy look of the paint but that is realy just to find something to improve because it is realy nice as it is.

Phil.
Modeling...
I rest my case.
New York, United States
Joined: March 08, 2010
KitMaker: 3,662 posts
Armorama: 3,078 posts
Posted: Wednesday, February 15, 2012 - 02:12 PM UTC
Keith it looks like it turned out really good but as Matt said your photos look a little yellow, do you have ones that were taken in better light

Active Campaigns on the bench:
Operation Fall Gelb - Pz.Kpfw. IV Ausf. C
Engineering the Future - M-26 Recovery Vehicle
115 Campaigns completed
California, United States
Joined: June 30, 2008
KitMaker: 2,408 posts
Armorama: 2,394 posts
Posted: Wednesday, February 15, 2012 - 04:01 PM UTC
Congrats Keith - good looking

!

England - North East, United Kingdom
Joined: October 22, 2007
KitMaker: 971 posts
Armorama: 280 posts
Posted: Thursday, February 16, 2012 - 04:02 AM UTC
Thanks for the comments Gent,s will take more photos in some natural light and post the reason for the yellow,ish tinge is that I took these without use of the flash as they looked to bright. As for the base yes it simple just a spare bit of MDF painted but I,am no expert when it comes to the finnish on this will have to practice more and thanks for the sound advice. Always wanting to learn more to improve and value any advice
Cheers Keith

#186
Texas, United States
Joined: May 24, 2006
KitMaker: 771 posts
Armorama: 750 posts
Posted: Thursday, February 16, 2012 - 04:56 AM UTC
Nice build keith. I like the sandbags on the front. Were those after market or did you make them? Congratulations on a really nice job!


#186
Texas, United States
Joined: May 24, 2006
KitMaker: 771 posts
Armorama: 750 posts
Posted: Thursday, February 16, 2012 - 06:06 AM UTC
There are some extra goodies in most of the recent DML Sherman kits that some of you may not have seen. Both of these items are on the 2 “V” sprues. First off are 12 small bolt heads marked V-33. The instructions show these as “not for use” but I use them on the boggie units to represent the bolts that hold on the track skid plates. There are 24 bolts total on the 2 “V” sprues, and each of the 6 boggie units requires 4 bolts.

The second item is also a set of bolt heads on the V Sprues. These are not even shown as parts on the front page of the instructions but as you can see in the picture they are there. I use these to represent the bolts that hold on the arm for the support roller. Again, 24 bolts on 2 sprues go on 6 boggie units with 4 per unit.

In the old days I’d represent these bolts using something from Grandt line, but in many of the Dragon Sherman kits they are there but not shown in the instructions.
Arkansas, United States
Joined: June 29, 2009
KitMaker: 11,610 posts
Armorama: 7,843 posts
Posted: Thursday, February 16, 2012 - 09:17 AM UTC
A pleasant surprise, Guy. I may be building one of these to go with my Pz.IV J for next years nationals.
Ideals are peaceful. History is violent.
Quebec, Canada
Joined: November 19, 2011
KitMaker: 1,389 posts
Armorama: 1,388 posts
Posted: Thursday, February 16, 2012 - 10:49 AM UTC
Quoted Text
Thanks for the comments Gent,s will take more photos in some natural light and post the reason for the yellow,ish tinge is that I took these without use of the flash as they looked to bright. As for the base yes it simple just a spare bit of MDF painted but I,am no expert when it comes to the finnish on this will have to practice more and thanks for the sound advice. Always wanting to learn more to improve and value any advice
Cheers Keith
With mdf when you a chamfer like you did cover it with a thin layer of bondo or seamfil (bondo is cheaper) before sanding it will produce a better finish.
Phil.
Modeling...
I rest my case.
Quebec, Canada
Joined: November 19, 2011
KitMaker: 1,389 posts
Armorama: 1,388 posts
Posted: Thursday, February 16, 2012 - 12:02 PM UTC
Here it is gents! My first build since 15 years is done!
The final dusting is made. Mig european dust over raw unber from kama pigments. I must admit I am a little disapointed of mig pigments. The pigments were coarser than I would have tought, the kama are realy apleasure to work with.
Voila the pics!


Crap! the server is busy, I'll post the rest later.
Thanks
Philippe.
Modeling...
I rest my case.
Quebec, Canada
Joined: November 19, 2011
KitMaker: 1,389 posts
Armorama: 1,388 posts
Posted: Thursday, February 16, 2012 - 01:19 PM UTC
There you go!


I'll surely place this beast on a base as soon as the Québec freezing wheater will go away so I can use the wood shop(unheated) Maybe 2-3 weeks.
Feel free to comment it is always enlighting earing from talented mens like you guys.
Thanks for all the support.
Phil.

Modeling...
I rest my case.
Arkansas, United States
Joined: June 29, 2009
KitMaker: 11,610 posts
Armorama: 7,843 posts
Posted: Thursday, February 16, 2012 - 01:23 PM UTC
Phil: nice build. I'll take into account your comments on the MIG pigments.
Ideals are peaceful. History is violent.
Izmir, Turkey / Türkçe
Joined: June 11, 2004
KitMaker: 1,426 posts
Armorama: 464 posts
Posted: Saturday, February 18, 2012 - 01:00 AM UTC
I also agree with the campaign. The campaign model is M4A3E8 Dragon (76) W Hvss ..
Starting today, I took photos.
Enjoy ...


All of them Braille Scale...
England - North East, United Kingdom
Joined: October 22, 2007
KitMaker: 971 posts
Armorama: 280 posts
Posted: Saturday, February 18, 2012 - 01:02 AM UTC
As Promised some shots in a better light
Guy the sandbags are made from milliput the stowage is a mix of Legends Academy and Tamiya from the spares box


Arkansas, United States
Joined: June 29, 2009
KitMaker: 11,610 posts
Armorama: 7,843 posts
Posted: Saturday, February 18, 2012 - 01:28 AM UTC
Erhan: Looking forward to your build.
Keith: Much better. That is quite a build.
Ideals are peaceful. History is violent.
Quebec, Canada
Joined: November 19, 2011
KitMaker: 1,389 posts
Armorama: 1,388 posts
Posted: Sunday, February 19, 2012 - 12:59 PM UTC
I've build a base for the finished Churchill mkVII.
Kept it simple since it is my first.


I havee used resin sand for it would build a good base and bond with the added dirt.


Since th resin sand is transparent a coat of desert yellow was applied

pigments


Any comment is apreciated.
Thanks.
Phil
Modeling...
I rest my case.
Pennsylvania, United States
Joined: May 14, 2007
KitMaker: 219 posts
Armorama: 217 posts
Posted: Sunday, February 19, 2012 - 02:20 PM UTC
Phil,
Great looking Churchill and base. The only recommendation I would make is to pull off the turret, drill a small hole through the bottom of the tank, then use a dry wall screw and run it through the bottom of the tank into the base until the screw pulls the tank down into the base material. Screwing the tank to the base will secure the tank to the base while giving the Chuchill the appearance of weight that a 30 ton vehicle would have on semi soft terrian. Otherwise, nice job.
thanks
Kevin
On the workbench:
Dragon SdKfz 251/9 Stummel
Visit Kingfisher models from Schuylkill Haven on FB
California, United States
Joined: June 30, 2008
KitMaker: 2,408 posts
Armorama: 2,394 posts
Posted: Sunday, February 19, 2012 - 03:03 PM UTC
Also run the bottom tracks over sand paper to give that weighted appearance too. It looks great all together now though!
Quebec, Canada
Joined: November 19, 2011
KitMaker: 1,389 posts
Armorama: 1,388 posts
Posted: Sunday, February 19, 2012 - 03:06 PM UTC
Kevin and Greg Thanks to both of you. I'll do just that!
Always pleasant to have fellow modeler to help you out when you are out of ideas

Thank.
Phil.
Modeling...
I rest my case.
Quebec, Canada
Joined: November 19, 2011
KitMaker: 1,389 posts
Armorama: 1,388 posts
Posted: Tuesday, February 21, 2012 - 02:49 AM UTC
Greg, and Kevin
Your tips worked realy fine and now the beast is secured in place! It went well until I heard like a tiny zipper opening and then:

It was just prior going to work

So I had the day to think about it hehe. It gave me an opportunity to practice my repairing skills. (it was pretty easy) Patched it with plaster, pigments and a dab of red brown.

It was still wet when I took the pics, pigments will be added to tone it down.
Even if it cracked my build I love this screw thing! Never tought I would use A inch and a half number two screw on a 1/35 model

Thanks again guys you are helping me alot improving this disipline.
Phil.

Modeling...
I rest my case.
California, United States
Joined: June 30, 2008
KitMaker: 2,408 posts
Armorama: 2,394 posts
Posted: Tuesday, February 21, 2012 - 03:38 AM UTC
Ouch. It could be safer next time to drill a hole through and use a nut and bolt. I can't see where it broke in the pics so that's good right?


