Campaigns
Where Armorama group builds can be discussed, organized, and updates posted.
Where Armorama group builds can be discussed, organized, and updates posted.
Hosted by Darren Baker, Richard S.
Allied Armor Campaign
Posted: Tuesday, January 24, 2012 - 02:12 AM UTC
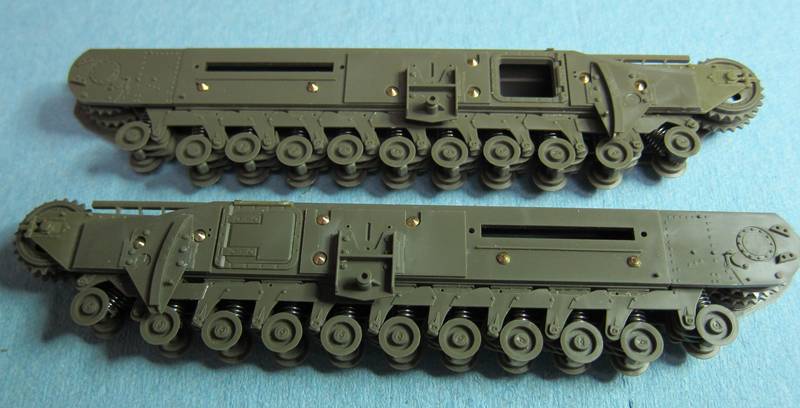
Here is a in process photo of the suspension of the Churchill Mk III AVRE


ElCapitan

Joined: May 14, 2007
KitMaker: 219 posts
Armorama: 217 posts

Posted: Tuesday, January 24, 2012 - 03:54 AM UTC
Tom,
Wow, that looks like a ton of work.
Are those metal screws I see holding the assemblies together? Are the tracks single links as well?
Wow, that looks like a ton of work.
Are those metal screws I see holding the assemblies together? Are the tracks single links as well?

retiredyank

Joined: June 29, 2009
KitMaker: 11,610 posts
Armorama: 7,843 posts

Posted: Tuesday, January 24, 2012 - 04:06 AM UTC
Really exceptional work everyone.
Posted: Tuesday, January 24, 2012 - 04:15 AM UTC
Quoted Text
Tom,
Wow, that looks like a ton of work.
Are those metal screws I see holding the assemblies together? Are the tracks single links as well?
Kevin,
Yes, it is a ton of work, and more to come.
Those metal "screws" you see are the representation of the conical bolts used on the real tank. AFV sells aftermarket bolts to replace the plastic ones in the kit. They are a little sharper in definition and require no cleanup.
The kit has rubber band tracks and they appear to be too short and do not glue together. Since the top run of the tracks will be hidden you could just weld/melt the ends together. However, AFV also has a set of individual links. I have built the run and will get some more in progress photos next week. This week is being used to prepare for a contest and show in Lake Charles LA.
Regards,
Tom

ElCapitan

Joined: May 14, 2007
KitMaker: 219 posts
Armorama: 217 posts

Posted: Tuesday, January 24, 2012 - 01:05 PM UTC
Tom,
Nice work and good luck with either track option. I'm sure it will turn out great.
thanks
Kevin
Nice work and good luck with either track option. I'm sure it will turn out great.
thanks
Kevin
BigSmitty

Joined: October 01, 2008
KitMaker: 597 posts
Armorama: 439 posts

Posted: Tuesday, January 24, 2012 - 03:46 PM UTC
As my "Trouble in Southeast Asia" campaign diorama is currently in a "holding pattern" I thought it best to begin posting with my first updates for this campaign. I'm using the DML T34/76 mod 1942 "Hex Turret" "Smart Kit".


First off, this is my first attempt at a T34 of ANY type, so bear with me. Secondly, I'm really not a big fan of the color photo instructions, as some of the parts placement gets lost, especially when the photos are in a 4BO green color and not gray like the kit is molded in.
Enough ranting, at least for now. Here's my progress after a couple of hours at the bench tonight:


Wheels are either a three or four-piece affair. Suspension bits are very crisp in detail, with just a small amount of cleanup needed after they're installed from the inside of the lower hull.
Sprue attachment points were surprisingly big for a kit released in 2008 (yes I know some sprues are older, but still...) but everything went together easy enough.
More to be posted later in the week.


First off, this is my first attempt at a T34 of ANY type, so bear with me. Secondly, I'm really not a big fan of the color photo instructions, as some of the parts placement gets lost, especially when the photos are in a 4BO green color and not gray like the kit is molded in.
Enough ranting, at least for now. Here's my progress after a couple of hours at the bench tonight:


Wheels are either a three or four-piece affair. Suspension bits are very crisp in detail, with just a small amount of cleanup needed after they're installed from the inside of the lower hull.
Sprue attachment points were surprisingly big for a kit released in 2008 (yes I know some sprues are older, but still...) but everything went together easy enough.
More to be posted later in the week.

GregCloseCombat

Joined: June 30, 2008
KitMaker: 2,408 posts
Armorama: 2,394 posts

Posted: Wednesday, January 25, 2012 - 04:04 PM UTC
Great start Tom and Matt.
I tried the floor wax method before applying the decals and that part went well. The Problem I had was applying the thinned Tamiya Matt Flat left a haze over everything - What's up with that? What do people use to bring the matt back?

It does kinda look like dust so I was OK with it for this experimentation model, but then I applied the Mig Beach sand with water and it stuck on there like paint. Ugh. So I used windex and cleaned it off (along with a little of the basecoat). Then I realized I could have just used enamel thinners, so did that step next.
Tonight I'll rub that off for a scruffy finish, I hope


and the m36 is almost done
I tried the floor wax method before applying the decals and that part went well. The Problem I had was applying the thinned Tamiya Matt Flat left a haze over everything - What's up with that? What do people use to bring the matt back?

It does kinda look like dust so I was OK with it for this experimentation model, but then I applied the Mig Beach sand with water and it stuck on there like paint. Ugh. So I used windex and cleaned it off (along with a little of the basecoat). Then I realized I could have just used enamel thinners, so did that step next.
Tonight I'll rub that off for a scruffy finish, I hope


and the m36 is almost done


ElCapitan

Joined: May 14, 2007
KitMaker: 219 posts
Armorama: 217 posts

Posted: Friday, January 27, 2012 - 10:10 AM UTC
Evening all,
Here is my completed M8 HMC. I've enjoyed participating in this campaign and will follow the thread over the next couple of months but now its time switch gears and start my M4 for the knocked out campaign. Good luck to everyone, there is some great progress going on here.


Comments welcomed.
Thanks
Kevin
Here is my completed M8 HMC. I've enjoyed participating in this campaign and will follow the thread over the next couple of months but now its time switch gears and start my M4 for the knocked out campaign. Good luck to everyone, there is some great progress going on here.
Comments welcomed.
Thanks
Kevin


retiredyank

Joined: June 29, 2009
KitMaker: 11,610 posts
Armorama: 7,843 posts

Posted: Friday, January 27, 2012 - 11:29 AM UTC
Greg: I have used Tamiya flat with the same problem. I have yet to find a solution. I would recomend MM clear flat enamel.
Kevin: A beautiful kit. The weathering is just right.
Kevin: A beautiful kit. The weathering is just right.

BigSmitty

Joined: October 01, 2008
KitMaker: 597 posts
Armorama: 439 posts

Posted: Friday, January 27, 2012 - 11:41 AM UTC
Kevin,
That old HMC looks amazing. Excellent work all around. I had one of those laying around (the old one, not the re-issue with the figures) and donated it to a club auction. You did a great job on her.
Can't wait to see your M4 over in the KO campaign!
As for me, I'm waiting for the AFV Club tracks for my T-34, so I will continue to work on the upper hull later this evening after the spawn goes to bed.
Posted: Friday, January 27, 2012 - 11:58 AM UTC
Kevin
It looks great. Nice job.
Kevin
It looks great. Nice job.
Kevin

dutchboyinohio

Joined: August 05, 2007
KitMaker: 258 posts
Armorama: 116 posts

Posted: Friday, January 27, 2012 - 01:12 PM UTC
Lots of great builds so far (Kevin, that M8 looks fantastic!). I'm going to finally jump in with a 1/72 UM Sherman M4 105mm HVSS.

I haven't gotten very far in two sessions at the bench, but the bogies are really testing my patience. There are 12 parts in each one, and the fit of some isn't the best. In fact, I had to cut of several locator pins already, because they were way too big for their corresponding holes. It took me about two hours to do 3 complete assemblies.

And a finished one (needs a little more clean up...):

More to come soon

I haven't gotten very far in two sessions at the bench, but the bogies are really testing my patience. There are 12 parts in each one, and the fit of some isn't the best. In fact, I had to cut of several locator pins already, because they were way too big for their corresponding holes. It took me about two hours to do 3 complete assemblies.

And a finished one (needs a little more clean up...):

More to come soon


ElCapitan

Joined: May 14, 2007
KitMaker: 219 posts
Armorama: 217 posts

Posted: Friday, January 27, 2012 - 02:33 PM UTC
Guys, thanks for the complements on the old M8. Years and years ago I did Tamyia's M5 light tank which is basically the same kit as the M8. The funny thing is I still have the old M5 and when I compare it to the M8, the basic kit is the same. It's a shame Tamyia hasn't up graded their kit over the last 25 years, but building it challenged me in different ways. I'm glad the final kit turned out as well as it did, there was day that I considered crushing it and moving on to something else. Thanks again for all the complements.
Greg, I use model master dull coat. I've used the acrylic version and the enamel version and have found that the acryllic version leaves a noticable hazing effect if you use a bit too much where the enamel version doesn't seem to do that. Good luck with your kit, I look forward to seeing your completed model.
later and keep posting, it's fun to see the progress.
thanks.
beefy66

Joined: October 22, 2007
KitMaker: 971 posts
Armorama: 280 posts

Posted: Friday, January 27, 2012 - 11:31 PM UTC
Kevin great work on the M8 nice paint job hope I can get mine to that kind of standard
Got the M10 Primed base coat on clear coat and Decals on now for the smaller details and then the wheathering
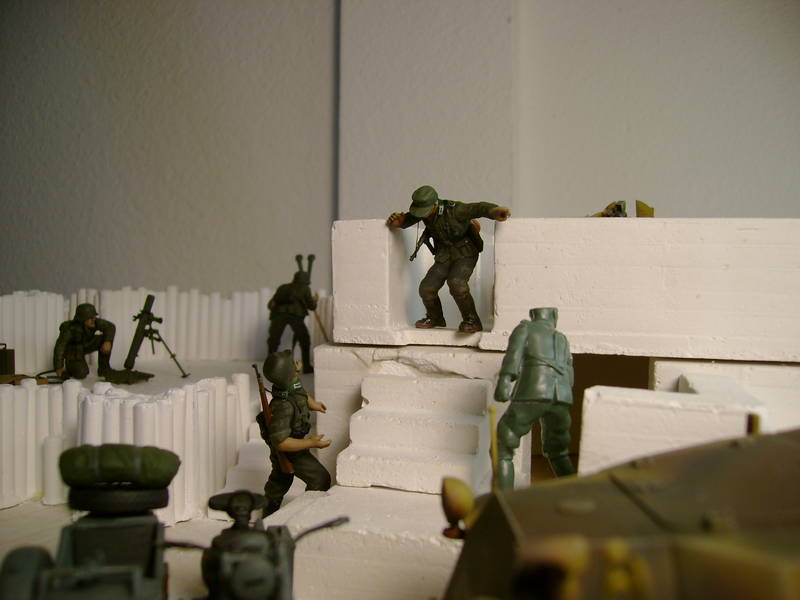

Got the M10 Primed base coat on clear coat and Decals on now for the smaller details and then the wheathering


GregCloseCombat

Joined: June 30, 2008
KitMaker: 2,408 posts
Armorama: 2,394 posts

Posted: Saturday, January 28, 2012 - 03:53 PM UTC
Kevin - Another great finished model from you. That M8 HMC is a interesting subject. ****One question: what colors are you using to paint the stowage?? - I like the look.
Kevin and Matt thanks for the clear flat tips
Keith - the M10 is coming along nicely
I think the Crusader III is back on track now and will do the chipping next.


A little chipping via black oil paints lightly brushed on edges. These photos really help me to see stuff I don't see normally (even the poor pics), like the figure bumps to clean up. I think I'm going to repaint some of the gear too (hint, hint, Kevin) and detail painting still needed. Hope to get a model day soon.
Kevin and Matt thanks for the clear flat tips
Keith - the M10 is coming along nicely
I think the Crusader III is back on track now and will do the chipping next.


A little chipping via black oil paints lightly brushed on edges. These photos really help me to see stuff I don't see normally (even the poor pics), like the figure bumps to clean up. I think I'm going to repaint some of the gear too (hint, hint, Kevin) and detail painting still needed. Hope to get a model day soon.
Posted: Saturday, January 28, 2012 - 04:08 PM UTC
Greg
Nice looking tanks. Great job.
Kevin
Nice looking tanks. Great job.
Kevin

BigSmitty

Joined: October 01, 2008
KitMaker: 597 posts
Armorama: 439 posts

Posted: Sunday, January 29, 2012 - 04:41 AM UTC
Work continues on the T-34. Picked these up today, cheaper than I could find online:

Big fan of AFV Club workable tracks. Pins are a bit smallish, but even on my 1/48 Tiger I the majority of them stayed put, even with my ham-handedness.
Photoetch scares me. There I said it. However, I have had some of Kenny Loup's "Gator's Grip" glue for a couple of years and figured I'd try it out on the kit supplied PE parts. My reasoning was even if I screwed it up, it would be hidden.


OK, I understand, these are baby steps. However, I think they turned out quite nice and I haven't lost a piece yet! Of course when it comes to the handles and straps on the sides, we'll see if my joy of PE is still here.
One last shot of my current progress on her:


Big fan of AFV Club workable tracks. Pins are a bit smallish, but even on my 1/48 Tiger I the majority of them stayed put, even with my ham-handedness.
Photoetch scares me. There I said it. However, I have had some of Kenny Loup's "Gator's Grip" glue for a couple of years and figured I'd try it out on the kit supplied PE parts. My reasoning was even if I screwed it up, it would be hidden.


OK, I understand, these are baby steps. However, I think they turned out quite nice and I haven't lost a piece yet! Of course when it comes to the handles and straps on the sides, we'll see if my joy of PE is still here.
One last shot of my current progress on her:


retiredyank

Joined: June 29, 2009
KitMaker: 11,610 posts
Armorama: 7,843 posts

Posted: Sunday, January 29, 2012 - 05:13 AM UTC
Matt: It would be a shame to cover that beautiful pe work.
roman

Joined: July 20, 2004
KitMaker: 99 posts
Armorama: 95 posts

Posted: Sunday, January 29, 2012 - 08:22 AM UTC
Renault UE Tamiya 1:35
planned camo - whole green French from Norway 1940

planned camo - whole green French from Norway 1940


retiredyank

Joined: June 29, 2009
KitMaker: 11,610 posts
Armorama: 7,843 posts

Posted: Sunday, January 29, 2012 - 09:41 AM UTC
Roman: I need to see some more of your progress photos.

ElCapitan

Joined: May 14, 2007
KitMaker: 219 posts
Armorama: 217 posts

Posted: Sunday, January 29, 2012 - 01:44 PM UTC
Greg,
On the stowage, I use Tamyia khaki acrylic followed by oil paints for the highlights and shadows. I use staight raw sienna or mixed with a little black for the outlining around the seams. Then using thinned raw sienna for shading with buff titanium for the highlights. Once all that dries, I hit it with flat clear from model master.
Good luck and good job on the M10.
Kevin

BigSmitty

Joined: October 01, 2008
KitMaker: 597 posts
Armorama: 439 posts

Posted: Sunday, January 29, 2012 - 02:22 PM UTC
Here's my update for tonight:
Got the AFV Club links started. I noticed they are a bit larger (not wider) than the Magic Tracks supplied by DML. No biggie, I'll just have a couple extra per side left over.

And I LOVE these AFV Club indy tracks... Very little fuss, click together, the little pins don't break off like the MK ones can.

Finished the PE grate that goes above the engine louvers I did earlier this afternoon. Here's a side by side with the... ahem... kit part:

Here it is installed (temporarily) over the PE I did this afternoon:

Frontal armor was up next. Here is the major assemblies. I heard the MG ball mount (part C5 I think) bounce somewhere, but I can add it later as it fits external to the MG mount itself:

Vision blocks painted Tamiya Clear Green. Then I realized the covers over them will completely cover them up. But at least I know they were painted:

The rear plate was next on the agenda, and I figured out rather quickly that the hatch does not fit as in the instructions. It's probably one of the poorest parts of the build (aside from the front left fender being marked as part G13, when there is in fact NO "G" sprue). I made a quick fix from the inside. Here is the part and the result:


More PE! I finally had a chance to dust off the Opti Visor for the latches and hinges on this box. More for practice than anything else. Hold N Fold and Gator's Grip used on this as well:

I was digging around my closet o' doom when I literally had this fall on my head. Neograde's T-34/76 resin frontal plate armor kit. I think I got it a year or so ago for around $10. Anyways, I decided to see how it looked, as it doesn't require any kit parts to be modified. Here is how it looks; keep in mind the frontal plate armor isn't attached, I'm still trying do decide if I want to use it, or save it for another T-34 if I build one:


So this is pretty much where I'm at right now with her:

PE hold downs, straps and the kit hex soft edge turret and main gun are up next if I decide to use them instead of the resin parts. Guess I have all day tomorrow at work to figure out what I want to do.
Got the AFV Club links started. I noticed they are a bit larger (not wider) than the Magic Tracks supplied by DML. No biggie, I'll just have a couple extra per side left over.

And I LOVE these AFV Club indy tracks... Very little fuss, click together, the little pins don't break off like the MK ones can.

Finished the PE grate that goes above the engine louvers I did earlier this afternoon. Here's a side by side with the... ahem... kit part:

Here it is installed (temporarily) over the PE I did this afternoon:

Frontal armor was up next. Here is the major assemblies. I heard the MG ball mount (part C5 I think) bounce somewhere, but I can add it later as it fits external to the MG mount itself:

Vision blocks painted Tamiya Clear Green. Then I realized the covers over them will completely cover them up. But at least I know they were painted:

The rear plate was next on the agenda, and I figured out rather quickly that the hatch does not fit as in the instructions. It's probably one of the poorest parts of the build (aside from the front left fender being marked as part G13, when there is in fact NO "G" sprue). I made a quick fix from the inside. Here is the part and the result:


More PE! I finally had a chance to dust off the Opti Visor for the latches and hinges on this box. More for practice than anything else. Hold N Fold and Gator's Grip used on this as well:

I was digging around my closet o' doom when I literally had this fall on my head. Neograde's T-34/76 resin frontal plate armor kit. I think I got it a year or so ago for around $10. Anyways, I decided to see how it looked, as it doesn't require any kit parts to be modified. Here is how it looks; keep in mind the frontal plate armor isn't attached, I'm still trying do decide if I want to use it, or save it for another T-34 if I build one:


So this is pretty much where I'm at right now with her:

PE hold downs, straps and the kit hex soft edge turret and main gun are up next if I decide to use them instead of the resin parts. Guess I have all day tomorrow at work to figure out what I want to do.

retiredyank

Joined: June 29, 2009
KitMaker: 11,610 posts
Armorama: 7,843 posts

Posted: Sunday, January 29, 2012 - 02:59 PM UTC
Matt: Looks to be a nice, clean build. Those are exactly the type of progress photos a campaign should have.

GregCloseCombat

Joined: June 30, 2008
KitMaker: 2,408 posts
Armorama: 2,394 posts

Posted: Sunday, January 29, 2012 - 04:23 PM UTC
Thank you Kevin! 

Roman - clean build. The tracks sag is very nice.
Matt - good luck tomorrow on the T34. Looking good


Roman - clean build. The tracks sag is very nice.
Matt - good luck tomorrow on the T34. Looking good
muttley

Joined: January 10, 2005
KitMaker: 251 posts
Armorama: 202 posts

Posted: Tuesday, January 31, 2012 - 02:00 PM UTC
Ok gents here she is after a fun month of working on her, I actually found it easier to build a large scale model. Big parts are easier to assemble I guess. Shes not weathered yet thats why you can see how white the star insignias. I plan on making her dirty the natural way by running her outside when the snow melts (good thing we didnt get that much this winter)
I shall call her done by then


I shall call her done by then


 |


