@ GregCloseCombat - Hi Greg, all I can say is 'very fiddly', I am a dedicated Braille scale modeller but even these little babies are a tad fiddly. Lovely model though.
I like the M5 Stuart, I know that Mirage have them in their catalogue and I tried to get a M3 Honey for the Western Desert Campaign for this campaign, I am still trying. If I get one it will be a second build. I hope to get at least 3 models done in the time-frame, lot quicker building in 1/72.
All the best,
Paul
Campaigns
Where Armorama group builds can be discussed, organized, and updates posted.
Where Armorama group builds can be discussed, organized, and updates posted.
Hosted by Darren Baker, Richard S.
Light Tank campaign

spacewolfdad

Joined: May 23, 2010
KitMaker: 642 posts
Armorama: 593 posts

Posted: Tuesday, February 21, 2012 - 01:40 PM UTC
spearhead21pz

Joined: May 11, 2009
KitMaker: 128 posts
Armorama: 127 posts

Posted: Tuesday, February 21, 2012 - 03:32 PM UTC
Been away awile, made some more progress on the 1/35 M3 Stuart. The PE is very fiddley as I have heard it said. Takes alot of time especialy at my age a eye sight.
Nice work going on here. Amazing detail in the Mirage 1/72 Vickers.
John, nice Pz II, nice weathering. Greg, nice 1/48 M5 late Stuart.
Here are some progress shots.


Nice work going on here. Amazing detail in the Mirage 1/72 Vickers.
John, nice Pz II, nice weathering. Greg, nice 1/48 M5 late Stuart.
Here are some progress shots.

GregCloseCombat

Joined: June 30, 2008
KitMaker: 2,408 posts
Armorama: 2,394 posts

Posted: Tuesday, February 21, 2012 - 07:17 PM UTC
Ralph - Nice work on the pe handles on the engine deck and the tool holds. I freely admit I have no love for pe and usually only do the bigger main pe parts as I'm a lazy modeller  Looks good though. I'm learning a lot about light tanks from this campaign.
@ Paul - I thin there must be a mathematical formula out there regarding model scale, shelf space, time, and money. I've tried about every scale so I can appreciate your build.
Keep having fun everyone - it's a great campaign!!
 Looks good though. I'm learning a lot about light tanks from this campaign.
 @ Paul - I thin there must be a mathematical formula out there regarding model scale, shelf space, time, and money. I've tried about every scale so I can appreciate your build.
Keep having fun everyone - it's a great campaign!!

woody6968

Joined: March 02, 2006
KitMaker: 454 posts
Armorama: 380 posts

Posted: Wednesday, February 22, 2012 - 01:16 AM UTC
just signed up for this one , heres a few pics of my 1/35th scale scimitar i would like to submit .


Big-John

Joined: August 12, 2010
KitMaker: 731 posts
Armorama: 711 posts

Posted: Thursday, February 23, 2012 - 10:18 AM UTC
Hi Ian,
Glad to have you aboard, but the kit has to be unstarted. Please go to the campaign page and read the rules for this campaign.
Glad to have you aboard, but the kit has to be unstarted. Please go to the campaign page and read the rules for this campaign.
woody6968

Joined: March 02, 2006
KitMaker: 454 posts
Armorama: 380 posts

Posted: Friday, February 24, 2012 - 04:27 AM UTC
ok thanks for the heads up john

Tojo72

Joined: June 06, 2006
KitMaker: 4,691 posts
Armorama: 3,509 posts

Posted: Friday, February 24, 2012 - 09:43 AM UTC
Ready for some paint,everything is attached except for some tools,headlights,and antenae.


Nito74

Joined: March 04, 2008
KitMaker: 5,386 posts
Armorama: 4,727 posts

Posted: Friday, February 24, 2012 - 02:17 PM UTC
Nice work Anthony.
I finished mine already, it's nice Tamyia build , detailed and perfect fit this little Panzer.
I finished mine already, it's nice Tamyia build , detailed and perfect fit this little Panzer.
max_meeki

Joined: December 19, 2011
KitMaker: 92 posts
Armorama: 88 posts

Posted: Friday, February 24, 2012 - 03:19 PM UTC
Mmmm nice work Anthony and John it looks like I'll be the last to finish out of the three of us doing this kit. Been focusing my work on the Dragon OOB campaign.
Cheers.
Cheers.
Joel_W

Joined: December 04, 2010
KitMaker: 11,666 posts
Armorama: 1,143 posts

Posted: Saturday, February 25, 2012 - 05:15 AM UTC
Hi all, just signed up a little while ago for this campaign. I'm planning on building the AFV Club M5A1 Stuart. Will be a about another 4-6 weeks before I can get started on this build, as I'm still working on my M51 Isherman for the Sands of Israel campaign. Sure looks like there is a lot of M5's already in various stages of construction.
Sabretooth

Joined: September 03, 2011
KitMaker: 55 posts
Armorama: 39 posts

Posted: Saturday, February 25, 2012 - 04:32 PM UTC
I have run into another problem with my 38t build. First, not sure the crew figures can actually fit in, but that's not for some time yet. Second, and more immediately, does anyone know what colour the radio is? I've been suffering from a lack of motivation so hopefully this will get me going again.
Also, if anyone knows of a build log for the Dragon 38t E/F, I could really use it.
Man, if I knew the interior was going to be this much of a hassle I would've just bought the Trumpeter one (maybe), but it's a learning experience I guess.
Thanks for the help,
Mark
Also, if anyone knows of a build log for the Dragon 38t E/F, I could really use it.
Man, if I knew the interior was going to be this much of a hassle I would've just bought the Trumpeter one (maybe), but it's a learning experience I guess.

Thanks for the help,
Mark
spearhead21pz

Joined: May 11, 2009
KitMaker: 128 posts
Armorama: 127 posts

Posted: Sunday, February 26, 2012 - 12:06 PM UTC
Here is a few progress pictures after I added Eduard and Royal Model PE detail to inside and outside of turret and cupola, made the PE cupola hatch lid rest, addded PE engine intake screen and mounted guages above driver. Also some base painting. The gun is olive green and gunmetal (model master acrylic), and natural steel(Vallejo). Interior is white primer with gloss coat. Next up is primer and base coat. Will have to tackle the tracks as well.


eoinryan

Joined: April 30, 2010
KitMaker: 232 posts
Armorama: 134 posts

Posted: Wednesday, February 29, 2012 - 07:32 AM UTC
Hi folks,
I've been really busy with other builds, but I can't wait to get my teeth sunk into this campaign.
I was always going to build a Scorpion but when I dug out an old 1/72 Airfix Scorpion, the kit was, to be diplomatic about things, poor.
Fortunately I got my hands on a 1/35 AFV kit which includes Aluminium barrel and some photo etch parts included. I'm back in the game!
Pics to follow in a couple days.
Eoin
PS @ Ian: Great Scimitar!
corsair924

Joined: August 11, 2008
KitMaker: 403 posts
Armorama: 322 posts

Posted: Wednesday, February 29, 2012 - 12:55 PM UTC
Same excuse, been finishing off other builds.
Going from the Revel 1/32 Atomic Annie (39" long) to a 1/35th Tamiya Stuart (4") my workbench looks empty!
Photos soon.
Does anyone know if USMC M3s in the Solomon Islands were painted USMC green or US Army Olive Drab.
Going from the Revel 1/32 Atomic Annie (39" long) to a 1/35th Tamiya Stuart (4") my workbench looks empty!
Photos soon.
Does anyone know if USMC M3s in the Solomon Islands were painted USMC green or US Army Olive Drab.
Posted: Thursday, March 01, 2012 - 02:53 PM UTC
To One and All,
Time to get back to the workbench, so here is my starting photo of the venerable 1/35 Tamiya M3 Stuart - an old favorite of mine from long, long ago...(nuff said)

I hope to have some progress shots after the weekend.
Yet one more Stuart - we will have a full company soon!
Thanks,
Stephen (Minas-Ithil)
Time to get back to the workbench, so here is my starting photo of the venerable 1/35 Tamiya M3 Stuart - an old favorite of mine from long, long ago...(nuff said)
I hope to have some progress shots after the weekend.
Yet one more Stuart - we will have a full company soon!
Thanks,
Stephen (Minas-Ithil)

DaveCox

Joined: January 11, 2003
KitMaker: 4,307 posts
Armorama: 2,130 posts

Posted: Friday, March 02, 2012 - 10:15 PM UTC
Just joined - ordered the Vulcan Light Tank VIc this morning.
Posted: Saturday, March 03, 2012 - 12:16 AM UTC
Hi Sal and John,
Nice work guys, excellent looking models.
Al


Nice work guys, excellent looking models.
Al


erhntly

Joined: June 11, 2004
KitMaker: 1,426 posts
Armorama: 464 posts

Posted: Saturday, March 03, 2012 - 04:49 AM UTC
Hi dear friends,
I thought a Stuart for this campaign. Hasegawa 1/72 scale M3 Stuart Mk.1
Today, I decided to and took pictures of the kit.


enjoy
I thought a Stuart for this campaign. Hasegawa 1/72 scale M3 Stuart Mk.1

Today, I decided to and took pictures of the kit.


enjoy

muttley

Joined: January 10, 2005
KitMaker: 251 posts
Armorama: 202 posts

Posted: Saturday, March 03, 2012 - 07:33 AM UTC
Proud to announce that the 'Haunted Tank' is finished. This Tamiya M3 was built straight from the box and the only modification I did was the replacement of the .30cal into a .50cal mg for the commander. I know if you go back to the old G.I. Combat comic books, tank commander Lt. Jeb Stuart did start off with a .30cal but eventually had a .50cal mounted in later issues. I also mounted the antenna to the side of the turret with the Confederate Dixie flag just as it was featured in the comics. This M3 would've been the most lethal light tank in "comics WW2" - it had the record of simultaneously blasting away German Tiger and Panther tanks with its puny 37mm gun! 


Basic weathering was applied with oil wash and dry brush with final coatings of Future and Testors Enamel Dullcote (yes I did say "enamel"!) This was another fun build and another fun campaign, now Im off to another one
Time to break into the basement or attic boys and start looking for those old G.I. Combat comics


Basic weathering was applied with oil wash and dry brush with final coatings of Future and Testors Enamel Dullcote (yes I did say "enamel"!) This was another fun build and another fun campaign, now Im off to another one

Time to break into the basement or attic boys and start looking for those old G.I. Combat comics


spacewolfdad

Joined: May 23, 2010
KitMaker: 642 posts
Armorama: 593 posts

Posted: Saturday, March 03, 2012 - 12:08 PM UTC
Hi Folks,
Some really nice builds going on at the moment and it is a pleasure to be in such an active campaign.
I have made more progress with my little Vickers light tank. I received my photo etch tracks today and had to make a length up to see what they would look like, which then went to another length and a side completed. I am very pleased with the result, I think it makes the little fella and the vinyl tracks don't compare - even though they are well detailed.
Anyway here are the build pictures...

The return rollers, two pieces and nicely detailed...

These are the running gear wheels, very, very tiny...

All the running gear made up...

A single unit, again nicely detailed for a small kit...

All the running gear, sprockets and idlers in place...


A close up view..

Turret added...

Another view of the turret..

The photo-etch tracks..

A single track run, excellent detail...

I noticed that the tracks came in little groups of three, this isn't mentioned in the sparse instructions, but I found the best way to complete the tracks was to bend all the teeth as per instructions and then, using Tamyia masking tape, fix the run to a hard surface - in my case a piece of plasticard - and bend one side run of three and then the corresponding run of three. This kept all the tracks in perfect register and only took a short while to complete.

The finished run...

The two runs attached to the tank...


A close up of the finished result, they look pretty good I think.
Well that was a lot easier than I anticipated. I will do the next run tomorrow and then finish off detailing it. I should be onto the airbrushing phase sometime next week and I look forward to that as the Polish army had some really cool camouflage schemes.
That's it for now, all the best,
Paul
Some really nice builds going on at the moment and it is a pleasure to be in such an active campaign.
I have made more progress with my little Vickers light tank. I received my photo etch tracks today and had to make a length up to see what they would look like, which then went to another length and a side completed. I am very pleased with the result, I think it makes the little fella and the vinyl tracks don't compare - even though they are well detailed.
Anyway here are the build pictures...

The return rollers, two pieces and nicely detailed...

These are the running gear wheels, very, very tiny...

All the running gear made up...

A single unit, again nicely detailed for a small kit...

All the running gear, sprockets and idlers in place...


A close up view..

Turret added...

Another view of the turret..

The photo-etch tracks..

A single track run, excellent detail...

I noticed that the tracks came in little groups of three, this isn't mentioned in the sparse instructions, but I found the best way to complete the tracks was to bend all the teeth as per instructions and then, using Tamyia masking tape, fix the run to a hard surface - in my case a piece of plasticard - and bend one side run of three and then the corresponding run of three. This kept all the tracks in perfect register and only took a short while to complete.

The finished run...

The two runs attached to the tank...


A close up of the finished result, they look pretty good I think.
Well that was a lot easier than I anticipated. I will do the next run tomorrow and then finish off detailing it. I should be onto the airbrushing phase sometime next week and I look forward to that as the Polish army had some really cool camouflage schemes.
That's it for now, all the best,
Paul

Tojo72

Joined: June 06, 2006
KitMaker: 4,691 posts
Armorama: 3,509 posts

Posted: Saturday, March 03, 2012 - 12:23 PM UTC
Very cool,Muttley

GregCloseCombat

Joined: June 30, 2008
KitMaker: 2,408 posts
Armorama: 2,394 posts

Posted: Saturday, March 03, 2012 - 12:23 PM UTC
Congrats Rei - great idea you saw to the end. Looks like it jumped right off the comic page 
Paul - I've never seen tracks like that, clever.
Good progress everyone. Here's where I am
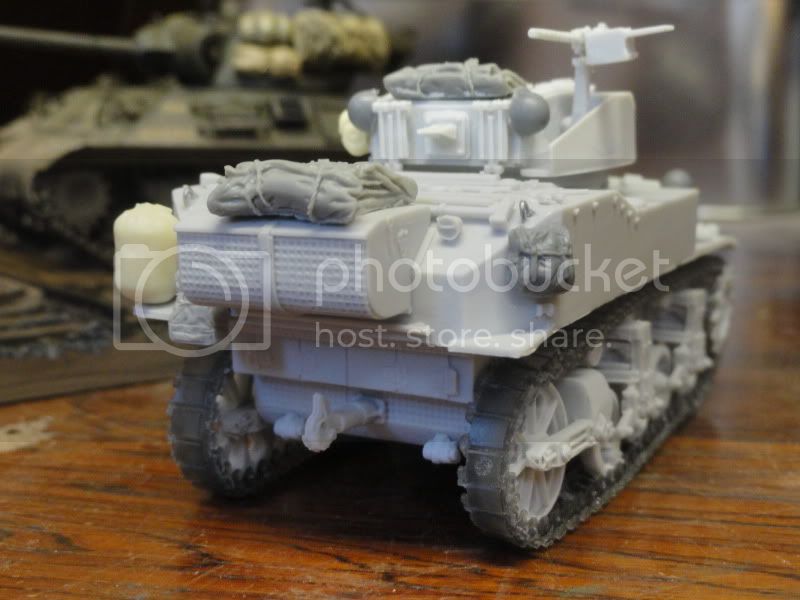

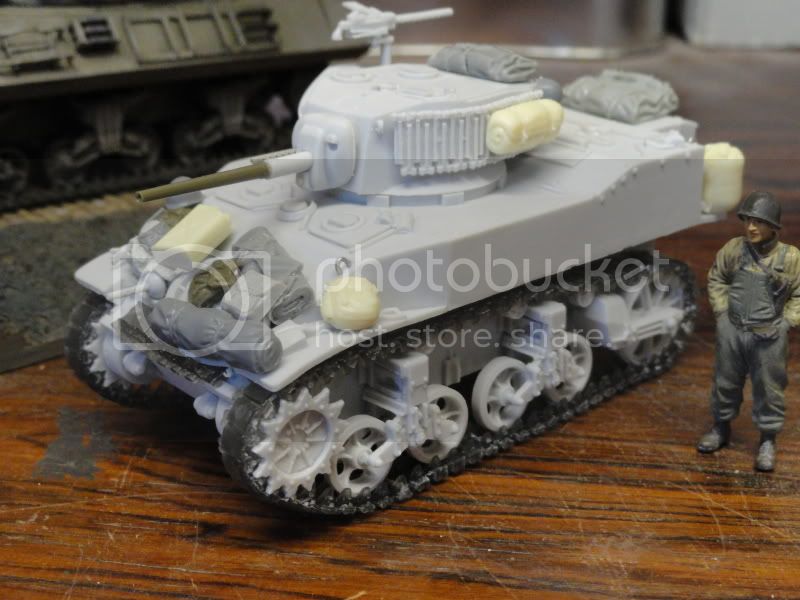
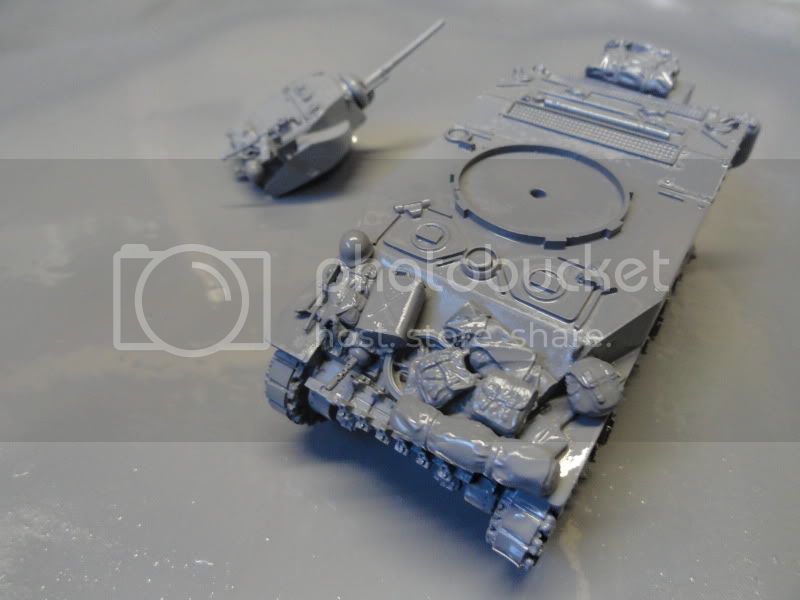
I will probably need to go back and add a strap here and there and some magic sculpt where gaps are (pics are wonderful for finding those)

Paul - I've never seen tracks like that, clever.
Good progress everyone. Here's where I am


I will probably need to go back and add a strap here and there and some magic sculpt where gaps are (pics are wonderful for finding those)
erhntly

Joined: June 11, 2004
KitMaker: 1,426 posts
Armorama: 464 posts

Posted: Saturday, March 03, 2012 - 07:49 PM UTC
Good morning,
Last night I completed the construction of the model. No problem.


Last night I completed the construction of the model. No problem.


Joel_W

Joined: December 04, 2010
KitMaker: 11,666 posts
Armorama: 1,143 posts

Posted: Sunday, March 04, 2012 - 12:57 PM UTC
Paul, nicely done on the tracks.

spacewolfdad

Joined: May 23, 2010
KitMaker: 642 posts
Armorama: 593 posts

Posted: Sunday, March 04, 2012 - 10:40 PM UTC
@ GregCloseCombat: Hi Greg, they are beautifully etched and if you do them as I described, they are very easy to complete. Your little gem is progressing well, look forward to seeing the painting stage.
@Joel_W: Hi Joel, you get some nice vinyl tracks with the kit, nothing wrong with them detail wise, I just don't like vinyl tracks that much.
I have been challenged by a 'friend' to put all the missing rivets on the turret, there are none on the sides due to the moulding process, so not one to shirk a challenge that is what I will be doing for the next few days. Fortunately I found a drawing of the tank and using simple maths found the correct spacing for the rivets, which I will plunder from the under-side of the model...lots of them there and you don't see them when the model is based. So my next post will be a turret with rivets, wish me luck.
All the best,
Paul
@Joel_W: Hi Joel, you get some nice vinyl tracks with the kit, nothing wrong with them detail wise, I just don't like vinyl tracks that much.
I have been challenged by a 'friend' to put all the missing rivets on the turret, there are none on the sides due to the moulding process, so not one to shirk a challenge that is what I will be doing for the next few days. Fortunately I found a drawing of the tank and using simple maths found the correct spacing for the rivets, which I will plunder from the under-side of the model...lots of them there and you don't see them when the model is based. So my next post will be a turret with rivets, wish me luck.

All the best,
Paul
 |


