Campaigns
Where Armorama group builds can be discussed, organized, and updates posted.
Where Armorama group builds can be discussed, organized, and updates posted.
Hosted by Darren Baker, Richard S.
Light Tank campaign
Removed by original poster on 03/22/12 - 04:02:45 (GMT).
jeremiaha41

Joined: February 27, 2011
KitMaker: 47 posts
Armorama: 18 posts

Posted: Wednesday, March 21, 2012 - 04:45 PM UTC
Peelou75

Joined: April 09, 2009
KitMaker: 140 posts
Armorama: 138 posts

Posted: Thursday, March 22, 2012 - 02:08 AM UTC
Hi Brent,
It is a cool tank:) Do you plan to build it OOB?
Really interesting how the light tank category changed since the birth of the armoured vehicles... Funny to compare the M41 to the PzI
It is a cool tank:) Do you plan to build it OOB?
Really interesting how the light tank category changed since the birth of the armoured vehicles... Funny to compare the M41 to the PzI

erhntly

Joined: June 11, 2004
KitMaker: 1,426 posts
Armorama: 464 posts

Posted: Thursday, March 22, 2012 - 09:22 AM UTC
Hi ,
little update,
painting is completed, after the gloss varnish, decal, glossy varnish ...I began to tank commander. Then I share figure.


little update,
painting is completed, after the gloss varnish, decal, glossy varnish ...I began to tank commander. Then I share figure.


Whiskey_1

Joined: November 22, 2008
KitMaker: 279 posts
Armorama: 272 posts

Posted: Thursday, March 22, 2012 - 10:05 AM UTC
Quoted Text
Working on the Vickers VIc.........jeez that suspension is an eye killer.
I know the feeling. A good tip is to drill out the lug nuts to size before cutting them off the sprue. Use superglue and take your time: give it all plenty of time to set. I`ve seen people replace the lugs that hold the road wheels with brass ones for added strength and that may be a good idea: it takes more time, but seriously decreases the flimsyness-quotient of the suspension.
jeremiaha41

Joined: February 27, 2011
KitMaker: 47 posts
Armorama: 18 posts

Posted: Thursday, March 22, 2012 - 10:55 AM UTC
Hi Brent,
It is a cool tank:) Do you plan to build it OOB?
Really interesting how the light tank category changed since the birth of the armoured vehicles... Funny to compare the M41 to the PzI
I plan on building it mostly out of box. I'm a thrifty modeler. However, I plan on replacing some hand grabs with brass wire. I'm thinking something from the cold war era. The Elvis Presley Movie GI Blues was the deciding factor to do this build. I built one back in the 1970's and it was a fun build.
Brent

DaveCox

Joined: January 11, 2003
KitMaker: 4,307 posts
Armorama: 2,130 posts

Posted: Sunday, March 25, 2012 - 03:46 AM UTC
Completed my Vulcan Vickers MkVIc for this campaign. Fairly happy with the result, but it's one of the few kits that I'd say "never again"! The suspension is a killer, and even now a couple of the road wheels are a bit skewed. The extra fuel tank features in several photos of the Vickers in action - mine was a Crusader tank that looks similar to the ones in photos and came from my spares box.


GregCloseCombat

Joined: June 30, 2008
KitMaker: 2,408 posts
Armorama: 2,394 posts

Posted: Sunday, March 25, 2012 - 05:51 AM UTC
Hi Dave, it turned out real nice - love the tracks and camo.
i notice though some pe ends sticking out off the tracks - I've removed such things from pe with a sanding stick, then just touch up the track again with some more paint.
i notice though some pe ends sticking out off the tracks - I've removed such things from pe with a sanding stick, then just touch up the track again with some more paint.

DaveCox

Joined: January 11, 2003
KitMaker: 4,307 posts
Armorama: 2,130 posts

Posted: Sunday, March 25, 2012 - 06:27 AM UTC
Thanks Greg, the tracks are actually plastic, and so fragile that I've had to fix them three times already without trying to trim those little tags off. My work area has a pale grey top or I'd have seen them before.
steph2102

Joined: April 23, 2011
KitMaker: 735 posts
Armorama: 606 posts

Posted: Sunday, March 25, 2012 - 08:02 AM UTC
DAVE nice work, I like painting.
steph
steph
Peelou75

Joined: April 09, 2009
KitMaker: 140 posts
Armorama: 138 posts

Posted: Sunday, March 25, 2012 - 10:10 AM UTC
Dave, it is a little gem! What is the actual lenght of the kit?

DaveCox

Joined: January 11, 2003
KitMaker: 4,307 posts
Armorama: 2,130 posts

Posted: Sunday, March 25, 2012 - 05:30 PM UTC
Quoted Text
Dave, it is a little gem! What is the actual lenght of the kit?
I guess at about 4 inches.......
iakarch

Joined: May 19, 2007
KitMaker: 459 posts
Armorama: 421 posts

Posted: Monday, March 26, 2012 - 12:11 AM UTC
Dave,
Nice Model, what paint did you use for? Maybe some sprue cutters would work well for taking care of those points on the tracks.
Nice Model, what paint did you use for? Maybe some sprue cutters would work well for taking care of those points on the tracks.

DaveCox

Joined: January 11, 2003
KitMaker: 4,307 posts
Armorama: 2,130 posts

Posted: Monday, March 26, 2012 - 04:26 AM UTC
Quoted Text
Dave,
Nice Model, what paint did you use for? Maybe some sprue cutters would work well for taking care of those points on the tracks.
I used a mixture of Revell, Tamiya and Vallejo paints, all applied by brush the same as I always do.
As for the tracks, I might just do a small vignette base to hide most of the points - any pressure at all with a cutter or knife and they'll be in pieces.
Peelou75

Joined: April 09, 2009
KitMaker: 140 posts
Armorama: 138 posts

Posted: Friday, March 30, 2012 - 08:25 AM UTC
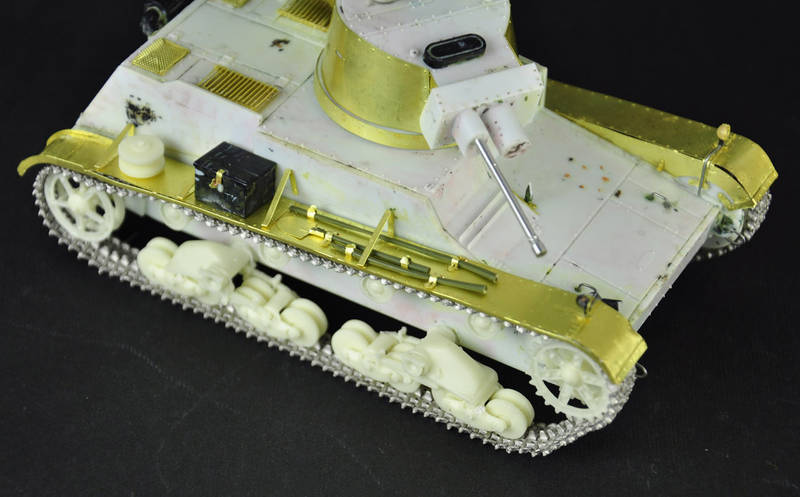
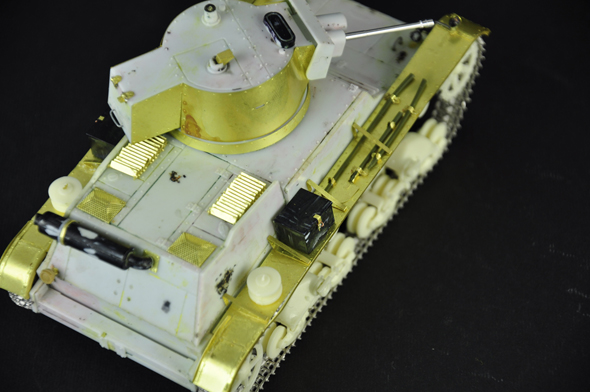
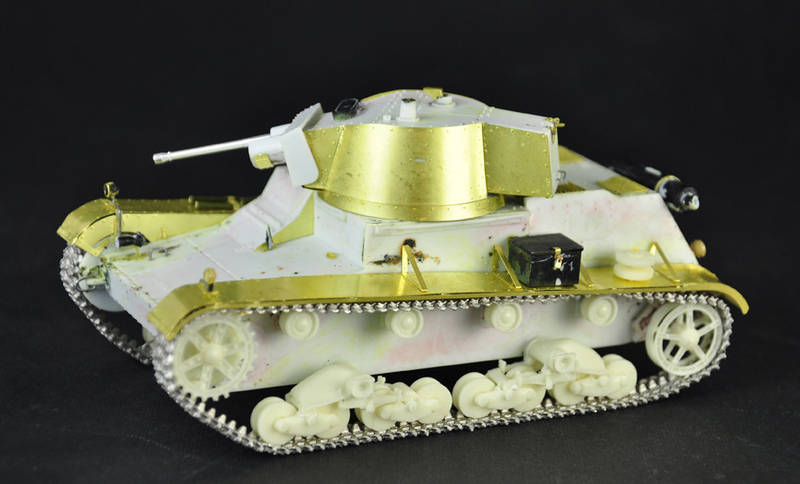
I almost ready with the construction. There is some missing part of the original kit I have to replace somehow, but the PE work has been done, and I also ready with the tracks. This is the first time I have used Friul tracks, and I have to say it was a pleasure to work with it. It took about 15 hours to finish, but after I quckly learned the tricks, it was a very relaxing process in the evenings, while the kids and my wife was sleeping... a really good way to forget about the everyday frustration of work. So I made some WIP photo, the kit is just dryfitted, as I'm planning a dio, and the suspension will fixed in angle, one of the tracks will be broken, the gun pointing down etc...
Istvan


Istvan

spacewolfdad

Joined: May 23, 2010
KitMaker: 642 posts
Armorama: 593 posts

Posted: Friday, March 30, 2012 - 09:13 AM UTC
Hi Istvan,
That looks really very good for a kit that has been resurrected, you have done a splendid job on it. I look forward to seeing the the next stages. I too have found Friul tracks very therapeutic...I was doing their Panther tracks and took a little longer than you, but had several peaceful evenings listening to the radio and making up sections of track.
All the best,
Paul

Scoutmaster

Joined: March 05, 2010
KitMaker: 81 posts
Armorama: 79 posts

Posted: Friday, April 06, 2012 - 03:14 AM UTC
Hello Folks!
Been raining at my part of the world the whole day and it put me off doing any airbrush painting on my Braille Pz.1 entry.
Decided instead to go ahead with the assembly of my second entry to this Campaign. This would be the 1/72 M24 Chaffee kit by Hasegawa:

The Sprue Shot:

This is an Old Model. So far, I haven't come across any other M24 in 1/72 Scale. I'll be doing some minor scratch-building to improve my build.
Have started the assembly and here is it as of this evening:

Been raining at my part of the world the whole day and it put me off doing any airbrush painting on my Braille Pz.1 entry.
Decided instead to go ahead with the assembly of my second entry to this Campaign. This would be the 1/72 M24 Chaffee kit by Hasegawa:

The Sprue Shot:

This is an Old Model. So far, I haven't come across any other M24 in 1/72 Scale. I'll be doing some minor scratch-building to improve my build.
Have started the assembly and here is it as of this evening:

JackG

Joined: May 28, 2006
KitMaker: 172 posts
Armorama: 122 posts

Posted: Saturday, April 07, 2012 - 10:35 AM UTC
Going backwards, but here are some in progress pics:


JackG

Joined: May 28, 2006
KitMaker: 172 posts
Armorama: 122 posts

Posted: Saturday, April 07, 2012 - 10:43 AM UTC
... and the completed pics.
This 1/35 scale vignette was built centered around Bronco's CV3/33 tankette . Also used was a Brach Models resin update kit to make a more accurate first production series L3/33. The new 1938 nomenclature introduced it as a light tank, while the 3/33 still represented the weight and year of design construction.
Everything was painted with acrylics - LifeColor, Vallejo and Andrea. Also used an ochre Mig filter and weathering powders.
regards,
Jack


steph2102

Joined: April 23, 2011
KitMaker: 735 posts
Armorama: 606 posts

Posted: Saturday, April 07, 2012 - 11:13 AM UTC
Hello,
jack, nice editing and nice finish. beautiful painting of the figures.steph
jack, nice editing and nice finish. beautiful painting of the figures.steph
Peelou75

Joined: April 09, 2009
KitMaker: 140 posts
Armorama: 138 posts

Posted: Saturday, April 07, 2012 - 07:03 PM UTC
Hi Jack,
Really great work on the figures and the vehicle both. The cloths seems like real cotton material.
Really great work on the figures and the vehicle both. The cloths seems like real cotton material.

JackG

Joined: May 28, 2006
KitMaker: 172 posts
Armorama: 122 posts

Posted: Sunday, April 08, 2012 - 03:21 PM UTC
Steph and Istvan, thank you for your comments.
For the coveralls, I really did not do anything special while painting them. Once the figures were attached to the base, they were airbrushed with Testors flat cote followed with some light dust weathering powder. Kudos must go out to the sculptors.
Lastly, (which should have come first) is the photo of box covers(s).
regards,
Jack

Posted: Monday, April 09, 2012 - 01:38 PM UTC
Hello everyone.
Just spent the last little bit reading all the posts in this thread. There is a lot of great work going on here. I'm now getting ready to start my Panzer Ib that i mentioned a while back.
anyways here are my starting photos.
On the bench after I cleaned up after my Universal carrier build.

and of course the whats in the box picture

Hope to actually start building in the next couple of days.
Delbert
Just spent the last little bit reading all the posts in this thread. There is a lot of great work going on here. I'm now getting ready to start my Panzer Ib that i mentioned a while back.
anyways here are my starting photos.
On the bench after I cleaned up after my Universal carrier build.

and of course the whats in the box picture

Hope to actually start building in the next couple of days.
Delbert
GaryKato

Joined: December 06, 2004
KitMaker: 3,694 posts
Armorama: 2,693 posts

Posted: Monday, April 09, 2012 - 08:26 PM UTC
Delbert,
Does that kit have the updated idler wheels? I recall Dragon's first Pz I Ausf.B had them wrong. They corrected it for their PzBefWg. If not, someone makes the correct idlers (LionMarc?).
Does that kit have the updated idler wheels? I recall Dragon's first Pz I Ausf.B had them wrong. They corrected it for their PzBefWg. If not, someone makes the correct idlers (LionMarc?).
Posted: Monday, April 09, 2012 - 10:24 PM UTC
Hi Gary
Your correct on the idler wheels.. I have the uncorrected kit.
Lionmarc does sell the later version wheels but they are sold out and I have yet to find any anywhere else.
I have a Panzerjager I kit that has the newer version wheels but I have yet to decide whether to use them, use the kit ones, or try and make my own.
Have to do some more research on that aspect..
Delbert

 |


