Campaigns
Where Armorama group builds can be discussed, organized, and updates posted.
Large Scale Build Campaign 1/24 ~ 1/6
PantherF
Visit this Community
Indiana, United States
Joined: June 10, 2005
KitMaker: 6,188 posts
Armorama: 5,960 posts
Posted: Sunday, July 28, 2013 - 02:46 AM UTC
Oh, there I go again being vague about things. I wasn't implying it was you at all.

'I want', 'just don't' are part of my dialog that just normally comes out. I know I don't own the forum, so I guess I should avoid those sentences in the future.

Heck yeah! Show us some muscle cars. They will be much appreciated.

At least you're one of the few who are building more than one kit, right here!


Jeff
imatanker
Visit this Community
Maine, United States
Joined: February 11, 2011
KitMaker: 1,654 posts
Armorama: 1,565 posts
Posted: Sunday, July 28, 2013 - 09:14 AM UTC
No sweat Dude. Should have something posted in the morning. Now that I opened my mouth, I need to find the pics
PantherF
Visit this Community
Indiana, United States
Joined: June 10, 2005
KitMaker: 6,188 posts
Armorama: 5,960 posts
Posted: Sunday, July 28, 2013 - 09:39 AM UTC
I have acquired a few car kits and also to build a special "Grumpy's Toy" in a '77 Camaro too.

Maybe we can get together a Campaign over at the car forum and have some different kind of fun?


Jeff
imatanker
Visit this Community
Maine, United States
Joined: February 11, 2011
KitMaker: 1,654 posts
Armorama: 1,565 posts
Posted: Sunday, July 28, 2013 - 10:02 AM UTC

Quoted Text

I have acquired a few car kits and also to build a special "Grumpy's Toy" in a '77 Camaro too.

Maybe we can get together a Campaign over at the car forum and have some different kind of fun?


Jeff


Oh Man, Grumpy's Toy, that's sweet. I saw that run on 3 or 4 different occasions . It was a real ground pounder And having a campaign is a great idea. But I've got to say I'm kinda flush at the moment. So at this point it would have to be March or April of next year but I think we should do it I'm defenitly up for it.
PantherF
Visit this Community
Indiana, United States
Joined: June 10, 2005
KitMaker: 6,188 posts
Armorama: 5,960 posts
Posted: Sunday, July 28, 2013 - 10:10 AM UTC

Quoted Text

But I've got to say I'm kinda flush at the moment. So at this point it would have to be March or April of next year but I think we should do it I'm defenitly up for it.


OH YEAH! Next year for sure.


Jeff
ltb073
Visit this Community
New York, United States
Joined: March 08, 2010
KitMaker: 3,662 posts
Armorama: 3,078 posts
Posted: Monday, July 29, 2013 - 01:26 AM UTC
Hi Guys
Here is what my GMC PickUp looks like now
 photo P1080200.jpg
 photo P1080199.jpg
 photo P1080201.jpg
The plow blade is dry fit and I need to find a chain to go from the hoist to the blade
My question is should I install the roll bar in the bed with extra lights and the fuel can on the rear or would that give it too much of a civilian look
imatanker
Visit this Community
Maine, United States
Joined: February 11, 2011
KitMaker: 1,654 posts
Armorama: 1,565 posts
Posted: Monday, July 29, 2013 - 09:16 AM UTC
Sal, I think if you camo'ed up the roll bar,lights and fuel can, you'd be o.k. If you have any military numbers or letter decals hanging around you could slap some of those on too. That would remove all sought about military or civilian use. Jeff T.
noddy927
Visit this Community
Scotland, United Kingdom
Joined: February 15, 2013
KitMaker: 1,273 posts
Armorama: 568 posts
Posted: Monday, July 29, 2013 - 07:39 PM UTC
Sal
I agree with Jeff T go for it and add them just camo them up. It's looking good my friend.

Pete
Torchy
#047
Visit this Community
England - East Anglia, United Kingdom
Joined: September 13, 2005
KitMaker: 2,016 posts
Armorama: 1,187 posts
Posted: Tuesday, July 30, 2013 - 12:53 AM UTC
Hi guys
A big ol lump of plastic

The dials are self sticky and fit a treat

The bezels and placards are held in place with cocktail sticks

before the tiny "screws" are added to hold them in

I've added a pic of the pilots girl which sets if off nicely

These really are fun to build and I hope for more soon.
Hope you like
Andy
PantherF
Visit this Community
Indiana, United States
Joined: June 10, 2005
KitMaker: 6,188 posts
Armorama: 5,960 posts
Posted: Tuesday, July 30, 2013 - 02:36 AM UTC
Dang! Is this a REAL aircraft your building Andy?

I think we set the scale limit at 1/6... I think.


Nice work.


Jeff
woltersk
Visit this Community
Utah, United States
Joined: May 27, 2003
KitMaker: 1,026 posts
Armorama: 654 posts
Posted: Tuesday, July 30, 2013 - 04:29 AM UTC

Quoted Text

Hi Guys
The plow blade is dry fit and I need to find a chain to go from the hoist to the blade?


@Sal--it's lookin' good. Here's a lousy idea for the chain:
-- Are you married? Is your wife very understanding? Does she have any costume jewelry that she wouldn't miss if it 'disappeared'? If so, you could 'abscond' a length or two of a necklace! if not, you might find a suitable size chain at one if those teeny-bopper accessory stores at a mall, or perhaps even at Ho Lo's.

Keith
vdejarnette
Visit this Community
Maryland, United States
Joined: February 25, 2013
KitMaker: 209 posts
Armorama: 33 posts
Posted: Sunday, August 04, 2013 - 06:27 AM UTC
Look what showed back up... Didn't mess it up this time. Painted Tamiya Racing Green and dipped in Future for a high gloss finish.

imatanker
Visit this Community
Maine, United States
Joined: February 11, 2011
KitMaker: 1,654 posts
Armorama: 1,565 posts
Posted: Sunday, August 04, 2013 - 10:55 AM UTC
Van,that is excellent,looks great. Let me ask you a question. How do you prevent the future from running and pooling in the low areas ? Jeff T.
vdejarnette
Visit this Community
Maryland, United States
Joined: February 25, 2013
KitMaker: 209 posts
Armorama: 33 posts
Posted: Sunday, August 04, 2013 - 02:52 PM UTC
Jeff, After removing the part from the future bath I drag it around with a low point edge touching the paper same as is typically done when dipping aircraft canopies in future.

After I hang it down to cure, I give it ~another 1-2 minutes to allow any more excess to pool and "bulge" at the bottom of the part and then wick it away with a small piece of paper towel or coffee filter.
noddy927
Visit this Community
Scotland, United Kingdom
Joined: February 15, 2013
KitMaker: 1,273 posts
Armorama: 568 posts
Posted: Sunday, August 04, 2013 - 03:13 PM UTC
Superb Van, glad it arrived. well done buddy

Pete
woltersk
Visit this Community
Utah, United States
Joined: May 27, 2003
KitMaker: 1,026 posts
Armorama: 654 posts
Posted: Monday, August 05, 2013 - 03:51 PM UTC
Ooo....something shiny! That looks really sharp Van. I noticed too things--the contraption you used to mount it makes it look like an external panel on a Transformer mech covering the robotic hardware underneath. That's just the geek in me.
And--is it so smooth that the dark image in the bottom left is the reflection of you and the camera!? Amazing.

Can't wait to see more.

Keith
imatanker
Visit this Community
Maine, United States
Joined: February 11, 2011
KitMaker: 1,654 posts
Armorama: 1,565 posts
Posted: Monday, August 05, 2013 - 10:34 PM UTC
Andy, that's just too cool Bub. The picture of his girl is a great touch.
Van, Thanks for the lowdown. I'm going to give that a run on my next car build. Jeff T.
imatanker
Visit this Community
Maine, United States
Joined: February 11, 2011
KitMaker: 1,654 posts
Armorama: 1,565 posts
Posted: Friday, August 09, 2013 - 02:55 AM UTC
And speaking of car builds, It's pouring rain AGAIN. So here's the other build I did for this campaign with out even knowing it . I'm not going to add it to the gallery cause I didn't blog it here, and that wouldn't be fair.

Just going to hit the high spots. The fit and finish on this kit was bad. I spent a lot of time just making things fit. Once I got the fit issues fixed it was pretty straight forward.

Here we go, Hang on, Kit to built in one post

Here's the kit, you can see the Centurion track box in the background.

The premise of this build was to do it "Old School" with just the stuff I had as a Kid. Little square bottles of paint, spray cans, watercolor paint brushes,and some sheet styrene to replace the vac-u-form plastic sheets I used for scratch building all those years ago. The only real concession was the Tamiya primer.


Parts

Tires and rims


rims drilled out

engine installed and running gear in place


interior stuff


body dry fitted on chassis, getting rid of that ugly hood scoop

Carbs on and new hood scoop


body basecoated

top coated and done
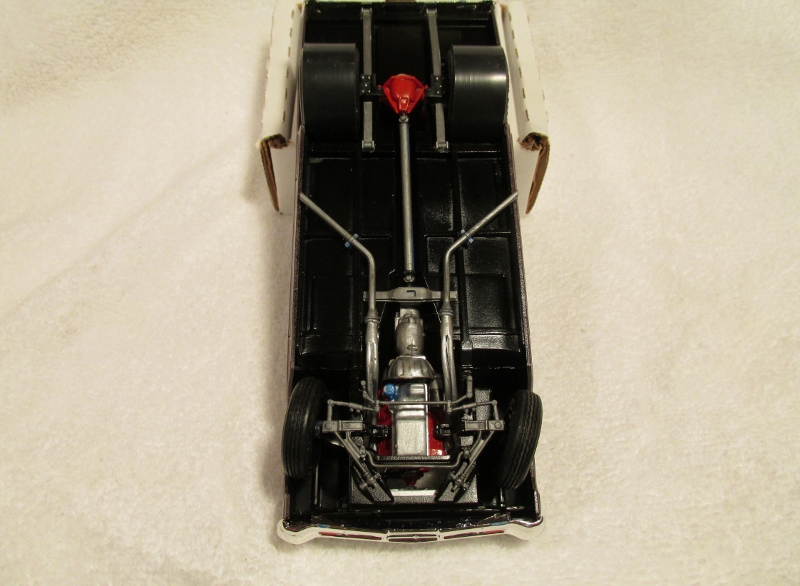
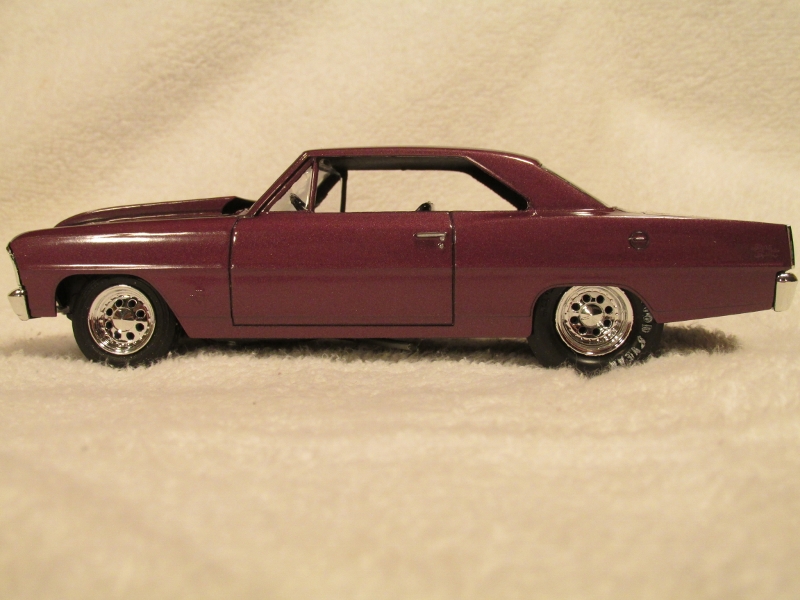
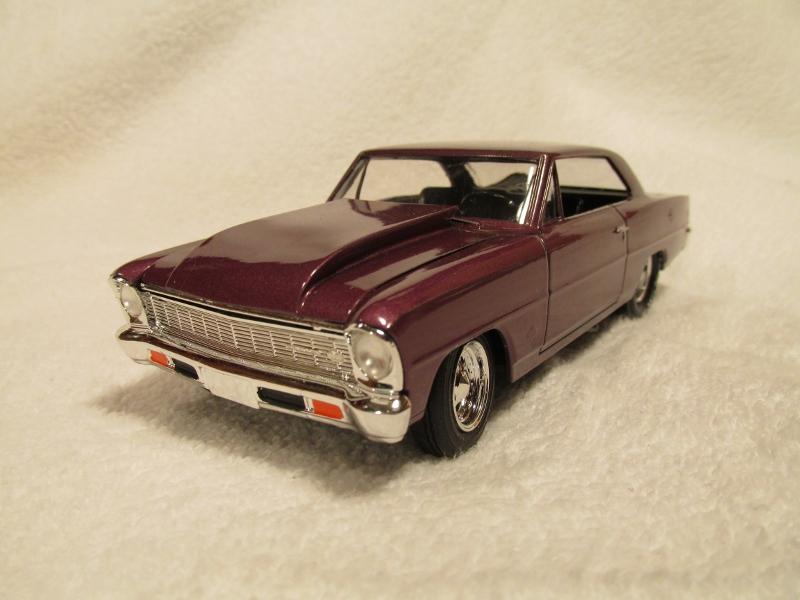
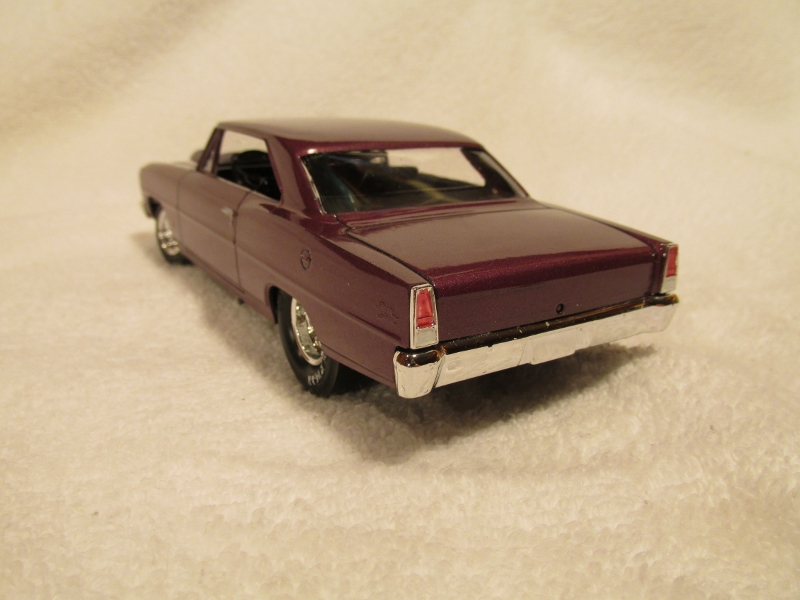
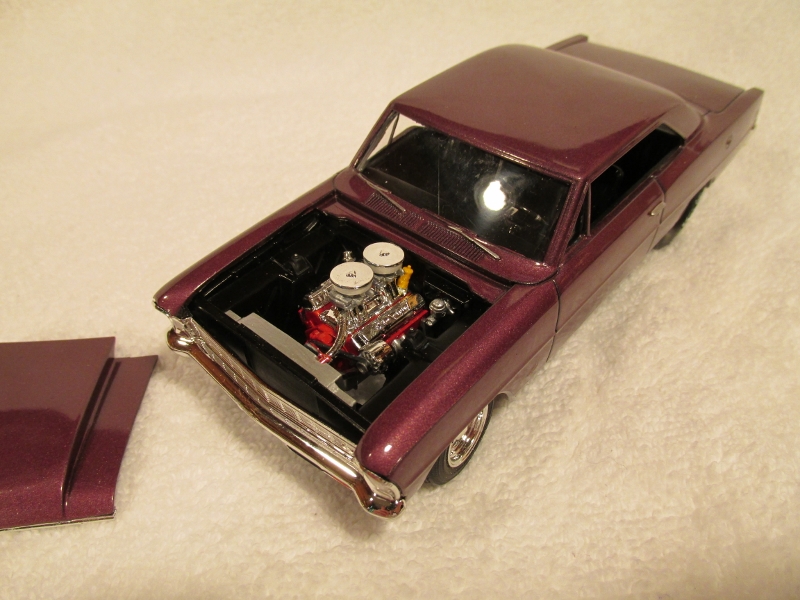
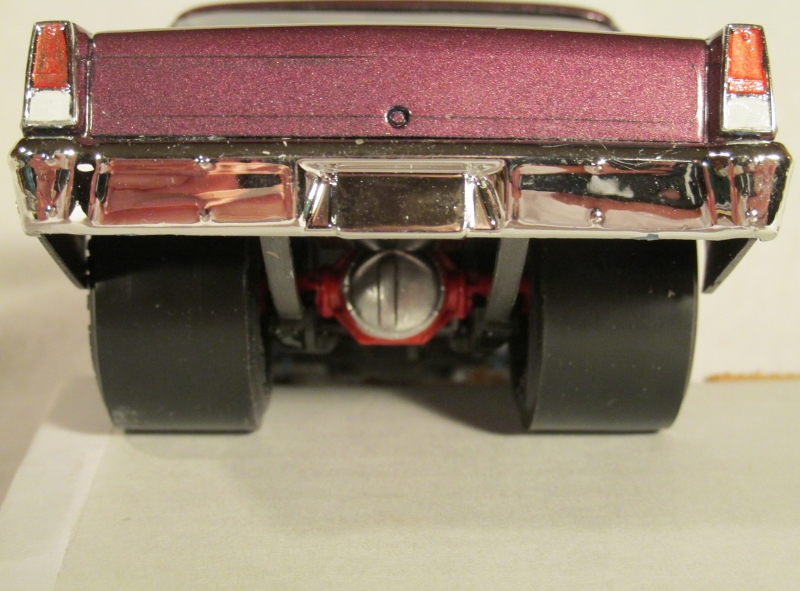
Phew, now I got finger cramps. Hope you like it. Model on, Jeff T.
noddy927
Visit this Community
Scotland, United Kingdom
Joined: February 15, 2013
KitMaker: 1,273 posts
Armorama: 568 posts
Posted: Saturday, August 10, 2013 - 04:59 AM UTC
Jeff T Superb buddy.....built and posted in a oner ....cool.

Pete
imatanker
Visit this Community
Maine, United States
Joined: February 11, 2011
KitMaker: 1,654 posts
Armorama: 1,565 posts
Posted: Sunday, August 11, 2013 - 09:08 AM UTC
Thanks Peter, but it did take longer to do than it took to post. I'm pretty sure that's by far the longest post I ever did
ltb073
Visit this Community
New York, United States
Joined: March 08, 2010
KitMaker: 3,662 posts
Armorama: 3,078 posts
Posted: Monday, August 12, 2013 - 11:56 PM UTC
Hey Jeff T great looking Nova SS, I love the paint job only thing I see that will make it completely awesome would be to make the SuperSport logo on the rear quarters chrome
I found a chain to use on the plow
 photo P1080215.jpg
Now I just have to add some markings and then on to the weathering
 photo P1080216.jpg
noddy927
Visit this Community
Scotland, United Kingdom
Joined: February 15, 2013
KitMaker: 1,273 posts
Armorama: 568 posts
Posted: Tuesday, August 13, 2013 - 02:09 AM UTC
Nice Sal .....mmmmmm whats the nice looking truck in the back ground?

Pete
imatanker
Visit this Community
Maine, United States
Joined: February 11, 2011
KitMaker: 1,654 posts
Armorama: 1,565 posts
Posted: Tuesday, August 13, 2013 - 09:24 AM UTC
Sal, thank you Sir. I thought about "chroming" the SS emblem,but I couldn't work up the stones to try it
I'm glad you found a chain. If I could make a suggestion it would be to move the end hooked to the upper blade to the lower A frame. I'll try to find a pic and post it to show you.
I'm with you Peter, just what IS that truck sneaking around in the back ground?
imatanker
Visit this Community
Maine, United States
Joined: February 11, 2011
KitMaker: 1,654 posts
Armorama: 1,565 posts
Posted: Tuesday, August 13, 2013 - 10:14 AM UTC
Sal, here ya go.

This is a Fisher plow, and I think yours is either a Western or a Frink, but the set up is about the same. You can see how the chain is hooked in two places on the plow frame and is looped through the top hook. Also notice the safety chain to keep the blade from dropping when the truck is going down the road.

I'm kicking myself now about you trying to find a chain. I have made them for some of my armor builds.
Here's what I did. Take 2 strands of copper wire the right size and twist them together like you where making a cable. Don't twist it too tight cause you want it to spread when you hit it with a hammer.
Take the length of twisted wire and place it on a hard surface like a steel bench vise or a concrete floor. DON'T DO IT ON A HARDWOOD OR LINOIOUM FLOOR. Don't ask . Hold the wire so it doesn't move around and gently start hitting it with a hammer. You will see it starting to flatten out. You should start seeing "links" starting to form as the wire flattens. It may take you a couple of times to get it right. Give it a try and see what you get. I think it looks pretty good. Model on, Jeff T.
ltb073
Visit this Community
New York, United States
Joined: March 08, 2010
KitMaker: 3,662 posts
Armorama: 3,078 posts
Posted: Tuesday, August 13, 2013 - 02:22 PM UTC

Quoted Text

Nice Sal .....mmmmmm whats the nice looking truck in the back ground?

Pete


Hey guys thanks that truck in the background is my AA campaign entry Hobby Boss GMC Bofers
Jeff the chain I used was a solid piece of plastic so moving it will be difficult. I'll try and make 1with your copper wire method and see how that works before I tear this one off