Campaigns
Where Armorama group builds can be discussed, organized, and updates posted.
Where Armorama group builds can be discussed, organized, and updates posted.
Hosted by Darren Baker, Richard S.
Cold War MBT Campaign

didgeboy

Joined: September 21, 2010
KitMaker: 1,846 posts
Armorama: 1,509 posts

Posted: Friday, August 09, 2013 - 10:00 AM UTC
Atta boy Tom, looks real nice.
IrishGreek

Joined: October 17, 2010
KitMaker: 627 posts
Armorama: 571 posts

Posted: Friday, August 09, 2013 - 10:11 AM UTC
Tom, Grant, Miguel and Lap Man,
Nice work.
John,
I need an extension. I am heading out of town till the 19th and won't be able to finish by then. In weathering stage, but need at least a few days of bench time.
Thanks,
Irish (John)
Nice work.
John,
I need an extension. I am heading out of town till the 19th and won't be able to finish by then. In weathering stage, but need at least a few days of bench time.
Thanks,
Irish (John)
Nito74

Joined: March 04, 2008
KitMaker: 5,386 posts
Armorama: 4,727 posts

Posted: Friday, August 09, 2013 - 01:48 PM UTC
Ok John.
I extended it until 25th .
Let me know if you need more time ok ?
Great builds everyone.

I extended it until 25th .
Let me know if you need more time ok ?
Great builds everyone.

vanize

Joined: January 30, 2006
KitMaker: 1,954 posts
Armorama: 629 posts

Posted: Friday, August 09, 2013 - 02:24 PM UTC
Ok, I finally got a new USB cord for my camera, and I *thought* i was finished with my T-55A till i started looking at the pics after i got them on my computer and noticed i hadn't painted the lenses for the lights.
so here are some work older work in progress photos from the fuel line upgrade, as well as a couple I thought I was finished pics.


so here are some work older work in progress photos from the fuel line upgrade, as well as a couple I thought I was finished pics.


Lonewolf7usa

Joined: March 24, 2009
KitMaker: 312 posts
Armorama: 296 posts

Posted: Friday, August 09, 2013 - 11:58 PM UTC
Nice job on your T-55A. Love the fuel lines, reminds me of my T-62 for this campaign! Have Fun!!

1721Lancers

Joined: March 21, 2012
KitMaker: 1,673 posts
Armorama: 1,640 posts

Posted: Saturday, August 10, 2013 - 04:46 AM UTC
Vance that is a cool looking T55 there  and very nice plumbing on the fuel tanks
Grant your T64 is very nice, I'm going to have to one of those sooner or later
Thomas the "Nightmare" Cent is absolutely brilliant, great job on the last of the classic panzers


Paul
 and very nice plumbing on the fuel tanks
Grant your T64 is very nice, I'm going to have to one of those sooner or later

Thomas the "Nightmare" Cent is absolutely brilliant, great job on the last of the classic panzers


Paul
andromeda673

Joined: July 30, 2013
KitMaker: 584 posts
Armorama: 525 posts

Posted: Saturday, August 10, 2013 - 08:54 AM UTC

Lonewolf7usa

Joined: March 24, 2009
KitMaker: 312 posts
Armorama: 296 posts

Posted: Saturday, August 10, 2013 - 09:22 AM UTC
Nice job on the chieftan. You might want to pick up some artist acrylic structure gel, whip up a little mud and stick some on the mud flaps and areas where the track can throw up mud. Just my two cents worth! Still nice job on the build!! Have fun!! 

andromeda673

Joined: July 30, 2013
KitMaker: 584 posts
Armorama: 525 posts

Posted: Saturday, August 10, 2013 - 11:14 AM UTC
Quoted Text
Nice job on the chieftan. You might want to pick up some artist acrylic structure gel, whip up a little mud and stick some on the mud flaps and areas where the track can throw up mud. Just my two cents worth! Still nice job on the build!! Have fun!!
thanks for the tip, I actually had mudded up the inside and the flaps, and also on the backside of the skirt, but I just forgot to take some pictures.
Posted: Saturday, August 10, 2013 - 07:28 PM UTC
I have completed my Aussie Leopard AS1.


TankSGT

Joined: July 25, 2006
KitMaker: 1,139 posts
Armorama: 946 posts

Posted: Sunday, August 11, 2013 - 10:31 AM UTC
WOW, these are all coming together great. Participating in this campaign was a lot of fun and seeing all the great work was a real inspiration. Great going guys.
Tom
Tom

SHAKY962

Joined: May 21, 2012
KitMaker: 765 posts
Armorama: 438 posts

Posted: Monday, August 12, 2013 - 09:39 AM UTC
@John: Beautiful Leopard!!!!!!!!!
andromeda673

Joined: July 30, 2013
KitMaker: 584 posts
Armorama: 525 posts

Posted: Monday, August 12, 2013 - 11:59 AM UTC
that aussie leopard is gorgeous! what kit is that? and I'm assuming it's a 1/35 scale kit?
Posted: Monday, August 12, 2013 - 07:29 PM UTC
Quoted Text
@John: Beautiful Leopard!!!!!!!!!
Quoted Text
that aussie leopard is gorgeous! what kit is that? and I'm assuming it's a 1/35 scale kit?
Thanks for the comments guys.
The kit is a 1/35 Tamyia Leopard with a "Mouse House" after market resin and etch kit.
vanize

Joined: January 30, 2006
KitMaker: 1,954 posts
Armorama: 629 posts

Posted: Tuesday, August 13, 2013 - 10:54 AM UTC
ok, my final pics - tho I have them on imageshack - do we have a gallery we are supposed to upload the final images to? if so i couldn't find it.


1721Lancers

Joined: March 21, 2012
KitMaker: 1,673 posts
Armorama: 1,640 posts

Posted: Wednesday, August 14, 2013 - 02:21 AM UTC
Hi Vance try this place:
https://gallery.kitmaker.net/showgallery.php/cat/27937
Cool T55 there
G.Houle, and another FV4201 , nice we're now moving towards squadron strength
  .
.
John, your Leo is just fantastic dude well done

Paul
https://gallery.kitmaker.net/showgallery.php/cat/27937
Cool T55 there

G.Houle, and another FV4201
 , nice we're now moving towards squadron strength
  .
.John, your Leo is just fantastic dude
 well done
Paul
vanize

Joined: January 30, 2006
KitMaker: 1,954 posts
Armorama: 629 posts

Posted: Wednesday, August 14, 2013 - 02:26 AM UTC
Quoted Text
Hi Vance try this place:
https://gallery.kitmaker.net/showgallery.php/cat/27937
Cool T55 there
thanks Paul! I couldn't find it because I was foolishly looking in the 2013 campaigns folder!

North4003

Joined: August 01, 2012
KitMaker: 960 posts
Armorama: 95 posts

Posted: Wednesday, August 14, 2013 - 06:55 PM UTC
My 1/72 scale Hasegawa Leopard 2 is complete. I may revisit the weathering at some point. I was going for a new but dusty look. The weathering is chalk and is loose. By the way this is my first completed tank since returning to the hobby.

FrancisMercik

Joined: March 12, 2007
KitMaker: 10 posts
Armorama: 10 posts

Posted: Sunday, August 18, 2013 - 05:56 AM UTC
All finished. A really fun build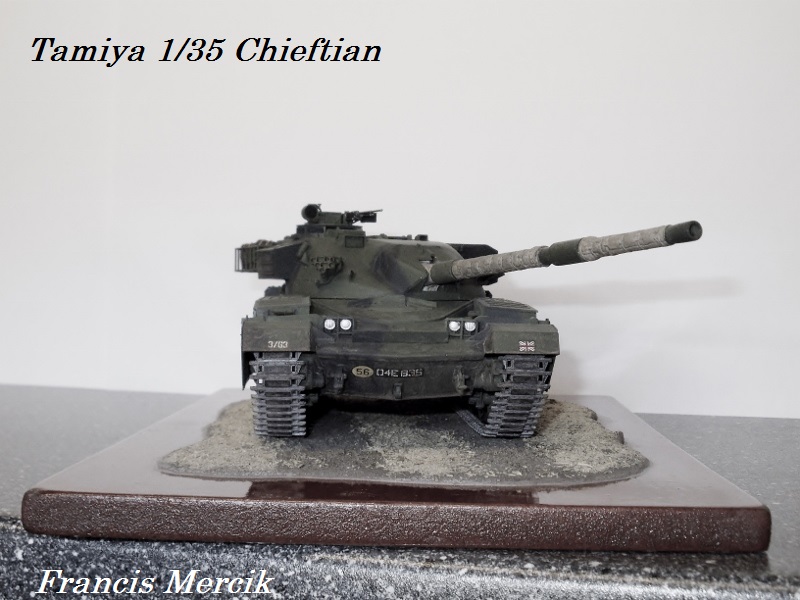
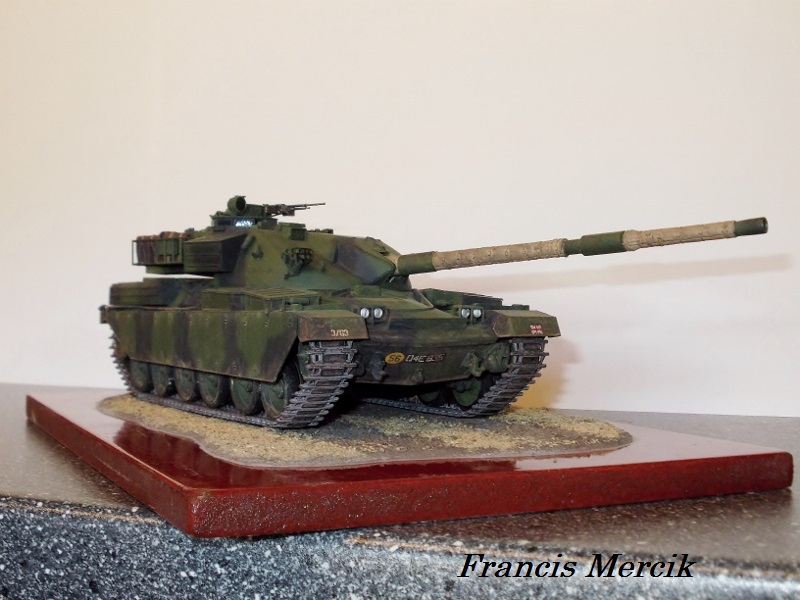
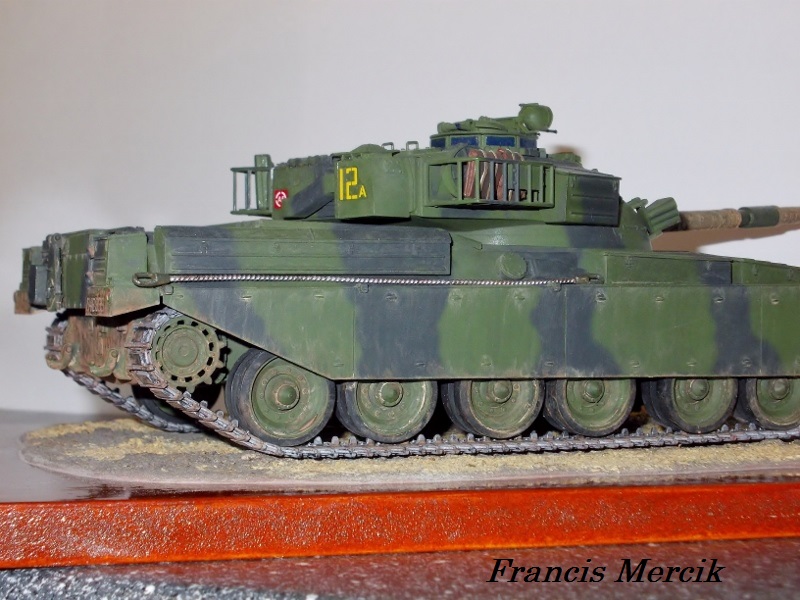
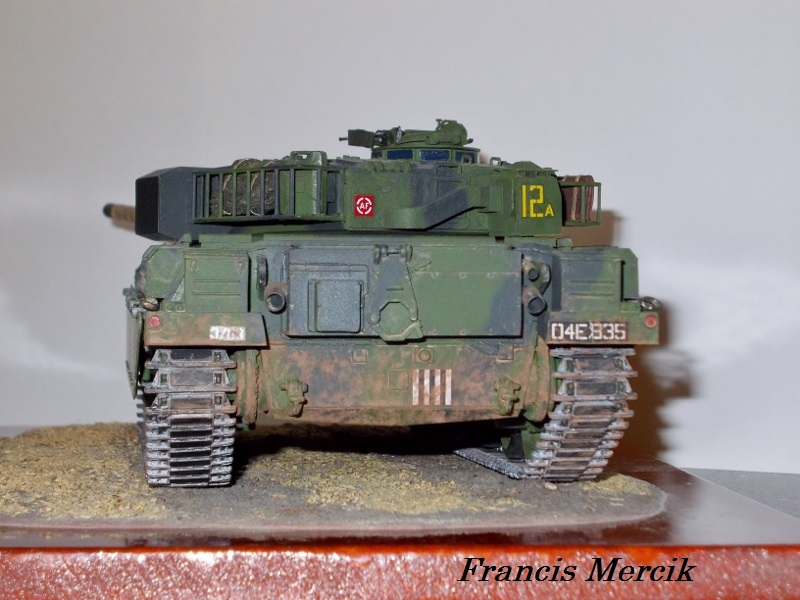
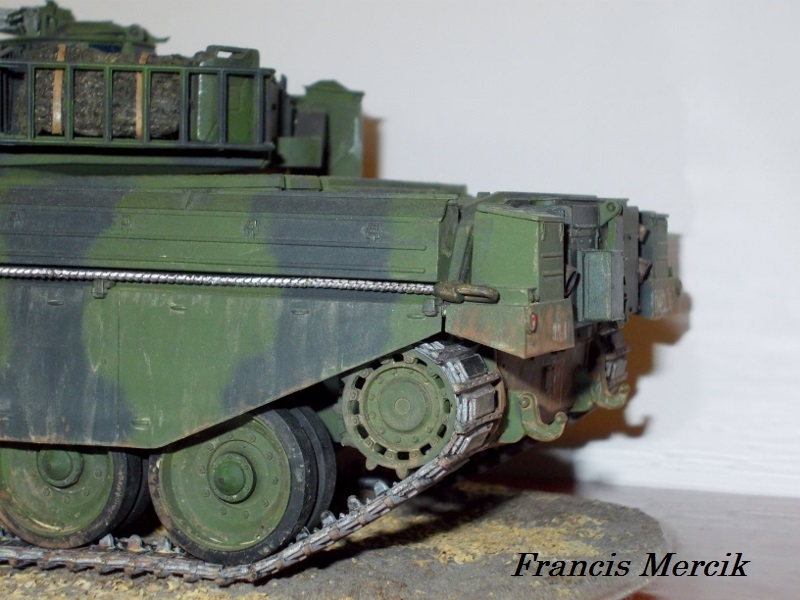
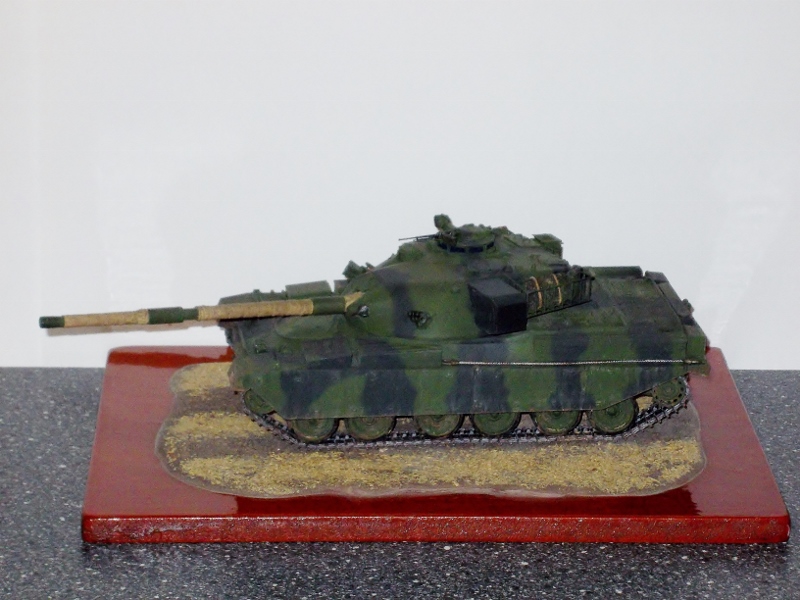 Thanks for looking.


 Thanks for looking.
TankSGT

Joined: July 25, 2006
KitMaker: 1,139 posts
Armorama: 946 posts

Posted: Sunday, August 18, 2013 - 06:24 PM UTC
Nicely done, I especially like the cammo.
Tom
Tom
Nito74

Joined: March 04, 2008
KitMaker: 5,386 posts
Armorama: 4,727 posts

Posted: Monday, August 19, 2013 - 11:39 PM UTC
5 days left.
Extensions needed ?
Guys don't forget to put your photos in the Gallery.

Great builds everyone !!!!
Sadly I could not finish my build...
Extensions needed ?
Guys don't forget to put your photos in the Gallery.

Great builds everyone !!!!
Sadly I could not finish my build...

Wolfsangel

Joined: January 15, 2010
KitMaker: 221 posts
Armorama: 91 posts

Posted: Tuesday, August 20, 2013 - 05:54 PM UTC
Hi John, Everybody,
Vance, your T-55 looks great!
I might need the extension because...
After finishing a couple of campaigns that I severely lagged on and seeing that this one was still going, I pulled out an old Tamiya M48A3 that's been in my stash almost as long as I've had my stash. Vietnam Marine M48 it is.
I ordered a PE set from a guy on Feebay and waited... and waited... Then my Graphics card went south and took the motherboard with it.
So, without the distraction of my square-headed mistress, I pulled the kit out and decided to recreate one of those glorious Modelling nights before AMS, Puberty, Cars, and Liquor, when I would slam a kit together in a couple of hours with a tube of Testors, an x-acto, and a rattle can of OD paint.
And I did. And it was HARD. The kit itself was easy, typical Tamiya, but fighting the AMS was like trying to put socks on a rooster. The suspension is too high, the lower hull has the motorization holes, and the EVERYTHING is too thick.
Not quite what I expected in the fun department.
The next morning I spray-bombed it and set it inside to cure.
That afternoon we had to leave for Houston as my Wife's Grandmother had passed (95, she had a good run). Unfortunately, I would have never thought that our innocent little kitty was VietCong.

3 days later that fluffy little bag of crap spread parts all over the house (mainly the Poly-Capped Road Wheels). And the PE was in the mail box.
After I was finished laughing (and locating the majority of parts) the decision was made to rebuild this into a M67A2 in Hue during the Tet offensive and correcting what I can as I go.
First, the lower hull

Patches over the holes and I'm going to shorten the arm snubber thingies a little bit before I reattach the arms for the road wheels to see if that works.
Charlie
Vance, your T-55 looks great!
I might need the extension because...
After finishing a couple of campaigns that I severely lagged on and seeing that this one was still going, I pulled out an old Tamiya M48A3 that's been in my stash almost as long as I've had my stash. Vietnam Marine M48 it is.
I ordered a PE set from a guy on Feebay and waited... and waited... Then my Graphics card went south and took the motherboard with it.
So, without the distraction of my square-headed mistress, I pulled the kit out and decided to recreate one of those glorious Modelling nights before AMS, Puberty, Cars, and Liquor, when I would slam a kit together in a couple of hours with a tube of Testors, an x-acto, and a rattle can of OD paint.
And I did. And it was HARD. The kit itself was easy, typical Tamiya, but fighting the AMS was like trying to put socks on a rooster. The suspension is too high, the lower hull has the motorization holes, and the EVERYTHING is too thick.
Not quite what I expected in the fun department.
The next morning I spray-bombed it and set it inside to cure.
That afternoon we had to leave for Houston as my Wife's Grandmother had passed (95, she had a good run). Unfortunately, I would have never thought that our innocent little kitty was VietCong.

3 days later that fluffy little bag of crap spread parts all over the house (mainly the Poly-Capped Road Wheels). And the PE was in the mail box.
After I was finished laughing (and locating the majority of parts) the decision was made to rebuild this into a M67A2 in Hue during the Tet offensive and correcting what I can as I go.
First, the lower hull

Patches over the holes and I'm going to shorten the arm snubber thingies a little bit before I reattach the arms for the road wheels to see if that works.
Charlie

TankSGT

Joined: July 25, 2006
KitMaker: 1,139 posts
Armorama: 946 posts

Posted: Wednesday, August 21, 2013 - 12:44 AM UTC
Remember what the door gunner said in "Full Metal Jacket", if they run they're VC if they stand still they're well disiplined VC". Best of luck reserecting your M48.
Tom
Tom
Nito74

Joined: March 04, 2008
KitMaker: 5,386 posts
Armorama: 4,727 posts

Posted: Wednesday, August 21, 2013 - 03:34 AM UTC
Quoted Text
Hi John, Everybody,
Vance, your T-55 looks great!
I might need the extension because...
After finishing a couple of campaigns that I severely lagged on and seeing that this one was still going, I pulled out an old Tamiya M48A3 that's been in my stash almost as long as I've had my stash. Vietnam Marine M48 it is.
I ordered a PE set from a guy on Feebay and waited... and waited... Then my Graphics card went south and took the motherboard with it.
So, without the distraction of my square-headed mistress, I pulled the kit out and decided to recreate one of those glorious Modelling nights before AMS, Puberty, Cars, and Liquor, when I would slam a kit together in a couple of hours with a tube of Testors, an x-acto, and a rattle can of OD paint.
And I did. And it was HARD. The kit itself was easy, typical Tamiya, but fighting the AMS was like trying to put socks on a rooster. The suspension is too high, the lower hull has the motorization holes, and the EVERYTHING is too thick.
Not quite what I expected in the fun department.
The next morning I spray-bombed it and set it inside to cure.
That afternoon we had to leave for Houston as my Wife's Grandmother had passed (95, she had a good run). Unfortunately, I would have never thought that our innocent little kitty was VietCong.
3 days later that fluffy little bag of crap spread parts all over the house (mainly the Poly-Capped Road Wheels). And the PE was in the mail box.
After I was finished laughing (and locating the majority of parts) the decision was made to rebuild this into a M67A2 in Hue during the Tet offensive and correcting what I can as I go.
First, the lower hull
Patches over the holes and I'm going to shorten the arm snubber thingies a little bit before I reattach the arms for the road wheels to see if that works.
Charlie
Charlie, how many days do you need ?
cagkancakir

Joined: April 28, 2011
KitMaker: 434 posts
Armorama: 409 posts

Posted: Wednesday, August 21, 2013 - 07:30 AM UTC
Leopard 1A2 hull complete, I decided to finish it as Italian Leo 1A2, it has a several spesific modifications like different front mudguards, none side skirts and none rear mudguards. The kit is very detailed but the pin marks and seam lines are really time consuming.


I hope that I can finish it just in time..
CagkanC


I hope that I can finish it just in time..

CagkanC
 |


